Crab Pinwheels l Pretty Handy Girl

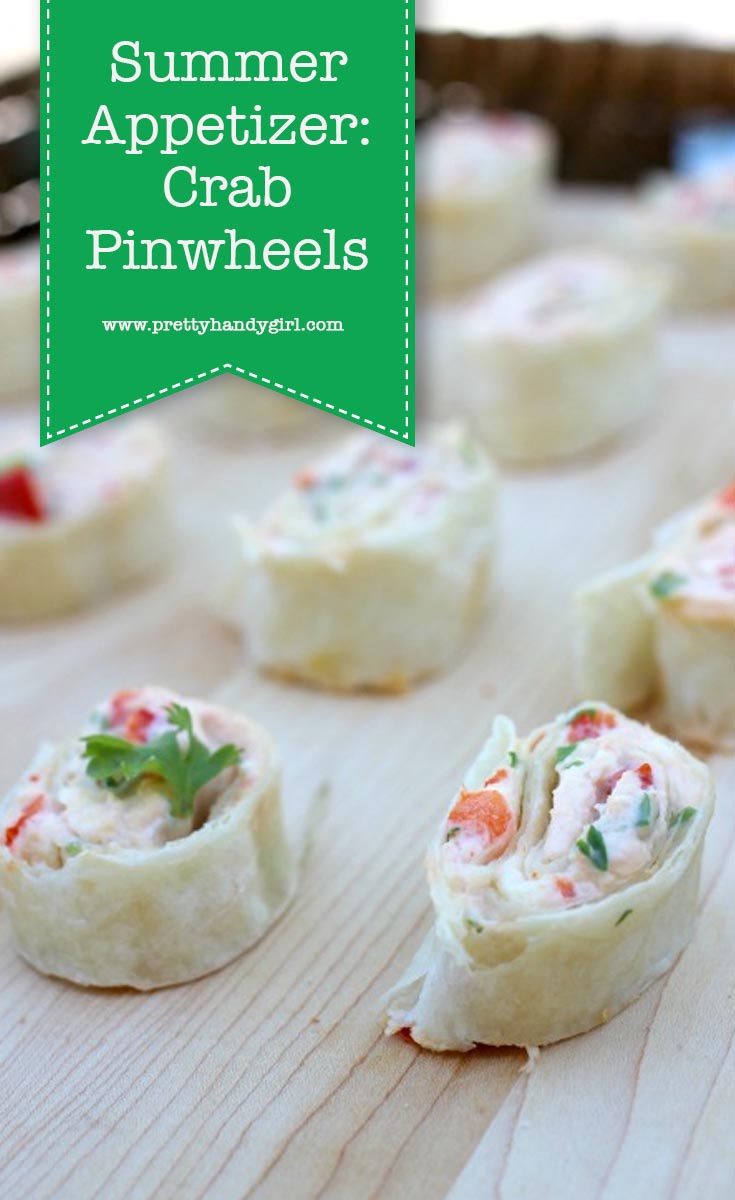
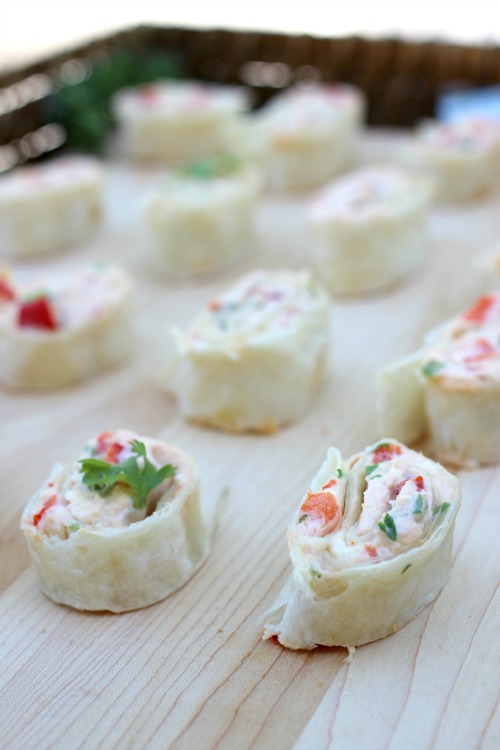
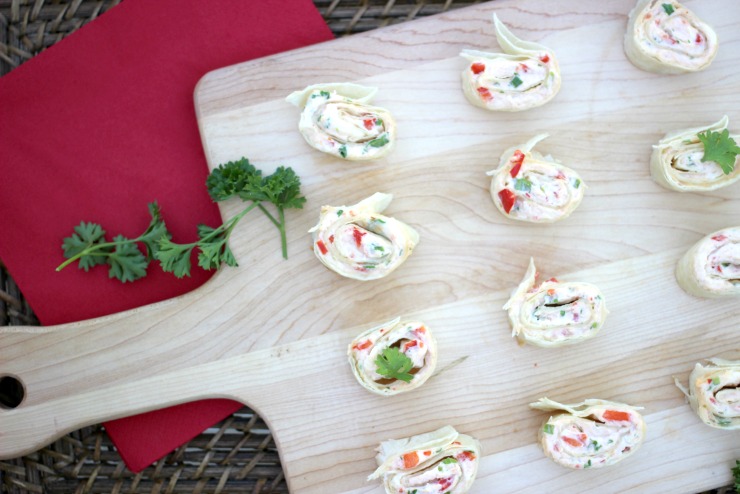
Hi everyone! This is Lindi, visiting again from Love Create Celebrate! I’m happy to be here again, this time sharing a quick and easy summer recipe. These Crab Pinwheels are one of my favourite summer appetizers. You will not be disappointed if you make them!

Crab Pinwheels l Pretty Handy Girl

The recipes I share are always two things 1) delicious and 2) easy! This recipe fits right in! If you are a gardener, I know that you are ready to use those fresh herbs that you’ve been growing all summer long. This recipe is the perfect way to use some of that green onion and parsley!

This is the perfect appetizer for all of those summer celebrations, from family reunions, to backyard BBQs, to potlucks. But potlucks don’t end when school starts! I honestly make this appetizer all year long when I have guests over. You will not be disappointed – even my toddler cannot stop eating them (and may have been stealing them off of the tray while I tried to photograph these ones!)

Ingredients:

  • 250 ml cream cheese package (at room temperature)
  • 3/4 cup red peppers, finely chopped
  • 2 green onions, finely chopped
  • 3 tbsp parsley, finely chopped
  • 1/2 cup grated cheddar cheese
  • cayenne pepper, to taste
  • 1 can crab, drained
  • 5-8 large soft tortillas

Instructions:

  1. Mix your cream cheese, red pepper, green onion, parsley, cheddar cheese, cayenne pepper, and crab together until mixed well.
  2. Spread your mixture on the tortillas and then roll them up. Cut slices of tortilla about 3/4″ thick
  3. Bake at 350 degrees for 8 minutes. Serve while warm.

You can serve them cool, but I definitely prefer them baked! This recipe makes at least 40 pinwheels.

Crab Pinwheels l Pretty Handy GirlCrab Pinwheels l Pretty Handy Girl

It only takes 20 minutes to prepare and cook these lovely appetizers, and your guests will thank you for making them!

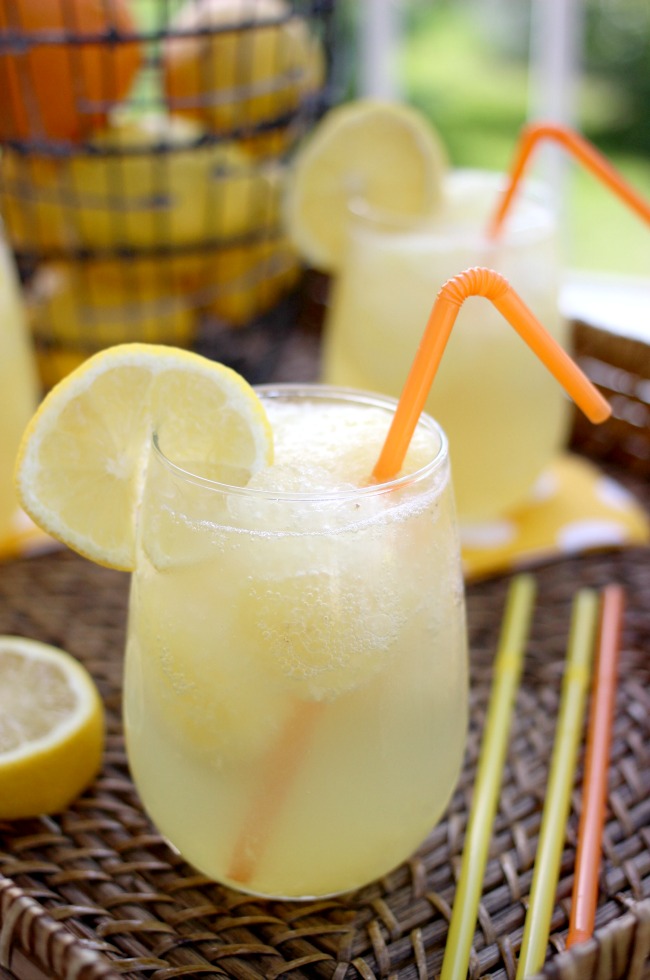
If you need a drink to go with them, I shared my favourite Summer drink a couple of weeks ago: The Adult Tropical Slushie!

Crab Pinwheeels I PHG

Enjoy!

Lindi Signature

~Read more of Lindi’s Posts~


Pin for later!

Chipotle Ranch Chicken Salad - Easy, Healthy and Delicious! | Pretty Handy Girl

Chipotle Ranch Chicken Salad - Easy, Healthy and Delicious! | Pretty Handy Girl

I have a new favorite salad and it is DELICIOUS!!! A few weeks ago we went to the beach for our vacation. At the end of the week I wanted to use up as much food in the fridge as I could. You understand the struggle, right? Who wants to waste food?

In the fridge we had leftover rotisserie chicken, corn, and salad ingredients. I also had some Drew’s Chipotle Ranch salad dressing (affiliate link), I could put that sh*t on everything! I was not paid to say this, Drew’s doesn’t know who I am, this is just my newest favorite salad dressing and I HAD to share it with you.

Chipotle Ranch Chicken Salad - Easy, Healthy and Delicious! | Pretty Handy Girl

I wracked my brain and blindly dove into creating this Chipotle Ranch Chicken Salad. I added a dash of this and a heap of that. And when I was done….it was AMAZING! Watch out Chopped, I’m your next top chef!

Here is my recipe for Chipotle Ranch Chicken Salad. I know you’ll be hooked too.

Ingredients:

3-4 Skinless Boneless Chicken Breasts
Head of Red Romaine Lettuce
1 Avocado
1 Ripe Tomato
1 Red Onion
1 Ear of Corn
1 Lime
1/2 cup Plain Greek Yogurt
1/4 cup Drew’s Chipotle Ranch Dressing
Sea Salt
Pepper
1 Tbsp. of Butter
2 tbsp. chopped Cilantro
Optional: Frank’s Red Hot Sauce

Feel free to add your own favorite Southwestern vegetables, some cheddar cheese or black beans.

Instructions:

1. Put a pat of butter into a fry pan and heat until melted. Sprinkle salt & pepper onto the chicken breasts. Squeeze lime juice over breasts. Add a dash of Frank’s Red Hot Sauce if you like your chicken spicier. Heat chicken until browned on both sides (8-10 minutes) and no longer pink in the middle. If your chicken breasts are super thick, butterfly them.

2. While the chicken is cooking, chop the salad vegetables (lettuce, tomato, red onion, and cilantro.) To cook the corn, microwave for 3 minutes INSIDE the husk. Let the corn cool slightly, then cut off the bottom of the corn cob (cut through the corn husk and ear.) Grab the corn silks and husk at the top and shake until the ear falls out. Magically all the silks will be stripped off! Cut off kernels from the the ear.

3. When the chicken is fully cooked turn off the heat but leave the pan on the burner. Mix yogurt and ranch dressing together in a bowl. Pour over chicken and flip chicken to coat in the yogurt dressing mixture.

4. Put salad vegetables in bowl. Top with sliced chicken, sliced avocado, and cilantro. Drizzle with more Drew’s Chipotle Ranch Dressing. Squeeze some more lime juice on top and enjoy your salad!

Chipotle Ranch Chicken Salad - Easy, Healthy and Delicious! | Pretty Handy Girl

Hope you love this salad as much as I do! It’s the perfect salad for lunch or dinner. And it’s a great way to get your veggies in. Enjoy.

PHGFancySign


Family Organization Door | Pretty Handy Girl

weekly-meal-planner-free-download-printable

Last week as I was showing you our new Family Organization Center Door, you probably saw this cute Vintage Farm Weekly Meal Planner:

Family Organization Door | Pretty Handy Girl

I created this re-useable meal planner with some beautiful vintage graphics from The Graphics Fairy. She has an entire library of vintage images in black and white and color! Including these images I used: pigs, chickens, metal frame, banner scroll. The menu fits in the Organization Door behind the glass so we can use it like a dry erase board.

Want one for yourself? I’d love to share the menu planner with you.

Download Your Vintage Farm Menu Planner Here!

Have a great week!

PHGFancySign


Pin for later!

Stay organized with this FREE vintage weekly meal planner from Pretty Handy Girl! | Free printable | Weekly meal planning #prettyhandygirl #mealplanner #weeklymealplan

diy gift idea hot cocoa mix in a jar

Hot Cocoa Mix in a Jar

I love making homemade gifts during the holidays. Not only is it more personal than something store-bought, but it’s a budget saver as well.  One of my favorite quickie gifts to make is hot cocoa mix.  With mason jars being all the rage, this gift in a jar is the perfect neighbor or teacher gift for the holidays!

Hot Cocoa Mix in a Jar Supplies:

  • 4 tbsp cocoa powder
  • 4 tbsp sugar
  • 8 tbsp powdered milk
  • 1/2 cup mini marshmallows
  • 1/4 cup chocolate chips (optional)
  • 16 oz pint sized mason jar (I used a wide mouth jar)
  • sandwich bag
  • scrap fabric
  • ribbon

homemade cocoa mix ingredients

Combine powdered milk, sugar, and cocoa mix in a large bowl until well blended. Pour mix into a mason jar. If necessary, wipe down the inside of the jar to remove any mix residue on the top half of the jar.

cocoa gift in jar

Add marshmallows and chocolate chips to the sandwich bag.  Squeeze all excess air out of the bag and twist to form a “ball” of marshmallows.

packaging cocoa jar gift

Carefully place the marshmallow bag on top of the cocoa mixture with the excess plastic at the top so the lid will conceal it.  Be sure to add your bag slowly so that you don’t cause the cocoa mix to spill.

mason jar topper diy

Cover the mason jar top with fabric. It’s a fast and easy way to make the packaging look a little more “fancy!” Simply cut a piece of scrap fabric slightly larger than your top.

making mason jar topper

Place the fabric and top on the jar and use the canning ring to secure it in place.  Tie a ribbon around the top to finish it off! Gift with the instructions to add 3 tbsp to 8oz of hot water.

how to make hot cocoa in jar

Do you like to make homemade gifts as well? What are your favorite DIY gifts to make or receive?

MelissaSignature~ read more about Melissa ~


Pin for later!

Last minute DIY gift idea: hot cocoa in a jar! | Pretty Handy Girl

peanut butter pumpkin dip recipe

Hey there, it’s Melissa from The Happier Homemaker back again and I have something I think you’re going to love this month. I love to cook and I especially love creating fun new recipes in the fall-everything about autumn is so inspiring!

It seems that when September rolls around I start trying to add pumpkin to everything-like my Skinny Pumpkin Spice Latte or  Pumpkin Pie Pancakes!  This tasty fruit dip is the perfect combination of pumpkin flavor with classic peanut butter satisfaction. Serve this peanut butter pumpkin dip with sliced fruit, cinnamon sugar chips, or spread on a muffin or toast for a perfect fall treat.

Ingredients: Read more