Hang-O-Matic Wall Hanging Tool Review | Pretty Handy Girl

This is one of the multitude of gadgets that gets sent to me for review. Most don’t make it to the light of the blog. But, this little gadget has proved useful in my toolbox. Stick around to learn how you too can Hang Art easily using Hang-o-Matic. And why I gave this little tool a second chance.

The creators of Hang-o-matic sent me this tool to try out. The first one I received was defective. The moveable clip was loose and wouldn’t stay put. I explained to the creators that I didn’t like the tool because the point wouldn’t stay where it was set. Apparently there had been some production issues and they shipped me a second one. I was doubtful, but after trying the tool a handful of times, I have to admit it is the perfect tool when you are hanging art, decor, or mirrors that have two hooks.

Instructions for Hanging Art Easily using Hang-o-Matic:

Remove the cover from the ruler/level section.

Hang-O-Matic Wall Hanging Tool Review | Pretty Handy Girl

Mark the height you want to hang your art with a pencil. Read more

Mold & Mildew Free Shower for 4 months | Pretty Handy Girl

Mold & Mildew Free Shower for 4 months | Pretty Handy Girl
Endurance BioBarrier Review

I’m going to warn you now, this is not a pretty post. But, this product review of Endurance Cleaner Prep and Endurance BioBarrier will most likely be one of your favorite posts if you deal with continual mold & mildew growth (especially in a small coffin-like shower from the 1970’s.)

(I’ve included affiliate links for your convenience. I earn a small percentage from a purchase using these links. There is no additional cost to you. You can read more about affiliate links here.)

You may remember how much I love our master bathroom shower:

Mold & Mildew Free Shower for 4 months | Pretty Handy Girl

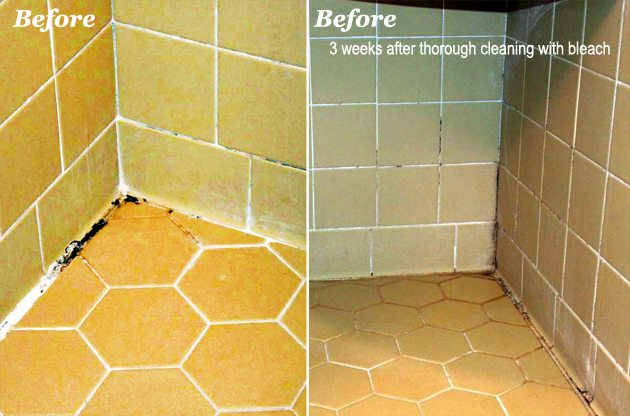
That ugly harvest gold tile shower is the ugliest spot in our home. And, its attractive color is not helped by the mold growth that returns like clockwork every three weeks. I have tried everything to control its regrowth. What I’ve tried is using bleach, and leaving the shower door open all day. I even replaced the caulk in this shower. But, every three weeks that mold peeks out from the cracks and crevices.

This bathroom is slated to be demolished at some point, but until then it needs constant cleaning. That is until a few months ago when I tried Endurance BioBarrier Mold Prevention Spray (non-toxic and low-odor.)

Endurance sent me a the Cleaner Prep and Biobarrier to try out. You may remember that I tried it after cleaning our dirty and moldy storm windows.

Easy Clean Your Storm Windows with Steam | Pretty Handy Girl

I didn’t want to blog about the products until I had tried them for more than a few months. I’m happy to report that for four months, I didn’t need to clean our shower! Normally after three weeks the mold and mildew would have been happily growing in the corners of my shower.

Mold & Mildew Free Shower for 4 months | Pretty Handy Girl

On February 5th, 2015 I set about cleaning the shower with high hopes but big doubts.

Mold & Mildew Free Shower for 4 months | Pretty Handy Girl

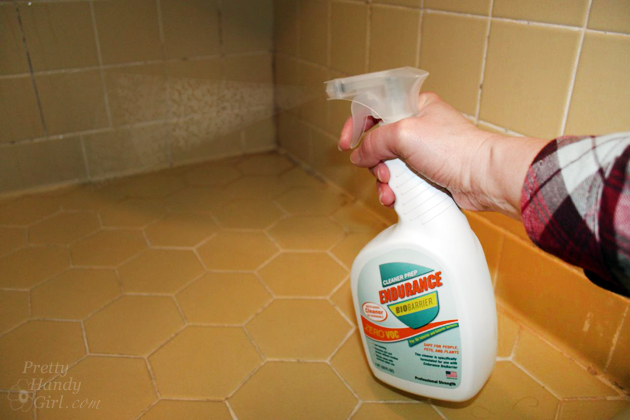
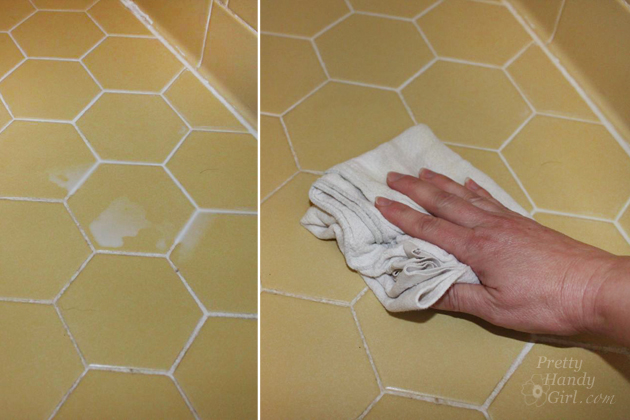
As directed, I sprayed the Endurance BioBarrier Cleaner Prep in the shower. I let it sit for 15 minutes (1-5 minutes for normal cleaning. 15 minutes for tougher jobs.)

Mold & Mildew Free Shower for 4 months | Pretty Handy Girl

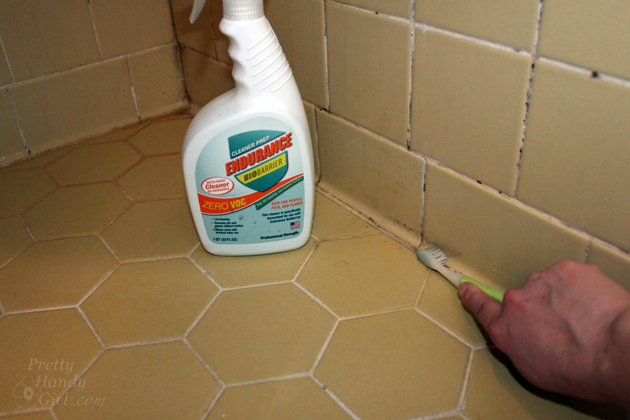
To clean off the mildew and mold, I used a scrub brush. Then rinsed all the surfaces with water.

Mold & Mildew Free Shower for 4 months | Pretty Handy Girl

After the shower is completely cleaned with the Cleaner Prep, spray the Endurance BioBarrier Anti-Mold protection spray to create a thin film on all surfaces.

Mold & Mildew Free Shower for 4 months | Pretty Handy Girl

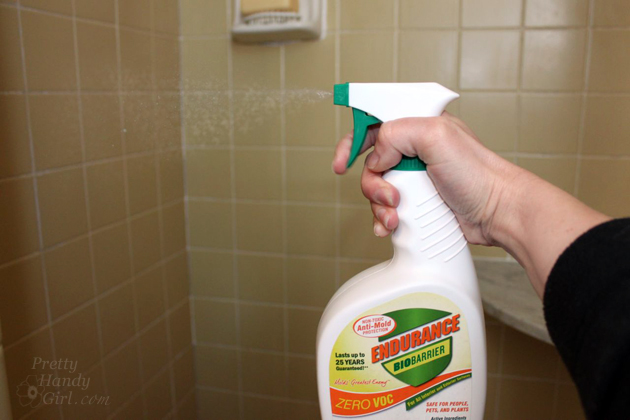
Wipe up any puddled spray after a few minutes.

Mold & Mildew Free Shower for 4 months | Pretty Handy Girl

The shower was clean and devoid of any mold or mildew. Nothing miraculous yet. I can achieve the same results with bleach cleaner.

Mold & Mildew Free Shower for 4 months | Pretty Handy Girl

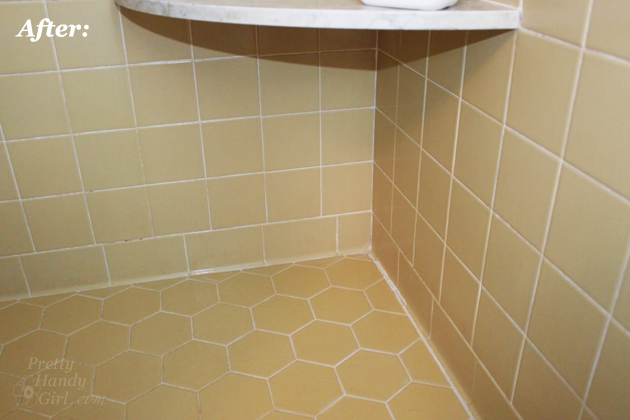
But, here’s where the similarities end. After four months (not three weeks) was the first time I began to see some mildew and mold regrowth. Read more

Natural-accents

It’s time to make room on your bookshelf for two more beautiful books. The first is Natural Accents by Stacy Risenmay. Stacy is a good friend and fellow DIY blogger. She’s also a power tool rock star. Stacy recently released this colorful book filled with lots of ways to decorate and furnish your home with natural elements. This book follows in the footsteps of Stacy’s blog with easy to follow step-by-step tutorials.

natural-elements-flowers

Natural Accents is filled with projects that you can make with simple materials found in your backyard.

crayon-holder-tree-stub

My favorite project is definitely this plexiglass side table. Natural Accents is filled with many more brilliant ideas!

plexi-glass-side-table

Get your copy today, because you’ll find at least half a dozen projects you’ll want to tackle this weekend.

Natural Accents by Stacy Risenmay $22.58 on Amazon (affiliate link)

page_break_2

new-ceramic-surface-design

New Ceramic Surface Design by Molly Hatch is a book full of ceramic eye candy. If you’ve ever wanted to dabble in ceramic arts, this is the book you want to devour. And even if you have no interest in ceramics, this book is filled with beautiful photos on each page. I found myself being drawn through the entire book enjoying all the gorgeous art pieces.

inside-new-ceramic-surface-design

Molly filled New Ceramic Surface Design with everything you need to know about working with clay, glazes and more. She gives her expert advice and tips to help you avoid botched projects.

types-of-clay

I leave you with one of my favorite images from the book. This beautiful Mishima Slip Inlay design in blue and white belongs on my shelf!

blue-mishima-slip

Get your own copy of New Ceramic Surface Design by Molly Hatch for $20.27 on Amazon (affiliate link)

PHGFancySign

Disclosure: Natural Accents by Stacy Risenmay and New Ceramic Surface Design by Molly Hatch were sent to me at no charge to review. I was not told what to write or say about these books. 

Black + Decker Flex Lithium Vacuum | Pretty Handy Girl

Black + Decker Flex Lithium Vacuum | Pretty Handy Girl

Black+Decker sent me their BLACK+DECKER MAX Lithium Flex Vacuum to test. I’ve been holding this review in my back archives for a while. I never like to publish a review until I’ve given a product a thorough testing and make sure it will hold up for the long haul. I’ve been using my Black+Decker MAX Lithium Flex 20V vacuum for a lot of my projects. You may have spotted it when I refinished the paint on my dryer. Or to clean up sawdust out of the grooves on my farmhouse table build. In fact, I grab for this little vacuum anytime I’ve made a little mess or spilled some powdered drink mix, etc.

Black + Decker Flex Lithium Vacuum | Pretty Handy Girl

But, last week I accidentally spilled a package of almonds in the tiny crevice between the seats in my car. I can’t even get my hand in this space, so I ran in to grab the big vacuum cleaner but stopped when I was in front of the Black+Decker Max Lithium Flex. I hate hauling out the big canister vacuum because it’s so heavy, but could a little vac handle nuts?

nuts-in-car-crevice

I honestly doubted it would be able to get all those almonds up. After all, I’d had poor luck in the past with small dust sucking devices.  Read more

WORX 56v Hedge Trimmer Review | Pretty Handy Girl

WORX 56v MaxLithium Hedge Trimmer Review | Pretty Handy Girl

We have a very wooded and heavily landscaped lot with lots of mature bushes. Some of the bushes were starting to achieve monster proportions. Do you see the resemblance? Today we are going to be talking about this awesome hedge trimmer. Check out this WORX Hedge Trimmer review.

WORX 56v Hedge Trimmer Review | Pretty Handy Girl

This is why I needed a bad boy hedge trimmer on my side. WORX sent me the 56V MaxLithium Cordless 24″ Hedge Trimmer  to try out. It turned out to be the perfect tool for our yard. Previously I tried the 20V MaxLithium Cordless 20″ Hedge Trimmer, but it didn’t have the muscle I needed to power through our landscaping. The 56V WORX hedge trimmer definitely had the power to cut easily through all our shrubs and bushes. But, the extra power is the result of a large battery which does weigh more than its 20V sibling. However, I’d much prefer a little extra weight because the trimmer can cut through bushes and shrubs much faster (saving on arm fatigue in the long run.)

WORX 56v Hedge Trimmer Review | Pretty Handy Girl

The WORX 56V MaxLithium Cordless 24″ Hedge Trimmer requires the assembly of the handle and shield when you first remove it from the box. You will need a philips head screwdriver.

WORX 56v Hedge Trimmer Review | Pretty Handy Girl

The battery pack should not be in the trimmer during assembly. Simply slide the shield into place (just above the blades) and secure it with the screws shipped with the tool.

WORX 56v Hedge Trimmer Review | Pretty Handy Girl

The handle requires some outward force to snap over the trimmer.

WORX 56v Hedge Trimmer Review | Pretty Handy Girl

The handle is secured with one bolt on one side.

WORX 56v Hedge Trimmer Review | Pretty Handy Girl

Snap the battery pack in place and you’re ready to tame that jungle you call your yard.

WORX 56v Hedge Trimmer Review | Pretty Handy Girl

Trimming the pampas grass used to be a tedious job using manual hedge shears and I inevitably lost the battle with lots of scratches. Read more