Master Bedroom Reveal | Pretty Handy Girl

Master Bedroom Reveal | Pretty Handy Girl

When I mentioned to Pretty Handsome Guy that I was going to give our master bedroom a makeover, he thought I was nuts. I did paint this room when we first moved into our home seven years ago. And I gave it a mini-makeover in 2011.

master_bedroom_photo

But, it was exciting to be able to repaint and give the room a fresh new look with an ombré wall technique.

Master Bedroom Reveal | Pretty Handy Girl

I saved a lot of cash by repainting the nightstand (and adding feet to it),

Master Bedroom Reveal | Pretty Handy Girl

the vanityRead more

DIY Button Pendant Light | Pretty Handy Girl

DIY Button Pendant Light |Pretty Handy Girl

While I was house touring on Tybee Island and having  fun antique and salvage shopping in Savannah, I spied some bare lamp shade frame hanging lights. They immediately inspired me to design a DIY Button Pendant Light for over my bedside table in our master bedroom. Part of the desire was born out of the necessity to have more space on my bedside because the table actually doubles as my makeup vanity.

DIY Button Pendant Light | Pretty Handy Girl

Making a Button Pendant Light is an easy DIY project, but you’ll need some patience while threading the buttons. I’ll also show you how to wire a lamp socket and lamp plug! Ready to get started?

(I’ve included affiliate links for your convenience. I earn a small percentage from a purchase using these links. There is no additional cost to you. You can read more about affiliate links here.)

Materials:

DIY Button Pendant Light |Pretty Handy Girl

Optional:

Instructions: Read more

how_to_install_hard-wired_pendant_light

You may have noticed that pretty little seedy glass pendant light over our sink from my video the other day. It was a breeze to install, so I want to share with you the tutorial.

(I’ve included affiliate links for your convenience. I earn a small percentage from a purchase using these links. There is no additional cost to you. You can read more about affiliate links here.)

And now it’s tutorial time!

Materials:

Instructions:

Safety First! Turn off the power to the light fixture circuit. If there is no light fixture installed, check the power with a voltage tester. (I had to flip 6 circuits before I found the one that fed power to that junction box! And you know, I updated the labeling in our circuit breaker once I found it. This is required by code.)

turn_off_power_check_wires

Modifying the Height of a Light Fixture:

Use a ruler to measure how low you want your pendant light to hang. If you need to, put a piece of painter’s tape at that mark to give yourself a visual reference spot to see if you like that height. (Or corral a partner into holding the light fixture for you while you make up your mind.)

uttermost_pendant_light

Lay your tape measure on the counter and stretch the light fixture out next to the ruler (be sure to set the glass shade on to gauge the full height.)

figure_link_to_remove

Assess where to separate the chain to reach the desired height.

remove_chain_light_links

You can separate chain links by using two screwdrivers and rotating them in opposite directions as shown below:

Read more

When Courtney (The Joy of Decorating) organized the Raleigh group for I <3 Thrifting Day she took us to an “off the beaten” path shop. Tucked into an industrial zone off Capital Blvd. in Raleigh, you would miss it unless you were specifically looking for it.

Here are just a few of the inspirational photos I took on my visit to Revival Antiques & Accessories:

Old bead board or flooring pieces cut, painted and turned into a coat rack!


A pendant light made from corrugated cardboard!

Here’s a closer look at the cardboard.

Give me chippy paint or give me death! Okay, I know I’m being dramatic, but I seriously love anything rustic with chipping paint.

Decorative scroll embellishment on an armoire.

Just think how easy these ampersand pillows would be to make!

Hello, does this vignette remind you of Miss Mustard Seed? Me too.

Painted and numbered chippy buckets.

Another scale and a buggy wheel. Makes my wheels churn thinking what I could make with it.

I just love the detail on this drawer pull (and of course the chippy paint.)

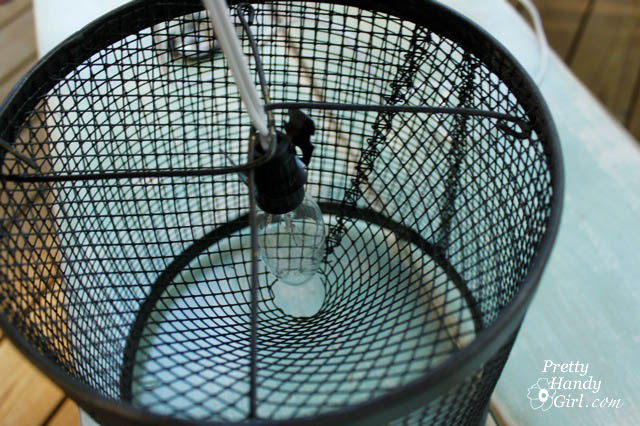
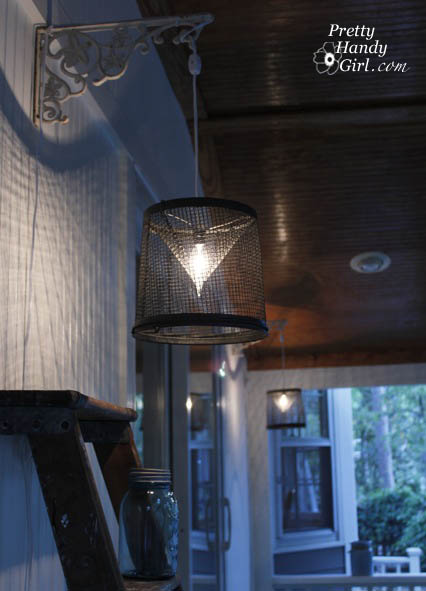
Bare wire framed pendants are very popular right now.

I think I like the pendant even more because of the antique light bulb.

Antique cameras are sculptural and easy to decorate with.

I spotted this shelf made from old shutters.

Or you could turn an old shutter into a coat rack.

This armoire is too stunning for words!

If I owned this dresser, her name would be buttercup.

Old typewriter keys are just graphic goodness.

This tool caddy is adorable, but I bet it would be easy to make. I think I could use Julie’s (Follow Your Heart Woodworking) tool caddy tutorial that appeared on Funky Junk Donna’s.

A cute little nook shelf. Complete with (you guessed it) chippy paint and beadboard.

This birdcage photo display gives me a few ideas. How about you?

2nd only to chippy paint, I love blue bottles!

Little antique crates can be found everywhere at ReVival Antiques.

A buoy birdhouse! How adorable.

{Yawn!} That’s it for today, I’m ready for my cat nap.

If you liked anything you saw in this post, be sure to visit or contact:

Revival Antiques & Accessories
1505 Capital Blvd, Suite 14-A
Raleigh, NC 27603

919-833-3444
www.revival-antiques.com

Disclaimer: This is NOT a sponsored post. Revival Antiques doesn’t know me, they didn’t poke or prod me to write this. It is just one of those places that I thought you might like to visit with me. So, I brought you along for the visual tour.

On our last trip to the beach, I stopped in a hole-in-the-wall thrift shop. The store was musty, dirty and reeked of old cigarette butts. I’m still not sure why I was drawn into this store. But low and behold, this is what I found!

The owner told me it was a minnow trap. Duh, of course it is! Actually, I’m not a fisherperson, so I never would have guessed that.

What I did see was two pendant lamps for my screened porch. I have been trying to decorate it for a year, but I have been unable to find some inexpensive porch furniture. Regardless, I am aiming for a breezy ocean theme, so these would fit in perfectly!

I separated the trap into two pieces. Then cleaned them with a damp rag.

To create the light kit frame, I used these tools:

I bent a small hook in the clothes hanger with the needle-nosed pliers. Then fed the end of the coat hanger through one top edge of the minnow trap.


Using my pliers, I pinched the hook shut.

If you pretend that the first hook was attached at 12 o’ clock, then you want to attach the second hook at 3 o’clock.

Using my pliers again, I bent both wires near the center into a 90 degree “L” shape.


Next, I wove the other L hook (over and then under) the first hanger and bent the wires until they overlapped at 6 o’ clock and the second one at 9 o’ clock. I played with the wires until I was able to create a small hole in the center.

I ended up with this on both traps (now looking more like lamp shades):


I sprayed my two lamp shades with an automotive primer (I read somewhere that it has better adhesion to metal) and followed up with 2 – 3 coats of Oil Rubbed Bronze spray paint.

For the light sockets, I purchased 2 candelabra base kits from Lowe’s.

I simply inserted the socket and light bulb underneath the coat hangers. Then bent the coat hangers while making sure to get the light kit centered in the shade.

When I got everything centered, I fed the unattached ends of the coat hangers through the shade and hooked it around securing it to the wire shade.

Then all I had to do was screw in these cool iron shelf brackets into the wall on my porch and feed the wires of my lamps through and use a twisty tie to secure it.

Now we have some unique mood lighting on our porch!


Do you like? Would you have known that they were minnow traps?

Too bad the weather is turning cool again. Maybe I can find some deals on porch furniture now!

Copy Me Challenge