“It’s a Party and I’ll Paint if I Want to…Paint if I Want to… Paint if I Want To…You Would Paint Too if you had Scotch Bluuuueee!”
I think I’m going to call 3M ScotchBlue right now and suggest this as their new jingle. Kind of catchy isn’t it?!

Check out my project tutorial on revamping an old cabinet door below.

Go ahead, grab your paint and brushes — and don’t forget a roll of ScotchBlue painter’s tape!

I have been using ScotchBlue painter’s tape for a while and I really like it. I am not being paid to say this (even though they did send me a few free rolls of painter’s tape.) You’d know I like ScotchBlue tape if you have read the backlit bookcase post, painting the bamboo rug post and the painting like a pro post (where I share some tips for using ScotchBlue Painter’s Tape!)

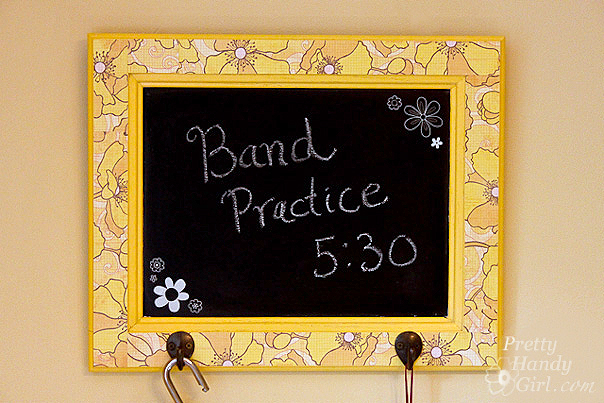
But, enough looking back, I want to share with you how to make something out of a disgustingly filthy grease covered discarded cabinet door. So, let’s hop to it! While building my mudroom bench, I took off the doors and kept them in the hopes of being able to use them another day. I’m working on a new bench for my Habitat ReStore demonstration, so I have more cabinet doors now! I devised a plan to reuse the doors in a creative way, a way that would be fun and yet help us keep track of our comings and goings. Meet my cabinet door turned into a chalkboard message board with hooks:

Materials:

(I’ve included affiliate links for your convenience. I earn a small percentage from a purchase using these links. There is no additional cost to you. You can read more about affiliate links here.)

Instructions:

Clean the doors! If you have a cabinet that has finished it’s first life as a kitchen cabinet, and has so much grease on it that you could grease a pig…well, you need to clean it off. I experimented with several different techniques (GooGone, Dawn Detergent, Shakelee DeGreaser Spray, and Ammonia), but the one that worked best was inexpensive ammonia mixed with hot water.


I saturated the cabinet with the ammonia mixture. Let it sit for a few minutes and voila! The grease came off like butter (no pun intended.)


Dry the cabinets and gently sand all the surfaces to rough them up slightly. (Don’t rough ’em up too much boys, we need him to be alive. LOL! Spoken like a true Western character.)


Wipe off the door thoroughly with a damp baby wipe.


Use wood putty to fill in the wood grain on the middle panel of the cabinet. (You could also fill in the cracks on the frame of the cabinet too, but I have other plans for the frame.)


Let the putty dry for about 10 minutes. Sand the panel until it is smooth.


Wipe off the cabinet door again. Be sure to get all the sawdust off.

Spray your cabinet door with spray primer. One coat should be enough to cover the door. It helps to elevate the cabinet with a block or two underneath so it doesn’t stick to your drop cloth.


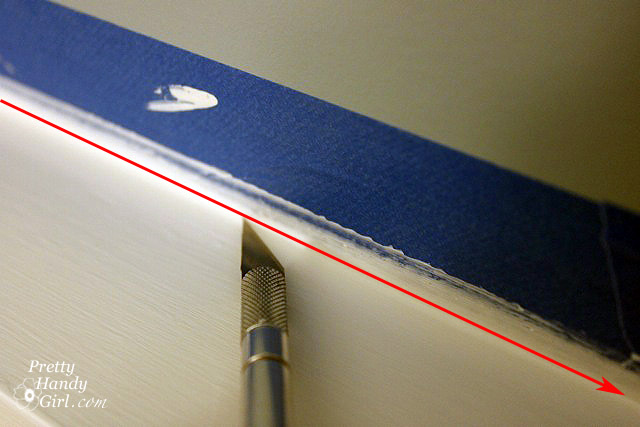
Mask off the middle of your door with newspaper and ScotchBlue Painter’s Tape. Press the edges down firmly by running a finger along the edge. (If your cabinet door is very textured, you can seal the edges by brushing matte medium where the tape meets the door.


Spray the frame with 2 even coats of the summer squash yellow color (allowing the paint to dry between coats.)


Remove the mask, now ooo and aaaa over that clean edge! Give the paint about an hour to cure before the next step.


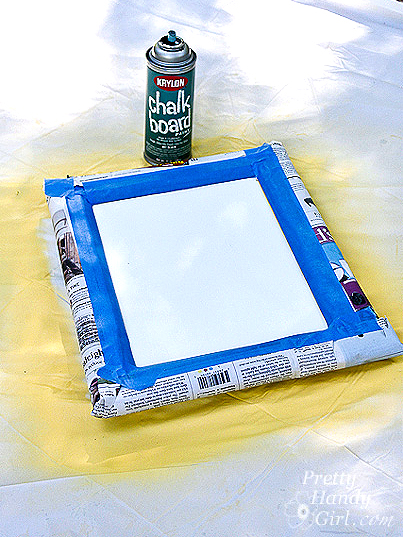
Wrap newspaper around the back of the cabinet door and fold the edges up. Use ScotchBlue painter’s tape to tape the edges of the frame off (cover all the yellow with tape or newspaper.)


Spray the inside panel with 2-3 even coats of the chalkboard paint. Let it dry throughly before you remove the tape and newspaper mask.


It is starting to look rather purrrrdy, ya think?! Feel free to stop here and say that you are done…


…or if you are a perfectionist (like me), you will want to cover the woodgrain on the frame with scrapbook paper.


Simply measure your border and cut scrapbook sheets to that width. It is okay if your sheets aren’t long enough to fit on one length, you can tile them.


Brush one layer of mod podge onto the frame then lay the scrapbook paper on top of the mod podge. Press out all the air bubbles. Let the mod podge/paper dry for a few minutes.


Then brush 1-2 coats of the mod podge on top of the scrapbook paper borders to seal the paper.


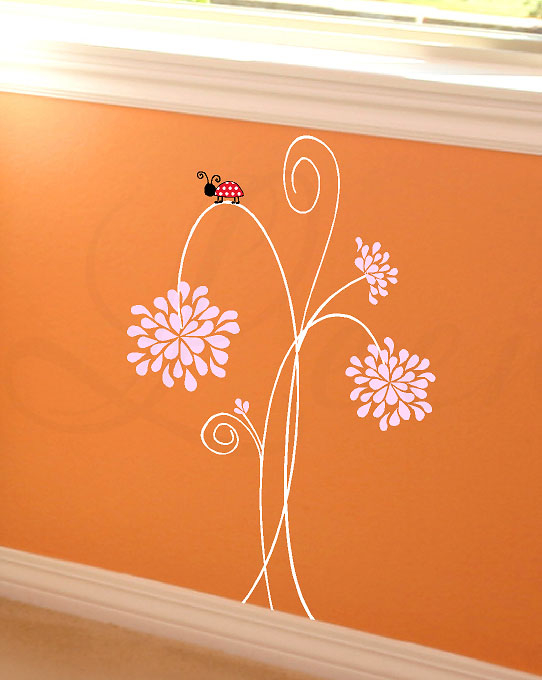
If you want to embellish your chalkboard frame, you can rub on transfer decals (or paint some decorations using white acrylic paint.)


To make your chalkboard frame more functional, add 2 D-rings on either side of the back for hanging purposes. Then add some garment hooks to the front.


Don’t forget to season your chalkboard. (I prefer Old Bay seasoning…just kidding! I always wanted to say that.) Rub a piece of chalk on its side all over the surface and then wipe it off with a dry rag.


And that concludes the tutorial. Don’t you think the results are sweet! Especially because it is made from something that would have otherwise been discarded.


I envision a wall with several of these chalkboard frames lined up, one per family member. That way a message can be written to each person. I guess I better get busy and make 3 more.


I love how the hooks add additional storage! Be sure to use two picture hangers (one for each D-ring hook.) If you have good eyesight you might have noticed my fishing line that is hanging the cabinet above. This was for photography purposes only. Unless you want your frame to rip the drywall and land on the floor the first time your child wants to hang something heavy on the hooks, do as I say, not as I do.


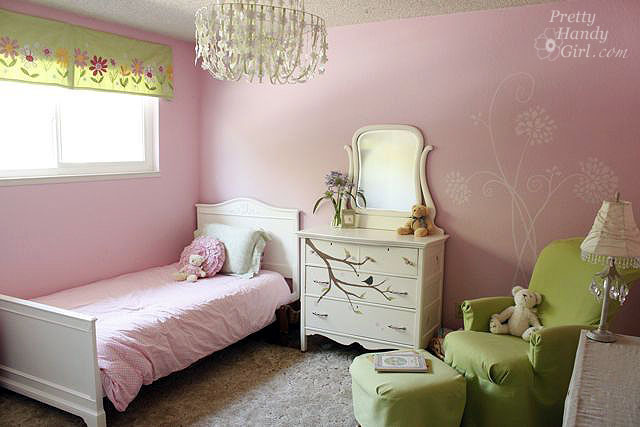
Awww, isn’t she just a perfect little slice of sunshine on a blank wall? She makes me happy.


You made it through another one of my insanely long tutorials! Congrats!


Disclaimer: I was one of the bloggers chosen to host a ScotchBlue Painting Party. I was not paid or compensated for this post. I was sent a few rolls of ScotchBlue painter’s tape, but I honestly can’t remember if it was 2 or 3 or 5 because they promptly got added to the collection of ScotchBlue tapes I already own.

I have amassed quite a collection of “project” furniture and objects waiting for a future date with my creative magic sessions. I worry that some of this behavior is bordering on packratness (I don’t think that is a word, at least my spell check says it isn’t. But, you get my drift, right?!) So, when a Wagner rep contacted me about trying one of their paint sprayers, I couldn’t reply “YES!” fast enough. I had visions of setting up all those projects and spraying them down in a line-up fashion. But, I reined in my “glass half-overflowing” mentality and decided to tackle one project at a time. Good thing too, because although the Wagner Power Painter Plus with EZ Tilt (affiliate link) did spray at lightning fast speed, there were a few drawbacks.

But, I don’t want to get ahead of myself. I still want to give you a bonafide tutorial on how to fix, prep, paint and finish a wobbly yard sale find for yourself.


Materials:

(I’ve included affiliate links for your convenience. I earn a small percentage from a purchase using these links. There is no additional cost to you. You can read more about affiliate links here.)

*These items are purely optional. You don’t NEED them, but they help.

This wash stand had a $5 price tag on it. But, my neighbor gave it to me for $3. Is that robbery to talk someone into less than $5 for this antique?! In self defense, the stand was in pretty poor shape. It was VERY wobbly and had some big scratches on it. Can you forgive me?

Here is what you do when you find yourself as the new owner of a “this really should be trashed” purchase. Take it apart and rebuild it from the ground up. Having done this before with Daisy the Discarded Chair, I was prepared to tear this wash stand down to the ground. But, luckily it had some better joints than I had anticipated. So, I basically pulled apart anything that was not tightly joined.

The shelf over the drawer came off super easy.

As did a few joints.

I wiped the whole wash stand down with a wet rag.

Then, the side of the stand got some new glue and a few finish nails.

The joints got some Gorilla Glue and were set back together. And, I added a thin bead of glue and some finish nails to re-secure the shelf.

Next I sanded down the whole piece of furniture with these two 3M sanding blocks. I like to call them Tweedle Dee and Tweedle Dum because they are super easy to use. Even an idiot can’t screw up.

They work great for around spindly legs because they can bend and flex (I wish I could bend and flex like that!)

After wiping off all the sawdust, my wash stand looked like this:

Almost too pretty to paint, but it had some serious gouges, so I took a picture and said goodbye to the beautiful wood.

Here is where the race began. I decided to time myself painting on the primer with a brush. Then time myself using the sprayer for the first coat of paint.

Start your engine….paint brush and KILZ Clean Start Primer…GO!


After 30 minutes I had primed the entire stand from top to bottom.

After the primer dried, I gave the stand a quick, light sanding with a 220 grit sanding block and wiped it down with a damp rag.

I set up the sprayer, read all the directions (very important!) Then I filled the quart size reservoir and attached it to the sprayer. The Wagner Power Painter Plus doesn’t require a compressor, just a good old fashioned extension cord plugged into your household outlet.

Start your engine…Wagner Power Painter Plus…GO!

VROOOOOOM! The sprayer let out the loudest and most obnoxious noise I had ever heard (Note to self to wear ear protection next time.) I thought the sprayer was going to self destruct, so I let go of the trigger. Then I pulled it again and the noise returned, only to abate after a few seconds once the paint started to come through the nozzle. Phew, that scared me.

I breezed through painting the entire wash stand from top to bottom. I started with it upside down and quickly flipped it while it was still wet (I left a finger print underneath, but no one will know about that unless you squeal.)

And I was done. Then I looked at my timer and WHAT?!!! 5 MINUTES! Holy Cannoli! I had no idea a sprayer could shave that much time off a paint job.

I left the wash stand outside, while I took apart the paint sprayer.

To avoid emptying the paint canister, I covered the container with saran wrap and a rubber band.


Then I took apart the ENTIRE sprayer and cleaned out all the parts. It is soooo important to clean the sprayer thoroughly or you risk paint drying in your machine and ruining it. This is a look at the sprayer disassembled.

It is paramount to clean the tiny dual spray tips on the machine. They are small slits that can clog easily if the paint is allowed to dry in them.

After the wash stand had dried. I put the sprayer back together and screwed the paint container back onto the gun.

I was all pumped and excited to be done in 5 minutes! With dusk still 30 minutes away, I had no fear. BIG MISTAKE!

What was to ensue was a stressful 45 minutes of paint globbing, paint sputtering, my cursing, and frantic cleaning of the sprayer again. I finished spraying, but I had to use a different top coat color because I ran out of the first paint color. (Which ended up being one of those happy mistakes. You’ll see.)

I wiped off the big globs of paint and decided to give those areas a little “extra” distress in the morning.

After stepping back from the project, doing some research and having a twitter conversation with Shaunna (the furniture painting guru), here is what I concluded from my disasterouos 2nd attempt:

  1. The paint sprayer MUST have a full paint cup in order to work properly. When the reservoir gets down to less than 1/4 full any air that gets into the paint suction tube will cause the sprayer to sputter and discharge big globs of paint, instead of a nice even spray.
  2. The sprayer dispenses an INSANE amount of paint in 5 minutes and when it runs low #1 happens. I used a half gallon of paint on the first coat of paint on this small wash stand. Whereas, I normally would have used maybe half a quart to brush on two coats total. The drop cloth was so heavy with paint when I cleaned up, that I realized the majority of the paint was wasted in overspray.
  3. The Plus does not have a low paint level indicator. Therefore, it is very difficult to determine when you are getting low on paint until the sprayer starts to sputter and shoot out globs of paint onto your project.
  4. In the same vein, the paint canister only holds a quart of paint, and 1/4 of that isn’t useable unless you like Jackson Pollock style painting.

The next morning, I took out my power sander and gave the sink some character by distressing it.


This is where the happy accident occured. Because I had to use an aqua blue as the top coat on my sink, you could see the blue gray color peeking out! Which I think makes it look sweet, shabby and old.

Once I was happy with the amount of distressing, I sanded any chipping paint and rough spots with the 220 grit sanding block. Then, I cleaned off the wash stand with a damp rag. To protect the sink, I used Minwax wipe-on Polyurethane. I like the wipe-on Poly for speed. But, it doesn’t leave as thick a coat as the traditionally brush on kind. So, if you really want to protect a piece of furniture, use the brush on kind instead.

I added a cute little crystal cheap acrylic knob to the drawer.

And my new/old dry sink looks right at home in the corner of my porch! Although, it needed something…hmmmm….

…how about a plant! I dropped in a plastic pot with NO holes in the bottom. I filled the bottom 1/4 with rocks for drainage. And my pothos plant. I used to have a chippy pedestal that sat there, but sadly I had to get rid of it. I’ll fill you in on the details next week. It is a sad story ;-(.

Here is my summary of working with the Wagner Power Painter Plus model:

  • Pros – Saves time. $100 price tag. No compressor needed.
  • Cons – Small Paint Cup, No Flow Speed Selector, No Low Paint Level Indicator, Lots of overspray and wasted paint.

I will definitely try the sprayer again. When I do I might add Floetrol to my paint, which is supposed to help your paint even out and give you a smoother finish. (Especially if it globs on you.)

  • Wagner Power Painter Max has a two speed selector AND a paint level indicator. This model runs under $100. Have a great weekend and see you next week with some more DIY goodies.

If you are just joining me and missed the tutorial for building board and batten moulding, you can view that tutorial HERE. Today I want to show you how to hide the holes, seams and how to paint the board and batten moulding. Plus, how I paint the wall so it looks more like wood and not like drywall.

Start by taping off the moulding. I used ScotchBlue painter’s tape with edge lock technology because 3M just sent me these rolls to try out.

If you are re-painting the crown moulding and the door, tape them off as well.

Usually I fill the nail holes with wood putty. Then I fill seams with caulk. To view a tutorial on filling holes with wood putty, click HERE.

I actually just read about a neat tip on Diane’s blog (who also just added board and batten moulding in her bathroom.)  She uses ice cubes and cold water for working with caulk. I’ve never tried this, but am happy to report that it really helps smooth the caulk and keeps it from sticking to your fingers.


Which caused me to amend the Pretty Handy Girl’s tried-and-true caulking method:

  1. Squeeze out your bead of caulk, using a caulk gun.
  2. Dip finger in the ice cold water.
  3. Run your finger along the bead to smooth it.

Seal every seam in your moulding and then let it dry.

Once all the putty and caulk has dried, get the primer out. Paint primer on all the wood moulding using a paint brush. In the center (drywall areas), you can roll on the primer.

But, before the primer dries use the brush to spread it in long vertical strokes.

After the primer has dried, go ahead and add one coat of paint. Follow the same direction of strokes with the brush as you did when priming.

I made a video to show you the technique I used to give the wall a wood grain texture. Please forgive the painting clothes and unwashed hair! I haven’t hired a hair, makeup and costume stylist yet.

I have yet to be able to get away with only one coat of paint. If you look close you can still see some of the blue wall color showing through.

After the paint has dried, it is time to remove the tape. Anywhere that you caulked between the wood and the tape, you need to score the caulk to give it a clean edge when you remove the tape.

Remove the tape and looky at that clean edge! I’ve used ScotchBlue painter’s tape before, but I can honestly tell you that the new Edge lock technology is a big improvement. As long as you press the edges down firmly there is hardly any places where paint seeped underneath. The only places seepage occurred was where there was a dimple or imperfection in the wall.

One thing I didn’t caulk was the light switch plate which I had to cut to fit next to the batten. I will probably go back and add a little caulk between the switch plate and the moulding.


I hope you learned something today. Coming up next, the bathroom reveal!

Last week I started to give my boys’ bathroom a facelift. The room was…well…a little fishy.

Removing Wallpaper Borders

Complete with fishy wallpaper border…

Removing Wallpaper Borders

And a fishy toilet seat!

Removing Wallpaper Borders

The room was cute and I didn’t mind it so much. But, the border had started to peel. And the toilet seat was rusting. DO NOT, I repeat, DO NOT buy any cheap toilet seats that have metal hinges. They may look cool, but the nature of moisture collecting around the toilet makes them rust in no time. This was our third seat to do this. Why I didn’t learn after the second? I’m optimistic by nature I guess.

Anyway, I had wanted to help this bathroom grow up a little. And I’d been anxious to try another moulding project after doing my son’s closet last year.

Before delving into the wonderful world of mouldings, I had to remove that wallpaper border. When wallpaper starts to peel, you think, “Oh cool! That means it will be easy to remove.” So you start picking and tearing at it. Well, resist the urge, it is just a funny joke wallpaper likes to play. You really need to be well stocked and prepared with the appropriate supplies for stripping wallpaper.

Removing Wallpaper Borders Materials:

Removing Wallpaper Borders

Wallpaper stripper (DIF or a cheaper alternative is to use 1:1 concentration of cheap pink fabric softener and water)

  • Scoring tool (aka Paper Tiger)
  • Scraper or spackle knife
  • Spray bottle
  • Lots and lots of rags
  • Sponge
  • Bucket of water

Removing Wallpaper Borders Instructions:

Start by using the scoring tool. Make lots and lots of holes until you just can’t lift your arm anymore.

Removing Wallpaper Borders

The more holes the easier it will be for the stripper to soak into the wallpaper glue.

Removing Wallpaper Borders

Spray on the wallpaper stripper and let it sit for 15 minutes.

Removing Wallpaper Borders

Repeat spraying the wallpaper (really soak it), and then gently try to slide your scraper behind the edge of the wallpaper.

Removing Wallpaper Borders

If you can remove the whole strip easily, go for it. In true stubborn form, my border was hanging onto the walls with a death grip. So, I sprayed more stripper behind the border and let it sit for about 5-10 minutes. (Please ignore the giant gaping hole in the drywall! I patched it later.)

Removing Wallpaper Borders

Hopefully by now, it has loosened it’s grip.

Removing Wallpaper Borders

Gently pull the strip off while using the knife to help separate the border from the wall.

Removing Wallpaper Borders

Remove any pieces that are left behind.

Removing Wallpaper Borders

Spray down the walls again with the stripper.

Removing Wallpaper Borders

Wipe it off with water and a sponge or rag.

Removing Wallpaper Borders
This should get rid of all the wallpaper glue residue. But, it is still a good idea to use a primer on walls that previously had wallpaper on them. This will protect your paint job from doing something alien like bubbling up, flaking or who knows what!

Removing Wallpaper Borders If you follow me on Facebook, you were privy to my post over at Parentables. I gave them a special all accesses pass to my brain on a recent trip to the Habitat for Humanity ReStore on THIS day.

Removing Wallpaper Borders

You can view this and more transformations over there! Be sure to leave me a comment. It seems those Parentables readers are a bit more shy than y’all!

And, one last note. I finally delivered my promised Pretty Handy Girl in a box to Cheri (pronounced like Sherry), who writes Dragonfliez Creationz. She is such a sweet person and she didn’t even complain that it took me a month to deliver her box. Cheri and I like the same burritos from Tijuana Flats (thanks to Courtney for introducing me to this Raleigh gem.) But, unlike me, Cheri has a tough side too (luckily I didn’t get to see it.) She’s giving me assertiveness training because I’m too nice.

Removing Wallpaper Borders

That’s all for today. See you next week with some more bathroom updates.

Removing Wallpaper Borders


Me and My Little Sister Caitlin

I just got back from surprising my little sister, Caitlin in San Jose, CA. My sister’s husband, Ryan, and I conspired to give her a real treat for her birthday. She was really sad when she couldn’t make it to my 40th birthday party. And she has been lamenting the fact that it was taking too long to get her 3 yr. old daughter’s room big-ified (insert big girl furniture and pull out the baby furniture for when their new baby arrives.) One of the projects that was holding them up was painting an estate sale bed frame. Ryan had sanded it, primed it, and then ran into problems while painting it. It was killing me that I couldn’t be there to help them. With over 3,000 miles between us, it was difficult to help only over the phone.

But, with some frequent flier miles and a few secret phone conversations with Ryan, a plan was hatched. I was to fly out to California and give her a grand birthday surprise.

View over San Jose, CA from the Airplane

The ruse was perfectly planned and timed. Ryan told Caitlin that he was going to the hardware store to pick up some things to finish the bed painting project that had gone awry. Meanwhile, he was actually picking me up from the airport. Upon arriving home, he told her, “Honey, I got everything I need to finish painting our daughter’s bed.” And then I rounded the corner. The look on her face was PRICELESS! You can watch the short video of her reaction if you want.


Caitlin’s Surprise from Brittany aka Pretty Handy Girl on Vimeo.


Ryan and I got busy working on repainting the bed the next day. Here is what had stalled the project:

The paint Ryan had used was Ben by Benjamin Moore. And it was bubbling and gumming up. It wasn’t until I started stirring up the paint can and pulled out a big wad of gummy paint at the bottom that we realized he had a bum can of paint.

The date on the can was almost a year old. Now, Benjamin Moore assured me that it still should have been okay if it had been stored properly. But, for whatever reason, it just gummed up on us.

We returned it to the Ace Hardware near their home. And they kindly upgraded our paint to Benjamin Moore Regal which boasts a paint and primer in one can.

The paint was better, no bubbles or bumps, however, we were still having issues with the paint drying very fast. I have to tell you that I’ve painted in heat before. But, we were having a very hard time painting that day. I’d brush on the paint, and could only brush through it one or two more times before it started to dry! CRAZY! I couldn’t understand what was going on. So, I contacted a few experts:

1. Diagnosis by Benjamin Moore Paint expert (I called their 1-800 number).  The Benjamin Moore Regal line is good paint, but it dries much faster than the Impervo (that I am used to using.) The other possibility for the fast drying time is the weather conditions. This makes sense because it was 96F in San Jose, but it was dry. Any paint would have dried faster that day as we slaved away in the garage. In NC, when the temperature reaches above 90F, it is icky, sticky, and muggy humid! You are lucky if your paint dries after 24 hours!

2. Diagnosis by Kate from Centsational Girl (a CA native blogger and furniture painting expert)- I figured she’d be a good resource for advice on painting in the CA dry heat. So I sent her a quick message asking for her help. She replied that I should look into buying some Floetrol to extend the paint and dry it slower. Thanks Kate for your quick reply!

We ended up moving our painting operation inside and that helped a lot. We didn’t buy the Floetrol, but I figured it might help y’all in the dry environments to know about it.

One other issue I had with the Regal Select was that there were a few spots on the furniture that we had sanded a little more thoroughly (through the separate coat of primer that was applied), and the stain or underlying paint kept coming back through the paint. I have to say, I am not exactly thrilled with the Regal “Paint + primer” in one. I suggest that you save yourself the headache and prime with a primer before you paint. Don’t try to cut corners.

Here are my lessons learned on this project:

  1. Check your new paint can carefully, if when mixing it creates a gummy blob at the end of your mixer, return it immediately!
  2. Use high quality paint to save you headaches and hassle. If we had driven the few extra miles to the Benjamin Moore store to buy Impervo paint (instead of the Ace Hardware where they only carried only a few Benjamin Moore lines), we would have had better painting results.
  3. If you have to use paint you already have and are working in a dry region, add Floetrol to it or move indoors.
  4. Don’t try to eliminate steps with a paint + primer in one product. Spend the time to sand your object, prime it, and then paint at least 2 layers of paint.

The five days I was in CA flew by, but we did accomplish a lot! My little niece has a big girl bedroom now and they have moved her baby furniture into the new baby’s room.

My little niece seems to like her big girl bedroom! She loves to stand on her bed and peek out the window now.

And check out the dresser that Caitlin refinished and hand-painted herself! Reminds me of a Miss Mustard Seed original!

I think she’s pretty talented, don’t you?

We added the “You are my Sunshine” vinyl graphic to the mirror.

Caitlin also wanted a art on the wall. She picked out a graphic from Leen’s site.

And I hand-painted a similar graphic onto the wall. After doing the dandelion mural in my bedroom, I knew this one would be a snap.

We also repainted this bookcase to match the new color scheme.

Finally, Caitlin found this tutorial written by Jen Duncan for sewing roman shades. She sewed the roman shade herself with just a few questions for me. (It was quite comical because neither one of us are strong at math.) But, we finished, and in the morning we had JUST enough time to hang it before leaving for the airport.

That little blue chair in the room was the first piece of furniture I ever painted. I painted it for Caitlin while I was in college. A long, long time ago.


Caitlin already had the curtain panels. She chose the roman shade fabric to coordinate with them. I love it!

I had so much fun surprising and helping my sister. Plus, it was fun working in and around a girly room. There is so much testosterone flying around my house (1 man + 2 boys + 1 male dog) that pink is not a color usually seen.

What do you think? Do you like my nieces’s big girl room? Have you ever surprised someone you love? I wanna hear!