I have been looking for the perfect foyer light about three years now. In the search, I removed an ugly dated hanging light and replaced it with this:

Okay, it is a little better, but I still wasn’t in love! And that is the key to the right lighting, you have to LOVE it EVERYTIME you see it.

So, when I saw this Pottery Barn fixture, I knew I loved it!

Amanda at The Hand Me Down House made one that looks very similar. I always thought I might copy her design, until I found a hanging light that had similar lines at our local Habitat ReStore.

See that brass beauty in the front? Well, ignore the brass because I had plans to paint it. By the way, the iron chandelier went in my friend’s hallway.

And that cute little fixture hiding in shame at the back was turned into another Pottery Barn knockoff lantern.

But, on to the star of this post. My new foyer light! I disassembled the foyer light and set the glass globe aside. Then I attacked her with a one two punch using my new dynamic duo of spray paints.

Automotive primer first and then two coats of Rustoleum Oil Rubbed Bronze!

After putting the glass globe back on the fixure, I installed the light fixture (you can follow the same instructions as I showed in this post.)


Check out that beautiful new/old light fixture! I know it isn’t exactly like Pottery Barn’s but I love it none-the-less. How about you?

I’ve seen several talented furniture rescuers (Miss Mustard Seed comes to mind) using Valspar Asphaltum glaze on their shabby chic creations.

Valspar Asphaltum Antiquing Glaze

I have to tell you right now, I had not been very successful with this glaze. Every time I tried to use it, I ended up wiping it all off and ditching my efforts. However, I finally figured out the technique for using this glaze (on this project). The trick can be summed up with “less is more”!

I poured out a quarter size dollop of the Valspar Asphaltum glaze.

Then gently dab your paint brush into it. Dab almost all of the glaze off onto a rag.

Next, lightly brush the glaze over your surface. The picture below shows using TOO MUCH!

Too Much Glaze

This is the amount you should see when you drag your paintbrush over the surface. Very dry brush and hardly any glaze on it:

Just Right

If the results still look too dark to you, go ahead and wipe the glaze off with a rag.

You can also drag your brush sideways. This works especially well on furniture edges.

Just Right, Sideways Dragging

Here are the results of using the asphaltum glaze on this dresser.

Now that you’ve seen the technique, what do you want to try this out on?

The other day I shared with you my french provincial dresser makeover. I dubbed her the Diva Dresser because of all the changes she pushed me to make. But, in the end I really liked what she wanted.

One of the tutorials that I promised you was how to add the decorative stencil on the top of the dresser.

I used the wrapping paper decoupaged on the side to help me create the design.


I scanned a section of the leftover wrapping paper and enlarged the scan 500% of the original size.

I opened the scan in Photoshop (but you could probably use any editing software.)

And cropped in on one quarter of the medallion.

In Photoshop, under Mode, I chose Image Size.


Then I changed the size of my image to the size that I wanted the stencil to be. In my case, I wanted it to be about 6 inches x 6 inches.
Then I printed out the design onto paper and added a few flourishes to the edges.
Using a soft pencil (#2 will work fine), I rubbed the edge of the pencil on the back of my printout until all of the back side of my stencil was covered.
 
Then I cut around my stencil and laid it onto the top of the dresser. Pressing firmly, I traced around all the edges of my design.
When you remove the printout, you should be left with your design in pencil transferred to the surface. (I use this technique all the time to transfer type and other designs onto an object.)

I chose to work with a sharpie pen and traced the design.

Then filled in my design with the marker.

Because I knew I was going to glaze over my stencil, I didn’t mind that you could see the pen marks. If I wasn’t going to glaze over my design, I probably would have use flat black acrylic paint instead.

Then I proceeded to glaze many colors of blue/gray over my dresser.

Until I was left with this!

I put one stencil in each back corner. And love how easy it was to do. And of course how beautiful it looks!

Do you have anything you want to add a sharpie stencil too? Maybe something you can monogram? I encourage you to try it!

I am in love with those adorable french provincial dressers. The flourishy handles are what really get my heart pounding.When I saw this dresser on Craig’s List for $35 dollars, I pounced!

 Disclaimer: I stole this picture from the previous owner’s Craig’s List Ad.

Oooo baby, don’t you just love that faux gold outlined accents and off white laminate top. Yes, I said laminate. But I wasn’t afraid of it. For $35 who cares if it gets messed up. If you never take the risk, you’ll never learn anything new, right?!

The drawers were still in good shape, but a little loose around the joints, so I squirted my new favorite Gorilla Glue into the joints and clamped lassoed them up!

Then I used newspaper to protect any of the areas I didn’t want sprayed.

After sanding all the surfaces to rough them up, I put a coat of primer on everything. Loving that crisp clean white, but the dresser told me to “Keep Calm and Carry On.”  So, I cooperated and continued on to another color.

Next, I sprayed Rustoleum Heirloom White and distressed the surface with a wood stain.

The drawer pulls got their own treatment of automotive primer followed by Oil Rubbed Bronze paint. Thank goodness they were happy with their new color because – I’m telling you – that dresser was certainly acting like a diva! She was still demanding a new color.

I have seen many Nantucket Fog makeovers and decided to make a run to Ace Hardware to pick up a small sample of that blue gray color. And I grabbed a can of artistic glaze.

After two coats of the Nantucket Fog glaze, that little dresser still wanted something else. Sheesh! So I pulled out some leftover blue paint from my dormer window shutters.

Finally, she shut up! It’s a good thing too, because I LOVE this color. I love it so much that I hauled my tired hiney back over to Ace to match the color just for you.

Does anyone else get starry eyed and entranced by all these fabulous colors?

The closest match is Buxom Blue from Benjamin Moore. Not too far off from Nantucket Fog, but you know those divas they want what they want!

Now, all important divas need something to wear that gets them noticed. Thus, I decoupaged some wrapping paper on the side (tutorial is here.)

And then because I liked the pattern so much, I blew it up and added it to two corners of the dresser top (tutorial for adding a sharpie stencil.)

I added some beachy blue glaze over the wrapping paper and the top graphic.

And I have to tell you that – halleluiah – I finally figured out the proper technique when using the valspar glazes (the tutorial is here.)

I finished up with three coats of a semi-gloss polyurethane.

And here is that stunningly beautiful diva of a dresser. Transformed from Cinderella to the Belle of the ball!

Isn’t it amazing what a little oil rubbed bronze can do!
 
 Hard to believe this was wrapping paper in a previous life!
 Peek-a-boo I see a cute stencil.

Now, I have to convince Pretty Handsome Guy that our master bedroom furniture doesn’t have to be all matchy matchy!

 Because I LOVE our Pottery Barn Sleigh Bed. 
But not the matching dresser.
 I love the new-old dresser! What do you think?

Any helpful hints on using Jedi mind tricks on unsuspecting Pretty Handsome Guy?

Update: Thank you to my readers that pointed out that I installed the handles upside down. They have been fixed now ;-).

Today I have the skinny on paintbrushes, they all look alike, but they don’t behave alike! Pretty Handsome Guy and I have painted our fair share of rooms, especially dated brown trim moulding. One thing we learned early on is that buying a good brush was key to making a difficult job more manageable. When we first moved in and were cheap didn’t know any better, we bought the least expensive store brand brush we could find. What a mistake! Those brushes barely held up to one room of trim. The bristles frayed and the paint brushes lost their chisel shape.
Case in point:

(That being said, the same thing can happen to a good quality paint brush if you don’t clean and care for it properly. More on that later.)

But, if you spend a little more to buy a good quality brush and take good care of it, you can use that brush for years!!!

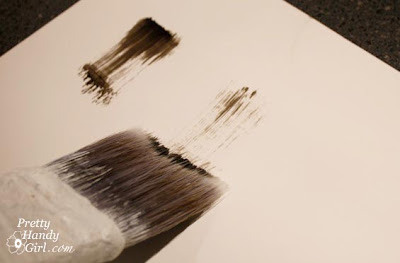
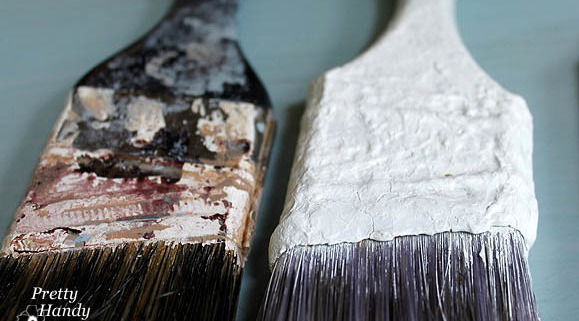
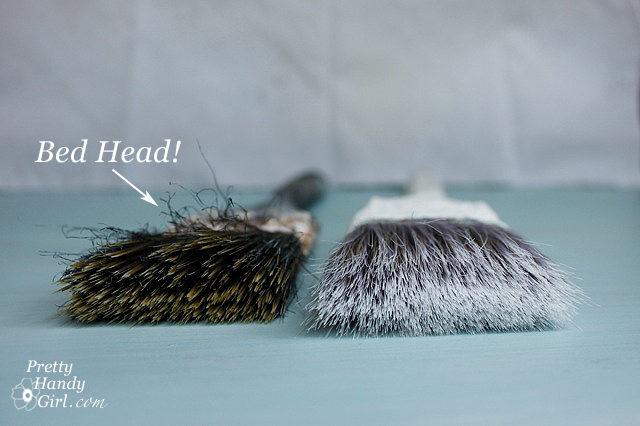
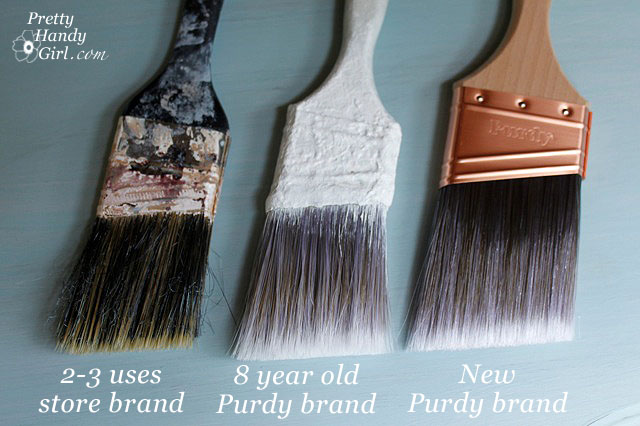
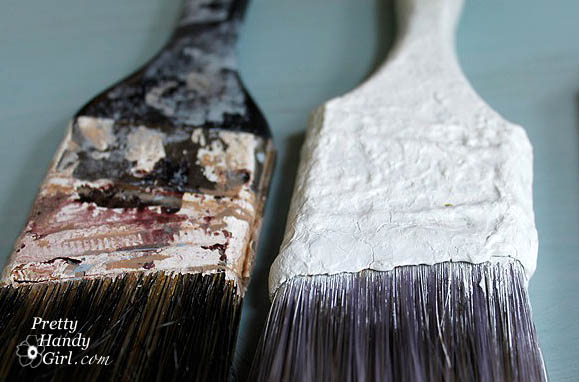
Above you can see the cheap store brand used maybe 2-3 times.
A brush we have owned and used for 8 years!
And a brand new never used Purdy brush.
(I encourage you to click on the picture to see it enlarged!)


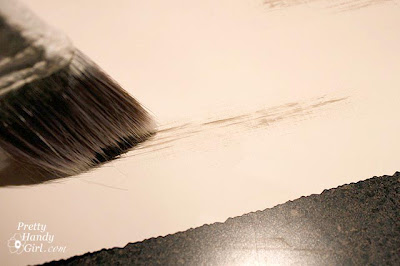
 Close up of the layers of paint on that 8 yr. old Purdy!

Recently Purdy contacted me and asked if I wanted to try one of their brushes  and maybe blog about it. I said sure, but I felt a little guilty. Why? (Whispering: Well, because we already have an arsenal of Purdy brushes in our painting supplies. When it comes to brushes, that is all we buy.)  Okay, this is where I need to tell you that –  yes, Purdy sent my a free brush and 5-in-1 painting tool to try out. But, did they pay me? No. And, did they ask me to write a positive review? No. So, I am being totally honest with you when I say that I do like their brushes. That being said, I have not tried some other high quality brushes. The only thing I do wish was different about Purdy brushes, is that they would develop an ergonomic handle for their brushes. After an hour of painting trim my hand always cramps up.

I haven’t bought any ergo handle type brushes, but I have seen this brush from Proform Technologies:

I might just have to try one of these next time.

Okay, so I sold you on buying a good brush, and you were shocked by the price tag. Now I want to show how to care for that brush so it will behave for you (and you won’t have to replace it anytime soon.)

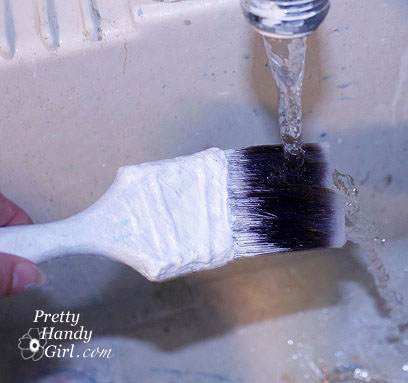
Be sure to clean your brush before the paint can dry on your brush. If you can’t wash it immediately, go ahead and leave your brush in a jar of water (or mineral spirits or turpentine for oil based stains or paint).

When you are ready, here is how to properly wash your paint brush:

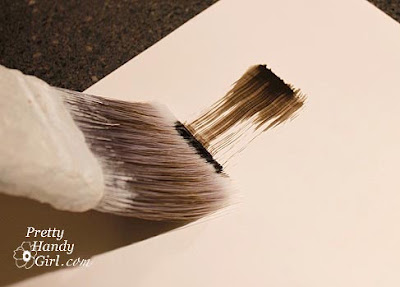
1. Rinse out as much paint as you possibly can.
 
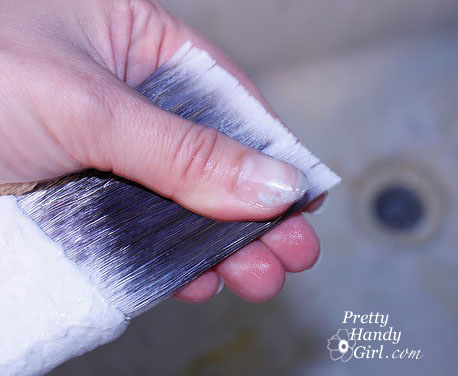
2. Bend the bristles against your palm or the bottom of your sink.
Repeat on the opposite side.
3. Gently separate the brush to expose the core
and rinse any paint out of the inside of the brush.
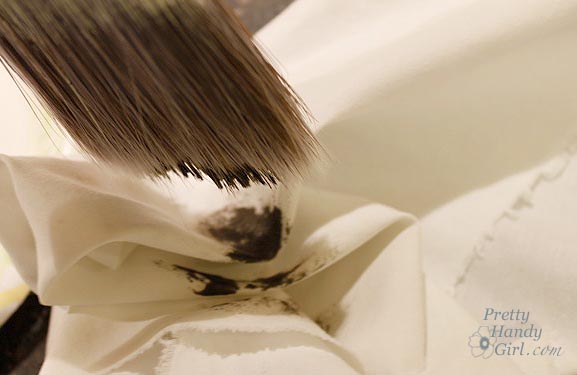
4. Squirt some dish or hand soap in your palm.
Working in a circular motion, mix the soap in your hand with your brush
until a big lather forms.


5. Then rinse all the soap out bending the bristles if needed.
6.Repeat steps 2-5 until the water runs clear. 
7.Squeeze all the paint out of your brush using your fingers like a squeegee.
Then hang your brush upside down to dry.
I used large paper clips to make these hooks that hang over the sink.

If you are using an oil based paint you will want to substitute mineral spirits or turpentine for the soap and water. I also try to keep the brushes I use for oil paint or stains separate from my latex brushes.

Happy painting for years to come!