Make Your Own Light Fixture

Make Your Own Light Fixture

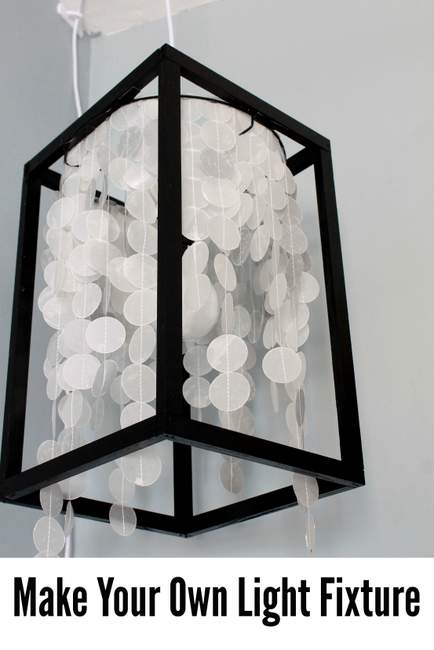
Hello, it’s Jessica here from Decor Adventures. This month I have what came out to be one of my favorite projects to date. It’s how to make your own light fixture using just wood trim and wax paper, and I promise it will look great in any room in your house.

Everyone loves Pinterest for inspiration and ideas, and I’m no exception. I was looking through my pins the other day and saw this one of a stunning (and I’m sure expensive) light fixture. I instantly thought how easy it would be to DIY that light and set out getting my supplies ready.

Materials:
(contains affiliate links)

For Wood Frame

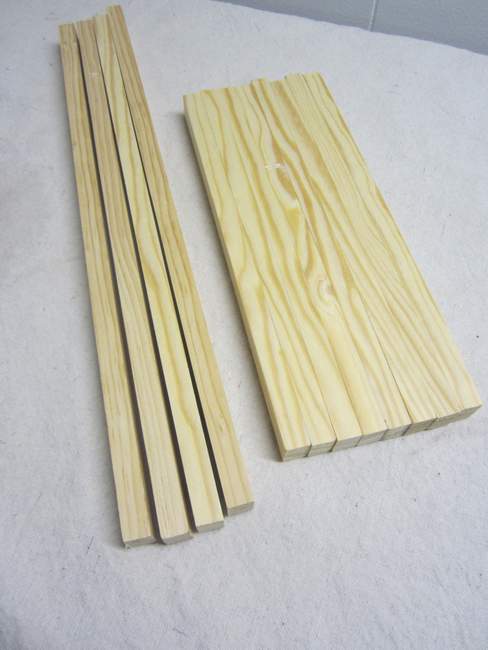
  • 3/4″ x 1/2″ pine wood
  • Hand saw or Miter saw (or have it cut at the home improvement store)
  • 9166 CORNER CLAMP
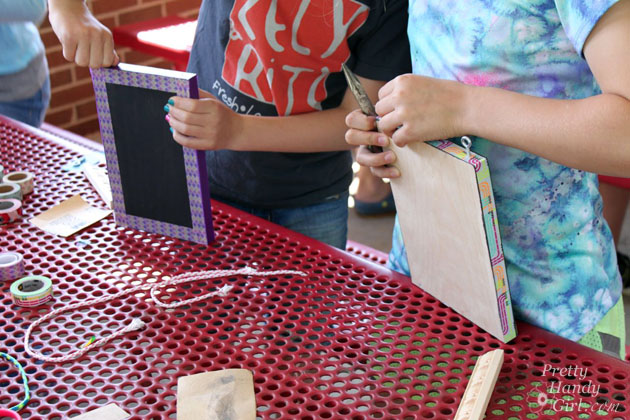
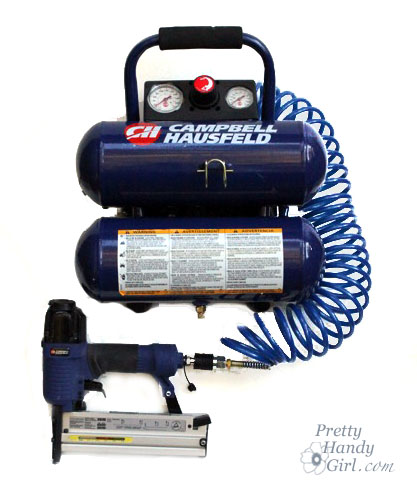
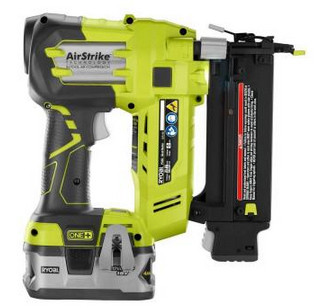
  • Nail gun and air compressor and nails
  • Spray paint
  • Old lamp shade or washer top of wire lamp shade frame
  • Hot glue gun and glue sticks
  • Gorilla tape
  • Lampshade Pendant Kit

For Capiz Shells

  • Wax paper
  • Iron
  • Circle Punch
  • Sewing machine and thread
  • Scissors

Instructions

For this tutorial, you’ll learn how to make and attach the black wood frame to a light pendant kit after you make and put on the faux (wax paper) capiz shells. For a step-by-step of how to make the shells, see my post on how to make a wax paper capiz shell chandelier and follow the instructions on how to iron together the wax paper and sew them together.

How to make the wood “frame” for your light fixture:

Cut your 3/4″ pine trim into 12 pieces. Eight of them will be the same (shorter) length and 4 of them will be the same (longer) length. My pieces are 9 1/2″ and 14 1/2″. Make sure your 8 smaller pieces are the exact same length and same goes for your longer ones. If they aren’t, your 3-D frame will not fit together perfectly.

Make Your Own Light Fixture

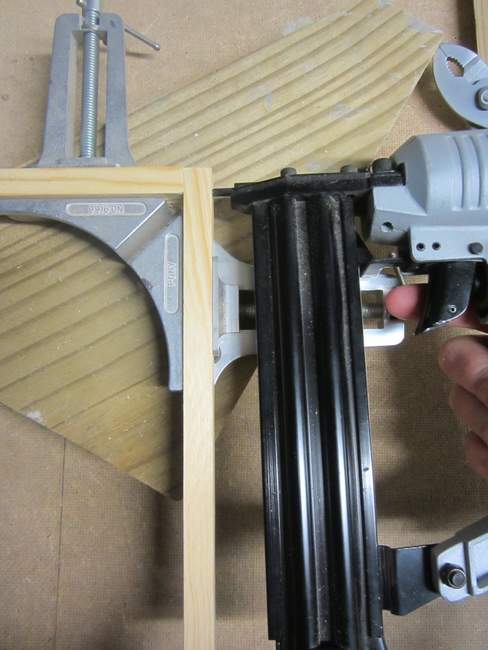
To assemble your boxes perfect for easier nailing, use a miter corner clamp. These are available at the home improvement store for about $25 and can be used for a lot of different projects.  Insert two of your smaller pieces into each side of the clamp, making sure the ends line up.

Using a Miter Corner Clamp

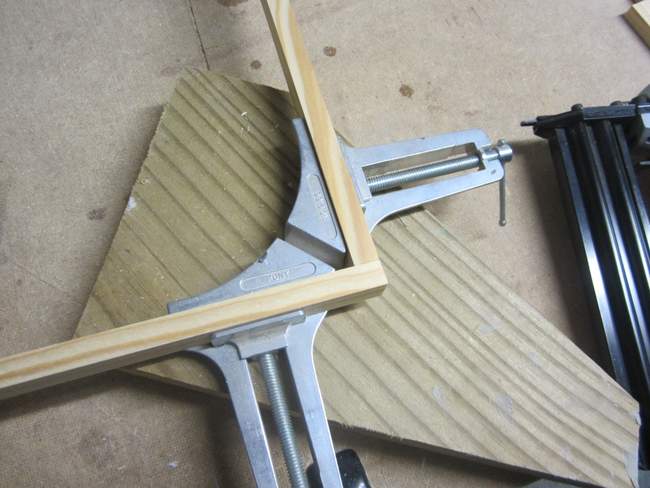
Using your nail gun, nail into the wood to secure a corner.

Make Your Own Light Fixture Read more

PB Knock Off Monogrammed Bulletin Board

edited-0510

Hey everyone!  If you remember, last month, I shared with you how I updated my boys’ desk in our den with a wood plank desktop.  The den is just about ready for the big reveal and now I’m just working on adding little details.  This includes these fun personalized bulletin boards I made for each of my boys.  I was searching for desk organization ideas one day and saw these personalized pinboards on Pottery Barn Kids.  I knew they would be perfect for my boys and that I could knock them off pretty easily.  I made two of these pinboards, but my supply list will be for one pinboard.

Materials:

  • 12″ x 12″ wrapped canvas (mine was 3/4″ thick)
  • 12″ adhesive backed cork sheet
  • Adhesive vinyl
  • Transfer paper
  • Die-cutting machine
  • Acrylic aint
  • 2 – 1″ foam paintbrushes
  • 1″ x 2″ x 6′ pine board
  • Wood stain
  • Sander w/ 220 grit sandpaper
  • Miter saw
  • Brad nailer
  • 1″ Brad nails
  • 24″ Bar clamps
  • Hot glue gun

Instructions:

Start by designing your stencil.  To make it look just like the PB Kids version, use the Varsity font.  (FYI, the letters are all capitalized, but when you use the shift key or CAPS lock, it will add the outline.)

Knockoff Personalized Pinboard

Cut your design out on the 12 x 12″ sheet of vinyl and weed the negative pieces out.  Remember that this is a stencil, so make sure to weed out the correct parts of your design.  Place your transfer paper over the design and use a scraping tool or a credit card to get out any air bubbles.

edited-7687

Peel the backing off of your vinyl and very carefully center it onto your cork sheet.  Use the scraping tool or credit card again to firmly adhere the vinyl to the cork sheet.  Carefully peel the transfer paper off. Stencil your design using the acrylic paint and foam brush. Read more

Sport Gear Storage in a Small Space | Pretty Handy Girl

My home is protected by ninjas! Well, actually Tae Kwon Do athletes, but they are ninjas in training. So, don’t even think about breaking into our house or they will open up a can of whoop ass on you! 😉

Unfortunately, where my boys are plentiful in kicking and punching skills they lack in the picking up your stuff department. Which means that the bottom of the stairway to our bonus room is usually the dumping ground for their gear bags, clothing and gear.

Sport Gear Storage Shelves in a Small Space | Pretty Handy Girl

I knew I could “up” the amount of storage we had in this small unused space by going vertical. I designed and created Sports Gear Storage Shelves in the small space at the base of our bonus room stairs. Adding mesh siding gives the storage system a locker vibe and allowed for better air flow around stinky sports gear.

Sport Gear Storage Shelves in a Small Space | Pretty Handy Girl

Want to know how to build your own Sport Gear Storage Shelves? Hang out for a while and I’ll walk you through the step-by-step tutorial.

Materials:

Cut List:

  • 5 – 15″ x 24″ plywood (shelves)*
  • 5 – 1 x 3 x 15″ (shelf cleats)
  • 5 – 1 x 3 x 23″ (shelf cleats)
  • 2 – 1 x 3 x 88″ (sides of support frame)
  • 2 – 1 x 3 x 4.5″ (top & bottom of support frame)
  • 1 – 5.5″ x 84″ piece of wire mesh
  • Rip edge banding 1/4″ thickness from one 1 x 3″ board

* You should be able to get a sixth shelf cut from your plywood if you wish to use it for a base.

Instructions:

Before beginning to build, sketch out your design with painter’s tape. Take note of the height of any baskets or gear bags you will store on the shelves. This should give you the ability to visualize the storage shelves and make any alterations to your design before you build. Once you are happy with the layout, write down your shelf heights.

Sport Gear Storage Shelves in a Small Space | Pretty Handy Girl

You may wish to clad the walls in wood planks like I did before you build the shelving. If you decide to add the planks, here’s the tutorial for planking your walls.

Sport Gear Storage Shelves in a Small Space | Pretty Handy Girl

Measure and mark the heights of your shelves.

Sport Gear Storage Shelves in a Small Space | Pretty Handy Girl

Using a level, draw a pencil line where the shelves will rest.

Sport Gear Storage Shelves in a Small Space | Pretty Handy Girl

Secure the 1×3″ cleats below the pencil line using 2 1/2″ wood screws into studs.

Sport Gear Storage Shelves in a Small Space | Pretty Handy Girl

Continue securing shelf cleats to the wall with screws into available studs.

Sport Gear Storage Shelves in a Small Space | Pretty Handy Girl

Paint or stain the cleats to match the wall color.

Sport Gear Storage Shelves in a Small Space | Pretty Handy Girl

Building Curved Shelves with Edge Banding: Read more

DIY Chalkboard Memo Board (4th grade project) | Pretty Handy Girl

DIY Chalkboard Memo Board (4th grade project) | Pretty Handy Girl

Before the end of the school year a REALLY GOOD friend of mine asked if I would give a talk in her daughter’s class about what I do for a living. I hemmed and hawed because I rarely have the free time. But, the main reason I was hesitant was because I didn’t know how to talk to 4th graders about what I do. Saying I’m a blogger is something that is hard for me to vocalize. “I write a blog” sounds simple and easy. But, in actuality, I do so many other things to make this blog a reality. Just a few of my job descriptions are: writer, photographer, builder, crafter, teacher, photo editor, business woman, manager, social media coordinator, graphic designer, web designer and all around handy girl! How could I explain all of that to the students?

Suddenly, an idea hit me! I would waltz into that classroom and use my platform to break down the stereotypes about women and handy people within 30 minutes (or less!) Then I’d empower the 4th grade students by letting them build their own chalkboard memo board AND use a power tool! Lofty goals, but I felt sure I could do it. Little did I know that the students wouldn’t be the only one empowered.

The quiz:

I started out by talking to the kids about what a handy person is. They shared terms that fit the definition of a handy person: fixes things, builder, carpenter, plumber, woodworker, and home improvement specialist. Then I showed them a slide presentation and gave the kids a quiz asking them to tell me which of these people are handy:

DIY Chalkboard Memo Board (4th grade project) | Pretty Handy Girl

I showed them one picture at a time and as expected, they got all of the answers wrong.

The answers: Read more

finish-nailer-comparison

A finish nailer is a great tool to have in your workshop.  It’s great for small projects, installing moulding, wall planking and more. After using both types of finish nailers for many projects, I wanted to break down the pros and cons of each.
Compressor_finish_nailer_combo_kitI was able to score this Campbell-Hausfeld nailer and compressor combo around Father’s Day at Lowe’s for $69! (Normal MSRP is $99.) I’ve used the compressor-powered nailer for many years on an assortment of DIY projects (like my Art & Craft Studio scrap wood wall.)  I haven’t had any problems with it. It’s reliable, lightweight and can fire a variety of length finish nails and U-staples. For the value, you can’t go wrong. The cons of the Campbell Hausfeld are mostly related to the compressor. It is very loud when the air tank is recharging. It’s a little bulky to store and haul around. You are limited to the length of your air hose and a power source. And you must empty the tank and maintain it periodically.

PostBreakblue

Ryobi-nail-strike

In all the ways that the Campbell-Hausfeld fails, the Ryobi Air Strike excels. It doesn’t take up as much room to store. No compressor needed because it is essentially built into the tool. As long as the battery is charged you are ready to fire nails on a moment’s notice. The light helps illuminate in dark working areas. You aren’t tethered to an air hose or compressor. This allows you the freedom to wander anywhere with the nail gun. And it is quiet (with the exception of the bang when firing the nail.)

The downsides are it doesn’t shoot U-staples. The gun itself is heavier to hold because of the battery and size of the gun. If you lose charge in the battery you have to wait a while for it to charge. Finally, the price is slightly higher than the MSRP of the Campbell-Hausfeld at $129.

Update: I’ve had a few occasions where my Ryobi Air Strike has quit firing. Usually I can get it working again by unlatching the front of the gun and checking it for jams or reloading with new nails. Recently at a DIY conference, I learned that I’m not the only person who has had this problem. So far the nail gun still works, hopefully it will continue to do so.

2nd Update: After another winter of the Ryobi Air Strike refusing to fire after every other nail, I’ve finally decided to pitch it. I’m in the process of testing a Porter-Cable 18 gauge 20 volt brad nailer and a DeWalt 16 gauge Angled Finish Nailer.

I hope this comparison helps you select your own finish nail gun.

PHGFancySign


Want to learn how to use a finish nailer? Check out my tool tutorial videos and more!


Pin for later!