Saving Etta: Kitchen Update & Installing the Range Hood

This kitchen was a big deal for me. It was one of those projects I knew would make or break this house. It was also the first time I’ve taken the reins on kitchen design and installed cabinets. As the project was in the home stretch, I spent many hours and late nights working on the kitchen. Today I’m thrilled to give you another update on the kitchen and show you the installation of the range hood (complete with all the mishaps involved). Speaking of mishaps, I have some tips to help you avoid a potentially dangerous and costly mistake when selecting a range hood.

Before we begin, I’d like to say thank you to all my wonderful sponsors on the Saving Etta project. I could not have saved Etta without their help. When you are looking for products that last and perform well, you can rest assured that I hand-selected these sponsors to represent the Saving Etta project.

Saving Etta sponsors

Where It Started:

If you’ve been along for the entire Saving Etta journey, you may remember the kitchen in the house when I bought it. Then again, you might be like me and need a little memory refresher once in a while. Here’s the kitchen before:

kitchen with cabinets

Saving Etta - The Story of Saving a House Built in 1900 | Pretty Handy Girl

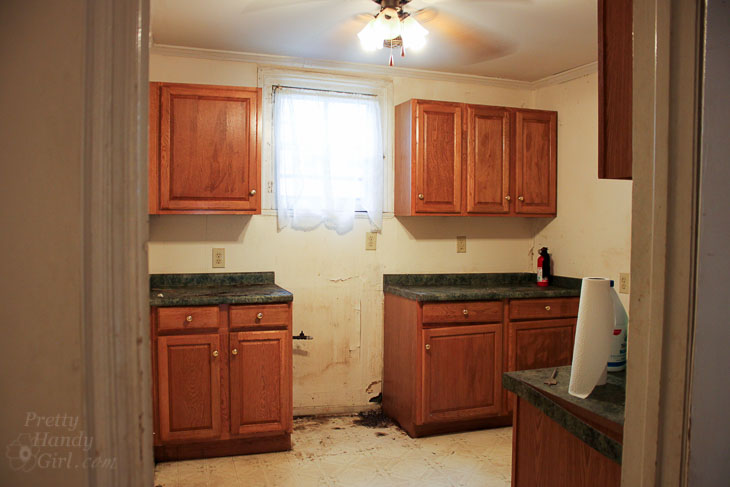
There were only a few base cabinets and five upper cabinets. Lucky thing because it made demolition of the kitchen easier. The first week after purchasing the property, I hauled all the cabinets to the dumpster and started peeling away the layers in the kitchen. It was a lot of work, but so much fun seeing through the decades and discovering old bead board beneath.

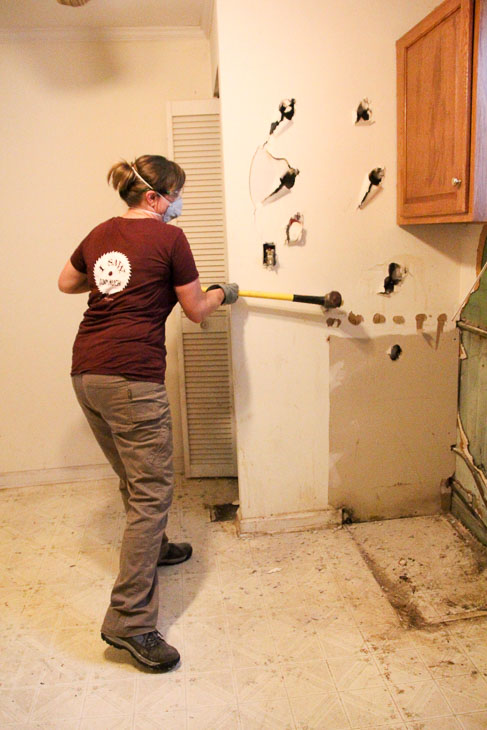
The water heater was walled into a little closet in the corner of the kitchen. It was a blast taking a sledge hammer to the wall. Who needs therapy when you can release pent up frustration through demolition?

Unfortunately it wasn’t enjoyable getting the water heater out. My plumber had a tough time removing the water heater from the house!

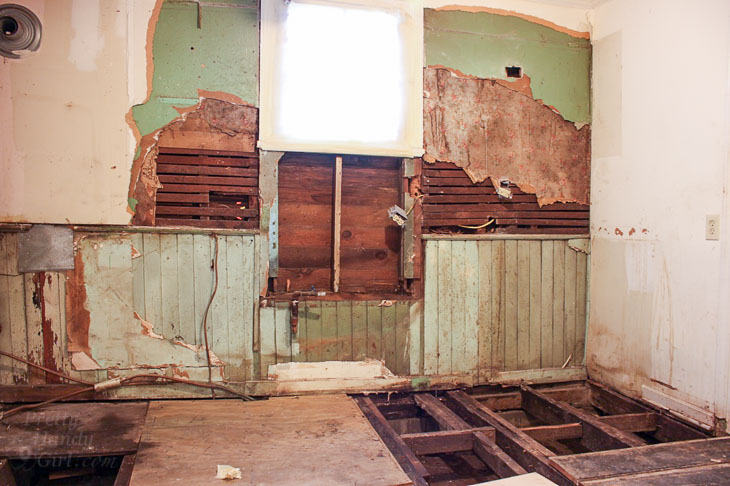
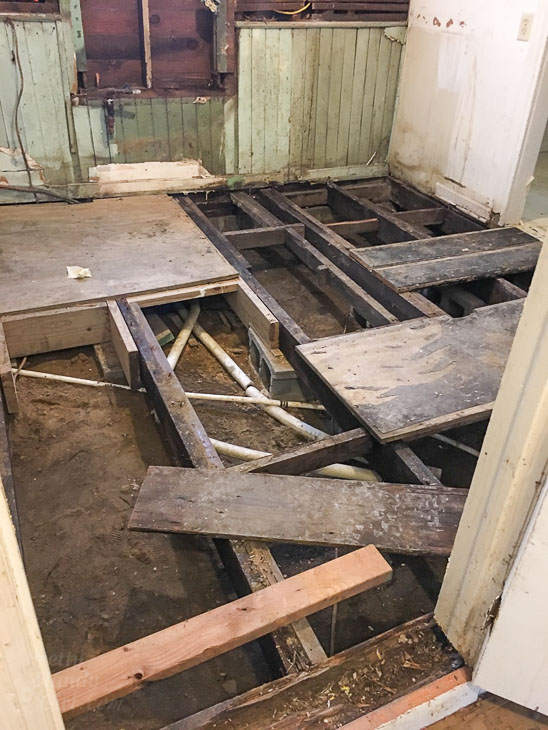
You might remember asbestos tiles were discovered on the floor and they had to be removed. What was left was a maze of floor joists and pipes where the floor used to be.

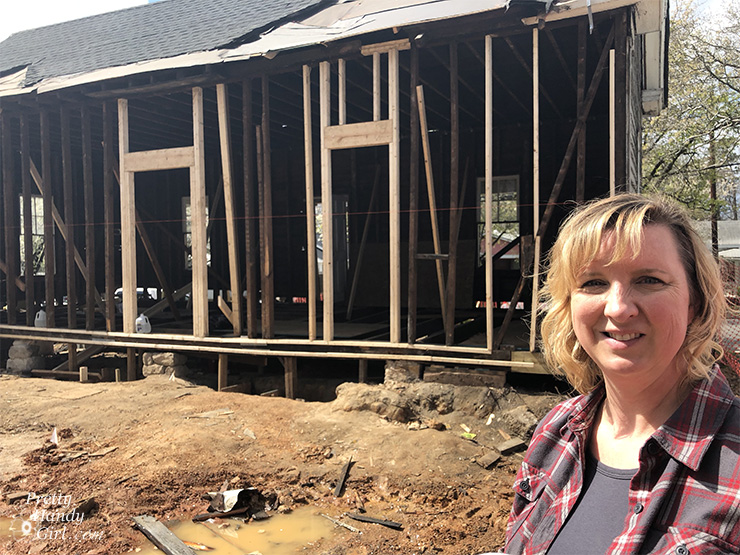
I originally hoped to save this room from demolition because it was part of the 1900 structure, but after assessing the lack of crawlspace and a severed structural beam with my architect, we decided it had to be removed.

The picture below is shortly after demolition. The doorway on the right is where the original kitchen entrance was. But, it had been walled off a long time ago to provide space for the refrigerator.

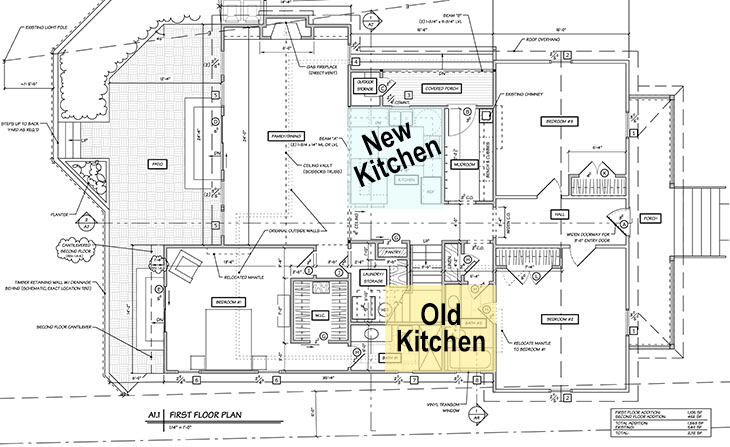
The new kitchen was moved to the other side of the house, as shown in the plans below:

Saving Etta First Floor Blueprints - Kitchen Location

Obviously, after demo, a lot of progress happened to get us to the new kitchen installation. If you want to read the previous updates, here’s what you missed:

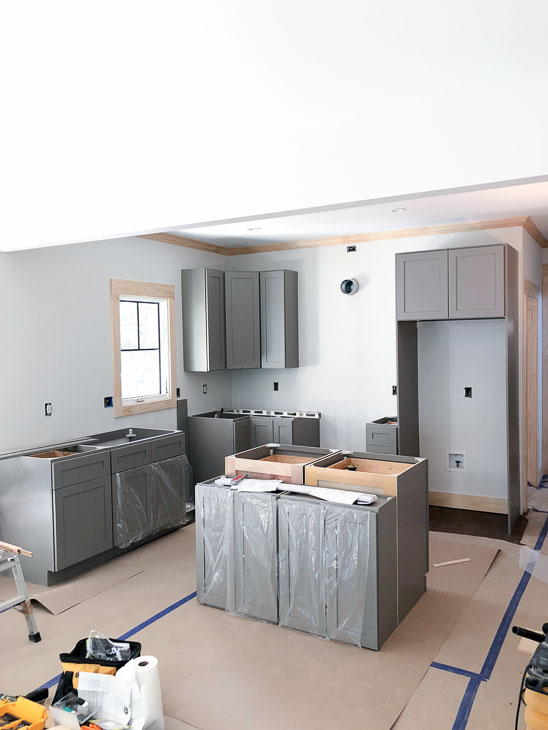
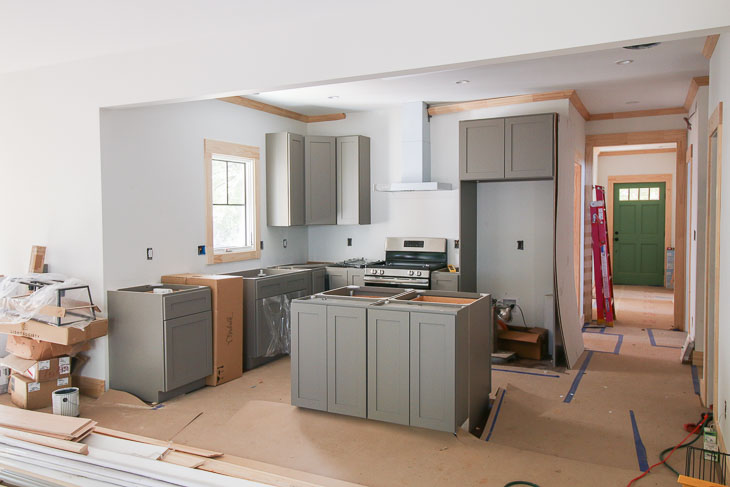
Now that you’re up to speed, this is where we left off (right after installing the kitchen cabinets.)

(I’ve included affiliate links for your convenience. I earn a small percentage from a purchase using these links. There is no additional cost to you. You can read more about affiliate links here.)

To protect the wood floors, we laid Surface Shield Builder Boards on the floor. They worked perfectly to protect the floor from spills, dropped tools, and lots of tracked in mud and dirt. It’s amazing how much dirt got tracked into the house. But, when the ground is scraped clean of any landscaping, things are bound to get messy. I eventually purchased two dirt trapper rubber mats and put them by each entrance. This helped limit much of the dirt from coming inside.

Selecting the Range Hood:

Choosing a range hood for the kitchen proved to be difficult because I liked so many of the Broan options. (Broan is one of the Saving Etta sponsors and provided the range hood for this project.)

The first hood I fell for was the Broan RM519004 Stainless Steel range hood. It’s sleek and modern, with a beautiful curved shape.

BROAN RM519004 Stainless Steel range hood

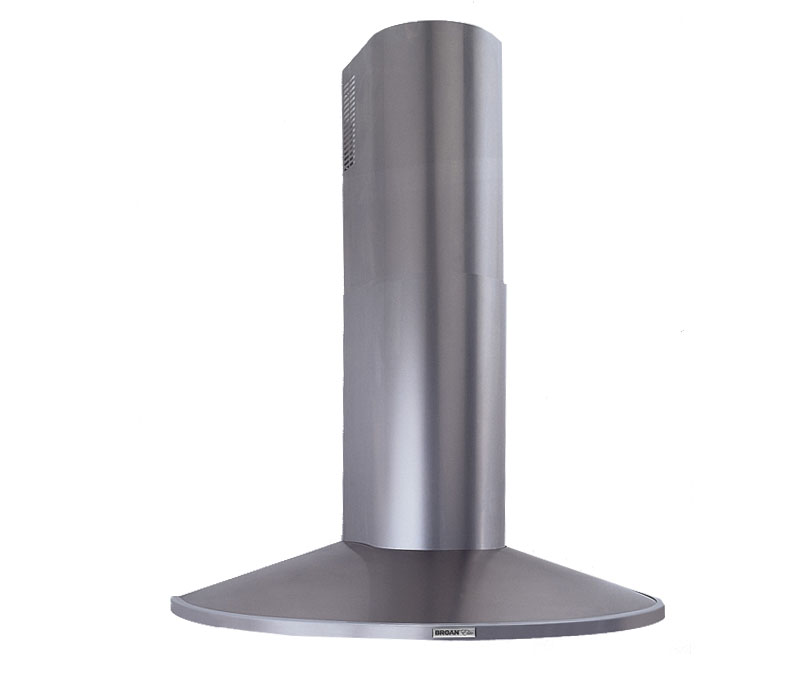
The style definitely appealed to me because it was different, but the width of the hood is 36″. I was concerned it might look too big in a small kitchen. Ultimately, I think the hood would have worked, but I had already moved on. (I will keep this range hood in mind for future kitchen renovations, because I still think it looks kind of sexy.)

Next I stumbled upon the the B5630SS Broan range hood. It had some curves, but more of a box shape. And the glass hood added some elegance.

Bo

Ultimately I decided against this range hood because I worried the glass would show dust or grease between cleanings. In hindsight, I’m glad I didn’t choose this range hood, because I would have been hit with an unexpected expense. Right before installing the new range hood, my mechanical contractor asked how many CFMs the range hood pulled. “CF-what?,” I said.

What is CFM and Do You Need Make Up Air for Your Range Hood?

CFM is short for cubic feet per minute and it describes the amount of air flow an exhaust fan can pull. Believe it or not, this is one of the most important specifications (besides dimensions) you need to know when considering a range hood. One would think the higher the CFM the better, because it sucks up more cooking odors and steam, right? Not necessarily. Typically 200-300 CFM is adequate for a range hood in a residential kitchen. If you have a commercial stove, or the range hood is mounted further away from the stove top, you may need something stronger. If you need a range hood with a stronger fan (over 400 CFM), you’re required to install a make up air device with an automatic damper. This will add to your expense and requires a licensed HVAC contractor to install it.

For reference, this is the code for exhaust hoods in residential construction:

International Residential Code: M1503.4: “Exhaust hood systems capable of exhausting in excess of 400 cfm shall be provided with makeup air at a rate approximately equal to the exhaust air rate. Such makeup air systems shall be equipped with a means of closure and shall be automatically controlled to start and operate simultaneously with the exhaust system.”

What happens if I don’t add make up air for my range hood?

Stronger exhaust fans can depressurize a house. Resulting in doors slamming shut, air pulled from any cracks or openings in the building envelope, or noise. Some unsuspecting homeowners have turned on their exhaust fan to find it pulls ashes from their chimney. If you don’t have make up air it could create a dangerous back draft situation in the home. This is why it’s important to know what the CFM is for the range hood you want to install. (This article does a good job of explaining the issues with stronger range hoods.)

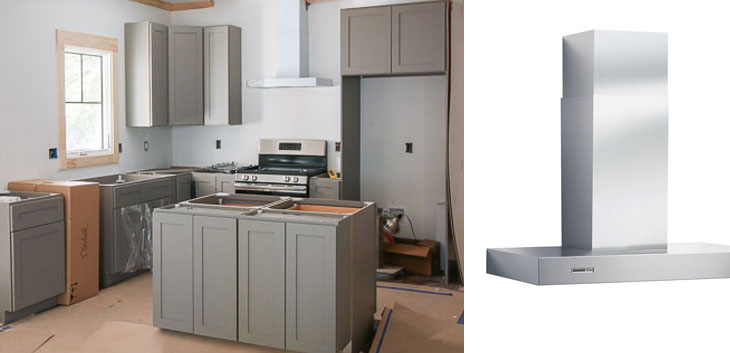
Luckily the range hood I chose for the Saving Etta kitchen was under the 400 CFM limit. This is the beauty I ordered, a sleek Broan modern stainless steel hood with a square chimney.

BROAN RM533004 Range Hood

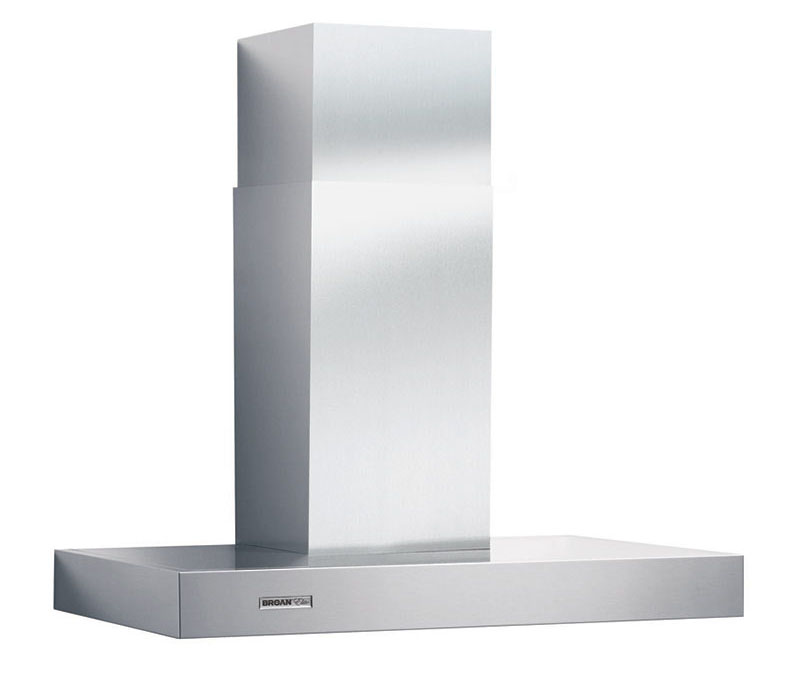
No glass to clean and the width is 30″. Plus, the CFM is 370, sufficiently low enough to not need make up air, but strong enough to exhaust cooking steam and odors. This made me happy, especially after all the make up air vents we had to install in the laundry room.)

Installing the Range Hood:

As with many installs at the house, I had to pick and choose which ones to assign to my subcontractors. The range hood was already slated to be installed by my mechanical contractors, so I let them take over installation. I was busy working on another project, but when I came into the kitchen I knew I had to step in and “help.” As before, things were not going smoothly. The first indication that the install may get screwed up was when I found the instructions folded up in the bottom of the product box. I pulled them out and quickly scanned the directions. The second clue was when I found a bracket in the box as well. The guys were trying to figure out how to attach the chimney to the wall (had I not arrived when I did, I’m sure they would have finagled some unattractive solution.) Without an invitation, I took over the role of supervisor and pointed out how the chimney needed to attach to the wall via the bracket in the box. I’m not sure if the guys were relieved or annoyed, but they put up with my directions (thank goodness!)

About Working with Contractors:

Before we go on, I want to point out the fact that these were the so called “professionals”. But, obviously they didn’t know how to install this particular range hood. I chalk this up to lack of experience with this model, not necessarily lack of experience as a mechanical contractor. BUT, they should have been reading the instructions. I want to leave you with this important message:

When you hire a professional, make sure you read the instructions for how the project should be completed. Do your homework and research online so you understand the steps in the project. Speak up if you see something amiss. Just because someone is a professional doesn’t mean they won’t make mistakes.

At the end of the day, the contractors go home. If something is installed incorrectly you’ll be the one who has to live with it. And, unless you are working with stellar contractors, it might be difficult to get them back to your house. (Then again, stellar contractors are oftentimes extremely busy. You’ll need to wait to get back on their schedule.)

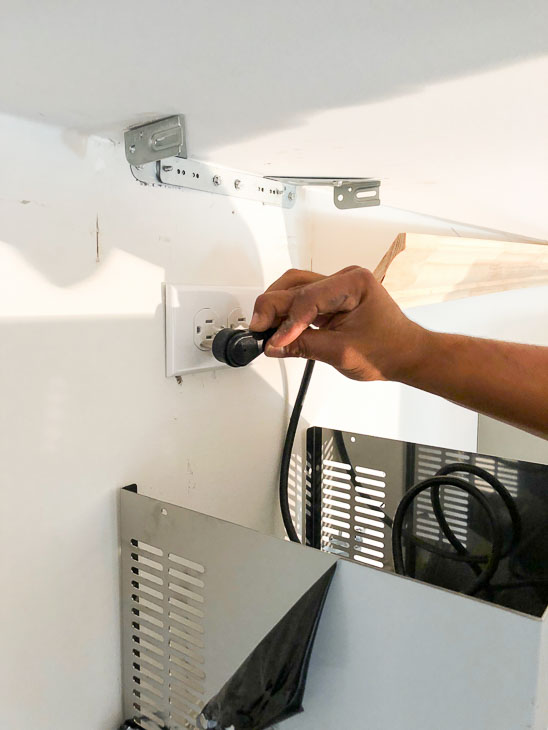
We worked together to hang the range hood chimney. The guys had already hooked up the ductwork and painted mastic over the seams (also required by code). The fan motor was plugged into the outlet above the duct.

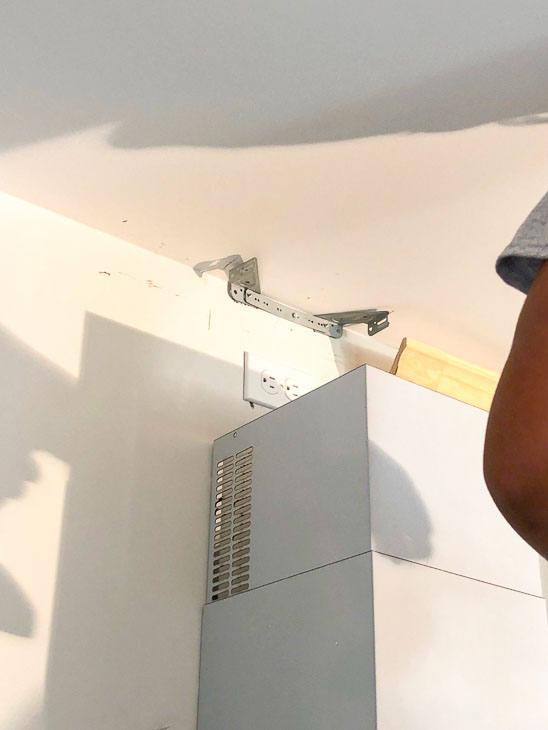
The hanging bracket was attached to the wall, and then the upper chimney was slid into place over the bracket. Securing the chimney to the bracket was a little tricky because the hole on the chimney has to line up with holes on the bracket. Plus, it was difficult maneuvering a drill against the ceiling. Ultimately, the chimney and range hood were installed. The power was turned on to the hood and…NOTHING! We scratched our heads until I climbed back onto a step ladder and peeked into the chimney. See the problem?

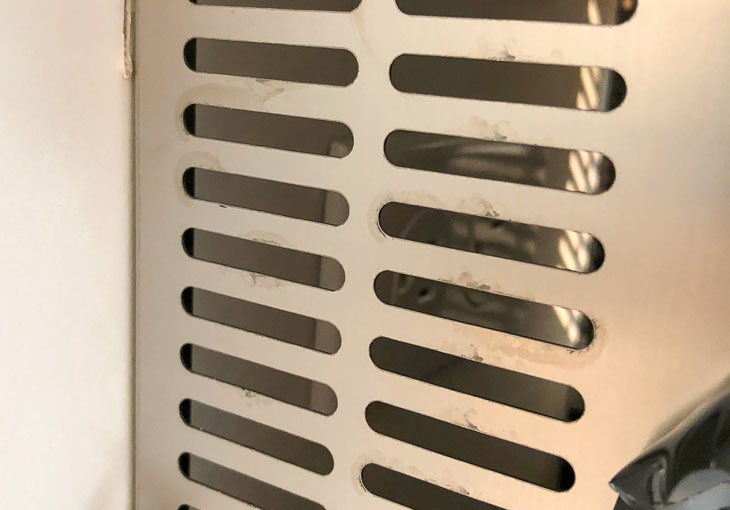
Doh! Somewhere along the way we unplugged the fan and forgot to plug it back in. Luckily we all had a collective laugh about it and then slid the chimney back down to plug it in, then re-attached the chimney to the bracket. My words of wisdom: “Always make sure it’s plugged in!” LOL.

We left the protective film on the range hood, and I’m glad I did because it was easier to clean and protect while tiling. Stay tuned for more updates and the kitchen reveal soon! Next up is tiling the backsplash.

kitchen cabinets installed

Disclosure: This is a sponsored post for Broan. I was compensated for my time and efforts to promote the Broan products. However, all ideas and opinions are my own. I will always let you know when you are reading a sponsored post. You should also note that I’m very particular about the brands I work with.

Gifts from your Kitchen Social media image

Gifts from your Kitchen Social media imageCreative DIY Gifts from Your Kitchen

The kitchen is the heart of the home and a place full of love, family, and delicious food. Why not make your kitchen the go to place for DIY gifts this year? Plus there’s something special about receiving a homemade gift. Would you agree? Instead of braving the mall and the stores this year, why not make these Creative DIY Gifts From Your Kitchen to show your friends how much you care.

Gifts from your Kitchen - Lemon zest Popcorn

Popcorn doesn’t have to be seasoned with just salt and butter! Add a tangy flavor with this delicious Lemon Zest Popcorn recipe. Go ahead and fill a cute mason jar with popcorn and tuck a movie theater gift card inside.


Gifts from your Kitchen - Blackberry Jam at Satori Design for Living

Homemade Honey Rosemary Blackberry Jam by Satori Design for Living is the sweetest gift that doesn’t have to be eaten at dessert time. It can be enjoyed all day long!


Gifts from your Kitchen - Easy Strawberry Tart Show your love with this gorgeous, mouth-watering Strawberry Tart Recipe.
It’s sure to be the hit of any pot luck too.


Gifts from your Kitchen - Peppermint Snowflake Ornaments

These Peppermint Snowflake Candy Ornaments are fun and decorative.
The kids will delight in helping with this DIY gift idea.


Gifts from your Kitchen

Dry weather can be brutal on our skin and lips. A homemade Lemonade Lip Balm is a sweet gift for anyone who needs a little ray of sunshine in their life.


Gifts from your Kitchen - Homemade Lemon Hand Scrub - My Uncommon Slice of Surburbia

This lemon-scented gift will surely pamper the skin (and would pair nicely with the Lemonade Lip Balm above.) Give your friend some Homemade Lemon and Peppermint Hand Scrub found at My Uncommon Slice of Suburbia.


Gifts from Your Kitchen - Sugar coconut scrub - The Palette Muse

This Sugar Coconut Scrub by The Palette Muse is another luxurious spa essential that makes lovely gifts for your friends.


Gifts from your Kitchen - White Chocolate Cookie Bars

White Chocolate Cookie Bars are a nice change from traditional brownies and chocolate chip cookies. I’m sure Santa wouldn’t mind a little variety in his diet this year. 😉


Gifts from your Kitchen - Salted Caramel Chocolate Chip Cookies

These Salted Caramel Chocolate Chip Cookies are my go to cookies when I want to impress. They are made using a standard mix from the grocery store, but you add the gourmet factor before baking!


Gifts from your Kitchen - Lemon Glazed Shortbread - DIY Beautify

These fresh and sweet Lemon Glazed Shortbread cookies by DIY Beautify would make a thoughtful gift any time of the year.


Gifts from your Kitchen - Coffee Shortbread Cookies with Chocolate Glaze

Coffee and Chocolate Shortbread cookies are the perfect gift for that caffeine junkie in your life. Bren from Bren Did even provides the free gift tag printable to go with this gift!


Gifts from Your Kitchen - Peppermint Oreos

Short on time? These Peppermint Oreo Cookies are simple to make and super scrumptious.


If you read my article about improving indoor air quality, you know how nasty store bought air fresheners can be. These next two ideas are not only thoughtful gifts, but they are also healthy alternatives when the house needs some freshening.

Gifts from your kitchen - Simmering Pots - Two Purple Couches

Give your friends a natural way to add fresh fragrance to their home with these 3 Homemade Simmering Pot Recipes by Two Purple Couches.


Scented Room Spray Recipe

For those friends that like to spray their way to fresher smelling air, make your own natural room spray to help them combat stale air in the winter.


Gifts from your Kitchen - chalkboard painted cocoa mugs.

If you aren’t the best cook, that’s okay. You can create these fun Chalkboard Painted Mugs. Then add some hot cocoa mix, because nothing warms better on a cold, winter day.


Gifts from your Kitchen - Friendship Soup in a jar - oh my creative

Cold weather brings out the desire to cook more soups. Show your love by giving friends this Friendship Soup in a Jar by Oh My! Creative. Not only is it tasty, but the colorful stripes are pretty too.


Gifts from your Kitchen - Sugar Free Hot Cocoa mix - Boxy Colonial

The holidays can be filled with so many sugary sweets. Your friend who has gone sugar-free, would appreciate this Sugar Free Hot Cocoa Mix by Boxy Colonial.


Gifts from Your Kitchen - Cocoa in a Jar

For the rest of your friends who don’t mind the real deal,  you can make them this adorable Cocoa in a Jar!


Gifts from your kitchen - DIY Danielle

Delicious Cake Mix Cookies like DIY Danielle’s are great gifts for anyone with a sweet tooth (even those that don’t love to bake).


Gifts from your Kitchen - bbq and ranch mixes - Hearth and Vine

Have a grill master in your life?  Give them these Homemade BBQ and Ranch Spice Mixes by Hearth and Vine.


Gifts from your Kitchen - Infused Oils - Craving some Creativity

These homemade Infused Oil bottles shared by Craving Some Creativity are a perfect gift for your friend who loves to cook!


Gifts from your Kitchen - Coconut Toffee Candy - My Life Cookbook

My Life Cookbook’s Coconut Toffee Candy would be a sweet little holiday treat for your friends.


Gifts from your Kitchen - Hot Chocolate on a Stick - Persia Lou

Give your loved one Persia Lou’s Hot Chocolate on a Stick. What a decadent gift that old and young will enjoy when stirred in warm milk.


Gifts from your Kitchen - Chocolate Dipped Candy Apples

Craving Some Creativity’s Gourmet Chocolate Candy Apples are a fantastic and fun gift for any occasion!


Gifts from your Kitchen - SlowCooker peanut clusters

Make these quick and simple Peanut Clusters in your crockpot! Cupcakes and Crinoline has the details for making this candy that your friends will go nuts over.


Gifts from your kitchen - Warm and Cozy Chocolate Gift Basket

Take any of the above chocolate sweets and use them to fill  this warm, cozy, and useful Chocolate Gift Basket this year.

I hope you found some inspiration for amazing gifts you can make from your kitchen. If you like this collection, pin the image below to share with your friends (because friends don’t let friends go crazy at the mall during the holidays):

Gifts from your Kitchen Pinterest image
Here are a few other creative gift idea posts you may enjoy:

21 Creative Gift Wrapping Ideas

Creative Gift Wrap Ideas


35 Upcycled DIY Gift Ideas

Upcycled Gift Ideas


Gift Ideas for the Creatives on Your Wishlist

gift ideas for creatives

10_dreamy_window_seat_inspirationsDreamy Window Seat Inspiration Photos

I have a friend, named Claire, who is an interior design genius. She would beg to differ, but honestly she is brilliant when it comes to design decisions. This friend was the visionary who created our kitchen floor plan for us. She was also the person who envisioned a window seat in our bay window. Magnifique! Adding a window seat to the bay window was a great way to free up floor space, add storage to the kitchen, and give us a cozy spot to sit and eat. You can read how I built the window seat with storage in our bay window here.

Fall Decor in a Rustic Farmhouse Kitchen | Pretty Handy Girl

Before building our window seat, I scoured the web for window seat inspiration photos and here are my Favorite Dreamy Window Seat Inspiration Photos (of the MANY more photos I pinned):

BHG_window_seatDesigner Carrie Miller created a relaxing beadboard window seat via BHG.com


California_blue_white_breakfast_nookGorgeous tower breakfast nook. Photo by Karyn R. Millet via House Beautiful


elegant_built_in_no_windowElegant built-in seat (without a window) via: London Painting Group


Refrigerator cabinets used to build a window seat via Centsational Girl


storage_drawer_window_seatWindow seat with storage drawers via BHG.com


Bedroom window seat by Newport Beach Interior Designer Wendi Young Design via Houzz


Curved banquette by Brooklyn architect Ben Herzog via Houzz


White_window_seat_with_plantation_shuttersWhite and black built in storage bench via BHG.com


Huge bay window seating by Flemington architect Pickell Architecture via Houzz


Small corner window seat by Santa Cruz Media and blogs Shannon Malone via Houzz


Finally, this was the photo that set my wheels in the right direction for construction via Houzz

Want to build your own? I have a great tutorial for how to build a window seat in a bay window with storage.

Hope you find some window seat inspiration! Happy building!

PHGFancySign

What No One Tells You About Farmhouse Sinks | Pretty Handy Girl

When we bought our farmhouse sink, I naively thought I wanted one because they looked so beautiful in photos of farmhouse style kitchens. Now that we’ve had our farmhouse sink for three years, I want to tell you What No One Will Tell You About Farmhouse Sinks, especially cast iron sinks.

Fact #1:

You will chip dishes and break glasses if you aren’t careful. It happens. We’ve lost two dishes and two glasses in our sink. Cast iron sinks are made tough to prevent chipping. Honestly, it’s cheaper to replace a glass or dish than the entire sink.

Fact #2: 

You may get wet. We’ve found that when our faucet is on the spray setting it spatters us. I’m not sure if this is a factor of the sink design or the sprayer. We didn’t have this issue with our old two basin sink. To solve the problem we use stream most of the time and put the water on low when spraying.

splashed-shirt

Fact #3: 

It will get dirty. A white sink will definitely show dirt and grime.

dirty-farmhouse-cast-iron-sink

This was a bit of a bummer, as someone who had to constantly shine the surface of our old stainless steel sink with baby oil to hide the hard water spots. But, I’ve come to terms with it and only have to clean it once a week to keep it looking like new.

baby oil shine stainless steel

Fact #4:

It will get scratched. Cast iron sinks will scratch, but I expected as much since we cook almost daily using heavy cast iron pans. Honestly I’m surprised we haven’t chipped the sink yet. It’s held up to a lot of abuse. In three years we have yet to chip our sink, but the marks and scratches have happened.

How to Clean a Cast Iron Sink or Tub | Pretty Handy Girl

Luckily, I have the perfect solution to clean a cast iron sink (or tub) to help it look new again.

How to Clean a Cast Iron Sink or Tub | Pretty Handy Girl

Before:

dark scratched cast iron sink

After:

How to Clean a Cast Iron Sink or Tub | Pretty Handy Girl

Fact #5:

You can’t wash dishes on one side and set the clean ones in a dish drainer in the second basin. With one large sink, all the dishes in it will get wet. This was the one change that was less of an issue for us. We simply put our dish drainer on the counter. When we have company, I put the drainer out of sight under the sink.

casement window over sink

Conclusion:

If we were to go back in time and do it again, would I buy a farmhouse sink again?

Absolutely! I still love the look. Cleaning the scratches every few weeks is no big deal. I absolutely hated our stainless steel sink because of hard water deposits and spots. Scratches are much less noticeable than the hard water deposits.

I LOVE having a big sink to clean dishes in. I feel a bit like Elaine enjoying the extra wide driving lanes Kramer created. Who doesn’t like a little more elbow room?

Best of all, I can hide dishes in it. Little known fact, my coffee mug and a knife were in the sink when I took this photo:

What No One Will Tell You About Farmhouse Sinks

The apron front farmhouse sink we have is this one. (affiliate link) If you decide to buy one, I think you will love it, as long as you are okay with those 5 Things No One Will Tell You About Farmhouse Sinks!

farmhouse sinks

Does your HE Washer stink? Here’s what you can do about it:clean front load washer


Want to save hundreds of dollars a year? Make my tested and approved DIY Laundry Detergent!DIY Laundry Detergent | Pretty Handy Girl


Holiday Home Tour - Kitchen | Pretty Handy Girl

Holiday Home Tour - Kitchen | Pretty Handy Girl

One of my favorite rooms to decorate is our kitchen. There is something about the combination of aqua with green that makes me happy. Welcome to the next room on my Holiday Home Tour, the kitchen!

Holiday Home Tour - Kitchen | Pretty Handy Girl

Updating the window seat with aqua and snowflake pillows is the first thing I do when Thanksgiving is over.

I love adding a little bling to the chandelier during the holiday season. Last year I hung a beaded garland from the chandelier, this year it’s white buds and gold painted eucalyptus leaves.

Holiday Home Tour - Kitchen | Pretty Handy Girl

The open shelves get a new vignette. It’s such an easy swap that gives us something new to look at throughout the season. Read more