Cute Sock Snowmen | Pretty Handy Girl

Cute Sock Snowmen | Pretty Handy Girl

I have a very special guest for you today. This woman is a very talented artist and art instructor in Northern Virginia. She is the one responsible for my artistic genes and half the equation for my DIY passion. This woman is my fabulous mother, Shari! (She’s also affectionately referred to as Grammy Mac in our household.)

grammy-mac

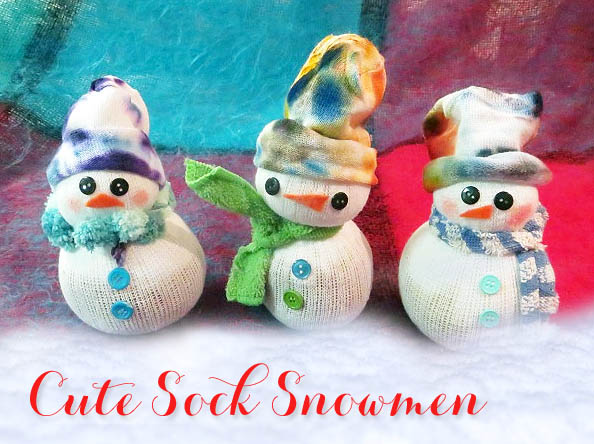
Please give my Mom a warm welcome here. She was kind enough to put together her first blog tutorial showcasing these cute sock snowmen that she made with her students (she teaches private art lessons after school.)

Take it away, Mom!

page_break_2

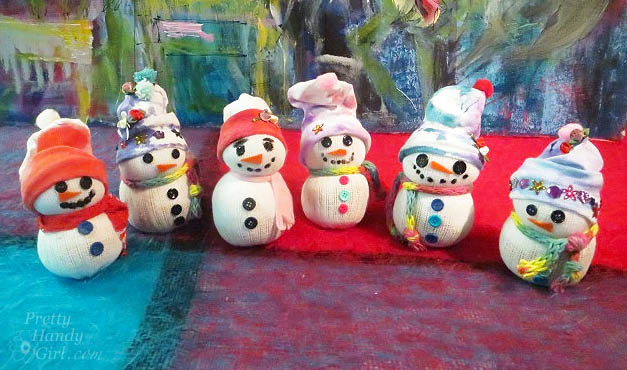
Snow Days! Here in Northern Virginia we have already had too many! The most disappointing part about this is that we haven’t had enough snow to make a snowball let alone a real snow person. In an attempt to make the kids happy, we headed to my studio to make snow people from tube socks. Perhaps if we make enough of them, they will bring on the real deal!

Materials:

(Shopping at the dollar store makes this project much more economical.)

  • 1 White tube sock (Adult Size 9-11)
  • Rubber bands
  • Rice (1/2 to 3/4 cup per person)
  • Polyester fiberfill stuffing
  • Buttons, pompoms, sequins, orange felt
  • Tacky glue
  • Brown pipe cleaners (to make stick like arms)
  • Black acrylic paint
  • Acrylic paint in your favorite colors for tie-dye hats and scarves
  • Cotton Swabs (a good tool for painting dots for smiles)
  • Faber-Castell Gelato pigment stick Bubblegum Shade  (if you can’t find this, you can use watered down pink craft paint)

Optional: 

  • Kitchen towels, fabric or ribbon cut into strips to make the scarves

Instructions:

Tie Dying the Hat & Scarf:

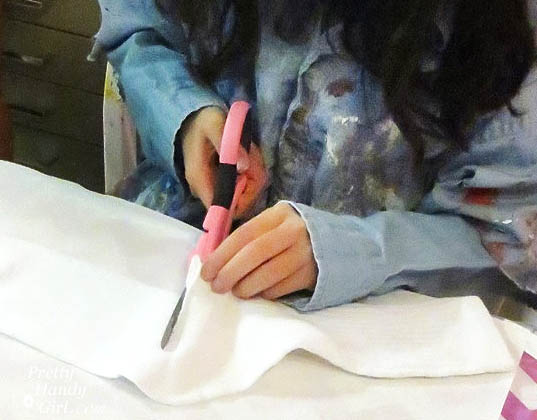
Cut the foot off your sock. (This will be the hat.) You may leave this white, or paint it.

Cute Sock Snowmen | Pretty Handy Girl

Fold the foot part of the sock accordion style, like a fan. Secure the folds with three rubber bands.

add-rubber-bands-to-accordian-sock

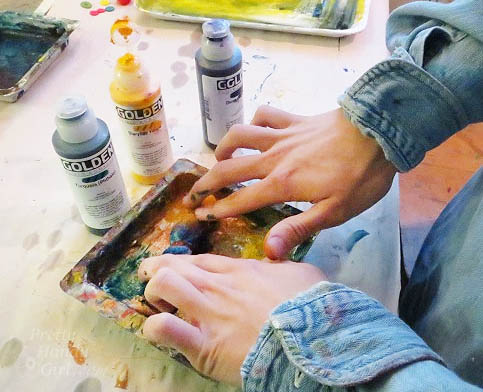
Pour your acrylic paints into a small tray or paper plate. Water the paints down slightly. Wet the wrapped sock in water, and roll it into two or three of your favorite colors.

Cute Sock Snowmen | Pretty Handy Girl

Let dry. Unroll the sock to reveal the beautiful colors. Cut off a 1” piece of the raveled end of the sock to make a matching scarf. Read more

Holiday Tablescape | Pretty Handy Girl

Holiday Tablescape | Pretty Handy Girl

Can we be honest for a minute? This year when Jen Woodhouse from The House of Wood asked me if I wanted to participate in a holiday tablescape blog tour I nearly replied, “No way!”

Holiday Tablescape | Pretty Handy Girl

Not because I was too busy…

Holiday Tablescape | Pretty Handy Girl

… and not because I didn’t want to.

Holiday Tablescape | Pretty Handy Girl

The truth is, I’ve never created a tablescape before. Yup, it’s true. Go ahead and google “Pretty Handy Girl tablescape,” I’ll wait.

Holiday Tablescape | Pretty Handy Girl

Did you see my Pinterest board filled with tablescapes pop up in the search results? Yup, I had to create one for inspiration.

Pinterest board of Tablescapes

The other reason I was cringing at the idea of a tablescape is because I don’t own chargers. Well, I own lots of chargers for my battery powered cordless tools. (Bah da dun. Sorry bad joke.) How can you create a tablescape without chargers?! Read more

Pretty Handy Girl's Holiday Home Tour 2014

Pretty Handy Girl's Holiday Home Tour 2014

Welcome to my Holiday Home Tour 2014! If you are just arriving here from The DIY Showoff, welcome! If you came here first, be sure to catch up on the other tour participants by following the links at the end of my post. A special thanks to Chris from Just a Girl for putting together this fabulous tour.

I’m thrilled to be able to open my door and let you in to see all the decorating I’ve been working on. I admit to you that my home doesn’t normally look this clean. And there may be a pile of papers or shoes behind a door, so watch your step.

Pretty Handy Girl's Holiday Home Tour 2015

I love to update fake pine wreaths every year by tucking new elements inside. This year I used some tree picks from Lowe’s. You can see my old Presto Chango Christmas wreath if you want some more quick ways to dress up a cheap wreath.

Pretty Handy Girl's Holiday Home Tour 2015

The front door wreaths benefited from a few sprigs of cut holly from the yard.

Pretty Handy Girl's Holiday Home Tour 2015

Adding some ornaments to my little red wagon planter will take the place of plants until the spring.

Pretty Handy Girl's Holiday Home Tour 2015

Come on inside the foyer, I know it’s a little cold outside.

Pretty Handy Girl's Holiday Home Tour 2015

The kids’ advent calendars are filled and await their eager hands each morning. The colorful little houses look right at home on my IKEA hacked cabinet.

Pretty Handy Girl's Holiday Home Tour 2015

This year I wanted to add a lit garland onto the stair railing! If you look closely you might see a white cord taped around the baseboard leading into the office. I refuse to be dissuaded by the lack of a nearby outlet. Read more

Starry Night Christmas Tree | Pretty Handy Girl

Starry Night Christmas Tree | Pretty Handy Girl

This year I might have taken the tree decorating a bit far. I couldn’t stop at just decorating the tree. No, I had to decorate up the walls around the tree and onto the ceiling. The tree is literally surrounded by a multitude of shimmery vinyl stars!

Starry Night Christmas Tree | Pretty Handy Girl

What do you think? Overkill? Or do you like the emphasis those stars place around the tree. If you like it, here is a link where you can purchase your own set of stars from Leen the Graphics Queen (affiliate link.)

Starry Night Christmas Tree | Pretty Handy Girl

My idea started when I was gazing at my favorite tree topper I bought at Target a few years ago. At night when the light is turned on, it casts a multitude of lit stars all over the ceiling and walls. I was thinking how sad it is that you can’t see all those stars in the day. I wanted a more permanent way to keep the stars on the wall and ceiling 24/7! That’s when I called my friend Leen the Graphics Queen on a whim. That girl is the sweetest thing. She put up with my crazy idea and promptly shipped me several sheets of stars in different colors to create my vision. Proof that she’s truly a wonderful friend, she sent me both a set of gold and silver stars for me to choose from. As you probably guessed, I used the gold stars.

Starry Night Christmas Tree | Pretty Handy Girl

Now, behold our blue, white and gold Christmas tree! The gold is the prefect touch of warmth against the cool white and blue color palette.

Starry Night Christmas Tree | Pretty Handy Girl

The feather boas and icicles were from Michael’s last year. The larger aqua blue embroidered ornament balls and silver tree skirt are from Lowe’s (yeah—I know—Lowe’s the Home Improvement store!) The rest of the ornaments I’ve had for a while.

Starry Night Christmas Tree | Pretty Handy Girl

At night when the tree is lit, you can see that I wrapped the tree with several strands of white and blue mini-lights.

Starry Night Christmas Tree | Pretty Handy Girl

The British horse bridal medallions were a gift from a dear friend a few years ago. They have made the rounds in my home decor, but this year I added them to the Christmas tree.

Starry Night Christmas Tree | Pretty Handy Girl

Starry Night Christmas Tree | Pretty Handy Girl

What do you think? Do you like my idea of surrounding our tree with its own constellation of stars?

Starry Night Christmas Tree | Pretty Handy Girl

You don’t have to use them on the ceiling. You can use them to decorate your desk, your door, holiday gifts, your refrigerator, your kids (okay maybe not them) or anywhere you want to decorate for the holidays! Best of all, when you are ready to remove them they peel off and leave no damage behind.

Starry Night Christmas Tree | Pretty Handy Girl

Happy Decorating!

PHGFancySign

Disclosure:

Some affiliate links appear in this post, if you click on them I earn a small percentage from the purchase. You are not charged any more.

Here’s the scoop, I wasn’t paid for this post. Leen is a good friend of mine and I love her graphic vinyl. I approached her about using her graphic stars. Yes, she sent them to me for free, but she’s a sweetheart like that. Leen and her husband run a small shop near the coast of North Carolina. They are the type of business that you want to support around the holidays and the rest of the year. I’d tell you more about how wonderful they are and how they are raising four wonderful children, but then it would sound like I’m gushing. So, hey, just know that I wasn’t paid and I want to see Leen succeed ;-)! 


Pin for later!

Hang Stockings Without a Mantel

Hang Stockings Without a Mantel

Hello, it’s Jessica here from Decor Adventures, back this month with a simple solution for holiday decorating. These days we see all kinds of lovely homes with Christmas stockings hung beautifully from the mantel or staircase. But what if you don’t have either in your home? I’ve come up with an easy way to display stockings that you can put together in less than an hour. Here is how to hang stockings without a mantel – frame them!

Materials:

Hang Stockings Without a Mantel

  • Large empty picture frame
  • Foam board
  • Fabric
  • Chicken wire
  • Wire snips or sharp scissors
  • Gloves
  • Paint (optional)
  • S-hooks
  • Glazier’s points and tool (or a wide flat head screwdriver)
  • S hooks
  • Stockings

Instructions:

1. For this project you’ll use a large empty picture frame that doesn’t have glass. You can find them at thrift stores, craft stores, or just reuse one of your own. You can paint or stain the frame to your liking, but that is optional depending on your style.

2. Cut a piece of chicken wire one inch larger on all sides than the inside of your frame where the glass would rest. Make sure to wear gloves for this part as the wire can be sharp. Most chicken wire comes with natural lines where the wire is twisted. You can use those as your edges. If you want to spray paint the wire to blend in, that would create a nice look too.

Hang Stockings Without a Mantel

3. Place the frame front side face down on a table and insert the wire into the back of the frame. Set that aside for the moment. Read more