Looking for a gift for those hard to buy people on your list? Or simply an inexpensive gift for your child’s teachers? I found the perfect gift while grocery shopping. Our local Kroger had Illy ground coffee and tumbler sets on clearance. Naturally I shoved everyone aside and grabbed as many as I could (not really, but I would have!) For under $8 each, it was a real sweet deal.

I thought the gift sets needed a little somethin’ special to give them holiday flair (or maybe I was feeling guilty that the gifts were just too easy and inexpensive.) With a little Martha Stewart multi-surface craft paint and Martha Stewart decorative snowflake stencils, I turned them into extra special holiday gifts.

Materials:

(I’ve included affiliate links for your convenience. I earn a small percentage from a purchase using these links. There is no additional cost to you. You can read more about affiliate links here.)

  • Tumbler and ground coffee
  • Martha Stewart craft supplies:
    • Multi-Surface Craft Paints:
      • Mother of Pearl
      • Wedding Cake
      • Summer Haze
      • Metallic Sterling
    • Holiday stencils
    • Holiday adhesive stencils
    • Roller tops
    • Specialty sponges
  • 3M ScotchBlue painter’s tape
  • Paint brush
  • Fabric
  • Baby wipes or wet rag


Decorating the Tumbler:

Clean the tumblers with soap and water. Let them dry.

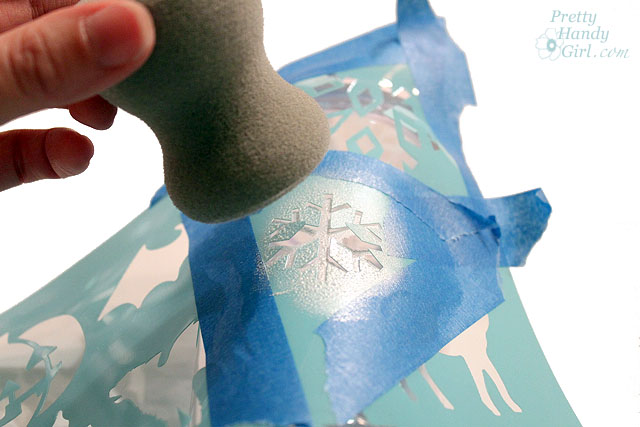
Tape off the areas of the stencil that you aren’t using. Add more tape to the outside edge of the stencil to hold it in place on the tumbler.

Wrap the stencil around the tumbler.

Dip a specialty sponge into the Martha Stewart  multi-surface craft paint. Dab off any excess paint.

Pounce lightly and straight onto the stencil. (If you come at it from an angle some of the paint may seep under the stencil or move the stencil.)

Gently remove the stencil and reposition it in another location on the tumbler. (Be careful not to overlap the first snowflake.)

Fill in areas between the larger snowflakes with small self-adhesive stencils.

The specialty sponge is too big for these smaller stencils, but you can use a paint brush to paint inside the stencil.

Repeat until you are happy with your decorated tumbler.


Snowflake Gift Bags:

Squeeze some craft paint into a Martha Stewart roller top (best invention EVER!)

Tape the stencil onto your fabric.

Gently roll the roller top back and forth over the stencil until the desired amount of paint comes out.

Remove the stencil and let the paint dry.

Repeat the snowflake design randomly throughout the fabric.

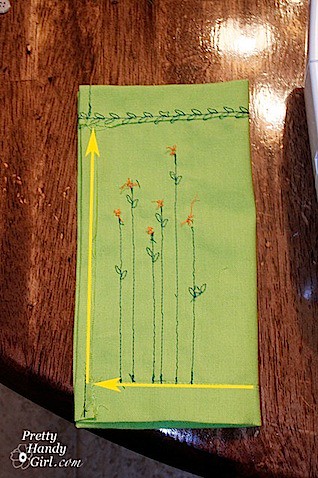
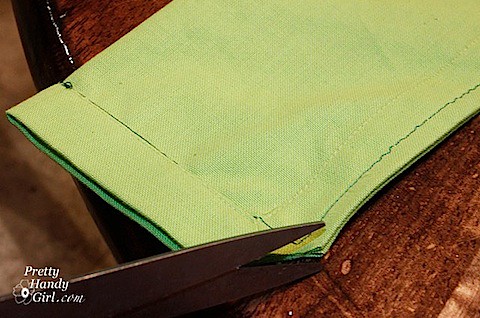
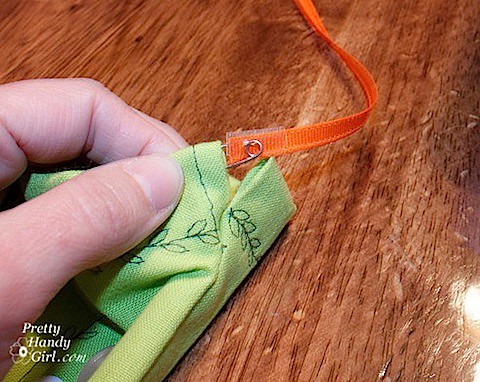
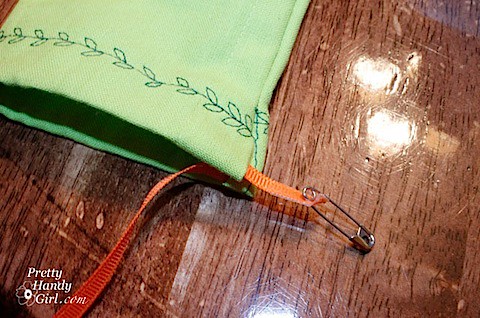
Sew a little box bottom drawstring gift bag, using the snowflake fabric. I think the snowflake themed coffee gift set will be a big hit! (Holiday decoration, thrifty, re-useable, and come on…who doesn’t LOVE coffee?!)


This was a very easy craft to create. You could decorate with any stencils you like. Think how cute a stenciled monogram would look on the tumbler.

I will probably include a note mentioning that the tumbler design will last longer if washed on the top rack of the dishwasher.


Disclosure: I was provided the craft materials and a small payment in exchange for writing this tutorial. The ideas, tutorials, and opinions are my own.
Sharing with:

Tip Junkie handmade projects

2011 Fall Home Tour

Fall is here, fall is here! Finally the cooler temps are near!

I’m not sure about your area of the world, but this summer seemed a little too hot for my liking. My husband told me about the term “Global Weirding“. It seems fitting for all this nonsense Mother Nature is throwing at us lately.

Luckily fall seems to have come just on time. Fall is my favorite time of year. Maybe it is the painter in me that loves all the colors. Or maybe it is the nature lover in me that longs to be outdoors in the fresh crisp air. Whatever it is, I love FALL!

I spent some time this past week putting out some autumn inspired décor. Although I’m definitely self conscious about my decorating skills, I tried to abide by my words from last year about not striving for perfection. So, now I’m taking a big breath and pressing the publish button to share my home looking warm and cozy (in my opinion.)

Antique books are my go-t0 decorating objects. I love books and I love those old linen covers. Even a torn and tattered book looks nice lassoed together with some friends.

Sometimes, even an open book can look warm and inviting.

I was so happy to bring my Ballard knock off painted pear out of storage. He really looks handsome with the autumn colors.

I love all the colors in this photo! I can’t imagine having a monotone autumn mantle.

Of course, Mr. Gourd looks handsome too. (Shhh. I don’t want to hurt his feelings, but I do love the pear more.)

Yes, I’m still switching things in and out like a high school football coach. I actually like the gourd, so he’s back in but the chicken wire basket is out. However, I wanted to show you the vintage map lampshade I made. The tutorial will be served up before you know it! Hopefully I’ll have a new lamp by then. This one is just a substitute for one on injured reserve.

You may have noticed this little terrarium on the side table. I was inspired by some insanely expensive versions here. Never fear, I will have a tutorial so you can make your own soon!

A full view of the mantle decorated. It is hard to believe that in a few months the stockings will need to be hung.

I had fun with this little vignette. A crow in an antique corn grinder? Now that is pretty silly. And another terrarium that makes me smile.

Quoth the Raven “Nevermore”

The acorn jar was an afterthought. It was just a quick little hot glue craft. Speaking of which, if you haven’t read my post about hot glue gun safety, it is a must! Your fingers will thank me.

It is fun having another surface to decorate. The top of our armoire (also known as the family command center) has some pretty purples and greens.

My Pottery Barn knockoff lantern makes a re-appearance.

Beautyberry and Orange Peel Cestrum from our yard.

The dining room has a simple centerpiece made with corn kernels and a candle.

But, I might be switching it out once I get this beauty back from my friends at the Habitat ReStore. Can you guess what it used to be? I’ll give you a hint: Hollywood glam never looked so good.

Sew Mini Gift Pouches from Napkins

AllPouches.jpg
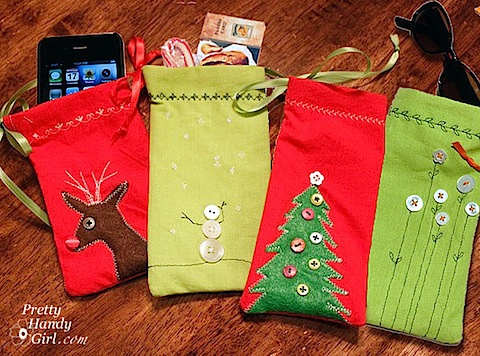
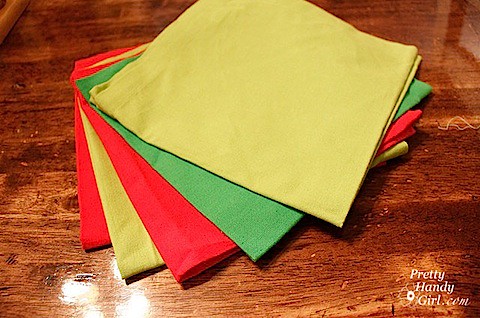
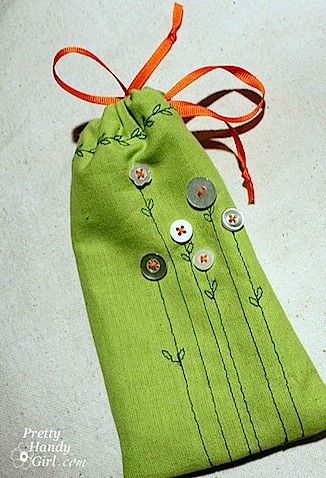
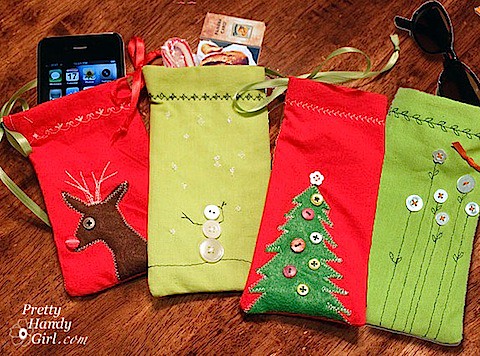
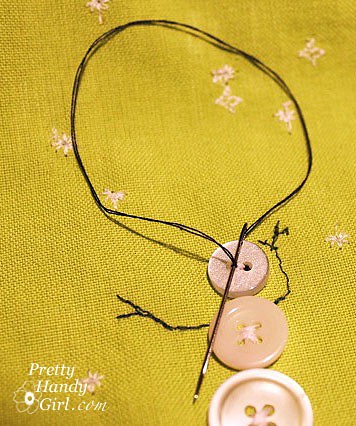
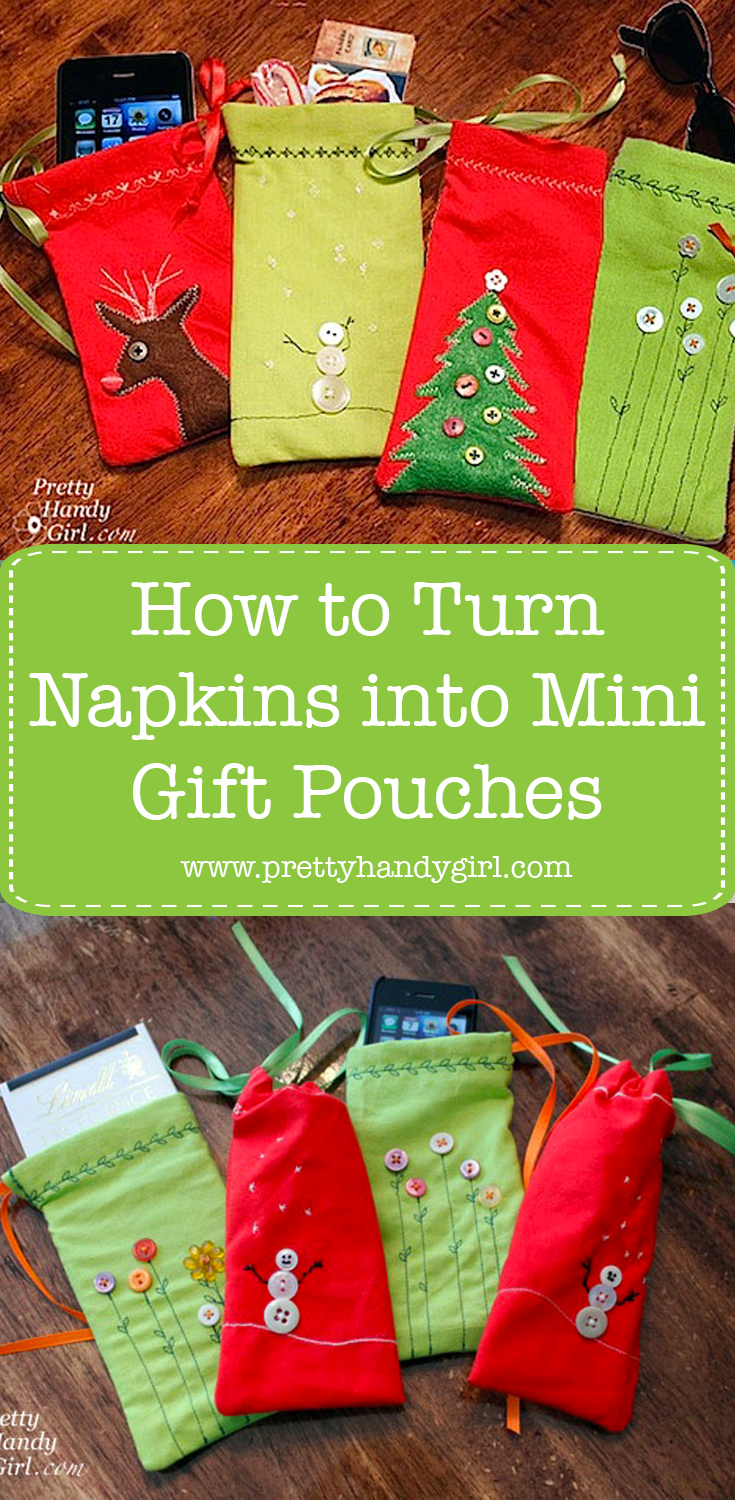
Oh the quandary of what to get my boy’s teachers, the sitter, and all those other important people in our lives. Usually I take the easy way out and buy gift cards. Well – okay – I’m still going to give the gift cards, but this year I wanted to present them in something a little nicer. Something handmade with love. Cute mini gift pouches!

These little handmade pouches are perfect for holding a gift card and some holiday treats. And then after the holiday season has ended, the recipient can use the pouch to protect and store valuables!

My pouches started like this:

DiscountNapkins.jpg

Discounted cloth napkins! 90 cents for each napkin. And here is how they became cute little mini gift pouches:

CutinQuarters.jpg

Open the napkin up and cut it into quarters.

FoldinHalf.jpg

Fold the napkin in half.

LayoutButtons.jpg

Allow 1/4 inch seam allowance on the open edge of your pouch, then layout your design and sketch with a disappearing marker where your stitch lines will appear.

SewStems.jpg

Sew along the lines you drew. (My machine has a few decorative stitches, but I could have done them by hand instead.)

SewOnButton.jpg

Then hand sew the buttons on where you want them.

HemPouch.jpg

Once your design has been completely stitched You will need to hem the raw edge on your napkin.

FoldOverDrawstring.jpg

Next, fold over the top of your pouch approximately 1/2″ to accommodate your ribbon drawstring.

DecorativeTopStitch.jpg

Stitch the ribbon drawstring pocket closed. If your sewing machine has decorative stitches you may choose to use one of them, but be sure to sew on the right side.

StitchLines.jpg

Fold your napkin back in half with the right sides together, and stitch along the bottom and open sides of your pouch. (I stitched this pouch a little higher on the bottom edge to make the flower stems end in the seam.) Be careful to stop stitching up the side before the drawstring opening.

CutCorners.jpg

Snip off the corners of your pouch.

TurnRightSideOut.jpg

Turn your pouch right side out.

FeedSafetyPin.jpg

Cut a length of ribbon long enough to thread through the top of your pouch and to tie a bow. Then attach a safety pin to one end of the ribbon. (I added some scotch tape so the pin wouldn’t fray the ribbon.)

PulledSafetyPin.jpg

Gently feed the ribbon through the bag using the safety pin to push its way through.

FlowerPouch.jpg

Add some goodies to your pouches and tie the ribbon to close it up.

AllPouches.jpg

For the Rudolf and tree bag, I simply cut out the shapes using felt and stitched around the edges.

SnowmanEyeballs.jpg

One more trick for you. The snowman’s eyes were added after I stitched the button on using white thread. Then I re-threaded my needle and sewed in and out a few times on each hole to give him little black eyes.

I will be the first to admit that I need to center my designs a little better, but for now I’m happy with them. And, hey, isn’t it the imperfections that make them look handmade?

https://3.bp.blogspot.com/_g5zUd7bijOw/TP5MiaPwgSI/AAAAAAAADLs/GU1XOSrD1_I/s1600/MoreXmasPouches.jpg

Update: I made a few more pouches last night, and altered my snowmen to a four hole button which gave me the option to add a mouth. I’m also perfecting my technique and getting better (not perfect) at centering the designs.


Pin for later!

DIY Christmas gift pouches made from napkins

CloseUpWreath.jpg
Sneak Peek at my Christmas Wreath

I am getting a lot of mileage out of my white base wreath I bought at Target several months ago. With it I’ve been able to make a Magnolia Leaf Wreath for the fall.

welcomewreath.jpg

I made a Feather Wreath for Thanksgiving.

SideViewWreath.jpg

Now it was time to give the wreath an injection of Christmas spirit. I removed the feathers, but left the green nuts on it. I had a green fabric leaf wreath that I made out of some floral filler stalks. All I did was twist 4 of the stalks into a circle shape and secure with a few pieces of floral wire.

2Wreaths.jpg

I set my white base wreath inside the green leaf circle.

TogetherasOne.jpg

To secure the two together, 1) I fed some of the base wreath twigs under the leaf wreath and 2) twisted them over to hug the green leaf wreath.

FoldUpSpring.jpg

That couldn’t be any easier! No glue, no mess.

I compared two different ribbons next to my wreath and ultimately chose the black and white one.

2Ribbons.jpg

Tied a pretty bow and stood back to admire.

BandWWreath.jpg

Hmmm, I like it, but it just wasn’t feeling Christmasy enough, so I quickly tucked some red floral sprigs with teeny bells on them into the wreath and gently curved them to match the shape of the wreath.

FinalWreath.jpg
Now that is more like it!
In less than 10 minutes I have my Christmas wreath! This base wreath has been the best $10 I’ve spent all year!

I’m going to try to use this wreath all year and will be sure to share the transformations with you.

Thank you to everyone who left me such wonderful comments on my rustic Christmas décor! I may not have been able to reply to all of you, but I DID read each and every comment! And thank you to the rest of you who took time out of your day to look at my post.

As promised, I am sharing with you the tutorial for creating the shutter screens that I display my Christmas cards on.

I am completely obsessed with decorating my home using shutters (only I use them on the inside instead of the outside!) I have one hanging in our half bathroom and two more in our upstairs hallway dressing up a dormer window. Luckily I still had two pairs laying around.

I began by attaching three hinges to hold a pair of shutters together.

I mixed two colors of red acrylic paint together (cadmium red medium & Lucas madder red) to get the perfect Christmasy red.

A perfect Christmas red is neither too orange nor too cranberry. It is very similar to Coca-Cola red.

Factoid: Did you know that Coca-cola red is so special that the company does not share the formula for the color?

Using a 2″ Purdy paint brush, I dabbed the brush into the paint and then wiped it off on the plate. Then dry brushed the paint onto the shutters, letting the bristles skip over the slats.

I kept dry brushing the shutter until I had enough paint for it to appear red, and yet some of the dark green color still peeked through.

Here is a close up of the green paint showing through:

Then I set each screen up in the corners of our living room and used clothespins to attach the cards.

The red shutters really bring in the holiday spirit!

I’m curious, how do you display your cards each year?

Did you like this post? Want to be notified when there are more fantastic tutorials by Pretty Handy Girl? Sign up to receive emails in your inbox:

Enter your email address:

Delivered by FeedBurner

Or follow me on Twitter or Facebook so you can be the first to know!


Pin for later!

displaying christmas cards on shutters