Special thanks to Becky from Organizing Made Fun for taking these photos.

For some reason, I like to spend my birthday at a Habitat ReStore. In 2010, I spent the morning wandering the aisles at the Raleigh ReStore. And this year, I gave a talk at the Atlanta ReStore.

During my talk at the Atlanta ReStore, there was a rogue cameraman who started following me around after the talk. I saw him ducking in and videoing while I was touring the store and sharing what I see in my mind when I look at gently used donations. Next thing I knew, he was interviewing me for the Ways to Save segment on 11Alive. There is a little article on their website about Easy Home Improvement Projects for Women, but as you know I believe that there isn’t a home improvement project that is too hard for women (so I cringed a little at the title.)

One of my readers, happened to capture the video segment when it aired and uploaded it to YouTube so y’all can see it here. A BIG thank you to Lori!

Being at the ReStore is one of my favorite things to do. Not only can you get some good deals, but I like to think of it as brain exercises. I love to challenge my brain to come up with some creative re-uses for the items. Do you want to see what I see? Here are two posts I created to help you see what’s in my head.

Re-imagining at the Habitat ReStore

What Do I See at the Habitat ReStore

I hope you have a great rest of your weekend. I’m not sure about your locale, but it has been hot, hot, hot here! Today is supposed to be up to 102F again.

Thanks to my Facebook fan, Heather H., for the ultimate compliment on this lantern. She asked if I got it at Pier 1! Nope Heather, I got it at the Habitat ReStore and it found its way into my hands in this condition:

After a Women Build meeting at the Habitat ReStore a month ago, I spied that dusty relic. An old discarded hanging light fixture. I grabbed it and promptly paid $5 for it. Then I got to chatting with the clerk at the ReStore and absentmindedly walked out without my lantern. By the time I remembered, the ReStore had already closed. It was sad… it was tragic… I didn’t know when I’d be reunited with my light fixture because the ReStore is about 25 minutes away from my home. But, there is a happy ending to my story, my mother-in-law (who gives a good name to all MILs out there) offered to swing by the ReStore the following day to pick up my lantern for me. Hugs to her for reuniting us. But, I had to laugh at the look of skepticism she gave me as she handed over the dusty light. She couldn’t see its true potential, but I could.

How about you? Would you have passed this light fixture by? Or would you have seen the potential?

Well, next time you see a light fixture like that, grab it and I’ll show you how to transform it.

Materials:

  • Old lantern style light fixture
  • Pliers
  • Wire cutters
  • Two screwdrivers (at least one needs to be flat head)
  • Damp rag
  • Sandpaper
  • Plastic drop cloth
  • Kilz spray primer
  • Rustoleum Lagoon spray paint
  • Rub n’ Buff Gold Color
  • Paper towels
Difficulty: Easy
Step 1. Disassemble the lantern by unscrewing all the parts.

Step 2. Use wire cutters to cut the wire to the light housings.

Step 3. Pull the light sockets, bulbs and lighting out of the lantern.

Step 4. Remove the finial from the bottom of the lighting and set it aside with the lantern. Discard or keep the lighting parts for some other project.

Step 5. If there is a chain attached to the lantern, insert the two screwdrivers into the link attaching it to the lantern. Rotate the two screwdrivers in opposite directions as shown to pry the chain link apart.

Step 6. Pry up the tabs on the lantern that are holding the glass in place. Remove the glass panels and set them aside.

These are the parts that I kept for the lantern:

Step 7. Wipe all the parts with the damp rag to remove any dust and debris. Then scuff the lantern parts with sandpaper and wipe off any remaining dust.

Step 8. Set the lantern and parts outside on the drop cloth.  Spray them with Kilz primer, flip the pieces over and spray again.

Step 9. When the primer has dried, inspect the lantern for any paint drips that need to be sanded smooth.

Step 10. Spray paint the lantern and parts with Rustoleum Lagoon. Flip everything after the first coat is dry and spray a second coat of paint.

Step 11. After the lantern has dried thoroughly, reassemble the lantern.

Screw the finial onto the inside of the lantern where the lighting used to attach.

Step 11. Wipe a small amount of rub n’ buff on a dry paper towel. Rub it on the cross bars of the lantern.

Step 12. Clean the lantern glass with windex and a clean rag. Then insert the glass panels back into the lantern.

Admire your new aqua beauty!

The hardest part of this project was trying to decide where to display my lantern. I could see it in every room of our home!

But, ultimately I gave it a place of prominence on our mantle. And included an old picture inside it.

Have you seen these old light fixtures? Could you ever guess that they could be turned into beautiful decorating gems?
Have a great weekend y’all. I hope you make a trip to your local Habitat ReStore and search for your own lantern.

I hope you’ll join Heather and some other friends on Facebook so you can see what I’m up to next!

Sharing with Tater Tots and Jello Weekend Wrap Up Party


You know that thing about your house that you really want to change, but it takes you a while to mull over how to change it? Well, that thing for me was our garage doors. They are the two giant doormen that greet me at least five times a day as I run errands and taxi my children to and from school. I always thought they could be a little more polished and more inviting. In this mulling over period I dreamt of painting the garage doors and boosting the character factor by adding grilles to the windows. I even created a paint preview to see what it would look like. I fell in love immediately and the hulking gray doors’ fate had been sealed.

I wasn’t exactly sure how I was going to add the grilles (cross pieces in the windows.) I thought about cutting up paint sticks or just plain strips of square dowels cut to fit, but I REALLY wanted them to look as real as possible and I liked the router profile of the real deal.

A few months later I literally almost tripped on a stack of donated window grilles at my local Habitat for Humanity ReStore. You know, the cheap ones that are pressed up against the window and always fall out. Grrrr!

That was when the “A-ha” moment happened and I figured that I could use them to dress up my garage doors. I carefully measured the panes on the garage then found a set of four grilles that would give me two cross pieces per window! Perfect! And the best part about those grilles is that they only cost $2 a piece. For $8, some paint and glue I was able to transform my garage doors from boring bland to cottage charm!

And here is the tutorial for how to add grilles to plain jane garage door windows!

Materials:

  • Reclaimed grilles from Habitat ReStore
  • Hand saw
  • Pencil
  • Tape measure
  • Paint
  • Loctite Outdoor Sealant Glue
  • Windex
  • Rubbing alcohol
  • 3M painter’s tape
  • Razor blade scraper
  • Paintable flexible caulk
  • Caulk gun
  • Wet rag
  • Gloves

Start by cutting the grilles down to size. This is how I got two crosses from each grille. First, cut the grille into two pieces as shown below:

No power tools needed. A handsaw works great.

Next, cut off the excess so you are left with two crosses that fit perfectly in the window panes of your garage door.

Test fit the cross. If your measurements are off, no worries, 1/2″ gaps can be filled with caulk.

After cutting all of the cross pieces, clean them off. Lightly sand and paint them the same color as your garage doors.

After the paint is dry, clean the glass with windex and then use rubbing alcohol to remove any dirt and debris from the glass.

Spread a bead of Loctite Outdoor Adhesive onto the backs of both the vertical and horizontal bars. Center and press the grilles onto the glass. Use painter’s tape to hold them in place.

Wait 24 hours for the glue to harden and dry. Then scrape any excess glue off the glass with a razor blade.

Time to fill in the cracks! Caulk all the seams. For the larger gaps, 1.) Apply painter’s tape on both sides of the void to 2.) keep the caulk off the window and give you a crisp, clean edge. (I’ll have a special caulk gun tutorial for you on Friday!)


3.) Remove the painter’s tape while the caulk is still wet. Let the caulk dry.


 And you’re done! How is that for adding instant character?!


I could kiss these beauties! They are definitely welcoming doormen now.

Speaking of welcome, I repainted our faded Welcome sign and hung it back up. Are you an eagle eye reader? What else changed in the pictures below? Five things have changed, can you spot them all? I’ll start you off:

  1. Painted doors
  2. Added grilles
  3. Refreshed welcome sign

Okay, one more lookey at my beautiful garage door windows and then you have to leave.

I want to give a big shout out and thank you to Waste Management and The Bagster who helped make my garage makeover a possibility. You can see more of my garage transformation here.


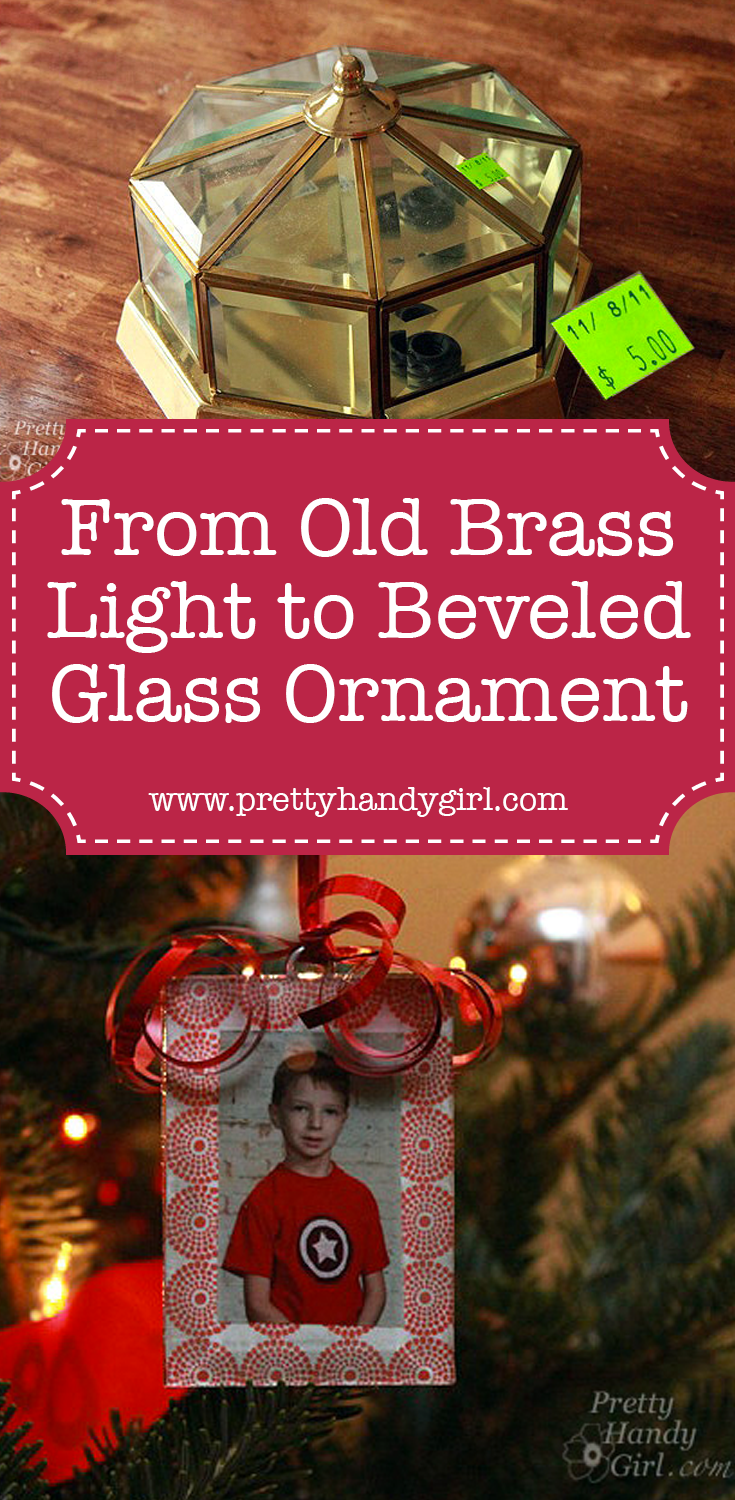
I had so much fun at the Habitat ReStore talk this past weekend. My favorite holiday decorations were these adorable beveled glass ornaments. Would you believe me if I told you that they began life as a dated octagon brass light fixture?

Well, they did! And here is the best part, for $5 you can score one of these fixtures at your local Habitat ReStore and make 16 ornaments from the one light!

Materials:

  • Beveled glass octagonal light fixture (the flimsier the brass the better)
  • Needle-nosed pliers
  • Wire cutters
  • Small flat head screwdriver
  • Gloves
  • Glass cleaner
  • Soft cloth
  • Scrapbook paper
  • Printed photos
  • Mod podge
  • Paint brush
  • Screw eyes
  • E-6000
  • Wax paper to protect work surface
  • Ribbon
  • Scissors


Instructions:

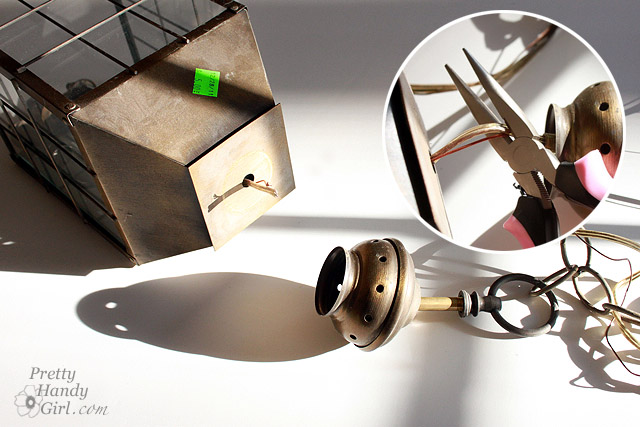
Put on your gloves for this first task! To free the beveled glass, you’ll need to poke, prod and cut at the brass surrounding the glass. Inserting a flat screwdriver will help to pry up the edges. As the edges come loose, cut into the metal with wire cutters, and pull it apart using needle-nosed pliers. All the while, use caution so as not to break the glass pieces.

After all the glass is free, clean both sides of the glass with windex and a soft cloth. Scratch off any dirt with your fingernail (or a razor blade).

Cut photos to fit inside the middle of the beveled glass piece.

Trace around the glass and cut a piece of scrapbook paper the same size as the glass.

Coat the back of the photo with mod podge and center it on the scrapbook paper.

Gently coat the front of the scrapbook paper border with mod podge (do not paint mod podge onto the photo or streaking can occur.)

Press the flat side of the beveled glass on top of the scrapbook paper/photo.

Flip the glass over and put a dollop of E-6000 at the top center of the scrapbook paper. Lay one screw eye into the glue, then cover the screw with a small dollop of E-6000 glue to secure the screw eye.

After the mod podge and E-6000 has dried, cut some pieces of ribbon and thread them through the screw eye. Make a loop with the ribbon and hang it on your tree!

Or give them as gifts to the Grandparents!

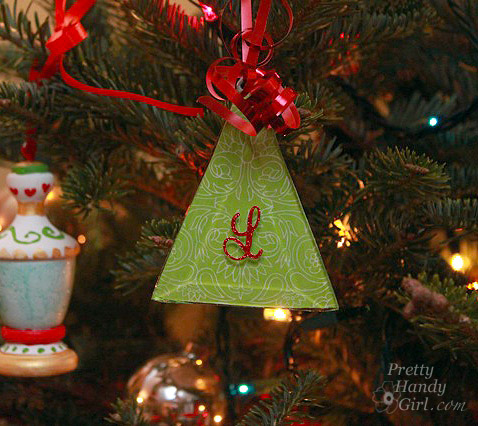
I made another ornament using scrapbook paper and stuck a monogram letter sticker on top of the glass. I also added a small quote on another ornament. The possibilities for this project are numerous!

I had to share with you a few other transformations that I showcased during the talk at the Habitat ReStore:

I took an old chandelier and flipped her over, coated her with primer, heirloom white spray paint and then added some distressing and finished with some antique gold Rub n’ Buff.

Now she’s a beautiful candelabra for our dining room table!

I used the canopy (round flat disk that attaches to the ceiling) as the base for the candelabra. When you take apart a light fixture, you can get creative by flipping and switching around parts and pieces.

Old lightbulbs became adorable little ornaments with a few stickers and a coat of spray paint. My favorite is this clear bulb that I added a heart sticker to. When I peeled off the sticker a little heart shaped window remained. Peek inside to see the filament.

If you’ve ever wrapped an easter egg with rubber bands before dying it, you’ll recognize this pattern.

A $2 cabinet door and some chunky cabinet handles partnered to form a holiday serving tray. The handles also got a little Rub ‘n Buff for shine.

I’m sorry I don’t have the tutorials for you right now. Most likely at a later date, I’ll post them for y’all.

I have two announcements:

#1 – The winner of the RIT dye giveaway is: Judi! She said,  “Dye WOOD –really !!!! Can’t wait to see what all else you (and I) can dye !! Loving it !!”

RIT Dye

#2 – My son let me paint his cast like a candy cane! I used KILZ Clean Start (zero VOC) primer and a flat brush to give his cast the stripes. One of my facebook fans had the genius idea of asking Santa to sign it!


Let’s just hope that he can keep this cast for more than a week!


Linking up to Home Stories A2Z Tutorials & Tips TuesdaysCentational Girl’s Holiday Home Craft Link PartyNot Just a Housewife’s Show Me What Ya GotFunky Junk Interiors SNS


Pin for later!


Ceiling Medallion Peppermint Wreath | Pretty Handy Girl

I just got back from Pretty Handsome Guy’s office party. We had a blast, and the evening was defined by a surprise entertainer: Doug E. Fresh who showed up to work the crowd. I have to tell you that I wasn’t too familiar with him. So when we saw him before entering the party, I was introduced to him as Doug E. Fresh. I ALMOST said, “Uh, so should I call you Dougie or Mr. Fresh?” Thank goodness I said neither and just stuck with the polite, “Hi, nice to meet you.” Within minutes of entering the room, he had the crowd moving and groovin’!

I truly enjoyed the party because I got to chat with two other “Handy Girls”. One of them reminded me that I haven’t publicized the date for my next ReStore talk! (Thanks Heath for jogging my frazzled brain!)

So, consider this your official invitation! Saturday, December 10th at 1pm, I will be speaking at the NEW Cary ReStore located at 181 High House Rd. Cary, NC 27511.  I can’t promise that Doug E. Fresh will be there, but I can tell you that it will be a fun talk with lots of cool idea for ornaments, a wreath, an advent calendar and other holiday decor. If you come, I hope you’ll stay a little afterwards so I can meet you. 😉

Want to give the grandparents something special from your son or daughter? But, you cringe at the thought of them throwing away another construction paper ornament? I guarantee, these  are 10 of the most special gifts that your children (all age range) can make for that someone special in their lives!