I’m stepping out today and making a super sonic trip from North Carolina to Maine for a guest post on my friend Kristi’s blog aptly named: CreativeKristi.com

I will be sharing the tutorial to create a Vintage Hook Frame:

You may remember the hook frame that I hung instead of my towel bar in my bathroom:

Well, I made another one to hold keys. If you want to view the tutorial, head over to Creative Kristi’s! I included a downloadable file for the “You are Home…Relax” sign over there.

And if you would like a version of my Star Soap sign, click HERE.

Pssst, leave Kristi some sweet comments. She’s been super busy preparing to put her house on the market. Did I mention that she’s also a momma to 2 little ones? Yep, she’s pretty busy right now.

She also has a really unique giveaway for a trip to GE Momsperience 2011 in Louisville, KY. Today is the last day to enter, so be sure to put your name in the hat HERE.

As we say goodbye to February, I have one final guest blogger for you. It is with great pleasure that I introduce you to Erin from Two Story Cottage.

If you haven’t been in Erin’s Two Story Cottage, she gives her readers a warm open invitation to view her beautiful home.

Two Story Cottage Dining Room

Reading her blog is like leafing through the pages of a home design magazine! And she shares her decorating secrets with you! Her home can be described in one word, GORGEOUS! Be sure to accept her invitation to view her home today.

Please welcome Erin from Two Story Cottage.


Dear Friends of Pretty Handy Girl,

Hi! I’m Erin @ Two Story Cottage. I’m a catalogaholic who enjoys art and all things cheerful in decor. As a Mom of two little ones I’m working to achieve balance between my creative side and my responsibilities at home. I’m a DIY newbie so I’m a total work in progress!

Today is the last day of “Falling in Love with your Home” so I’m hoping that by now you are smitten. If not maybe creating a focal point will tip you over the edge. The goal of a focal point from a design perspective is to draw the viewer’s eye to a central point. Do you have a room in your home that needs some “umph”? Or maybe you are looking to focus attention away from something else? Creating a focal point may be your answer.

There are many great ways to accomplish this! I’ll show you some ways I have created focal points in my home.

A Focal Point Using Color
We have a TV over the fireplace in our family room which I like to draw attention away from. To do that I hung a large, bold painting on the perpendicular wall.  It draws your eye away from the TV wall for sure!

A Focal Point to Ground the Room
We have a living room/ dining room combination that felt like a bowling alley. To help define the living room I created a large focal point by adding a fireplace ( an ambitious project for a DIY beginner like me). The addition of the fireplace served two purposes. It took attention away from the looong space but also served as a central point to arrange furniture around.  I painted it white and used glaze to antique it for contrast so that it would stand out a little more while staying within my neutral palette.
A Focal point to distract from the obvious

My desk in the breakfast room is large and seemed to stick out like a sore thumb in our very open home. An unintended focal point! However, I did NOT want to get rid of my workspace so I decided to take attention away from its’ purpose. I took away all of my obvious office supplies and utilized the shelves to decorate it as if it were a buffet. I also mounted the hutch to the wall and added Ikea cabinets
underneath to store all my clutter.

A Focal Point to Create Interest
My dining room is very neutral and I love it but it needed something to jazz it up a little. Enter my accent wall. A few stripes and decoupaged plates took it from barely noticeable to “wow”.

Thanks for letting me guest post, Brittany.  You have definitely empowered me to find my inner DIY skills!

Thank you Erin! I hope you enjoyed her post on Focal Points. I realize I have some work to do in a few of my rooms now. How about you?


This concludes the “Falling in Love with Your Home” series at Pretty Handy Girl.

This is also your last chance to enter my 1,000 follower giveaway. Be sure to enter HERE,
because I will be choosing a winner on March 1st!

IMG_2642

Today, I have another special guest for you. Kim from Sand & Sisal is here to share with us some tips for using plants to decorate and improve our homes.

And the best news is that you don’t need a green thumb to care for many of these. She breaks down each plant’s water and light needs.

If you haven’t been to Kim’s blog, you need to surf on over there right now (get it? Sand & Sisal, Surf?! Ha, ha, I’m so witty. One of my favorite projects she has tackled was renovating her 1949 Bathroom.

Bathroom After

Amazing transformation isn’t it?! Okay, now everyone kick back, and enjoy a guest post from my friend Kim at Sand & Sisal.

Hello everyone! I’m Kim from Sand & Sisal, and I’m so glad to be guest posting for Brittany’s “Fall in Love with Your Home” series today. Brittany and I are southern girls and actually live only a few hours away from each other, but we met through blogging and were Twitter friends. I was thrilled to meet her face to face at the Blissdom 2011 Conference held at Opryland in Nashville, TN.

PHC & SS

The Opryland Hotel has 9 acres of lush indoor gardens and even though there was snow outside the tropical foliage and flowers brought a touch of paradise that melted any vacationer’s wintery chill. Below are some pictures I took in their gorgeous Conservatory.

IMG_2402 IMG_2421 IMG_2408
IMG_2417 IMG_2394

Springtime (thankfully) is approaching fast here in the South, but you can have a taste of spring by bringing a bit of the tropics indoors! One of my favorite plants to have around the house, and had also covered Opryland’s gardens, is the Peace Lily. Its lush green foliage, beautiful white blooms, and low maintenance make the Peace Lily a household favorite.

IMG_2642

The Peace Lily requires low light and should be watered to keep soil moist but allow the soil to dry out between watering. The Peace Lily is one of the top 10 plants that clean the air in your home. They are known to reduce formaldehyde and carbon monoxide levels.

Do you have an empty corner that just needs something? I have several! The Majesty Palm, another “clean air plant” is what you need!

majesty palm

Majesty palms thrive on bright light and minimal water but I have found they do quite well in moderate light. I have several that are all on the north side of my home. Water these palms once a week but make sure they are not sitting in water or they will yellow and drop dead quickly.

Need a pop of color? The Flamingo Flower comes in red, pink, white, or lavender. It blooms year round and requires medium light with moist soil. I have found the Flamingo Flower to be an easy plant with a showy blooming performance.

flamingo flower

Another plant with bright, bold color is the Croton. Croton’s start out dark green but will develop bold color as they mature and are allowed to have bright light and cooler temperatures. So if your Croton is lacking in color, then move it to a bright window but don’t let it get overheated. It loves to be moist so this one requires watering at least once a week. The Croton is another top “clean air plant”.

croton plant

Plants not only help clean the oxygen in our homes but add a sense of tranquility and comfort to our indoor spaces. Choose an empty corner or a lonely tabletop and add lush plant, and I promise, you’ll smile, and maybe just breathe a bit better!

Kim

Thank you Kim! I love decorating with plants! They offer such life and texture to my vignettes.

After reading Kim’s post, I’m ready to try my thumb at a bigger species. So, I’m off to the nursery to buy one of those gorgeous majesty palms. I had not idea I could grow one of them in my home.

How about you? Do you have any plants you love to decorate with?

I hope you’ve enjoyed the posts on “Falling in Love with Your Home” in February. We’re in the home stretch (yes, pun intended) now. Today I have my roomie from Blissdom, Sandra from Sawdust and Paper Scraps. She and I love our power tools, and LOVE to build things. I think it would be a blast to work on a collaborative project one day. She’s definitely my soul sister.

Please welcome the lovely Sandra from Sawdust and Paper Scraps who is going to show you how to disguise an ugly view!

Good morning Pretty Handy Girl fans! I’m Sandra from Sawdust and Paper Scraps, here to share an easy and inexpensive project to transform and beautify a window with a less-than-stellar-view!

(Or a window where you want privacy without blinds or drapes like a bathroom or shower.)

We have a basement and even after I added casing, trim and paint to the inside of my window… it was still really unattractive- outside!

So I went to Lowe’s and bought a $14 roll of frosted glass vinyl window cling!
Before installing, I made sure my window was as clean as possible.  I had to clean AND scrape off some paint because SOMEONE was a little sloppy!  (uhem-me)

I installed it on one window by myself and it was something like a scene from an I Love Lucy rerun.  Vinyl flopping down over my head, sliding off one side while I was trying to smooth out the other…
Definitely easier to install with 2 people. But do-able with only one!

The instructions for the stuff I bought said to spray the window and the sticky side of the vinyl (with a liquid that you can purchase separately. But, you can also use a soapy water mixture in a spray bottle).  You have to peel off the backing which I did just a little at a time while person 2 sprayed and then stick it to the window.

After you put the vinyl on the window, use a utility knife to trim off the excess and a credit card or little squeegie to smooth out the wrinkles and push the extra liquid out from under the vinyl.  While it’s wet, you can pull it off and reposition it- so keep it all wet until you have it placed just right.  Then let it dry.  That’s it!

Easy.

I think it’s a big improvement for relatively little cost or effort.

This particular room is my daughter’s playroom so I also built some shutters,


a wall of storage,

and a playhouse. If you’re looking for another project to whip up!

But it all started with the window-well.

And a little vinyl cling!

Thanks for having me Brittany!  And thanks for letting me share with you all one thing I did to help me “Fall in Love with My HOME!”

Thank you Sandra! Great tutorial. I love how easy and quick that solution was. If you haven’t been to Sandra’s blog, you need to zoom over there now. She is the Queen of built-ins and decorative mouldings. Plus, she has just enough crafts to keep you creative!

Hey all, I’m super excited to share a sweet friend with you today. I met Kristi at Blissdom and she is one of the most unselfish women I’ve ever met. She blows me away when it comes to her blogging knowledge and business savvy . But, what I really wanted her to show you was her faux granite countertops! If you hate your countertops, you are going to want to see this!

But, first a little more about Kristi’s blog. Kristi truly is creative, she blogs about crafts, home renovations, and oodles of other ideas! Check out this ingenious solution she came up with for hiding an access panel in her home:

She turned it into a cute framed chalkboard!

Be sure to hop over to her blog to get the full effect of Creative Kristi!

Now, please welcome Creative Kristi to Pretty Handy Girl:


Hey all! My name is Kristi & I blog at Creative Kristi. A little about me: I’ve been blogging for over 2 years & just love it-it’s my creative outlet. I’m married for 4 years to my wonderful husband, Military Man, who is in the Army National Guard. We have two beautiful kids- Little Man who is 3 & Miss E who is 8 months. We live in Maine & are SO READY for spring – how about you?

I’m so happy that Brittany asked me to share my counter-tops with you during her “Fall in Love with Your Home” series because doing this really did help me fall more in love with the home we have rather than always pine about what we didn’t have.

See, I had these ahem lovely baby blue countertops (with matching wall paint) when we moved in:

While I’m sure many of you are just so jealous of my very 1980’s kitchen, I was not so much a fan. But getting new countertops was not in the budget for a very long time. So I started researching alternative countertops. I loved concrete counters but when I priced it out it was still pretty expensive-even the DIY version. Then one day I stumbled upon someone who had painted their countertops to look like marble. I’m not a fan of marble but I thought surely the same concept could apply to granite counters. Nevermind that I am not an artist-I can’t even draw a person! I decided to just go for it. The materials listed online were very expensive paint and sealer-I figured I could try it with little bottles of acrylic craft paint and a glossy sealer (supplies listed below) I found at my local hardware store.

It took me one week and many bottles of acrylic paint but less than $30 later I had my ‘granite’ countertops!

It worked, looked amazing & two years later it still looks new! (You can read more about the transformation HERE.)

I even put together a video tutorial so that you can do your own if you’d like! You can watch it on YouTube HERE.

Here is a close up of the ‘granite’ I created.

I know that there are counter top paints now out on the market but I can pretty much guarantee they don’t come close to this level of ‘fooling’ people because they are usually only one or two colors, you need multiple colors & varying patterns in order to mimic mother nature. Besides I think acrylic paints, a gloss sealer & paper towels might just be cheaper! I still (2+ years later) get asked all the time when we got our new granite counters!

Supplies:

  • One U-G-L-Y laminate countertop (mine was blue)
  • A cleaner of some type and a rag (I used a 50/50 mixture of vinegar to water- as I do to clean most surfaces in my house)
  • 1 Quart of Kilz primer (or other stain blocking primer-you need something that will ‘block out’ the color underneath & also give your acrylic paint something to ‘stick to’)
  • Acrylic Paint in colors to match a print out of granite you like. (Just google granite countertops and find an online store that has close ups of the granite…find one you like, print the picture and head off to the craft store!)

I used FolkArt brand (made by Plaid) and the colors I used are: 938-Licorice, 425-Medium Grey, 2381-Battleship Grey (I did one section of my counter top in this and didn’t like it so used it very very sparingly after that), 450-Parchment, 602- Country Twill, and applied with an old toothbrush to just lightly mist the counter top: 660-Metallic Pure Gold.

  • An old toothbrush
  • paper towels
  • a piece of cardboard or something to squirt your paint onto.
  • Foam brushes (for clear coat application)
  • Some form of high gloss clear coat-non-yellowing (I used: Water-based Polycrylic Protective Finish in Clear Gloss-I only bought 1 QT. I believe but it will depend on how much counter space you are painting)

Thank you again Brittany for letting me share my favorite tutorial & if any of you try this please feel free to send me pictures-I would love to see them & feature them on my blog!

Have a happy day,

Thank you Kristi. Okay, so seriously, isn’t that an amazing transformation! I love that she was able to re-create the look of granite so successfully.

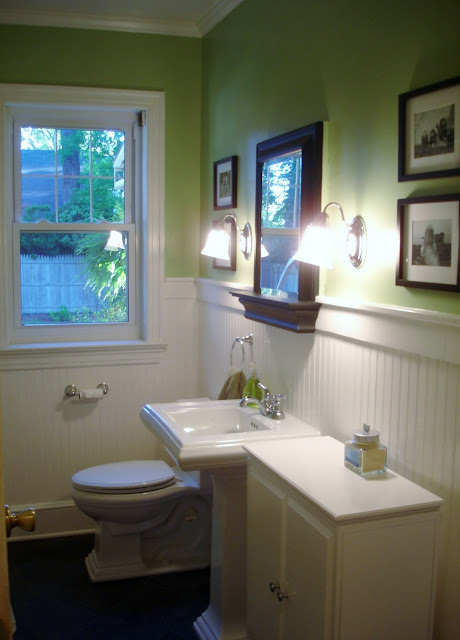
I know there may be some doubters amongst you that don’t believe that you can repaint laminate counters and have them last. Well, I can vouch for the fact that you can re-paint laminate countertops because ours has lasted over three years. You can see them in my guest bathroom vanity makeover where I painted over the harvest gold counters.

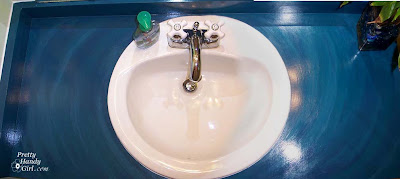
Those counters still look almost new. The only issue popping up is that there are hard water stains right behind the sink, but that would happen regardless of the counter surface. I hate hard water.

I hope you are enjoying the “Fall in Love with Your Home Series”.
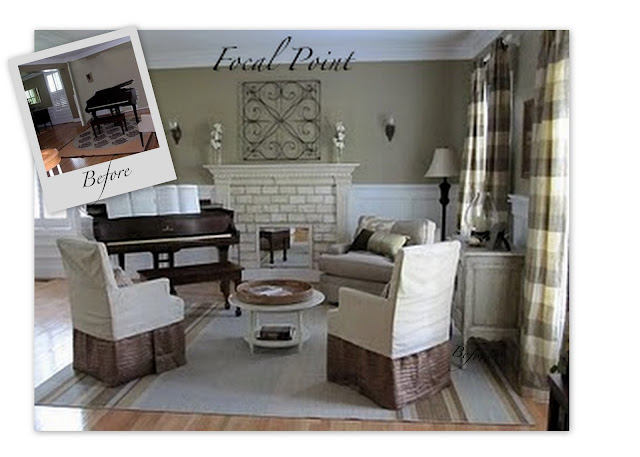