Personalized Rustic coasters sawdust2stitches for www.prettyhandygirl.com

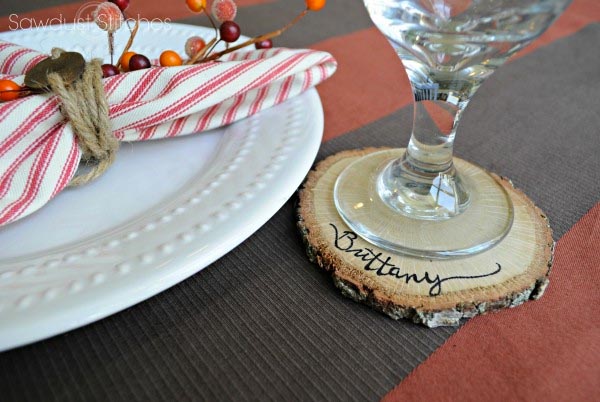
Today I have the ever fabulous and always vivacious Corey on stage. She will be sharing how to make these Personalized Wood Slice Coasters.

Rockstar DIY Series

Corey is the rockstar designer behind Sawdust 2 Stitches. As if you had any doubt, this girl is multi-talented with her building and sewing skills! You’ll definitely want to check out her amazing gallery of tutorials.

Hey, I think I hear a chainsaw? Take it from here Corey!
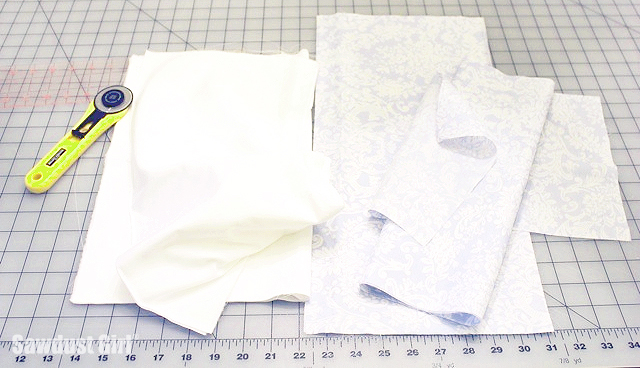
page_break_2

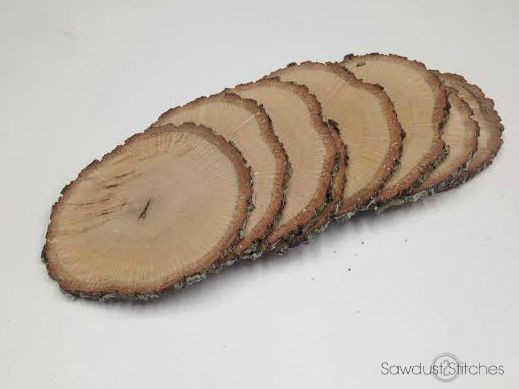
Hey all, this is Corey from Sawdust 2 Stitches. I am one of THOSE people, that when I get an idea, I run with it… and I run fast. One day I decided that I didn’t like the tree in our front yard. Long story short, I had a small supply of wood logs at my disposal.

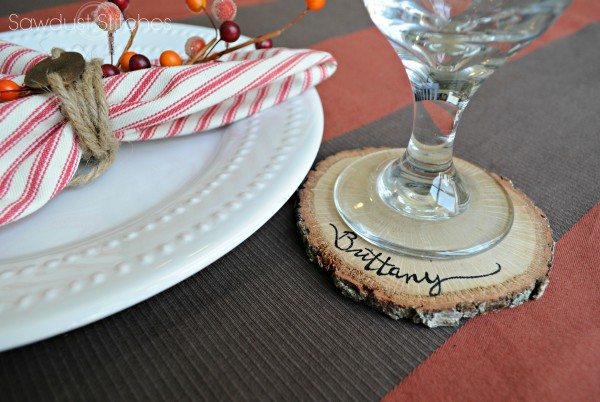
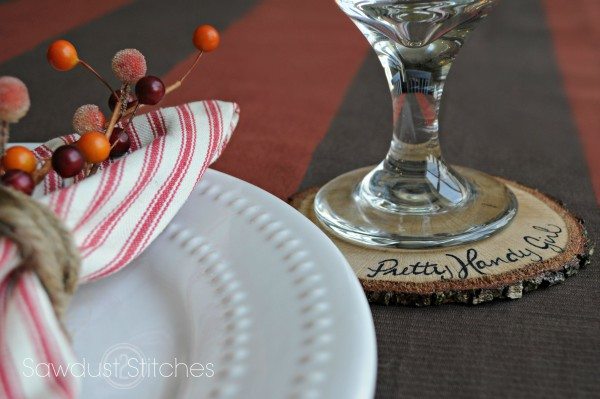
As the Holiday Season is quickly approaching, I decided to slice up the stump and use them in a plethora of festive decor. One such idea was Personalized Wood Slice Coasters. These are great for anyone attending and/or hosting a holiday dinner! This little tutorial will have you prepared to make the atmosphere absolute perfection. Or if you are attending an event these would make thoughtful hosts gifts.

Rustic coasters sawdust2stitches for www.prettyhandygirl.com

Materials:

  • Log or Wood Slices
  • Pencil
  • Fine Tip Sharpie
  • Poly Acrylic
  • Foam Brushes

Instructions:

As I stated earlier, I had wood logs at my disposal and I chose to slice them about 1/4″ thick on my compound saw. One thing to consider, if you are using fresh wood they will be undergoing a drying process for a few weeks, and they can crack! I had some of mine do this, but truth be told, I kind of liked it. It added a little character. However, if you would prefer them not crack-less variety there are ways to lessen the possibility. I have been told that if you store the wood slices in in a double bagged brown paper sacks, it will prevent them from drying to quickly. Simply open the bag every day to let in fresh air, and then reseal it.

HOWEVER if you don’t have time for that, many craft stores have wood slices available and ready to use.

wood slices

Once the slices are ready to use, I began by drawing on my design with a pencil first. ( If you hate your handwriting you can always use a stencil or transfer paper. ) Read more

Make Your Own Finger-Printed Star Pillows | Pretty Handy Girl

Make Your Own Finger-Printed Star Pillows | Pretty Handy Girl

Personalized finger-printed envelope star pillows are an easy and fun gift item to make. My boys and I enjoyed making these pillows for their home room teachers. We got the idea from Cristina’s beautiful seaside themed thumb print pillows.

Materials:

Make Your Own Finger-Printed Star Pillows | Pretty Handy Girl

  • Fabric (I used bleached and washed leftover drop cloths)
  • Pillow insert
  • Thread
  • Sewing machine
  • Freezer Paper
  • Fabric Paint
  • X-acto knife
  • Small Flat Brush
  • Permanent Marker
  • Scissors
  • Piping (here’s the tutorial to make your own piping)

Instructions:

Cut your front fabric with 1 inch excess around the pillow form. Cut the two back pieces of fabric with a 1 inch excess on all sides, plus allow for a 3″ overlap in the center.

Make Your Own Finger-Printed Star Pillows | Pretty Handy Girl


Fingerprinted Star Tutorial:

Here’s a great way to customize your pillow for the recipient. Let your little ones finger-print inside the star. Read more

Crochet Market Bag

21 Ways to Make and Decorate Tote Bags | Pretty Handy Girl

Have you been enjoying all of the awesome tote bag tutorials this week? Today we’ve rounded up even more sewing tutorials, decorating ideas, and an amazing crocheted tote bag. Let’s talk about 21 ways to Make and Decorate Totebags.

How To Sew Totebags:

canvas-tote phg

Who can resist an adorable lined tote bag with a monogram. Can you believe this beauty is all DIY! Jaime of That’s My Letter whipped up a classic monogrammed canvas tote.

Quick-Easy-Tote-Bag

Drop cloths aren’t just for catching paint anymore! Heather of The Sewing Loft shows how to make an Easy Canvas Tote Bag out of painter drop cloths!

Fox book bag

What does the fox say? He’d say he’s head over heels in love with this tote bag. Perfect for back to school, Heather shows how to sew or iron on this fox applique with sweet embroidery details.

reversible-reusable-tote-tutorial

Sandra from Sawdust Girl is famous for her amazing woodworking so it should be no surprise that she has a fabulous tutorial for Reversible Reusable Ruffled Grocery Bags.

how-to-make-a-piped-edge-totebag

It’s okay to cheat a little. Grab a store bought tote and dress it up that plain tote bag with piping. This tutorial also shows a cheat for the non-sewer!

decorate tote with old shirt

Old shirt + another store bought tote = Adorable! Customizing a Totebag With an Old Shirt in an hour.
This goes straight on my Christmas to-do list!

T-Shirt-to-Library-Tote-Bag

I know, it’s hard to discard that favorite t-shirt. Now you don’t have to! Repurpose that favorite tee into a library totebag? Jessica from Mad in Crafts shares how easy it is in her step-by-step tutorial.

tote bag from tee shirt

What’s better than repurposing one t-shirt? Of course, recycling two shirts! On Creative Green Living, Carissa shares another t-shirt-to-totebag tutorial using two shirts. One makes a stylish liner.

PostBreakblue

No-Sew Totebags: Read more

Customize a Tote Bag with an Old Shirt | Pretty Handy Girl

Customize a Tote Bag with an Old Shirt | Pretty Handy Girl

Welcome to another Tote Bag Week Post! Are you getting lots of ideas for how to make and dress up tote bags? If you’re just joining in here’s the line up:

Today I have a fun tutorial for Customizing a Tote Bag with an Old Shirt.

Materials:

  • Canvas tote bag
  • Long-sleeve button shirt
  • Scissors
  • Pins
  • Sewing machine (or needle and thread)

Instructions:

Begin by cutting off the sleeves and cuffs on your shirt. Save the sleeves to use on another project, like Adding Piping to a Tote Bag (or piping on a pillow, an upcoming tutorial.)

Customize a Tote Bag with an Old Shirt | Pretty Handy Girl

Cut off the pockets (cut as close to the seams as you can.)

Customize a Tote Bag with an Old Shirt | Pretty Handy Girl

For the customized tote bag, we’re going to use the cuff and two pockets.

Customize a Tote Bag with an Old Shirt | Pretty Handy Girl

Fold the cuff in half and cut it.

Customize a Tote Bag with an Old Shirt | Pretty Handy Girl

Stitch the end of the raw edges on the cuff closed.

Customize a Tote Bag with an Old Shirt | Pretty Handy Girl

Pin the cuff halves to the inside center of your tote bag (buttons facing out.)

Customize a Tote Bag with an Old Shirt | Pretty Handy Girl

Stitch the cuff end to the tote bag until secure.

Customize a Tote Bag with an Old Shirt | Pretty Handy Girl

Pin the pockets to each side of the tote bag (if your tote bag doesn’t have sides, the pockets would look just as cute on the front and back of the tote bag.)

Customize a Tote Bag with an Old Shirt | Pretty Handy Girl

Stitch along the top of the pocket. Then lift the pocket flap up and sew the rest of the pocket to the tote bag.

Customize a Tote Bag with an Old Shirt | Pretty Handy Girl

Feel free to finger print a star on your tote bag (tutorial for finger-printing stars here.)

Customize a Tote Bag with an Old Shirt | Pretty Handy Girl

These shirt embellished tote bags are perfect for a day at the beach. Or as a gift for a friend, teacher or grandparent.

Customize a Tote Bag with an Old Shirt | Pretty Handy Girl

Personally, I think I’ll be making many more of these in the future.

Customize a Tote Bag with an Old Shirt | Pretty Handy Girl

I hope you enjoyed this tutorial for customizing a tote bag with an old shirt. Get ready for a grand finale tomorrow!

PHGFancySign


Pin for later!

Reversible Tote Bag Tutorial by Sawdust Girl | Pretty Handy Girl

Are you enjoying Tote Week?!

Tote Week | Pretty Handy Girl

If you’re just joining in here’s the line up:

Today I have one of my closest friends and blogging buddies here. If you don’t know who I’m talking about, she’s the amazing, the incredible and the always vivacious Sandra from SawdustGirl.com. And she’s going to give you a tutorial for sewing those cute reversible and reusable tote bags!

page_break_2

Howdy Handy friends! I’m Sandra of Sawdust Girl – formerly Sawdust and Paper Scraps. I try to reduce, reuse and recycle anyway so this tutorial for reusable, reversible, ruffled totes is fitting. Don’t ya’ think? I like to use my totes as grocery bags and have given a pair of these as gifts along with a few reusable produce bags found at the dollar store.

Reversible Tote Bag Tutorial by Sawdust Girl | Pretty Handy Girl

I used an old sheet and a set of pillowcases to make mine but for a gift item, maybe use new fabric. If you look for sheets on clearance you can get a LOT of fabric for just a few dollars.

Reversible Tote Bag Tutorial by Sawdust Girl | Pretty Handy Girl

This is a really easy pattern that I made from looking at a canvas tote. (It fits perfectly on a standard pillowcase.)

*Seam allowance? I run the fabric along the right side of the foot. I think it’s a waste to take a wide allowance and then trim!

Instructions:

1. Use the same pattern for the bag and the liner. You could use the same fabric for both or mix it up for fun. I like to use 2 different fabrics so I can flip it inside out and have a totally different bag!

Reversible Tote Bag Tutorial by Sawdust Girl | Pretty Handy Girl

2. Sew all 4 pieces (excluding the bottom) together like this: front/side/back/side making one long piece of fabric.

Reversible Tote Bag Tutorial by Sawdust Girl | Pretty Handy Girl

3. If you are going to add any kind of embellishment, now is the time. I’m adding three rows of ruffles! Read more