Scrap Wood Planter Box

Scrap Wood Planter Box

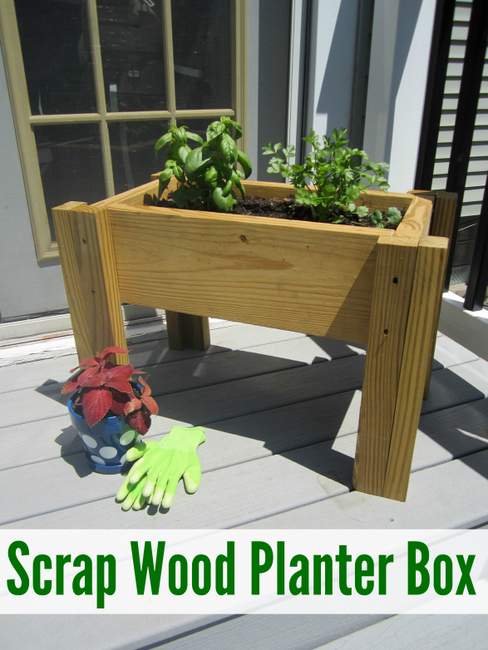
Hi, it’s Jessica from Decor Adventures, back this month with an outdoor project that’s perfect for summer. You know how your garage is filled with scrap pieces of wood from other projects you’ve done? Today you get to put those scraps to good use and make a planter box for plants or herbs. It’s very easy to use what you have and it won’t cost you much at all. Here’s how to make a scrap wood planter box.

The main box is made from 2″ x 8″ boards. You can make this box whatever size works for your space, or based on how much wood you have in your scrap pile!

Materials

The idea for this project is to use what you have on hand, so some of the sizes of your wood may vary. Here are the materials I used for this planter box.

  • 2×8″ pressure-treated wood for box and legs (or 2″x4″ pressure treated wood for the legs)
  • ChoiceDek composite deck material for bottom of box
  • 2″ x 2″ wood for bottom of box
  • Scrap triangles cut from 2″ x 4″ boards (Triangles can be cut out of 2″ x 4″s on a miter saw set at 45° degrees.)
  • Miter saw
  • Safety glasses
  • Drill
  • Screws
  • Potting soil
  • Plants or herbs

Instructions

The width of the three deck material pieces I used were 6 3/4″ each. This material was used to build our deck, so we had leftovers on hand and it’s great to use for plants since it won’t rot. The composite deck material is sold at home improvement stores and comes in different lengths and widths.

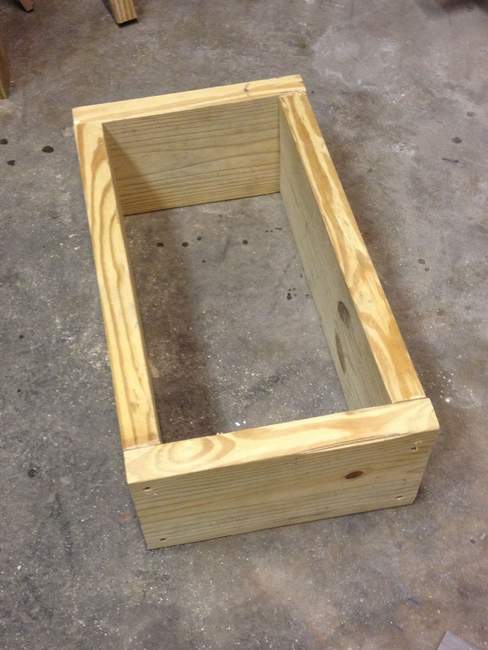
For the box and legs, you can use pressure treated lumber since it also resists rot and insects. The long sides of the box measure 19 3/4″ and the shorter end pieces measure 12 1/2″.

Cut your wood to size with a miter saw.  Using your drill and screws, assemble the box into a rectangle. Place the ends on each side of the longer boards as shown below:

Scrap Wood Planter Box

Screw the 4 triangles to the bottom of your box, into the corners, with your screws. Attach  the 2″ x 2″s along each long side of the box also lined up with the bottom of the box. This should give support on the underside so you can rest the composite pieces inside to make the bottom.

Scrap Wood Planter Box Read more

Lowe's Spring Makeover Reveal | Pretty Handy Girl

Lowe's Spring Makeover Reveal | Pretty Handy Girl

**This project and post has been sponsored by Lowe’s Home Improvement. They are a company that works hard to give back to the community. I am honored to have been given the opportunity to make a difference in one family’s life. Thank you, Lowe’s!**

You guys, there is one thing I love more than a beautiful makeover. That one thing is giving a beautiful makeover to a deserving family. Elizabeth and Jörg moved to this home in September. They had no family nearby and didn’t know a lot of people in the area. And then one of the harshest winters on record hit. For this family, the winter brought more than cold and snow. They also dealt with their youngest being hospitalized and a miscarriage.  Elizabeth’s sister, Sarah applied to give Elizabeth and Jörg a landscape makeover. As the oldest of three girls, I know how awful it feels when one of my sisters is hurting. And I know I’d do anything to help them.

That’s why it felt so good to give up four days (two travel and two work days) to give this young family a beautiful makeover.

If you remember, this is what the home looked like the morning we arrived. No landscaping.

front-yard-before

No pathway. No railings. No plants.

barren-landscape-bed-before

No grass or defined play space. In one respect, we had a clean slate, but it left us with a lot to do!

swing-set-before

And, I couldn’t have done it without all these heroes!

volunteers

After two days of non-stop working, we kicked the homeowners out of the yard, sent them inside and told them they couldn’t look at their yard for the last few hours of the makeover. When they came out, their reaction was priceless: Read more

Dragonfly Garden Decor using a Dollar Store Whisk and Skewer | Pretty Handy Girl

Dragonfly Garden Decor using a Dollar Store Whisk and Skewer | Pretty Handy Girl

Summertime is coming and I’m enjoying spending more time in our garden. I’m always looking for cute craft ideas that I can do with the kids while school is out. When I saw this great idea for making a wire whisk dragonfly on Morena’s Corner, I knew I had to try it. I altered Morena’s plans slightly using plastic beads and used a skewer for the plant stake. The cost and materials are minimal to make this Dragonfly Garden Decor using a Dollar Store Wire Whisk and Skewer. This craft can be done with the kids, but you’ll need to be the one to cut and bend the wires and watch out for the pokey edges with real little kids.

Dragonfly Garden Decor Materials:

Dragonfly Garden Decor using a Dollar Store Whisk and Skewer | Pretty Handy Girl

  • Wire whisk
  • Wire skewer
  • Beads
  • Needle-nosed pliers

Dragonfly Garden Decor Instructions:

Begin by bending the first wire loop out to the side to create a wing.

Dragonfly Garden Decor using a Dollar Store Whisk and Skewer | Pretty Handy Girl

Repeat with three more loops (2 on each side).

Dragonfly Garden Decor using a Dollar Store Whisk and Skewer | Pretty Handy Girl

Use the needle-nosed pliers to cut one wire loop into two short pieces as shown below. (You might need to twist the pliers back and forth to cut the wires.) Read more

Heart Shaped Topiary | Pretty Handy Girl

Heart Shaped Topiary | Pretty Handy Girl

The season of love is upon us. Have you embraced it? Or are you struggling to find something cute but not cutesy. Or something non-red or pink? Today I have a tutorial to show  you how easy it is to create a heart shaped topiary. Keep it for yourself or give it to the one you love. As the vine continues to grow, the heart will be embraced by the leaves and fill out.

In late Autumn, we had a final blue bloom on our hydrangea bush. I clipped it and brought it inside before the impending cold snap arrived. To keep the hydrangea company, I put a few snips of variegated ivy into the vase too.

Heart Shaped Topiary | Pretty Handy Girl

Over the winter, the ivy grew a healthy root system. Ivy is an easy plant to root. Simply put some clippings in water and keep it watered. After the ivy has rooted, you can create a beautiful topiary plant for a kitchen window sill.

Heart Shaped Topiary | Pretty Handy Girl

Begin by collecting your materials.

Materials:

Heart Shaped Topiary | Pretty Handy Girl

  • Ivy with roots
  • Copper water line or thick wire
  • Wire cutters
  • Pot
  • Rocks
  • Sand
  • Potting Soil
  • Trowel
  • Water

Optional: string, floral wire or a twisty tie

Instructions:  Read more

Flying Yellow Jacket | Pretty Handy Girl

Honeybee vs. Yellow Jacket | Pretty Handy Girl

Summertime is here and I can’t keep shoes on the kids…

Honeybee vs. Yellow Jacket | Pretty Handy Girl

…or clothes for that matter.

Honeybee vs. Yellow Jacket | Pretty Handy Girl

I think my kids inherited it from me. I have fond memories of running around our backyard as a child barely clothed. I also have a not so fond memory of stumbling upon a yellow jacket nest. I ran until my little legs gave out and I hit the ground face first as those little devils stung my backside several times. Nothing puts a damper on summer fun like a bunch of yellow jacket stings on your hiney. Two years ago, my oldest son had the unfortunate experience of stumbling upon a nest in our yard. If I could have taken the stings for him, I would have. Lucky for us, he didn’t experience an allergic reaction on top of the stings. But, allergic or not, yellow jackets are not welcome in my yard!

That summer that I got stung, I learned to tell the difference between yellow jackets and honeybees. Do you know how to tell the difference? It’s important to stop and take a moment to identify which you are dealing with. Did you know that honeybees and yellow jackets are very different in appearance? Once you know what to look for, you can easily identify them: Read more