Rustic Scrap Wood Shadow Box Frame | Pretty Handy Girl

Okay all you woodworkers. You know as well as I do that you have an ever growing scrap wood pile that you don’t want to throw away because you know you’ll use it one day.

Rustic Scrap Wood Shadow Box Frame | Pretty Handy Girl

Well, today is that day! I challenge you to use some of that scrap wood to make a Scrap Wood Shadow Box Frame like this one.

But, if this isn’t your cup of tea, Sawdust Girl has an entire link up party of scrap wood projects. And you can link up your own scrap wood challenge too!

Okay, so the truth behind this project is that Pretty Handsome Guy has been begging me to frame his U.S. Open flag from Pinehurst almost two years ago. My poor hubby rarely asks for anything, and I figure he waited long enough.

Materials:

  • Scrap wood
  • Backer board (scrap bead board, masonite, thin plywood)
  • Construction glue
  • Lattice edging
  • Wood stain
  • Plexi-glass
  • D-hooks
  • Drill bit
  • Drill
  • Double stick foam tape
  • Brad nails
  • Nail gun or hammer
  • Machine screws
  • Saw (miter, jigsaw or Dremel UltraSaw)

Optional: Gorilla Glue

Instructions:

Cut backer board to the size you want for your frame.

Rustic Scrap Wood Shadow Box Frame | Pretty Handy Girl

Lay out your scrap wood on top of the backer board until it is covered completely.

Rustic Scrap Wood Shadow Box Frame | Pretty Handy Girl

I tried Gorilla Glue Construction Adhesive on this project (Gorilla Glue sent me a tube of glue to try out.) It dried and held all the scrap wood firmly.

Rustic Scrap Wood Shadow Box Frame | Pretty Handy Girl

Lift up one piece of scrap wood at a time and apply construction glue onto the backer board. Read more

Wall Art Pottery Barn Knock Off

Today we have Roxanne taking over the Rockstar DIY stage! Roxanne is the knock off queen. She will be showing us how to create these beautiful knock off Pottery Barn Blue Textile prints for much less. If Roxanne sees something from a high end store, she has the super power to create a knock off for 1/10th the price or less! She recently knocked off a $695 Restoration Hardware capiz chandelier for only $52!

You can do the math, but I know that’s a real steal.

Roxanne from The Honeycomb Home

Roxanne, is the talented DIYer behind The Honeycomb Home blog. She can frequently be found turning her cookie cutter home into a beautiful home on a budget. Please welcome the dynamic Roxanne to the stage!

Rockstar DIY Series

page_break_2

I was recently browsing my favorite website, Pottery Barn, and noticed this set of beautiful Framed Blue Textile Art. I loved the wooden frames and the blue fabrics, but not the price! They sell for $169 for one, or $334 for the pair! I realized this would be very easy to knock-off for a fraction of that price.

PB framed textile art

To re-create this look, I ordered fabric samples from Calico Corners. To make this work, you will need the larger sized samples. Average size samples are usually around 5.5″ squared. The larger versions at Calico are 27″ X 18″. I always prefer to order the larger size because its hard to get a good sense of how it will look in the room from the small size. Here is a picture of the small sample versus the large.

Fabric Sizes

I found two beautiful wood frames at Michael’s, which are normally priced $29.99, I scored them on sale for $10 each, it was a steal! I bought them in size 16″ X 20″, which is a little smaller than the Pottery Barn frames. Read more

Create this fabulous knock-off West Elm wooden framed mirror without any fancy power tools. Just use a 1x6 tongue and groove board which is the perfect fit to insert an inexpensive IKEA mirror.

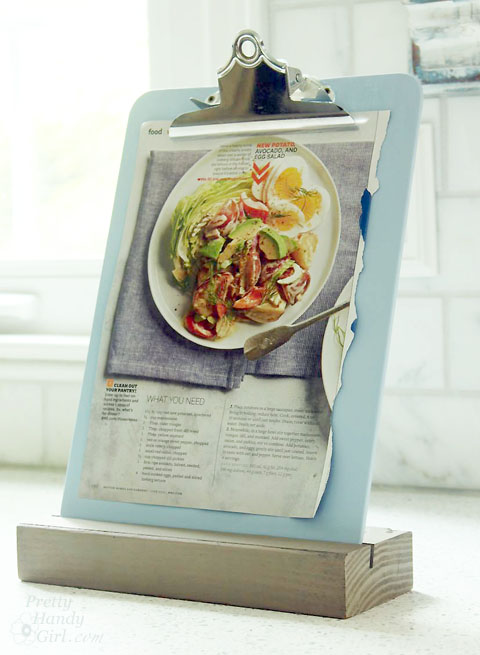
Today on the Rockstar DIY stage is Kim, with the tutorial to make this beautiful money saving West Elm Inspired Framed Mirror!

Rockstar DIY Series

Kim is the power DIY blogger behind The Kim Six Fix. She shares the belief that there isn’t any project big or small that she can’t tackle. Currently Kim lives in California with her husband and three little ones. But, she used to live practically in my backyard in Durham, NC. Unfortunately we never met before she moved. #MissedOpportunity Because if we had, we probably would have fixed up an entire block of houses together!

Kim Six

Today Kim is here with the genius solution to building a West Elm Inspired Framed Mirror using tongue and groove boards. Those saws have started buzzing, so I know she’s ready…take it away Kim!

page_break_2

I’m so excited to be here on Brittany’s blog today! I have been a HUGE fan since I first started blogging about my DIY projects and so it is surreal to be actually posting here…  ON HER BLOG!!! Squee!!  Of course I want to thank her so much for this opportunity, and I hope you all enjoy my project.

Okay, enough fan-girling.. On to the post: 

If you know me, you know I am a big fan of knocking off overpriced high priced name brand home decor. There is almost a challenge to it.  And when I saw this simple mitered block wood mirror on the West Elm website I knew I could create the look for a lot less.

Create this fabulous knock-off West Elm wooden framed mirror without any fancy power tools. Just use a 1x6 tongue and groove board which is the perfect fit to insert an inexpensive IKEA mirror.
Now, unlike a lot of the other guest bloggers who have been sharing their amazing tutorials, I don’t yet have a fabulous tool stash (something I am trying to remedy.)  What that means for you is that you don’t need a big tool stash either! We’re in this together!

So in this case, when I saw the mirror had the glass inset into the wood, (something typically achieved with a table saw or a router) I knew I would have to think outside of the box. How could I get the wood to wrap around the mirror without cutting it myself?

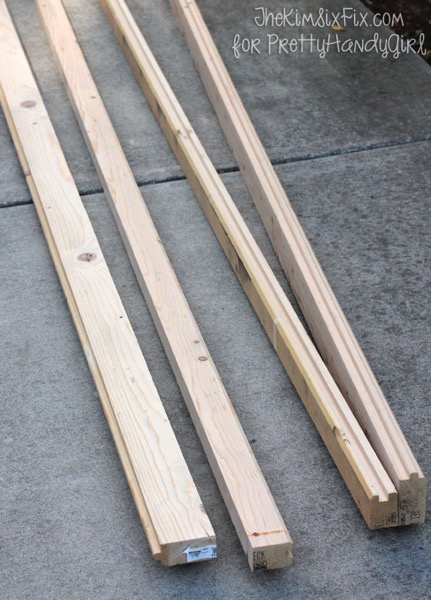
A trip down the lumber aisle of the hardware store revealed the answer: Tongue and Groove 2×6 boards  (typically used on walls or floors).  It has a ’tongue’ on one side which insets into the ‘groove’ on the other.  Perfect: A board with a built-in mirror holder!

2x6 southern yellow pine tongue and groove flooring 425
The boards they had in stock at the big box home improvement store weren’t anything super special, and they weren’t very expensive. For my project I only needed two 8 foot boards at $8 each.

Usually these types of boards are made of whitewood (or pine) since that is the least expensive. However, my store actually used Cypress (a whitewood alternative), which was a fun change for me. This was my first project with that wood type and it pretty much acted like pine.. .so I was in my comfort zone. You could do this with cypress or pine (or even hardwood).

Now that I had the boards, I had to get them down to the correct dimensions, and I didn’t want the tongue, only the groove.  The first thing I did was rip the boards down to the width I wanted for the mirror frame.  Now, once again, most people would do this on a table saw, but I don’t have one.  I only have a circular saw, so I used it plus the Kreg Rip Cut, to cut the boards down lengthwise:

Next I sanded them like crazy.  The circular saw doesn’t leave the cleanest cut, and the boards were in pretty rough shape.  Nothing a random orbital sander couldn’t help.

Sanding boards for mirror frame
Here is a good closeup of how exactly the mirror fits in the groove.   You can see where the mirror (a $9 one I picked up at IKEA) fits into the groove of the board. And although it isn’t obvious, each side of the groove is actually shaped differently. On one side it was squared off, while the other was rounded down.  You can use either edge as the ‘front’ of the mirror frame, but just make sure you are consistent!

Channel in 2x4 for framing Mirror
I liked the square edge facing out (I thought it was closest the inspiration piece.)

Also, be aware when measuring your mirror, that it will extend down into the mitered corner.  You can’t just measure the perimeter of the mirror and cut the frame the exact same size.   The frame will actually be slightly smaller.

Inseting mirror into frame groove

I measured by putting the mirror into the notch of the board and sliding the 45 degree pre-mitered corner down onto the perpendicular board (which should also have the mirror placed in the groove.) Where the point of the mitered board hits the perpendicular board is where you should put a mark. Then miter the second board at a 45 degree angle with the longest point hitting that mark.

Measuring and Marking Mitered frame
You want a pretty tight fit because the only thing holding the mirror into the frame will be that channel. If you cut the edges too long, the mirror will want to fall out.  Be as accurate as you can, and make sure you make plenty of dry fitting before you start the assembly process: Read more

Easy Clipboard Stand | Pretty Handy Girl

Easy Clipboard Stand | Pretty Handy Girl

Today’s project is so easy, I named it the Easy Clipboard Stand (catchy name, no?) This is a great way to upcycle an old clipboard and a scrap 2×4. This clipboard stand is super versatile. It can be used as a traditional stand for announcements; a copy stand; a recipe holder; an art frame or anything you need to bring attention to. Plus, if you use a dark chalk paint color, it can be used as a chalkboard sign. Bonus.

Materials:
(contains affiliate links)

Tools:

Instructions:

Cut the 2×4 scrap to the same width as the clipboard. Set your table saw blade approximately 2/3 height of the 2×4 block. Angle the blade to 15 degrees. Carefully slide the block over the blade. You’ll notice I use a GRR-Ripper Push Block to keep my hands away from the blade. (If you own a table saw, you need one of these!)

Easy Clipboard Stand | Pretty Handy Girl

The 2×4 should look like the photo below.  Read more

Easy Plexiglass Art Frame | Pretty Handy Girl

Easy Plexiglass Art Frame | Pretty Handy Girl

Have you ever wanted to frame a piece of art but didn’t want to pay the high cost to buy a custom frame? Or worse, you’re like me and too lazy to DIY your own frame? That’s where I found myself last week when I was creating the perfect gallery wall. I was at the corner of cheap and lazy. But, I stood my ground at that corner and created an Easy Plexiglass Art Frame!

I wouldn’t recommend this technique for priceless art, but for posters and other art that you want to frame quickly or easily, this is your tutorial!

Materials:
(contains some affiliate links)

  • Art poster or drawing
  • Double-stick tape
  • Plexiglass
  • Pencil
  • Jigsaw or plexiglass cutter
  • Board larger than the art (at least 3″ on each side)
  • Small wood screws
  • Sandpaper
  • Drill with drill bit smaller than screw diameter
  • Screwdriver bit
  • Picture hanging hook(s)

Optional: Paint and Paintbrush

Instructions:

Cut your board to size. If you want, stain or paint your board ahead of time. Allow it to dry.

Easy Plexiglass Art Frame | Pretty Handy Girl

Put pieces of double stick tape on the corners of your art and position it in the center of your board.

Easy Plexiglass Art Frame | Pretty Handy Girl

Lay the plexiglass on top of the art and mark where to cut the glass (allow at least 1/4″ overlaps.)

Easy Plexiglass Art Frame | Pretty Handy Girl

Cut your plexiglass with a jigsaw, bandsaw, scoring plexiglass knife or ask a local home improvement store to cut your glass exact. Sand the edges of the plexiglass until it is smooth. Read more