Mid-Century Modern design is a trend that is sweeping the design world by storm. While researching lighting options for Millie’s Remodel, I curated a list of possible light fixtures. Here are some of my favorite mid-century modern lighting options.


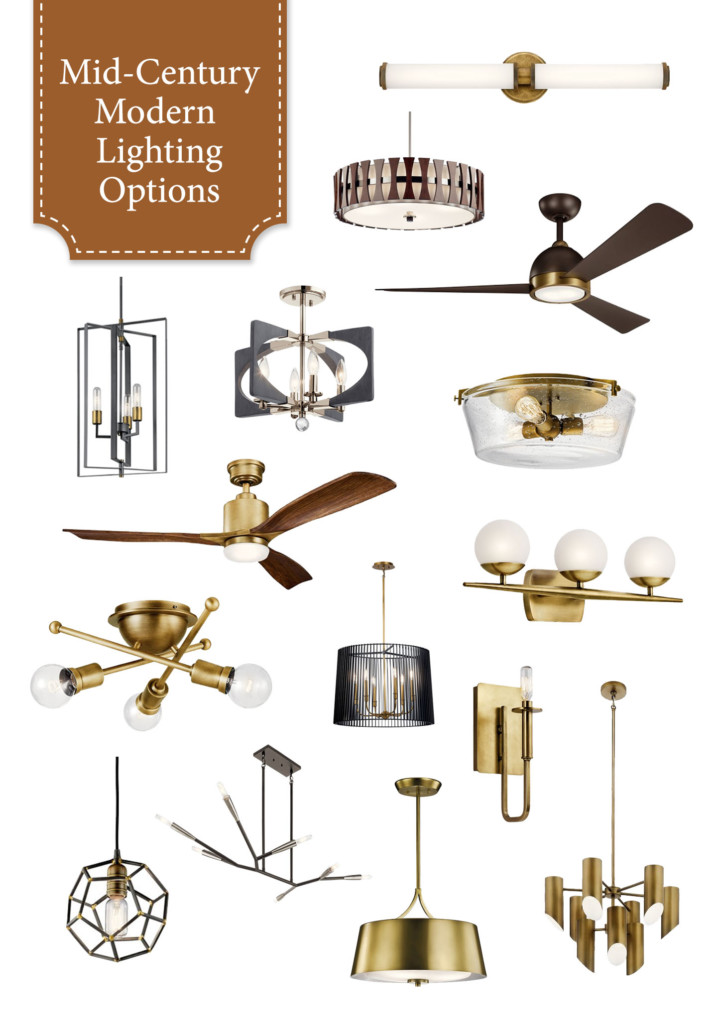
Mid-Century Modern Lighting Options for Millie’s Remodel

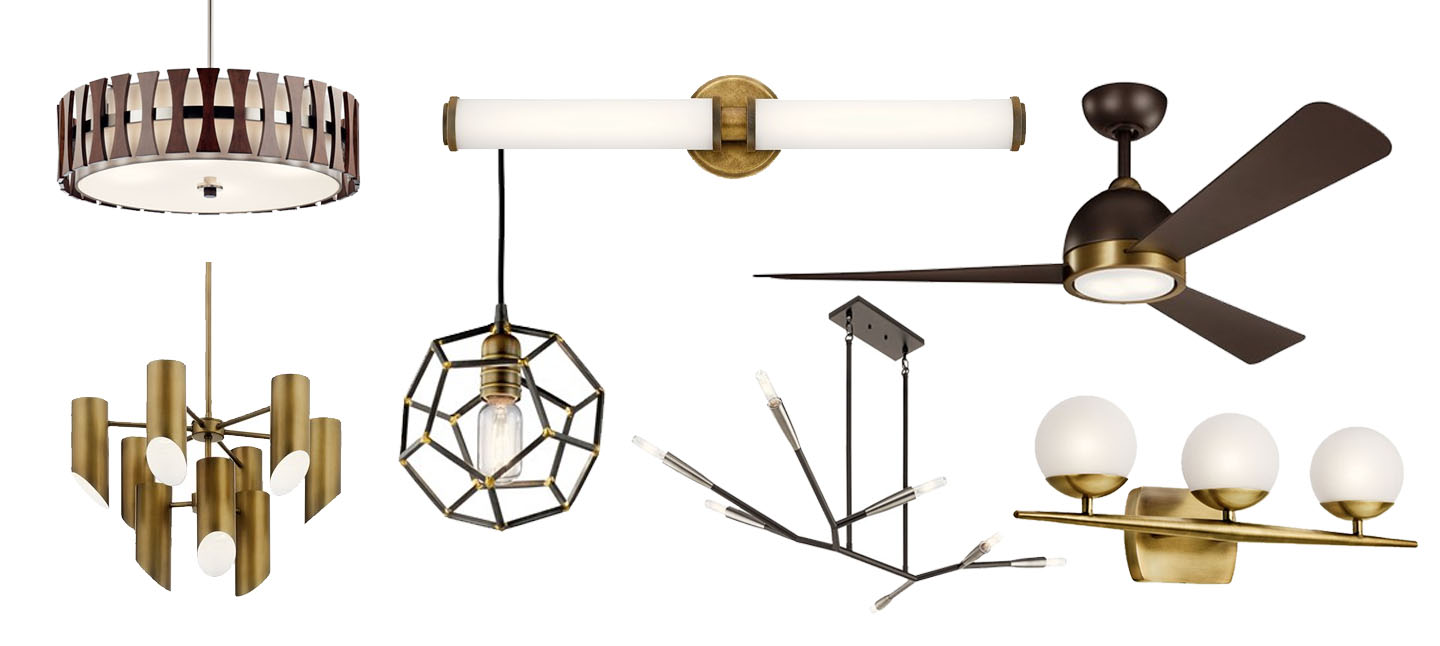
Mid-Century Modern design style is filled with sleek lines, golds, wood tones, and shapes reminiscent of galactic constellations. While looking for lighting options for the Millie’s Remodel house, I spent a fair amount of time curating lighting to fit with the modern style. Luckily I found a fair amount of light options and a few ceiling fans that would look perfect in any mid-century modern house.

Disclosure: Kichler Lighting is a Millie’s Remodel gold sponsor. I was provided with complimentary fixtures for the house. 

Mid-Century Chandeliers

Chandeliers are often the focal point in a room and for good reason. Typically they are larger in size, elegance, and number of light bulbs than other fixtures in the home. Why not steal the show with one of these mid-century modern style chandeliers?

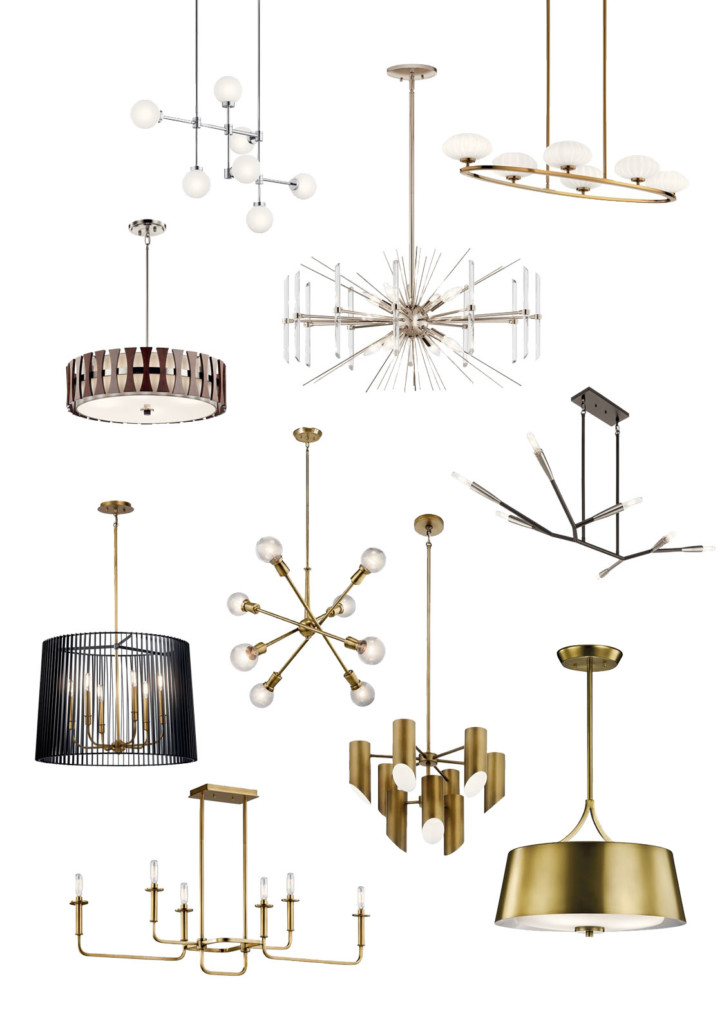
Aura 7 Light Chrome Chandelier | Pim 6 Light Oval Chandelier | Cirus Wood Pendant Style Chandelier | Eris 8 Light Nickel Chandelier | Branches 7 Light Chandelier | Linara 6 Light Black Shade Chandelier | Armstrong 8 Light Chandelier | Trentino 9 Light Chandelier | Alden 6 Light Chandelier | Maclain Brass Shade Light


Mid-Century Modern Pendant Lights

Pendant lights might be my favorite light fixtures after chandeliers. With their smaller size, pendants can fit perfectly over a sink, paired in a set of two on either side of a mirror, or in groupings over an island or bar. These are some great options for Mid-Century Modern pendant lights.

Mid-Century Modern Pendant Lights

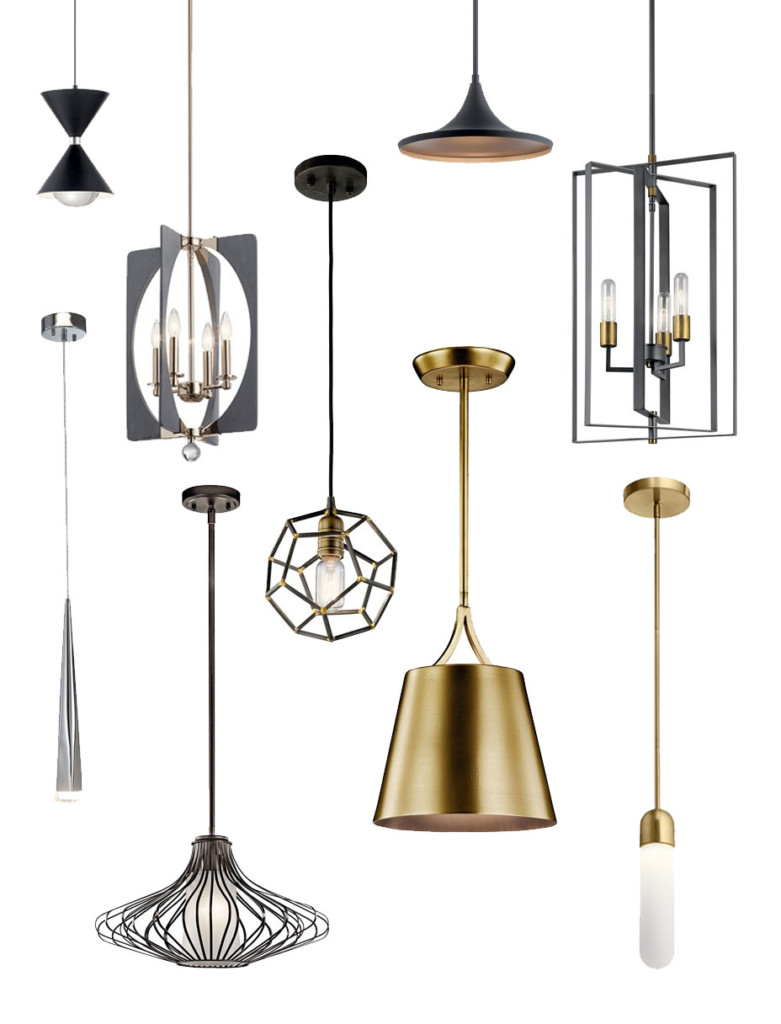
Kordan Matte Black Hourglass Pendant | Elias 14″ Black Penant Light | Alscar 4 Light Foyer Pendant | Taubert 3 Light Foyer Pendant | Rocklyn Hexahedron Pendant | Antonia 1 Light Chrome LED Pendant | 1 Light Undulating Line Bronze Pendant | Maclain Brass Pendant Light | Sorno Mini Gold Pendant Light


Mid-Century Modern Ceiling Lights

When you have low ceilings, flush mount and semi-flush mount light fixtures are a necessity. Meet a whole crop of beautiful mid-century modern inspired ceiling lights.

Mid-Century Modern Flush and Semi-Flush Mount Ceiling Lights

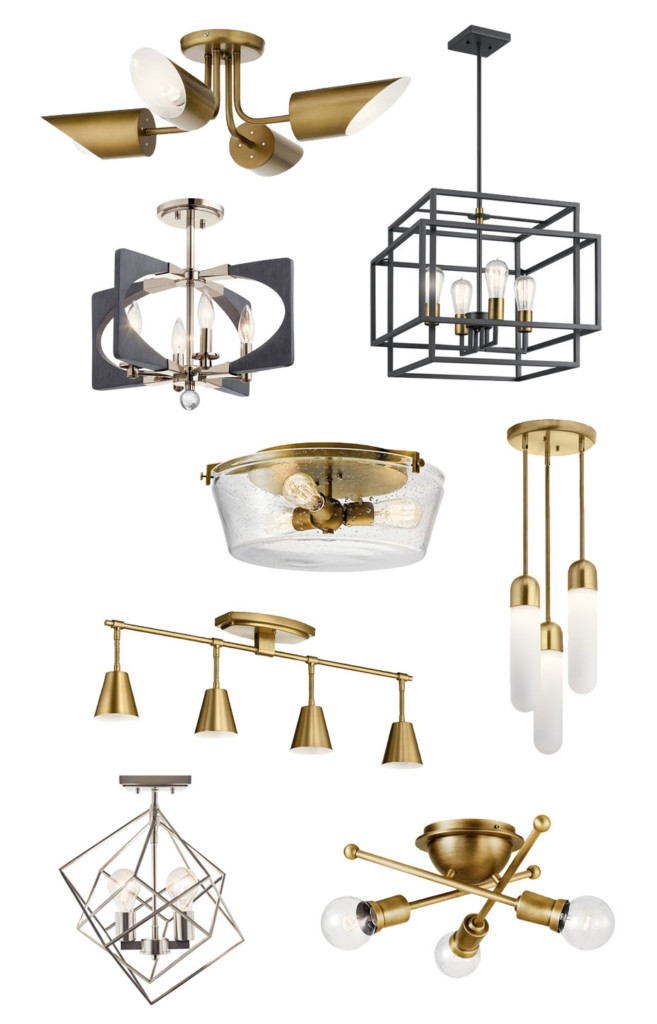
Trentino 4 Light Brass Lights | Alscar 4 Light Semi-Flush Light | Taubert 4 Light Square Light | Alton Flush Mount Light | Sylvia Brass Rail Light | Sorno 3 Light Semi-Flush Mount | Beckenham 2 Light Chrome Cube Light | Armstrong 3 Light Brass Flush Mount Light

Mid-Century Modern Wall-Mounted Lights & Sconces

Bathrooms are the primary location for wall-mounted lights, but look close for other opportunities to use wall-mounted lights. Sconces are right at home on either side of a window, doorway, or to add lighting on a staircase. Regardless of where you want to install them, here are some great options for mid-century modern wall-mount lights.

Mid Century Modern Wall Mounted Sconce Lights

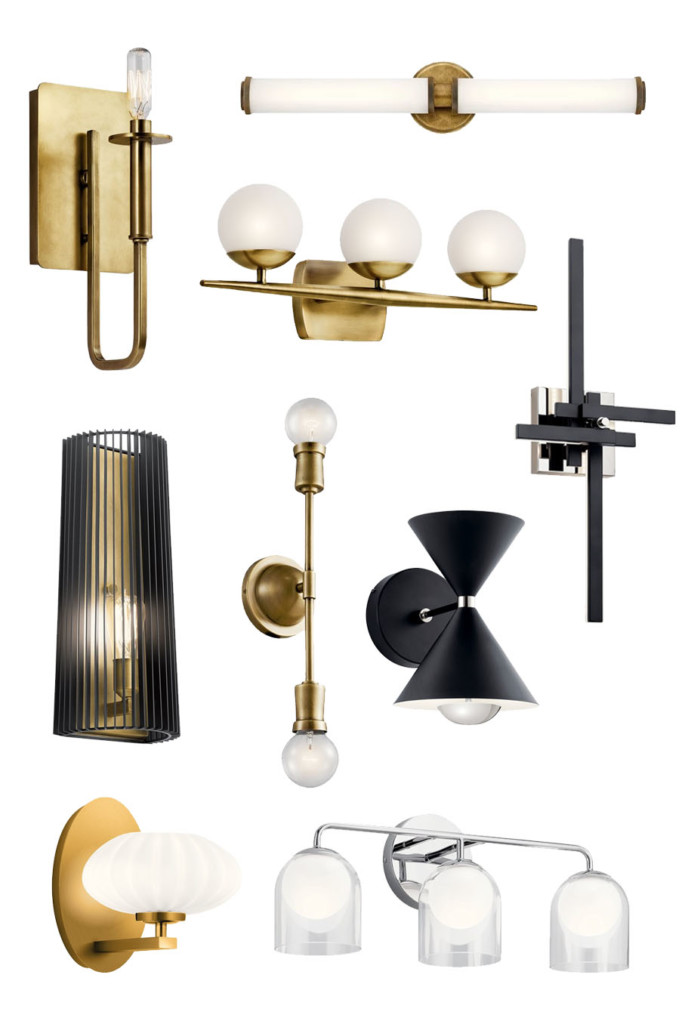
Alden Brass 1 Light Sconce | Indeco Linear Bar | Jasper 3 Light Bath Light | Linara Black Wall Sconce | Armstrong Brass 2 Light Sconce | Kordan 2 Light Wall Sconce | Charter Black Sculpture Wall Sconce | Pim 1 Light Gold Wall Sconce | Beryl 3 Light Vanity Light


Mid-Century Modern Ceiling Fans

Those of us that live in warmer climates know sometimes you need a ceiling fan paired with your light. There’s nothing like a hot and humid evening to encourage some airflow over your skin to cool off. Below are several sources for ceiling fans that pair nicely with mid-century modern furniture and fixures.

mid-century ceiling fan options

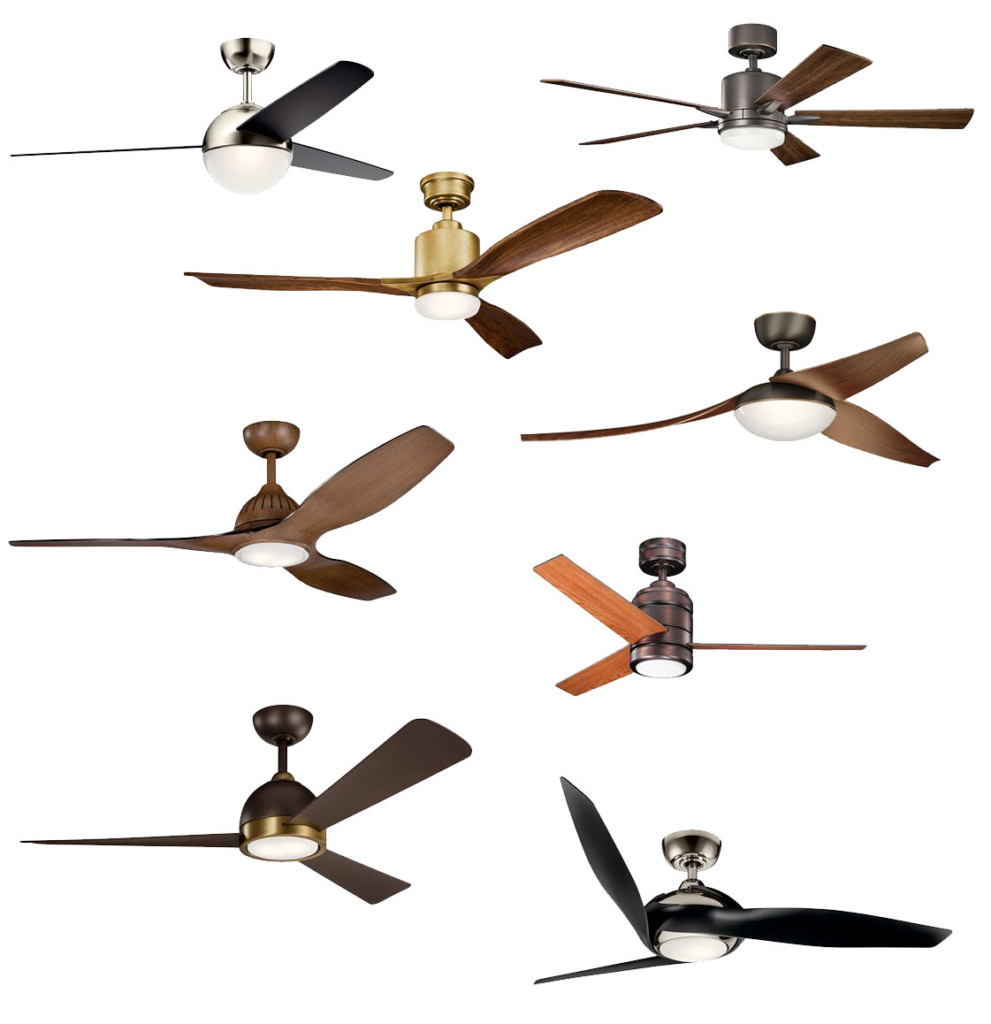
Bisc LED Fan Polished Nickel & Black Fan |Lucian 52″ LED Old Bronze Fan | Ridley II 52″ Brass & Wood Fan | Flyy LED 60″ Fan Olde Bronze | Jace 60″ Walnut Fan | ArkWright Customizable Fan Motor | Incus 56″ Bronze & Brass Fan | Zenith 60″ Polished Nickel & Black Fan


Are you embracing the mid-century modern design trend? I’d love to hear which are your favorites.

Disclosure: Kichler Lighting is a Millie’s Remodel gold sponsor. I was provided with complimentary fixtures for the house. 

3 Ways to Shorten Light Fixtures for Low Ceilings

Hey all, do you have eight foot ceilings or lower? Have you lamented the fact that the light fixtures you love will be too tall for your height-challenged ceilings? Well put that light fixture back in your cart because I’m here today to show you how to make light fixtures work for your low ceilings with 3 Ways to Shorten Light Fixtures for Low Ceilings.

I may only be 5’6″ tall, but my brother-in-law is 6’4″ and my own brothers are both well above six feet tall. Recently my brother-in-law was visiting and he hit his head on our foyer light. He told me it’s an annual occurrence. I was mortified he never told me he hits his head every time he visits! Immediately I got to work shortening the light fixture.

I measured the light and then raised it an inch taller than his height.

Ways to Shorten Light Fixtures

At the same time, I had been contemplating changing our mudroom light fixtures. I was growing tired of them and wanted something that would cast more light in the room. I found the perfect pendant lights, but knew I’d have to alter them to make them shorter for our low ceilings.

To shorten light fixtures, you’ll need a few supplies.

Materials:

(I’ve included affiliate links for your convenience. I earn a small percentage from a purchase using these links. There is no additional cost to you. You can read more about affiliate links here.)

Optional:

Solution 1: Contact the Manufacturer

To shorten a light fixture, you can contact the manufacturer and ask if they can provide you with a shorter down rod or parts to assist you with reducing the height of the fixture. For the Kichler Pendant light I purchased, the customer service rep was able to locate a shorter down rod,  a threaded loop, and a chain which allowed me options for shortening the fixture.

down rod lengths

Solution 2: Use Chain instead of a Down Rod

Your second option for shortening a light fixture is to use a chain and remove links until you achieve the desired height.

If your light fixture doesn’t come with a chain, you can purchase some in a variety of finishes at your home improvement store.

Did you know removing links can be done easily by using two screwdrivers or pliers and a screwdriver to push in opposite directions against the inside of a link to open it up.

To close the links, use the pliers to squeeze the link ends back together. After your chain is the appropriate length, feed the wires through the links and the threaded loop in your light fixture.

Solution 3: Make Your Own Connector

Occasionally a light fixture may still be too tall (or your ceilings too low) and you may need to remove the chain or down rod all together and make your own connector.

First measure the finished height you want your fixture to be. Remove the chain and/or down rod. Feed the excess wire through the threaded loop. Attach the light fixture directly to the threaded loop with a quick link, or you can use heavy gauge wire to create your own link. (Watch the video below to see how.)

Hopefully one of those 3 Ways to Shorten Light Fixtures for Low Ceilings will work for you. Let me know if you found this tutorial helpful!

If you want more details on how to install a pendant light, I have several tutorials in my Electrical category.

Or you might find one of these tutorials helpful:

3 Ways to Shorten Light Fixtures

How to Install a Wired Pendant Light


Convert a Recessed Light to Accept a Hardwire Fixture | Pretty Handy Girl

How to Install a Hard-Wired Pendant in a Recessed Can Light

Laundry Room Update and a No Hands Light Switch

Saving Etta: Laundry Room Update and a No Hands Light Switch

About that Saving Etta laundry room, did you get a peek last week? If you missed it, I showed you how I installed the cement tile floor. We can all agree, the star of the laundry room is the floor. But, there’s another star in this room that’s hard to show in pictures. It’s this little guy:

Laundry Room Update and a No Hands Light Switch

That, my friends, is a Decora motion sensor in-wall switch from Leviton (one of the proud Saving Etta sponsors.) And it works automagically! When you walk in the room, the light comes on. Then it shuts off after a predetermined amount of time (choose between 30 seconds, 5 minutes, 15 minute, or 30 minutes for the time-out period.)

Before I tell you more about this fabulous no hands light switch, I need to give you the full details about the laundry room and discuss something I would definitely do differently next time.

Saving Etta: Laundry Room Update

After the cement floor tiles were installed, I had to cover them up with Builder Board from Surface Shields to protect them. The small area covered was protected, but I should have covered the entire floor because my mechanical subcontractors were the messiest bunch of guys I’ve ever met. Every time they came into the house I had to follow them around cleaning up mud and dirt. Plus, I lost track of the number of fingerprints they left on the walls. Seriously, it was like following children who had just played all afternoon in the mud.

Laundry Room Update and a No Hands Light Switch

To make matters worse, they didn’t share my eye for aesthetically pleasing mechanics.

Laundry Room Update and a No Hands Light Switch

Avert your eyes from the giant hole in the ceiling and look at the water heater vent pipe. Did you count all the sections?

Laundry Room Update and a No Hands Light Switch

One, two, three, four sections. What the fizz?! When I called my mechanical contractor, I told him this looked like a preschooler installed it. In all fairness, it would have passed the inspections, but I hated how it looked. Instead of letting them monkey around more, I took matters into my own hands and ran to Ferguson to purchase one vent pipe. It looks much better, right?

Laundry Room Update and a No Hands Light Switch

I’m sure you are wondering about the giant hole in the ceiling — it’s for make up air. This is required when you have a gas appliance in an enclosed room. The codes want to make sure that gas can’t build up in the room. I had already installed a built-in vent over the door, but the inspector wanted more. We added make up air in the floor. (You can see it in the picture below. It’s the hole in the floor on the left. And it eventually got a floor vent cover.)

Installed Avington Cement Tiles from TheBuilderDepot.com

But, the inspector still wanted more make up air. My mechanical contractor suggested cutting holes in the wall into the kitchen, but I said “No way!” Ultimately, the best (and least unattractive) solution was a ceiling vent which eventually got a round diffuser placed over it.

Laundry Room Update and a No Hands Light Switch

It felt like the issues around the gas water heater were never ending. One of the inspections noted where there wasn’t enough clearance between the vent pipe and the framing. It was easily fixed, but between this and all the makeup air required for the gas water heater, I have vowed to go tankless next time. In the next flip, I’ll listen to my plumber’s suggestion to install a tankless water heater. It will cost more, but will look a lot better and not have as many issues during installation. A tankless water heater will still need to be vented, but it can be vented out the wall instead of the roof.

Laundry Room Update and a No Hands Light Switch

Live and learn, right? Regardless, the laundry room is still a show stopper with the cement tiles and room for a side-by-side washer and dryer. (Most of the houses in the downtown area only have room for a stackable washer and dryer.)

Laundry Room Update and a No Hands Light Switch

How to Install a Hands Free Light Switch

Now, onto the one affordable upgrade I will make again and again! The Leviton motion sensor switch is a wonderful addition to a laundry room or other areas in your home where you frequently have your hands full carrying things such as laundry or groceries. Or you might be carrying something so filthy you don’t want to touch the light switch. As soon as the door is opened (or someone walks into this room) the sensor detects your presence and turns the light on. It will also automatically turn the lights off, saving you frustration and money in rooms where lights are frequently left on.

Laundry Room Update and a No Hands Light Switch

The Leviton Decora Motion Sensor is set to turn off after 15 minutes when no motion is detected, but you can set the device to turn the lights off at 30 seconds, 5 minutes, 15 minutes, or 30 minutes. The motion sensor can also be tweaked to detect motion in a certain range from the sensor.

You’ll definitely want one in your house, so here’s the video tutorial to learn how to install a Leviton Decora Motion Sensor switch:

Materials:

(I’ve included affiliate links for your convenience. I earn a small percentage from a purchase using these links. There is no additional cost to you. You can read more about affiliate links here.)

Instructions:

Before installing the motion sensor, turn off the power at the circuit breaker to your switch. Using a voltage tester, make sure the power is off.

Disclaimer: Always use caution when working with electricity. Follow the instructions provided with your device. Do not attempt to make changes to your home’s electrical system without prior electrical experience and knowledge of your area’s electrical codes. Contact a licensed electrician if you have any questions. Pretty Handy Girl can not be held responsible for personal injury or harm.

  1. Remove the Leviton Decora Motion Sensor from the package and read the instructions.
  2.  Look at your wiring, you should have a ground wire (bare or copper), a neutral wire (white), a line wire (this is the live wire that’s usually black), and a load wire (sometimes it’s also black and sometimes red.) The line wire is the wire that carries the electrical current from the circuit breaker to the switch. The load wire carries the power from the switch to the light fixture.
  3. Strip ⅝” of the insulation off the wires. You don’t need to bend your wires into shepherds hooks, the wires can be inserted straight under the screws on the Leviton Motion Sensor.
  4. Always connect the ground wire first. 
  5. The neutral wires should be connected to each other not the sensor.
  6. Next connect the load wire to the black terminal.
  7. Finally connect the line wire to the red terminal.
  8. Gently fold and tuck the wires into the wall box. Make sure the word TOP is facing up on your sensor.
  9. Drive the screws into the top and bottom of the motion sensor.
  10. Turn the power back on and test your motion sensor. If it works, great!
  11. Follow the instructions to make any adjustments to the length of time the lights stay on and the motion sensing field.  
  12. Attach the cover to the motion sensor.

Laundry Room Update and a No Hands Light Switch

Enjoy hands free control of your lights with the Leviton Decora Motion Sensor

Laundry Room Update and a No Hands Light Switch

You can also install the motion sensor in a room where little kids like to play but aren’t good about turning out those lights. Or in that dark room where you always fumble for the light switch.

What about you, where would you install a motion sensor light switch?

Laundry Room Update and a No Hands Light Switch

Disclosure: This is a sponsored post for Leviton. I was compensated for my time and efforts to promote the Leviton Residential products. However, all ideas and opinions are my own. I will always let you know when you are reading a sponsored post. You should also note that I’m very particular about the brands I work with.

 If you haven’t done so already, be sure to *subscribe to my YouTube channel!

Subscribe to my YouTube Channel

*My followers on YouTube get sneak peeks of some of the projects I’m working on, so subscribe today!

Want more automation in your home? You’ll definitely want to check out these tutorials:

How to Install Smart Dimmer Switches

How to Install Smart Dimmer Switches


How to Install USB Charging Outlets

How to Install a USB Charging Outlet

iphone charging by bedside usb charging outlet

Learn how you can make simple electrical upgrades to your home. Today I’ll show you how to install an outlet that charges your USB devices and powers your appliances at the same time.

How to Install USB Charging Outlets

How to Install a USB Charging Outlet

I’m so excited to share this tutorial with you. Anyone who has a tablet, mobile phone, or other USB connected device will love this tutorial! How many times have you combed through your house for the plug to the cord for your device? I think I lost count how many times those little square plugs have eluded me. But, today they can stay hidden forever! I don’t need them now that I discovered How Easy it is to Install a USB Charging Outlet! As one of the Saving Etta sponsors, Leviton sent me several USB charging outlets to install in the house. (Spoiler Alert: I’ll be sharing some photos of the finished Saving Etta project. If you want to wait for the progress posts, go ahead and avert your eyes.) My electrician and I installed the outlets in strategic places where the homeowners would likely want to charge their USB devices.

Each bedroom received at least two outlets on either side of where a bed might be positioned.

usb charging outlet next to bedside table in master bedroom

The kitchen has a few on the counters…

white usb charging outlet on white subway wall open shelving

…and one in the island (in a matching gray color.)

gray usb charging outlet in gray island cabinets

The upstairs bedroom has a few more, especially under the little built-in desk between the closets. This is the perfect spot to sit and work while enjoying the view out the window.

vintage typewriter on desk by window between closets

Are you ready to learn how to install your own Leviton USB Charging Outlet in your home? It’s easy and takes about ten minutes to complete. Grab these few tools and let’s get busy.

Materials:

(I’ve included affiliate links for your convenience. I earn a small percentage from a purchase using these links. There is no additional cost to you. You can read more about affiliate links here.)

materials for installing outlets

Required Safety Instruction:

Turn off the power to the outlet you are working on. Check the outlet with a voltage tester. If you don’t have one, I highly recommend putting a night light or light in the outlet and turn it on. Then shut off the circuit at your circuit breaker and check to see that the light has gone out.

How to Repair Your Dishwasher - Control Panel Replacement

Ok, now that you have all of your materials and the power is off, you’re ready to go. To see how to install this USB charging outlet watch this step-by-step video tutorial below. It also shows you how to install the outlet it if you are starting with a new construction junction box.

If you need to remove your old outlet, you can follow the directions in this post on replacing an ugly old outlet.

Now that you are finished, aren’t you feeling proud of yourself? Taking on a simple electrical project like swapping out an outlet is super simple. I hope you’re motivated to make more electrical upgrades in your home!

For example, why not learn how to install a smart dimmer switch you can control with your phone or with a voice-activated device like Alexa or Google Home!

How to Install Smart Dimmer Switches

Gotta run now, I’m still finishing up some last punch list items at the Saving Etta house. While I work, it’s been nice having the ability to plug in my phone to charge while listening to my Pandora stations!

iphone charging by bedside usb charging outlet

Visit the Leviton website for more information, installation instructions, and where to buy devices from Leviton’s residential product family.

Disclosure: This is a sponsored post for Leviton. I was compensated for my time and efforts to promote the Leviton Residential products. However, all ideas and opinions are my own. I will always let you know when you are reading a sponsored post. You should also note that I’m very particular about the brands I work with.

change-ugly-recessed-lights

Do you have those old discolored recessed can lights in your home that use big hot flood bulbs? If so, it’s time for an upgrade!

Update Ugly Recessed Can Lights with Energy Efficient LED
How to Update Ugly Recessed Can Lights with Energy Efficient LED Lights

Today I want to show you how to update ugly recessed can lights with energy saving LED recessed lights. This process is quick and easy, not to mention the new lights will look better, last longer, and save you money on your energy bill! What more could you want? Change out all your ugly recessed lights in no time by following this simple tutorial.

Materials:

(I’ve included affiliate links for your convenience. I earn a small percentage from a purchase using these links. There is no additional cost to you. You can read more about affiliate links here.)

Instructions:

Here is what my old lights look like. Not only are they ugly, but they use the large flood light bulbs that use too much energy, radiate heat, and burn out quickly. I don’t know about you, but I am tired of changing these burned out bulbs.

Update Ugly Recessed Can Lights with Energy Efficient LED

Want to see how quickly you can change out your lights? Here’s a one minute video (that’s how fast you can do it):

The first step to replacing these recessed lights is to remove the light bulb by simply unscrewing it from the socket. Unless you’re extraordinarily tall, you’ll probably need a step ladder for this project.

Update Ugly Recessed Can Lights with Energy Efficient LED

Next, find two small springs inside the baffle, as shown in photo below. They look like a wire with a loop in the center. Pull up and out on the springs to release the baffle inside your can light.

Update Ugly Recessed Can Lights with Energy Efficient LED

Remove the trim by simply pulling it off the ceiling.

Update Ugly Recessed Can Lights with Energy Efficient LED

Grab your new retrofit LED recessed light and screw the adapter into the light bulb socket, exactly as you would screw in a light bulb. It’s that easy!

Update Ugly Recessed Can Lights with Energy Efficient LED

Inside the opening, find two metal clips. Squeeze the spring hinges on your LED light and insert them into the clips inside the old recessed can. These will hold the light in place.

Update Ugly Recessed Can Lights with Energy Efficient LED

Finally, gently push your light up into the ceiling. Believe it or not, you’re done!

Update Ugly Recessed Can Lights with Energy Efficient LED

Now you have a beautiful, white, and energy-efficient LED recessed light. Take some time to admire it.

Update Ugly Recessed Can Lights with Energy Efficient LED

Now you can easily change out all the can lights in the room and voila, your lighting is upgraded! This is such a quick, easy, and inexpensive project. There is no point in putting it off any longer.

Update Ugly Recessed Can Lights with Energy Efficient LED

I hope you enjoyed this tutorial. Feel free to share any questions or thoughts in the comment section below. Thank you for reading!

Update Ugly Recessed Can Lights with Energy Efficient LED

Liked this project? I know you’ll love these other lighting upgrades:

Update Ugly Recessed Can Lights with Energy Efficient LED

Change Out a Dated Hollywood Strip Light


Update Ugly Recessed Can Lights with Energy Efficient LED

How to Convert a Recessed Can Light to Accept a Hard-Wired Light