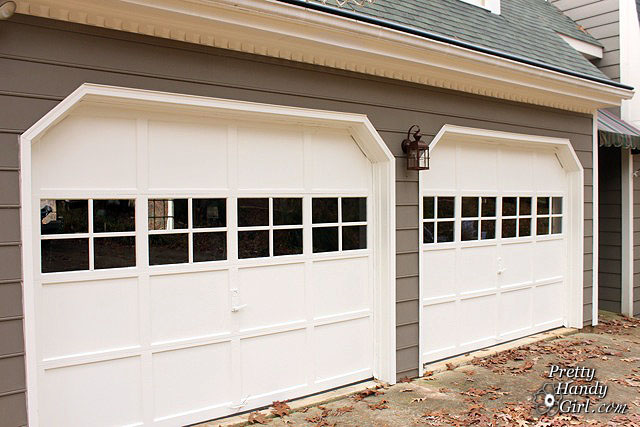
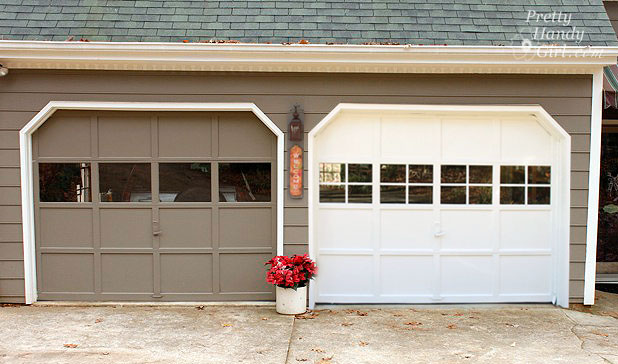
You know that thing about your house that you really want to change, but it takes you a while to mull over how to change it? Well, that thing for me was our garage doors. They are the two giant doormen that greet me at least five times a day as I run errands and taxi my children to and from school. I always thought they could be a little more polished and more inviting. In this mulling over period I dreamt of painting the garage doors and boosting the character factor by adding grilles to the windows. I even created a paint preview to see what it would look like. I fell in love immediately and the hulking gray doors’ fate had been sealed.

I wasn’t exactly sure how I was going to add the grilles (cross pieces in the windows.) I thought about cutting up paint sticks or just plain strips of square dowels cut to fit, but I REALLY wanted them to look as real as possible and I liked the router profile of the real deal.

A few months later I literally almost tripped on a stack of donated window grilles at my local Habitat for Humanity ReStore. You know, the cheap ones that are pressed up against the window and always fall out. Grrrr!

That was when the “A-ha” moment happened and I figured that I could use them to dress up my garage doors. I carefully measured the panes on the garage then found a set of four grilles that would give me two cross pieces per window! Perfect! And the best part about those grilles is that they only cost $2 a piece. For $8, some paint and glue I was able to transform my garage doors from boring bland to cottage charm!

And here is the tutorial for how to add grilles to plain jane garage door windows!
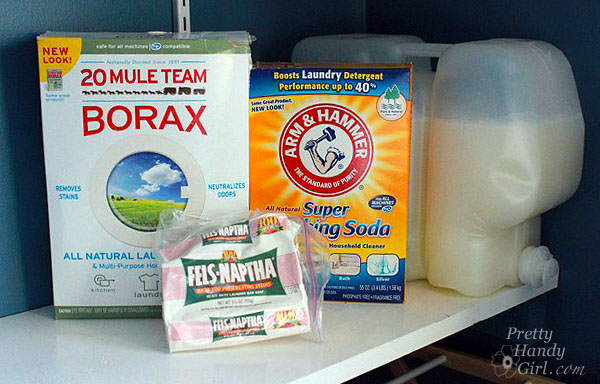
Materials:

  • Reclaimed grilles from Habitat ReStore
  • Hand saw
  • Pencil
  • Tape measure
  • Paint
  • Loctite Outdoor Sealant Glue
  • Windex
  • Rubbing alcohol
  • 3M painter’s tape
  • Razor blade scraper
  • Paintable flexible caulk
  • Caulk gun
  • Wet rag
  • Gloves

Start by cutting the grilles down to size. This is how I got two crosses from each grille. First, cut the grille into two pieces as shown below:

No power tools needed. A handsaw works great.

Next, cut off the excess so you are left with two crosses that fit perfectly in the window panes of your garage door.

Test fit the cross. If your measurements are off, no worries, 1/2″ gaps can be filled with caulk.

After cutting all of the cross pieces, clean them off. Lightly sand and paint them the same color as your garage doors.

After the paint is dry, clean the glass with windex and then use rubbing alcohol to remove any dirt and debris from the glass.

Spread a bead of Loctite Outdoor Adhesive onto the backs of both the vertical and horizontal bars. Center and press the grilles onto the glass. Use painter’s tape to hold them in place.

Wait 24 hours for the glue to harden and dry. Then scrape any excess glue off the glass with a razor blade.

Time to fill in the cracks! Caulk all the seams. For the larger gaps, 1.) Apply painter’s tape on both sides of the void to 2.) keep the caulk off the window and give you a crisp, clean edge. (I’ll have a special caulk gun tutorial for you on Friday!)


3.) Remove the painter’s tape while the caulk is still wet. Let the caulk dry.


 And you’re done! How is that for adding instant character?!


I could kiss these beauties! They are definitely welcoming doormen now.

Speaking of welcome, I repainted our faded Welcome sign and hung it back up. Are you an eagle eye reader? What else changed in the pictures below? Five things have changed, can you spot them all? I’ll start you off:

  1. Painted doors
  2. Added grilles
  3. Refreshed welcome sign

Okay, one more lookey at my beautiful garage door windows and then you have to leave.

I want to give a big shout out and thank you to Waste Management and The Bagster who helped make my garage makeover a possibility. You can see more of my garage transformation here.


If you happened to glance this way yesterday you may have seen a blank screen…nada…nothing! And if you came by today, you probably saw the home page with some error codes and not much else but 404 errors when you tried to go to a post.

I admit it, I broke my blog!

How did I do it? Well, in short, I blatantly disregarded the written warnings not to mess with the code in my theme files in WordPress. Being the do-it-yourselfer that I am, I was determined to fix something on my own. You know that motto of mine? “If a human being can do it, then there is a 95% chance that you can do it too!” Well, I guess I finally found that 5% that I can’t do!

Have I learned my lesson? Will I leave my blog code files alone? Maybe, at least for now I will.

Until that future date when I become a proficient coder, I will be relying on the fantastic WordPress Guru, Ashley, from MyFrontPorchSwing.com. She was able to recover my blog and bring it back from the dark abyss. I’m not exactly sure what she did or how she did it, but I am forever grateful!

Ashley is the code savvy person I used to switch me from Blogger to WordPress at the beginning of 2011. She was super helpful and spared me the headache of trying to learn to do it myself. She provides WordPress support and Blogger to WordPress conversions (in addition to social media promotions.) If you are thinking of making the big switch, contact Ashley.


Back Up Your Blog:

After this harrowing experience of breaking my blog, I have learned the über-importance of having a back up of my blog. Lucky for me, my guardian angels at BlueHost had made a back up a week ago. The tech support person I talked to was able to reload my blog from the back up they had created. However, the scare of losing all my posts has made me realize that taking back ups into my own hands is a necessity. Ashley recommended this WordPress Plugin that emails regular back ups to you: WP DB Backup

Stop Those Spammers:

When my blog was moved to WordPress the spam commenters came out of the woodwork. That was when Ashley told me to install Akismet (I installed the free version.) It catches about 99% of the spam comments and moves them into a folder for you to go through and delete anytime you have time (yeah right.) The spam comments add up quickly and there were repeat spammers. Which is why I loaded this other spam filter: Block Top Spammers. When you check a box next to the repeat offenders, the plugin  recognizes their IP address and stops their disgusting spam before it even goes into the spam folder. This has been a huge help for me because I don’t have time to go through thousands of spam messages and delete!

Speedier Loading:

This has got to be the biggest change I made to my blog! It is the one silver lining in this whole debacle that I endured for 2 days. Ashley told me about the W3 Total Cache plugin. It single-handedly turned my blog’s loading speed into a speed demon. I seriously can’t believe the difference it made! Load this sucker right away.

Uploading Multiple Images:

One of the biggest hassles I had when moving to WordPress was dealing with the image uploads. Being a tutorial blogger, I load oodles of pictures for each post! Faster Image Insert is a nifty little plugin that allows me to upload multiple images at once and choose one or all of them to insert into the post. I <3 this plugin!

Auto-Email Replies to Commenters:

Have you ever left a comment on a blog and months later you are back on that blog and realize that someone responded to your comment? Reply Me is a plug-in that automatically emails replies to the commenter and it is sent from the commenters email address so they can reply back with ease.

Creating a Site Index:

I have been struggling (and still am) with the best way to help my readers find past posts on my blog. But, I also wanted to make sure that the web spiders were able to crawl my site more efficiently. I found this cool plugin called AZIndex. It takes all of my posts and creates a site index. I placed the links on a page which is now my site index. The index is only customizable to a certain degree though. Some day I want to create a beautiful thumbnail directory for y’all, but until then this will have to suffice.

Loading the Plugins:

To load any of the above mentioned plugins into your WordPress blog, simply go to your WP dashboard, chose Plugins > add new and search for the plugin name I’ve highlighted above. I’ve linked each to their respective sites for more detailed information about each plugin.

I hope some of these plugins help you. I’d love to hear about any WordPress plugins that you love!

P.s. I hope to be back to the normal DIY tutorials this week. Thanks for your patience ;-). XXXOOO


I’ve been keeping a secret from y’all and I just can’t live with it anymore. I have a miracle stain remover recipe that has time and again proven to work on some of the most stubborn stains. Plus, find out why we don’t need dryer sheets anymore!

miracle stain remover

Miracle Stain Remover and a Healthier Alternative to Dryer Sheets

Recently, Pretty Handsome Guy came back from a business trip with a stained button-down shirt. It had wing sauce on it AND it had been allowed to settle for a few days AND he hadn’t pre-soaked it or used any stain remover. (Have I not taught him anything?! Sigh.) I thought for sure the shirt was a goner. But, I decided to put my miracle stain remover recipe to the test. Low and behold after 24 hours of soaking in the concoction, the stain was magically gone! No scrubbing, it was simply gone. Can I apply for a magic wand now?

I can’t lay claim to the recipe. I found it on our local “Mommy” message board back when I was a new mom. But, this recipe has worked on more stains than I can count.


I mixed up a batch today to try on one of my son’s shirts that got blueberry jelly on it. My mom tried to wash it to get the stain out, but it was still there after laundering. Normally once a stain goes through the dryer it is set in. But, that didn’t deter the me from trying my Miracle Stain Remover. Sit back and learn young Jedis (we watched Star Wars last week, so it is on my brain.)

Miracle Stain Remover…

Ingredients:

(I’ve included affiliate links for your convenience. I earn a small percentage from a purchase using these links. There is no additional cost to you. You can read more about affiliate links here.)

Fill your basin with warm water then add the Oxi-clean, Clorox 2, and powdered Dish Detergent. Give it a swirl and mix until the powders dissolve and bubbles form.

Place the stained garment into the mixture, being sure the stain is submerged. After two hours you can take a peek! My stain was gone.

For tougher stains, let it soak overnight. Remove the clothing to behold the miracle! Normally I will throw the garment into the wash, but you could simply rinse and dry it.

And, this formula is also safe for colors as well!

Laundry Detergent…

In the spirit of sharing, I also have this recipe for Making Your Own Laundry Detergent for only $1.25 per year! I mean, have you seen the price of laundry detergent lately?! 200 oz. for “gulp” $35! Whereas the recipe I made yielded 250 oz. for….are you ready for this…$0.61! This is a 97% saving on detergent by making your own.

And the best news is that it is safe for HE washers. You only need 1/4 cup per load. Click Here to Get the Recipe for Making Your Own Laundry Detergent for $1.25 per year!

Drying clothes…

And since I’m talking laundry today, this post wouldn’t be complete without mentioning my secret weapon for drying clothes.

I use two of them! They may look like medieval torture devices or rabid animals, but these little hedgehog dryer balls have completely kicked our fabric softener sheets to the curb! I haven’t used dryer sheets in over 9 years now! At first I was concerned about static (the bane of my hair’s existence), but then a friend told me that you can eliminate static by not letting your clothes over dry. Simply shut off the dryer when your clothes are about 95% dry. Don’t let the dryer run and run and run until the clothes are piping hot and there isn’t a spot of dampness on them. Instead, let the moisture sensor (if you have one) do its job and it should shut off right before the clothes are dry. The waistbands in jeans or sweatpants may feel slightly damp, but everything else feels dry. And most importantly, pull out fleece, polyester, or synthetic clothes about halfway through the cycle.

The dryer balls (you should use two) work together to punch, separate, fluff, and dry your clothes. They also help keep wrinkles to a minimum, but I’m not afraid of a few wrinkles (see my no iron solution to wrinkles post.) The Dryer Balls cost less than $10, but the cost savings of not using dryer sheets is definitely worth it. Plus, you don’t have to stress about the chemicals that are in dryer sheets. These little wonder balls (I can’t believe I just typed that) last for a long time, but it’s good to have three in case one hedgehog loses a nose (it can happen.) I have been using mine for over nine years. They start to get darker on the nubs from dye in your clothing, but it doesn’t transfer and it doesn’t hurt their effectiveness.

I hope you found these laundry tips helpful. Please share with a friend!
miracle stain remover
Matchbox Car Racing Ramp

Do you have a little free time over the Christmas break? How about taking some time to make a wooden racing track with your kiddos!

If you have boys, I’m sure you have Hot Wheels cars in your home. They go hand-in-hand. My boys play with their race cars for hours!

They have several of the plastic tracks. And even a curly-Q racing ramp. But, honestly they seem to play with my scrap pieces of wood more than the plastic tracks. Chances are, if you or your spouse build things, you will have all the scraps of wood on hand to make this racing ramp.

My 7 year old and I worked together on this project. (He was my design consultant and he also helped with some of the assembly.) But, imagine the surprise on a child’s face if you made this ramp as a holiday or birthday gift!

Materials:


  • 2 – 1 x 4 x 13″ boards (tower sides)
  • 1- 1 x 4 x 9″ board (tower roof)
  • 2 – 1 x 8 x 33″ boards (ramp sides)
  • 1 – 1 x 6 x 33″ board (ramp)
  • 1 – 3/4″ dowel rod (cut to 12″)
  • 1 – 1/8″ dowel rods
  • 1 – thin rectangular strip for a divider 33″ long
  • 1 5/8″ screws
  • 1″ finish nails
  • 2″  finish nails
  • Gorilla Glue
  • Sandpaper
  • Primer
  • Spray paint
  • ScotchBlue Painter’s Tape
  • X-acto knife
  • Clamps
  • Cordless drill
  • Handsaw or miter saw
  • 3/4″ spade bit
  • 1/8″ drill bit

Start by cutting all your boards to length. Grab the ramp board (1 x 6 x 33″) and cut one end of the ramp at a 30Ëš angle.

Glue the narrow strip onto the center of your ramp using a small amount of Gorilla Glue.

Clamp the strip and add a few 1″ finish nails to secure the strip.

Set up your boards as shown. Tilt the ramp up at the back, the angled cut will rest on the floor (not shown.)

Drive a few screws through the side walls and into the ramp with your drill.

Line up the tower sides approximately 2″ from the back edge of the ramp walls. Then secure them in place with a few more screws.

Drill a hole into each tower side large enough for the 3/4″ dowel rod to fit through.

Slide the dowel rod through and center it on the ramp.

Mark the location of the center of the left and right tracks onto the dowel rod. Measure the distance between the dowel rod and the ramp. Use this measurement to cut 2 pieces of 1/8″ dowel rod 1/2″ longer than that measurement.

Remove the 3/4″ dowel rod. Drill holes 1/8″ wide halfway through the big dowel rod at the locations you marked for the centers of the tracks.) Wrap a piece of painter’s tape around the drill to indicate a depth 2/3 of the way through the 3/4″ dowel rod. Then don’t let the bit go further than the tape into the rod.

Mark the location where the dowel meets the outside of the tower wall.

Drill a hole all the way through the large dowel rod. Insert the 3/4″ dowel rod through the holes in the tower walls. Glue the 1/8″ cut dowels into the halfway holes. Then cut and glue two more 1/8″ dowels to go through the 3/4″ dowel on the ouside of the tower walls. These will anchor the large dowel rod and keep it from slipping out of alignment.

Nail finish nails through the tower roof and into the walls of the tower.


That completes the building portion of this tutorial. Hopefully your ramp resembles this one:


Now it is time to add some pizzazz! Ka-chow!

My design consultant demanded fiery red flames and black on his ramp. (And what he wants, he gets!)

I lightly sanded the wood race track. Added a coat of primer and some red and yellow spray paint.

Then I cut out a flame design using ScotchBlue painter’s tape (4 pieces overlapping) and an x-acto knife on a cutting board.

I gently lifted the tape and adhered it to the side walls.

After a coat of metallic hammered metal spray paint, I removed the tape to reveal:

What do you think? Do I have a shot at a job on Orange County Choppers??!! The “logo” on the top was made by pressing letter stickers over the primer, then I taped off around the words and sprayed some red and yellow spray paint. The lines are made with black graphic adhesive lines.

On your marks…get set…

and GO!


Nice two wheel stunt!

I hope you will make one of these for your little stunt driver.

scrap_wood_christmas_tree

Holiday decorating is in full swing in my house. We bought our tree today and Pretty Handsome Guy and the boys decorated it today while I worked on the cute little scrap wood Christmas tree above.

When I saw the scrap wood DIY Christmas Tree made by Creative Chaos, I fell in love and knew I had to make one too.

Having an ever growing scrap wood pile also helped convince me to make it.

I decided to try dyeing the wood scraps! You read that correctly, dye the wood. Did you know that you can use RIT dye to color more than just fabric?! Check out the RIT Dye website to learn more about all the techniques and materials you can dye. You will be amazed! Plus, RIT created a RIT Formula Guide that will give you 500 formulas to mix your own custom colors!

Seriously, that is an amazing array of colors!

Building the scrap wood tree is a super easy project that doesn’t take much skill. There is a fair amount of waiting time (waiting for the wood to soak up the dye and waiting for concrete to harden) but I’m sure you can find something more productive to do than watching cement dry.

Materials:

(I’ve included affiliate links for your convenience. I earn a small percentage from a purchase using these links. There is no additional cost to you. You can read more about affiliate links here.)


Cut your wood scraps to create a triangular form when stacked on top of one another. Cut one long strip to use as the tree trunk.

Dyeing the Wood:

Lay out three 5 gallon buckets (or mix the colors one at a time and use the same bucket.) Set out the dye colors (dark green, apple green & teal) and salt or vinegar onto a plastic sheet. RIT Dye works best when mixed with hot water. Our water heater is set on a safe hot temperature so as not to burn our boys’ hands. Therefore, I decided to add a little bit of boiling water to my mixture to increase the temperature.

Follow the directions on the RIT container. I added 1/2  bottle of RIT Dye to 3 gallons of water (1/2 gallon of which was the boiling water.) Then mix in 1 cup of vinegar (or salt) in each bucket. (I tried both and didn’t notice any major differences between using salt or vinegar, so you can use either for dyeing wood.)

Put on rubber gloves. Stir until the dye is well mixed.

Split up your wood and dip each into the desired color. Because the wood will float, you may need to clamp a piece of wood to hold your larger scraps below the liquid. Then flip the wood to dye both ends of the scrap. The smaller pieces can be floated right side down for color absorption on the side you’ll see.

After 30 minutes remove the wood and let it dry. (Look at that scrumptious color! And the cool thing is that the grain still shows through.)

While you are waiting for the dye to dry. Stain the tree trunk strip by dipping a paper towel into Minwax Early American stain and rubbing it on the wood. Alternatively, you could stain the trunk with RIT Dye in a brown color.

*A note about pre-painted or sealed scraps. The wood needs to be unpainted, unsealed, or unstained in order to accept the RIT dye color. I tried dyeing these two strips and obviously it didn’t work too well.

No worries though, I mixed up some green acrylic paint and some water and then painted them separately.


Building the Tree:

Position the scraps in the desired location on the trunk.

Gently hammer the scraps to the trunk strip with brad nails. Make sure the nails will go through the scrap and about halfway through the trunk.


Making the Cement Base:

*If you want to stake your tree in the ground, feel free to skip this step.

Wash out the plastic container. Fill the container with cement mixture from the stepping stones kit. Follow the directions on the package. (I ended up using only half the kit, so I halved the directions.) Slowly add water and stir the cement mixture until it is thick and heavy, but not crumbly.

When you have the right consistency, gently bang the container on the ground to get some of the air bubbles out and to level the top. Slide the tree trunk stake into the cement.

Level the tree from side to side and front to back. Then secure the tree with clamps (or other props) while it dries overnight.

In the morning, squeeze the sides of the container to release the cement base. Remove the container and brush off any cement crumbs from the base.

Cut a piece of fabric in a circle large enough to cover the base.

Gather the fabric up and tie it with a ribbon to secure it in place.


Adding the Star:

Trace a star shape onto a scrap of sheet metal (duct material) or a metal can. Cut out the shape using tin snips. Wear gloves to protect your hands from the sharp edges.

Position the star so it overlaps the top piece of scrap wood on the tree. Hammer two brad nails through the star and into the wood.

Decorate your tree with some holiday lights. (I found a set of battery powered LED lights at Target. They aren’t as bright, but it eliminates having to plug in a light cord and having a tripping hazard.)

I like the variety in color I got from using the three different colors of RIT dye. I am really loving my little table top tree. He kind of reminds me of a Charlie Brown Christmas tree, but I’m not sure why.


I have to tell you that I was so excited when I saw the color of the Teal RIT Dye, that I couldn’t resist throwing some old scarves into the bucket with the wood.

I had two scarves, one was light green and the other light blue. The green one never accepted the dye even after an hour of soaking. Obviously, the scarf was made of polyester, which will not accept dye. The light blue one came out beautifully. I attempted to recreate an ombré technique as described on the RIT Dye website, but didn’t read the directions until after the scarf had been sitting still in the dye for about 10 minutes. This gave me a sharp dye line, but it isn’t really noticeable when wearing it.  Next time I’ll know to keep dipping and moving the fabric.

This forgotten scarf has now been relegated to my wear almost everyday scarves!


Disclosure: This post has been sponsored by RIT Dye. I was sent several bottles of RIT Dye and paid a small fee in return for writing a post about my experience using their product. The ideas and opinions are strictly my own. I will never let any compensation (monetary or free product) keep me from giving you (the reader) a straight up and honest review.

Pin for later!