I’m so excited to share this tutorial with you. I knew it could be done, but honestly I didn’t believe it until I tried it. When I saw THIS cute project over at Home Frosting, it got my creative wheels turning.

I asked Lesa for a few clarifications and she gave me the courage to try feeding drop cloth material through my printer. {gulp}

Printing on material is fairly easy to do if you have the right materials.

Materials:

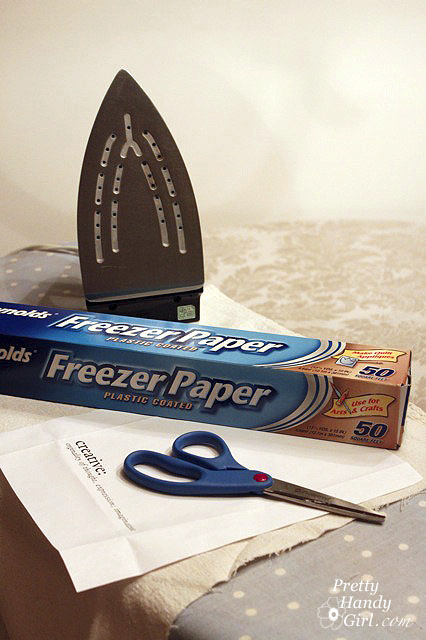
  • Laser or ink jet printer (I only tried it on the laser printer, but it can be done on either.)
  • Reynolds Freezer Paper
  • Iron
  • Ironing board
  • Sheet of letter size paper
  • Scissors
  • 3M Duct Tape
  • Cork Board
  • Irwin mat knife
  • Painter’s drop cloth bleached and washed until soft

Start by creating your words that you want to print in Word or any other program.

Set your iron to preheat.

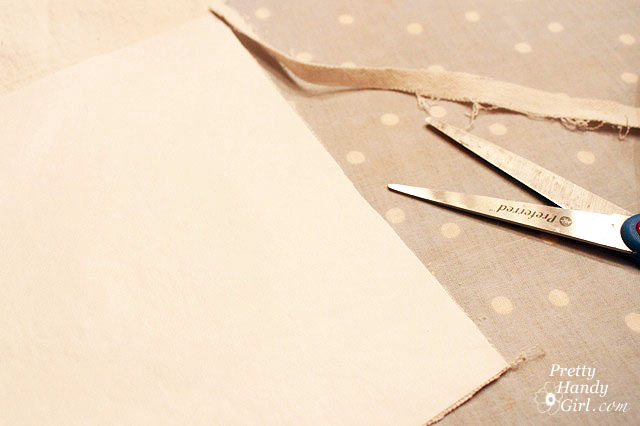
Tear off a sheet of Freezer paper slightly larger than letter-size paper. Cut the freezer paper down to 8.5″ x 11″.

Lay the freezer paper shiny side down on the drop cloth.

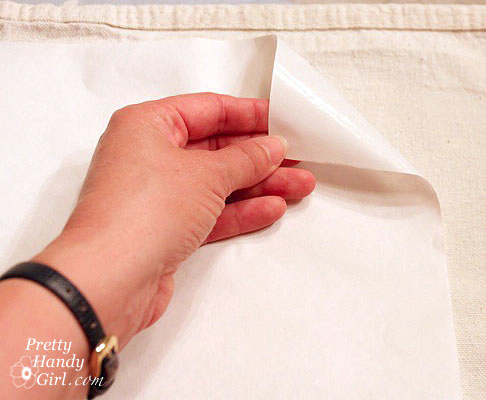
Press firmly on the paper and move the iron around constantly for about 15 seconds. Let the freezer paper cool for a minute and test to make sure it is lightly adhered to the drop cloth. If not, iron a little longer.

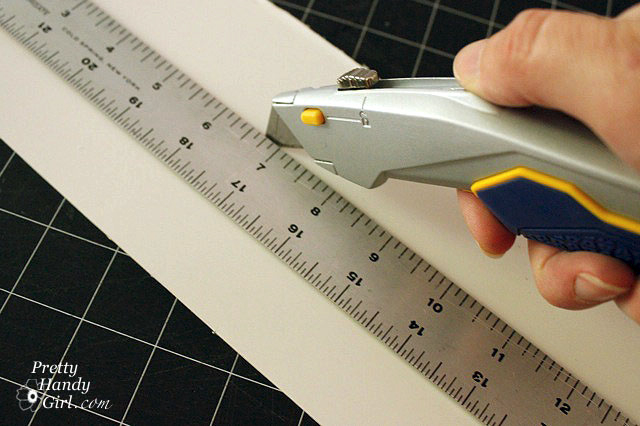
Now trim the edges of the drop cloth until it is the same size as the freezer paper.

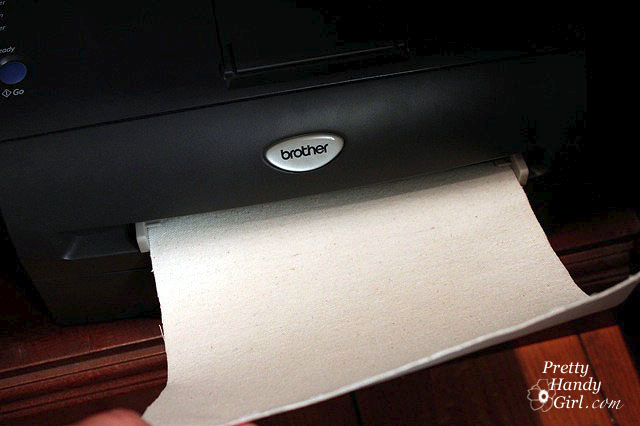
Take your freezer paper/drop cloth sandwich to the printer. If you have an individual sheet feed location on the printer, it would be best to use it. But, it can be done without. Print the document you created earlier.

Oooo, sooo pretty!!! I actually ran my “sandwich” through twice to get it darker, but it was still too faint for my liking.

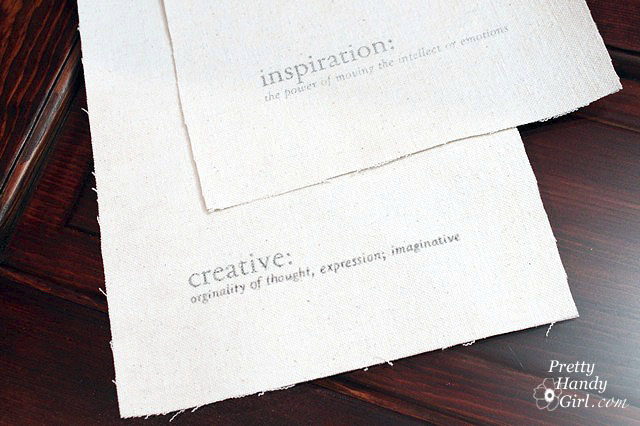
If you have the same issue, you can go over the letters with a ball point pen.

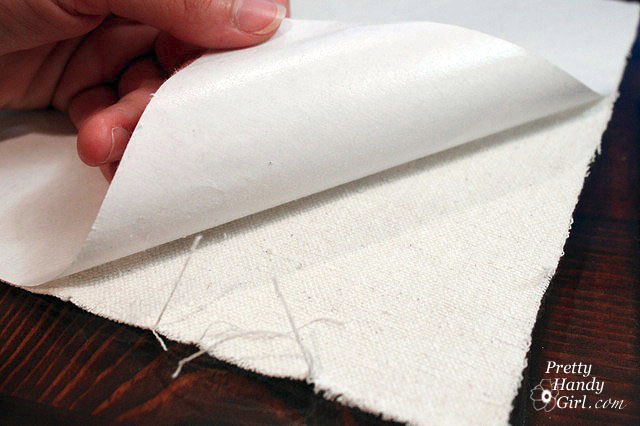
Peel off the freezer paper.

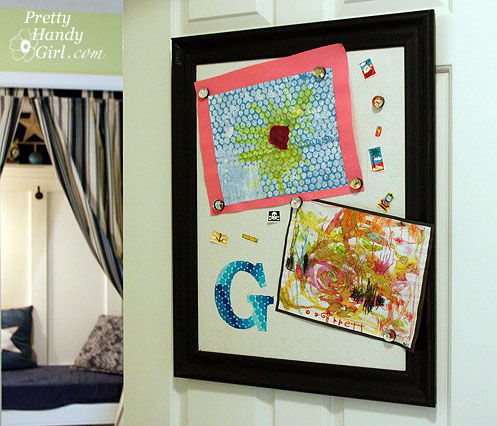
Now, cut your cork board. (If you are using the these cork boards in a window, be sure to pre-measure the individual window panes first.)

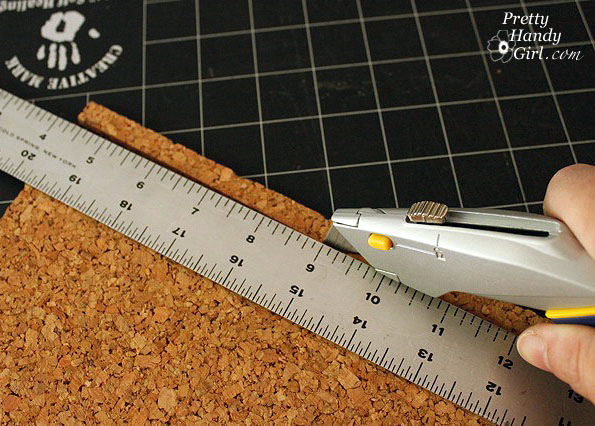
I have to tell you that Irwin sent me another tool to try. The mat knife. Their claims sounded outrageous, claiming it can cut better than other mat knives. “Whatever” is what I thought. But, as usual, they proved me wrong. I used the Irwin knife to cut BOTH cork board and foam core!

Have you ever cut foam core with a mat knife cleanly? Not me, until now.

I swear to you that Irwin has not paid me to say any of this. I just like their tools. I am waiting for an Irwin tool that I don’t like and then I’ll let you know what it is. But, I wouldn’t hold your breath.

Line up the drop cloth where you want it with the cork board underneath. Fold one edge of the fabric over onto the back.

Secure it with the duct tape.

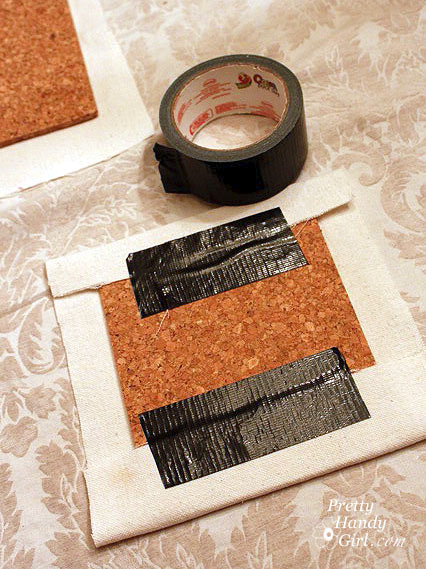
Pull the opposite side of the fabric and wrap it around the back. Continue until all the sides are taped to the back of the cork board.

And there you have it! A unique personalized cork board.

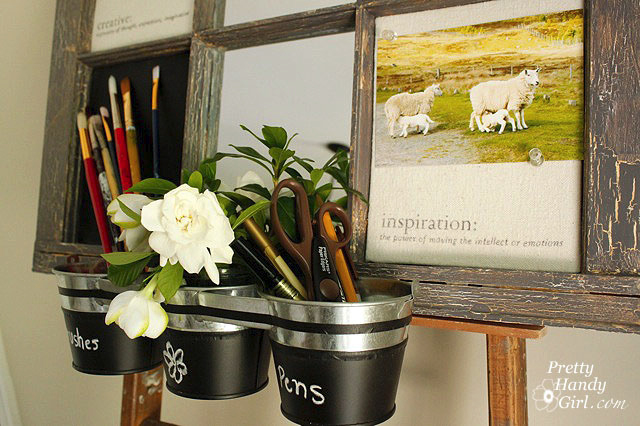
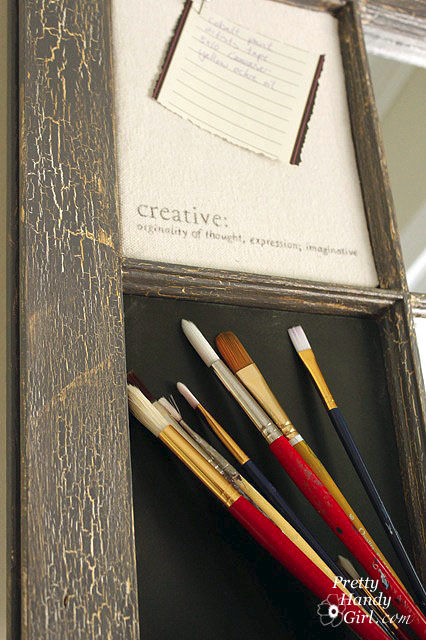
Want to see how to use the drop cloth bulletin boards in this Artist’s Inspiration Board?

Another project I completed before the birthday party was a quick makeover for a pair of ho-hum dollar store flower pots. My friend Heather helped me add some jute rope and fake flowers then set them out with utensils in them. Perfect for a summertime birthday party!

Materials:

  • Hot Glue Gun w/ glue sticks
  • Jute Rope
  • Flower Pot
  • Fabric Flowers
  • Scissors
  • Foil or wax paper (to protect work surface)

Instructions:

1. Plug in your hot glue gun to warm up. Cut the stems of your flowers about 2″ from the flower.

2. Turn the flower pot upside down. Put a dollop of glue against the rim of your pot and secure the end of your rope on it. Squeeze a line of glue around the pot rim and press the rope into the warm glue.

3. After one row is complete, add the flowers by bending the stems until they lay flat against the pot. Secure with a lot of glue. Then wrap the subsequent rows over the stems.

4. Continue gluing the rope onto the pot. Make sure to press each row of rope tightly against the row before it.

5. When you reach the bottom of the pot, secure the end of the rope with another dollop of glue. Be sure your rope doesn’t extend past the bottom of the pot or it could make the base wobbly.


Now set them on your table and fill with utensils. Later you can put a plant, flower or pens inside.

Are you ready for Independence Day? Would you like a quick and easy sewing project to add some patriotic flair to your home? Hop on over to Parentables to read my tutorial for making adorable star pillows.


And don’t forget, today (June 30th) is the last chance to enter the giveaways! I will be picking the winners after midnight tonight.

I had the opportunity to meet Leen the Graphics Queen last week when she, her husband and her two sweet boys were in town. We met at Monkey Joe’s (an inflatable playground) and our boys had a fun and energetic afternoon playing together. If you haven’t heard of Leen, she is widely known in the decorating blog circles as the go-to gal for wall decals and vinyl. She helped Layla & Kevin install an ENTIRE wall of words for a beach cottage makeover.

Beautiful, don’t you think?!

I asked Leen to make me a custom quote for our bedroom wall, the one where I had agonized over what phrase to put. After months of thinking about quotes, one came to me and I knew it was the quote for us. You see Pretty Handy Guy and I are HUGE Dave Matthews Band fans, and this lyric has special meaning to us:

Leen sent me a few samples of vinyl colors to help me decide. I fell in love with the silver vinyl which changes color depending on the lighting and where you are standing in the room (as shown above.)

If you’ve never installed vinyl before, it isn’t terribly difficult, but it does help to know a few tricks of the trade. Here is how I learned to install vinyl (back in the days when I worked for the sign and banner company):

Materials:

(I’ve included affiliate links for your convenience. I earn a small percentage from a purchase using these links. There is no additional cost to you. You can read more about affiliate links here.)

Installing a Wall Quote:

Start by hanging your vinyl (front, lettering, backing and all) on the wall using painter’s tape to hold it. Adjust the location until you like where the decal will rest.

Set a level up against the bottom of the middle line of text. Adjust the placement of your decal until the type is level.

Draw a level horizontal line across the paper and let the line extend slightly onto the wall. Make a vertical line that is plumb (level up and down) and be sure to extend your line slightly off the paper and onto the wall.

You should now have intersecting lines that run vertical and horizontal on your wall graphic and four small tick marks extending onto the wall.

Remove your wall quote and lay it on a flat surface. Begin to remove the opaque shiny backing paper (it may have a grid or lettering on it.)  Your decal should stick to the clear semi-transparent sticky sheet that was on top of the quote. If some letters come up, simply lay the paper back down and rub it firmly with the gift card and try again.

Continue peeling off the backing paper.

Be careful not to touch any of the lettering (or they can stick to your fingers and won’t remain in proper placement.)

You are now looking at your lettering in reverse on a sticky sheet. Good job, the hard part is over. Well, almost over.

Carefully pick up your quote and turn it so the sticky side faces your wall. Line up your lines with the tick marks still on the wall being VERY CAREFUL not to rest the sticky paper onto the wall. (If it accidentally sticks, carefully pull it off being sure that the letters come off with the sticky paper.)

When all four tick marks are lined up with your horizontal and vertical lines, gently press your decal down. Starting from the center, rub your hand from the center out to the edges to adhere the quote and the sticky paper to your wall.

Lightly spray water all over the sticky paper. This will loosen the sticky paper and release the vinyl decal.

Use your gift card to burnish (sign shop lingo) the letters onto the wall. Use firm pressure and be sure to rub all the letters with the card.

Carefully begin to peel the sticky paper off the wall. If the letters start to peel off with the paper, lay the paper back down over that letter and rub your finger on top of the paper to press the letter back onto the wall.

When the paper backing has been removed. Erase your tick marks.

Now stand back and admire your new wall quote!

Thank you Leen for helping me complete my bedroom makeover! I LOVE IT!

Take a few minute to browse through some of Leen the Graphics Queen‘s beautiful decals in her website.

Some of my favorites are:

Home Decor Accents

Trees and Flowers


I don’t know about you, but I’ve been fighting a losing battle lately. I have begged, yelled, and threatened my boys to stop putting stickers and tape on the walls.

I think my youngest one upped me, he put tape and stickers on his door! I had given up the battle until I came across this magnetic chalkboard from Less-Than-Perfect Life of Bliss:


And this burlap bulletin board from Between Blue & Yellow:


Those two boards got me thinking. If I married the two ideas, I could have a magnetic fabric display board! Luckily I have a stash of old picture frames in the attic. I grabbed the biggest one I had and painted it black and within a few hours I had a magnetic display board for my son’s door!

Here is how to create your own:

Materials:


  • Painter’s Drop Cloth
  • Contrasting Decorative Fabric
  • Double sided fusible interfacing
  • Scissors
  • Sheet metal flat sheet* ($10 in duct work aisle of Lowe’s or Home Depot)
  • Duct Tape
  • Sharpie Marker
  • Tin snips
  • Gloves
  • Picture frame
  • Double sided foam tape (optional)
  • Strong magnets

*Be sure to bring a magnet to test the sheet metal. Some of them aren’t magnetic.


Instructions for making the magnetic frame:

Start by measuring the opening in the back of your frame. Mark those measurements on the sheet metal using a sharpie marker.

Using tin snips, cut the sheet metal. Believe it or not, this was very easy, but gloves are a must because the edges are sharp.

Cut out the drop cloth about two inches larger than the sheet metal. Trim the corners off the fabric.

Fold the edges over and secure with Duct Tape.

Did you know that Scotch has a whole line of Duct Tape? There are five different kinds, and they each have a different use! REALLY! See for yourself.

I didn’t know about them either until they sent me these to try out. I haven’t used them yet, but I will be soon. And I promise to tell you what I honestly think. Until then, I wonder how I could make them into a cool vase.


Instructions for Applique Monogram:

To add an applique to the fabric, print out a large letter from your computer. Then fuse a square of fabric (large enough to fit the letter onto) to the double sided fusible interfacing. Follow the instructions on the interfacing package.

Pin the printout on top of the fabric and cut it out.

Peel the back off the interfacing …

…and iron it onto your fabric covered sheet metal.

Make sure the letter is securely fused to the drop cloth.

Insert the board into the frame.

Secure the board into the frame by using a staple gun and stapling at an angle into the frame.

Add a wire or hanger to the back of your frame.

Hang the frame on the wall, door, or wherever you like. Because I was hanging the display frame onto the door (and because 4 year olds are notorious for slamming their doors), I added some double stick foam tape to the back side of the frame.

YES, I know what I said, but Mommies are allowed to use tape ;-).

I used some of the glass bead magnets we made last summer and now my son can put up his artwork and stickers without incurring the wrath of Mommy!

Now that is what I call one handsome art display!


Looking for some more creative ideas for displaying your child’s artwork? Check out my article on Parentables today: 8 Great Ways to Display Your Child’s Artwork.


Ahhh, the birds are chirping and the flowers are in full bloom. The azaleas in our yard look like fireworks exploding with color.

I long to open the windows and let in the sounds and the sweet smells.

But, alas, the pollen bomb is still in full dumping mode.

I’m not going to let that get me down. I decided to bring the outdoors in and finished switching out my Valentine’s Day decorating (yup, I like to get the most out of my seasonal décor.)

So, without further ado, here is how I’m celebrating Spring!

I saw the window idea at Classicly Amber (via Pinterest) and had just pulled a few old windows out of a curbside pick up pile. Speaking of Pinterest, if you haven’t tried it yet, you are missing out! It is a great place to “pin” ideas you see and be able to refer back to them easily.

Beth at The Stories of A2Z gave a tutorial on using Pinterest HERE. She’s the one who introduced me in the first place, so I’ll let the master show you the ropes!

I always make it a point to refer back to the original source if I get an idea somewhere else. (Granted, some things are so widespread amongst bloggers, that it is hard to credit the original source.) Pinterest has helped me keep all the ideas together and makes it easier to find the original source. Plus, you can follow other people’s pins and boards. Feel free to sign up and follow mine HERE. Then you can steal my ideas before I blog about it…just kidding!

The striped pedestal holding up the plant is actually a cake stand I made recently using a plate and a candlestick. I’ll be blogging about it later this week, but trust me it is nothing new. You’ve probably seen this trick somewhere else.

This little adorable birdhouse was lovingly painted by my 7 year old son. I always have a stock of $1 birdhouses that they like to decorate on a rainy day. This one brings so much sunshine into my heart.

I love how easy this centerpiece was to create. I rested the ceramic bird into  a shredded paper bag nest. Then set the nest on top of a ceiling medallion ($3 at a yard sale) and surrounded the medallion with ivy.

And finally, my favorite: a robin’s egg nest that I made with chicken eggs.

You can view the tutorial for making the eggs and nest at TLC’s Parentables today.

If you struggle with decorating and creating vignettes, you might want to read a few of the guidelines I use when designing groupings and seasonal décor HERE.

Entering this post into the CSI Spring Decor and Vignettes challenge:

Visit thecsiproject.com