Wall Art Pottery Barn Knock Off

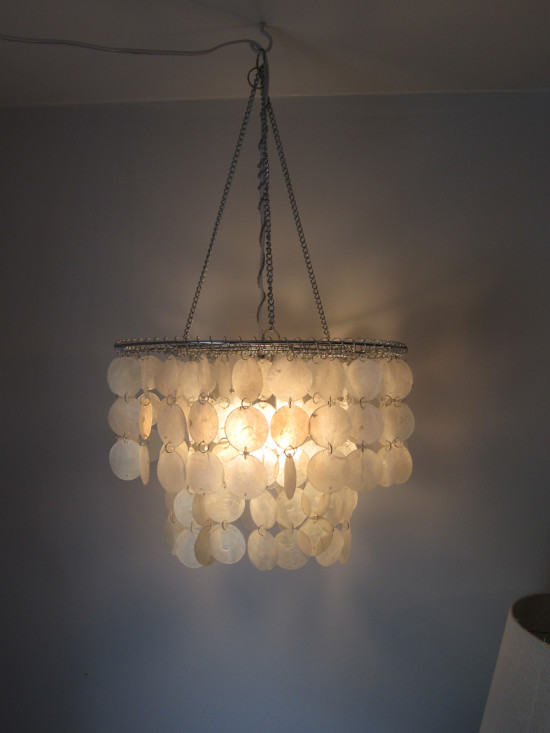
Today we have Roxanne taking over the Rockstar DIY stage! Roxanne is the knock off queen. She will be showing us how to create these beautiful knock off Pottery Barn Blue Textile prints for much less. If Roxanne sees something from a high end store, she has the super power to create a knock off for 1/10th the price or less! She recently knocked off a $695 Restoration Hardware capiz chandelier for only $52!

You can do the math, but I know that’s a real steal.

Roxanne from The Honeycomb Home

Roxanne, is the talented DIYer behind The Honeycomb Home blog. She can frequently be found turning her cookie cutter home into a beautiful home on a budget. Please welcome the dynamic Roxanne to the stage!

Rockstar DIY Series

page_break_2

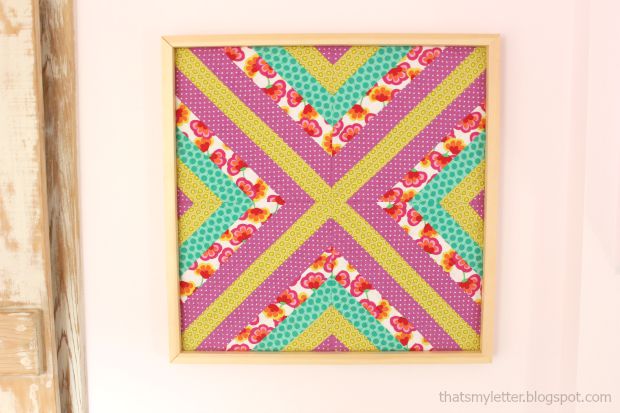
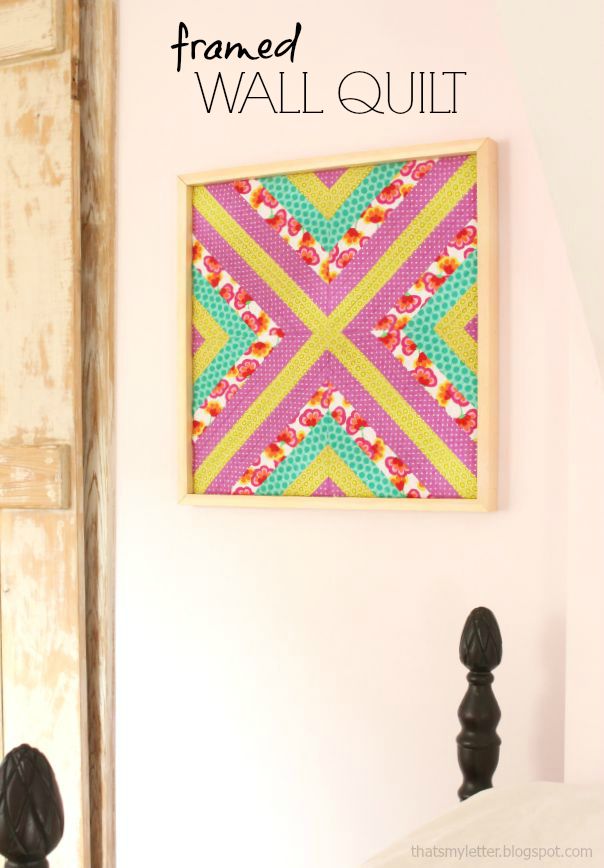
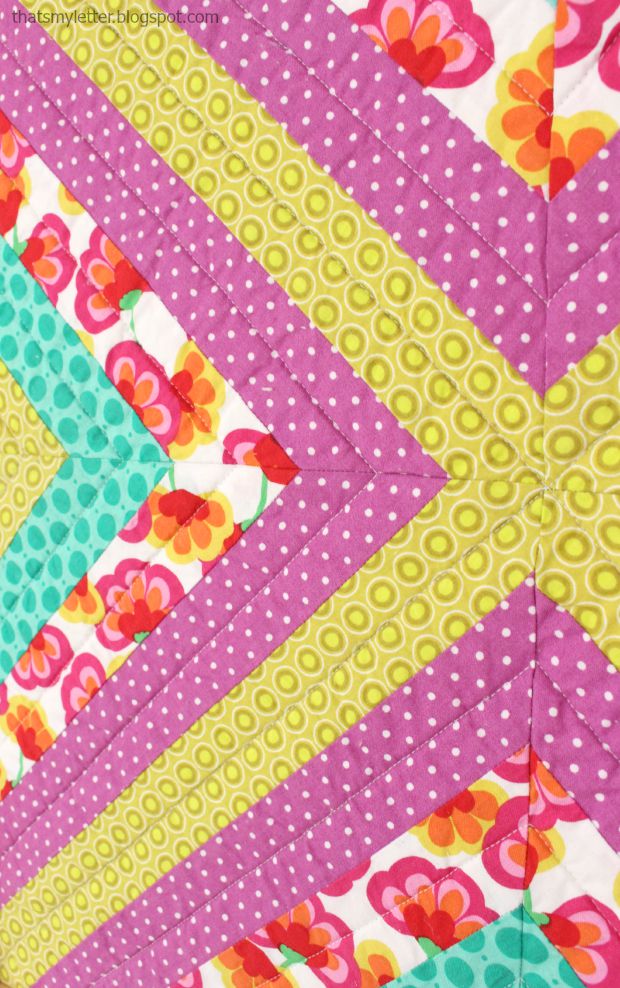
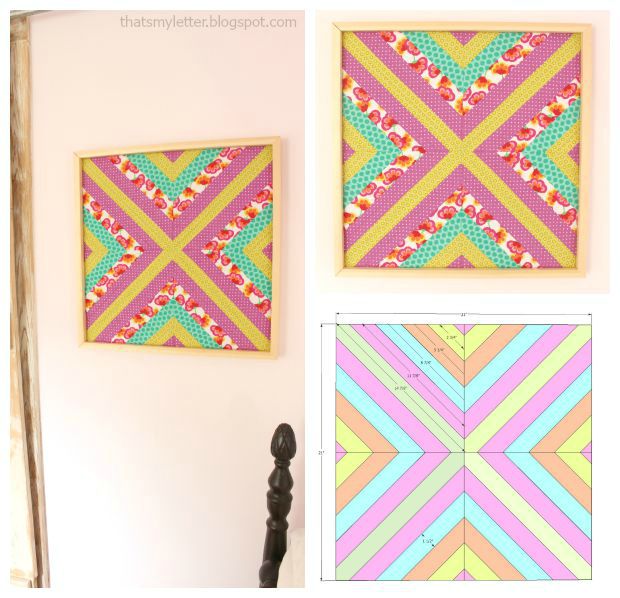
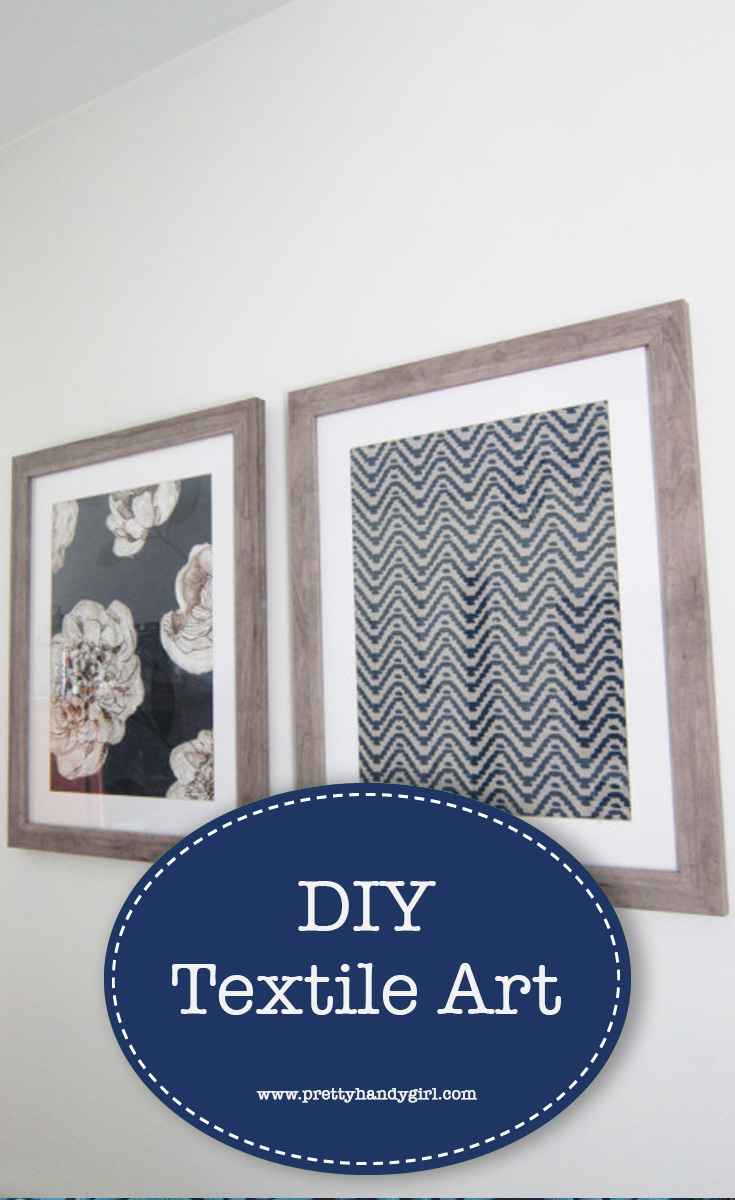
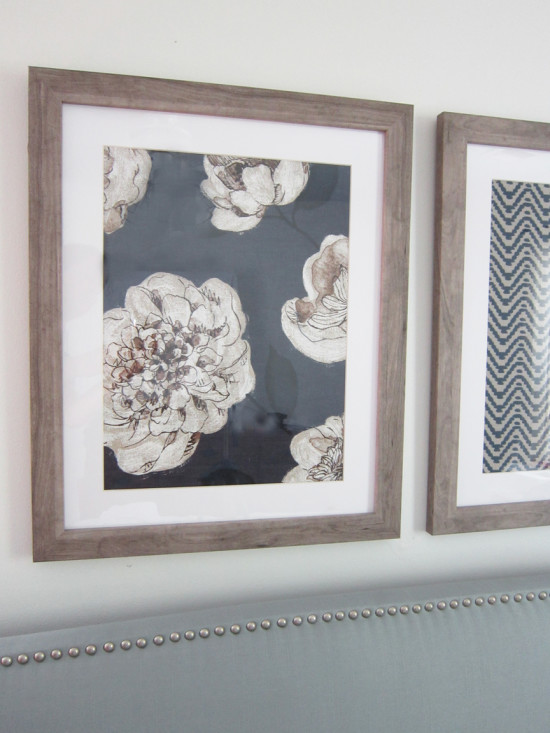
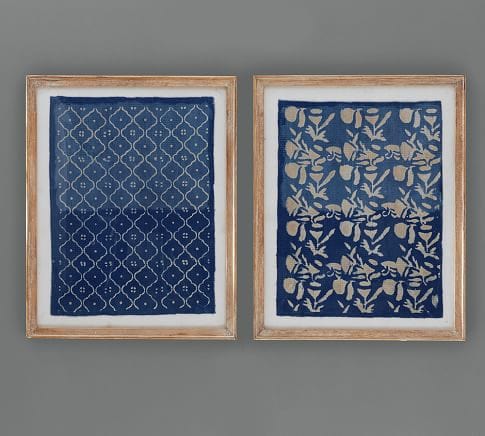
I was recently browsing my favorite website, Pottery Barn, and noticed this set of beautiful Framed Blue Textile Art. I loved the wooden frames and the blue fabrics, but not the price! They sell for $169 for one, or $334 for the pair! I realized this would be very easy to knock-off for a fraction of that price.

PB framed textile art

To re-create this look, I ordered fabric samples from Calico Corners. To make this work, you will need the larger sized samples. Average size samples are usually around 5.5″ squared. The larger versions at Calico are 27″ X 18″. I always prefer to order the larger size because its hard to get a good sense of how it will look in the room from the small size. Here is a picture of the small sample versus the large.

Fabric Sizes

I found two beautiful wood frames at Michael’s, which are normally priced $29.99, I scored them on sale for $10 each, it was a steal! I bought them in size 16″ X 20″, which is a little smaller than the Pottery Barn frames. Read more

wall quilt title

Today on the Rockstar DIY stage is Jaime, with the tutorial to make this drop dead gorgeous Framed Wall Quilt.

Rockstar DIY Series

If you can sew a straight line I promise you can make this framed wall quilt.  You all are familiar with Jaime from That’s My Letter, I’m sure! She’s one of the regular band members here on PrettyHandyGirl.com. I can honestly say that she is one of the most gifted and talented DIY rockstars I know. She can build, she can fix, she can craft and she can sew. She also balances a job blogging and being a mother. Enough said.

Jaimes_headshot

With that, I turn the stage over to Jaime and her tutorial for creating a Wall Frame Quilt!

page_break_2

Gather up your favorite fabrics and we will make this statement wall art that would be great hanging nearly anywhere. And, it makes a wonderful gift idea.

wall quilt 3

Although the pattern looks to be a little tricky, it’s actually four of the same pieces sewn together in an X format.

wall quilt detail

wall quilt collage

Materials:

  • 1/4 yard each of 4 cotton fabrics
  • Basic sewing supplies: sewing machine, thread, pins, scissors, pencil, iron & ironing board
  • rotary cutter, clear quilting ruler and self-healing mat
  • 24″ x 24″ cotton fabric (for backing)
  • 24″ x 24″ batting
  • safety pins
  • 1/2″ plywood @ 21″ x 21″
  • 1x2x8 pine board
  • staple gun
  • wood glue
  • miter saw
  • nailer & 1 1/4″ brad nails
  • clamps

Instructions:

Step 1: Begin cutting the fabric into 2″ wide strips.  Looking at the diagram below, you will need multiple lengths of each fabric. I suggest cutting very long 2″ strips which you can cut down later.  I like to fold the fabric in quarters then cut off a 2″ wide strip using a rotary cutter and clear quilting ruler.

wall quilt step 1

wall quilt layout

Step 2:  Sew strips together using a 1/4″ seam allowance.  Determine your pattern, start from the middle longest piece (bright green) then add strips on either side.  With each additional strip, line up the strip with a ‘step down’.  Press.  Eventually you will trim edges with a 45 degree angle which is marked on the quilting ruler.

wall quilt step 2

Step 3: Make 4 identical pieces.  Sew the top square to the bottom squares.  Press. Then sew the middle seam together to make one piece. Press. Be sure to line up the seams. Read more

one of the easiest pallet projects ever

A DIY Pallet Slat Bin makes a hanging display box or centerpiece. Today on the Rockstar DIY stage is Karah, with the tutorial to make this beautiful pallet bin.

Rockstar DIY Series

If you haven’t met Karah yet, I know you’ll be fast friends. Karah blogs at the space between.

Both Karah & I love serious DIY. We both grew up in houses that were always at one stage or another of completion, which has probably heightened our ability to deal with all of the house projects we seem to always be tackling. Karah is kicking off our Rockstar DIY Series straight from the beautiful beaches of Aruba (lucky duck!) Take it away Karah!

page_break_2

Hey everyone! I’m Karah and I blog at thespacebetweenblog.net. If you’ve been a Pretty Handy Girl reader for a while you might remember me as the one who PHG was separated from in childhood.

separated-at-childhood

If we haven’t met before, hey there! Nice to e-meet you. And no, I don’t always wear matching shirts with my friends. Only when we know there are cameras close. 😉

By way of introduction, my blog is about DIY and home improvement with a focus on all things repurposed, re-invented or upcycled. The blog is also a journey through our evolving life that brings us all over as we follow my husband’s career. Which right now finds us living in Aruba (I know!), so I am also all about the super simple projects that don’t pull me away from the beach, or just staring at the view, for too long. 😉

Palm Beach Aruba rainbow

So here is an easy upcycling idea using only one pallet slat that makes a great project that you could hang on your front door, or use as part of a table arrangement or centerpiece.

welcome to fall

Project: DIY Pallet Slat Bin

Materials:

  • 1 pallet slat
  • handful of small finish nails
  • jute twine (optional)
  • 150 grit sandpaper

Tools:

  • pry bar
  • hammer
  • tape measure
  • saw

I didn’t even use any power tools to make this but you could speed up the already quick process by using a nail gun (like this one) or a miter saw (like this). (affiliate links)

Instructions:

Step 1: If you’re not lucky enough to happen to have just a single pallet slat on hand use the hammer and pry bar to remove one pallet slat from a pallet.

12May wonder bar hammer pallet

Step 2: Use your saw to cut two pieces 12 inches long (for the front and back) and two pieces 3 inches long (for each end), then put them together like this to mark where to cut the piece for the bottom.

12May cut pallet slats.jpg

Step 3: Use the hammer and nails, rusty finish nails optional, to put it all together. Read more

Install a ReadyMade Mirror Frame on Door | Pretty Handy Girl

Install a ReadyMade Mirror Frame on Door | Pretty Handy Girl

You guys, I can’t believe I have a middle schooler. I know, I know, I’ve been having a pity party for myself for two weeks. But, I’m finally coming to terms with it. This past week, I helped Handy Boy #1 de-clutter his room and carve out a space for him to do his homework (without being interrupted by his younger brother.) We moved his furniture around and actually had a lot of fun talking and working together.

Install a ReadyMade Mirror Frame on Door | Pretty Handy Girl

I also installed a mirror on his door. Although he’s not obsessed with how he looks or dresses yet, I know that time is coming soon. Instead of putting up a cheapy plastic-framed mirror, I worked with MirrorMate to test out their new READYFrame kit. You may remember when I ordered a custom MirrorMate frame for that ugly and naked mirror in my sons’ bathroom. It still looks great today (although I painted it blue for a new look.)

MirrorMate now sells pre-made frames that fit several of the standard sized mirrors you can buy at Lowe’s, IKEA or HomeDepot. I chose the Essex Crosshatch Silver and the tall 16″ x 58″ mirror from Lowe’s.

I didn’t need to purchase any hanging hardware because MirrorMate ships it with your frame.

Install a ReadyMade Mirror Frame on Door | Pretty Handy Girl

Want to see how easy it was to hang and dress up the mirror? I’ll give you a hint, it was easy and it looks beautiful!

Materials:

(I’ve included affiliate links for your convenience. I earn a small percentage from a purchase using these links. There is no additional cost to you. You can read more about affiliate links here.)

Install a ReadyMade Mirror Frame on Door | Pretty Handy Girl

  • MirrorMateREADYFrame
  • Screwdriver (or drill with phillips head bit)
  • Rubber mallet (or hammer)
  • Tape measure
  • Pencil
  • Level
  • Wet wipe
  • Heavy book or weight
  • Thumbtack or pin
  • Rubbing alcohol
  • Cotton ball or rag
  • A helper

Assembling the Frame:

Open up the READYFrame box and remove the frame connectors from the packaging.

Install a ReadyMade Mirror Frame on Door | Pretty Handy Girl

Remove the top from the glue and peel off the seal. Poke a thumbtack in the glue bottle to create a hole in the nozzle. Apply glue to the edges of theREADYFrame. Read more

Pretty Handy Girl Living Room Reveal | Pretty Handy Girl

Cory Rolling Storage Ottoman from La-Z-Boy | Pretty Handy Girl

I’m so excited to finally reveal our living room makeover to you. I partnered with La-Z-Boy to furnish our living room almost exclusively with La-Z-Boy furniture and accessories. The furniture from La-Z-Boy arrived a while ago, but the rug was backordered for several months. My La-Z-Boy in store designer asked me twice if I wanted to chose another rug, but I’m so glad I decided to wait. I love the rug and can honestly say that it was well worth the wait!

Before we get to the tour, I think it’s only fair to show you a few pictures of the progression of the living room over the years. About a year after we bought the house in 2007, I painted the walls a lighter sage green and added sconces. We also paid a contractor to double the width of the opening to the kitchen. That made a huge difference. You can see the missing flooring where the small opening used to be below:

doorwayopenedup

The sofa was a hand-me-down from my Godfather’s parents.

Xmasmorning

Underneath the red slipcover was this fabulously reupholstered sofa. Can you tell what year I re-covered it?

plaid_sofa

Ummm, hello 1990’s hunter green plaid. I don’t have a photo, but under this plaid monster is the original fabric from the 60’s. It was a floral woven tapestry fabric. I still can’t believe we sat on this sofa that was over 50 years old. It was hard as a rock.

In 2009, I pulled up the wall-to-wall carpeting and installed antique heart pine wood flooring. I also painted the previously painted white fireplace to look like brick again.  You read that right, the brick is painted!

livingroomdone2

In 2011, I covered the sofa with a new slipcover, but it was still the same uncomfortable hard sofa. We also tried positioning the sofa at an angle in the room.

living_room_vertical

This past winter we moved the furniture around again and for the first time we felt that we had found an arrangement that worked for us.

Pretty Handy Girl's Holiday Home Tour 2014

If you recall, I took a little field trip to our local La-Z-Boy furniture gallery back in December. I met with Lexie, the designer, who was invaluable with her expertise and design advice. Then you all helped me by voting for your favorite fabric selection (big virtual kisses and hugs from me to you for that!)

The voting was a tie, so I combined fabrics from the two winners and ultimately chose this combination:

La-Z-Boy Living Room Mood Board | Pretty Handy Girl

Ready to see how they look in the living room? Are you telling me to shut up already and get to the reveal? Your wish is my command, here is our living room reveal:

(I’ve included affiliate links for your convenience. I earn a small percentage from a purchase using these links. There is no additional cost to you. You can read more about affiliate links here.)

Read more