I hope you will take a moment to view how I test drove my Dremel Trio. This is seriously a really fun power tool! Just be sure you are safe so as not to ruin the fun. Eye protection, face mask, and ear plugs. Check.
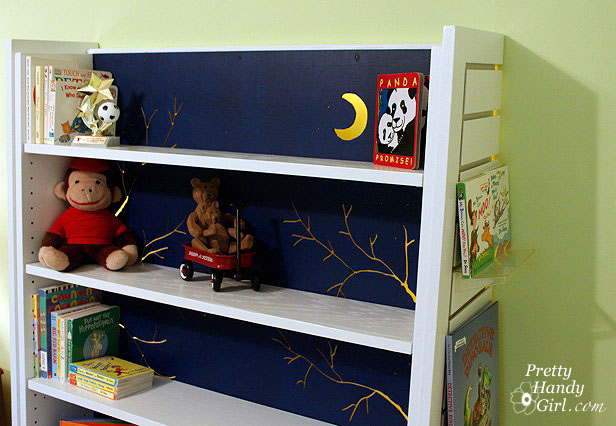
For those of you who like to skip to the end of the book and see the ending, here you go:

For the rest of you, here is how I created this cut out/back lit bookshelf that started life as a bookshelf from a closing Borders bookstore.

Tutorial for creating a cut out bookcase:
Almost any bookcase will work for this project, but the ones that have a thin wood (can be masonite) backing will work best. Set up a work area that you don’t mind getting dusty and dirty. Remove the shelves from your bookcase.
Cutting the endcap:
Materials:
- circular saw
- level
- clamp
- scrap wood
- screws
- drill
I cut the endcap in half lengthwise so I could use half for each end of my bookshelf, and to position it flush against the wall. To cut a straight line using a circular saw, I clamped one end of a level to the endcap. My level wasn’t long enough, so I drilled a scrap piece of wood on top of the level and into the end cap to support the other end.

I set the circular saw blade just below the depth of the endcap. By resting the endcap on two 2×4″ boards, I was able to creative a gap below the endcap for the sawblade to pass through.Then I ran the circular saw along the level for a straight cut. Straight as an arrow, and it met Pretty Handy Dog’s approval.

Cutting out the backing design and painting:
Materials:
- Dremel Trio
- Palm sander
- Sandpaper (100 grit & 220 grit)
- Scrap 2×4 lumber
- Chalk or pencil
- Wood putty
- Putty knife
- Primer
- Paint (white and navy blue)
- 3M Clean Edge technology painter’s tape
- Newspapers
- 2″ paint brush
- Small paint roller and tray
Sketch out the design on your bookshelf (using chalk or pencil) before beginning.

Before using any new power tool, take some time to read through the manual.

To insert a bit into the Dremel Trio, you push in the blue (shaft lock) button on the front and use the enclosed wrench to loosen the collet nut on the tool.

Insert the cutting bit into the Trio. (The trio also comes with a sanding drum bit and a routing bit!)

Tighten the collet nut with the wrench.

Turn the blue handle on the side of the TRIO to raise or lower the base plate.

Adjust the base plate until the cutting bit extends slightly below the wood backing of your bookcase.

Lay the bookcase down on its back. Position 2×4 boards under the edges of the bookcase (or you will be cutting into concrete. I’m pretty sure the TRIO is not capable of that, but I could be wrong.)

Plug in your Trio and get ready to have some FUN! You may want to practice on a scrap piece of wood before working on your bookcase. The TRIO allows you to change directions quickly and easily. Creating fanciful cuts is a breeze!

Squeeze the trigger and when the bit reaches full speed you can plunge it into the workpiece. For the pin holes hold the Trio steady, insert the bit and then lift it back out of the same hole.
To cut trees and other designs, plunge the TRIO into the wood and then slowly move the tool through the wood to carve your design. Be wary of long “V” shape cuts as they will make the backing weaker.

When your design has been completed, use the power sander to sand the back of the bookcase (where the majority of the splintering will have occurred.)

Insert the sanding drum bit into the TRIO and sand any large cut out areas.

Fold a piece of sandpaper in half and feed it through the thin lines of the branches to sand any rough edges that can’t be reached with the sanding bit.

Set the bookcase upright and inspect the cuts for more splinters. You can preview what your design will look like when lit up. Lookin’ good, huh?!

Before sanding the rest of the bookshelf, repair any dents or holes with wood putty. (This is a post I wrote about repairing all types of holes if you need help.)

Use the palm sander and a fine grit (220 grit) sandpaper to rough up the rest of the bookshelf.

Apply a coat of primer to the bookcase, shelves and sides. (Still working on emptying that can of KILZ Clean Start primer! Love that stuff.

When the primer has dried, mask off the sides of the bookcase where they meet the back.

3M sent me this Scotch Blue Painter’s tape with Edge-Lock protector to try. I was skeptical, but when I pulled the tape off it did give me a clean edge. The only place I had a little bit of seepage was in the corners where I didn’t press the tape tightly into the corner. The key to using this tape is to firmly press the edges with your finger to engage the “Edge-Lock” seal. I haven’t tried it for painting walls, but you better believe I have a wall project coming up that I can try it on.

Paint the back of your bookcase. I chose a very dark navy blue. To save paint, I used a medium blue paint for my first coat to darken the back and hopefully save paint.

Then paint one coat of the navy blue.

Follow up with a second coat to eliminate any streaking.
When the navy paint has dried, tape along the edges of the navy blue backing, where it meets the sides. Slip pieces of newspaper underneath to catch any paint splashes. (Will you get a load of my lazy supervisor! You think he’s been working hard in the heat? Uh no, that would be me doing all the work and him snoozing away the day.)

Paint the rest of the bookcase, the sides and the shelves white. I used two coats of Benjamin Moore Impervo Semi-gloss white.

Once the paint has dried completely, re-assemble the bookcase. And screw the end cap halves onto either side of the bookcase.
I installed a light rope behind the bookcase (tutorial to come at a later date) and set the lights on a timer. The rope light comes on at dusk and illuminates all the cut outs.

There is a very soft glow emitted from the back of the bookcase.

It provides the perfect amount of light for my son who HAS to have a light on at night.

My only complaint about the rope lights is that they give off a strong plastic odor. But, after a week the smell has dissipated.
I had the foresight to purchase a few of the clear display stands that slide into the end caps of the bookcase. It makes it easy to display books to pique my son’s reading interests.

Oh look! There he is now! Mission accomplished, reading interest piqued. Yes, I think he is double-jointed and a teacher pointed out that both my son’s sit like that. Must be in the genes.

A few more detailed pictures of the bookshelf. This has to be one of my favorite projects I’ve created recently. And it wasn’t very difficult to complete.


