Easy Wooden Chalkboard Sign | Pretty Handy Girl

Easy Wooden Chalkboard Sign | Pretty Handy Girl

Do you keep scraps of wood and say to yourself, “I might need that for something someday.” Well, today is your someday! Grab a scrap (or ask Lowe’s for their scraps) and create this super easy wooden chalkboard sign.

When you’re done, you can turn it into a sign that displays your favorite quote; a plaque welcoming friends; or you could create a fun Christmas Countdown sign!

Easy Wooden Chalkboard Sign | Pretty Handy Girl

Materials:

Easy Wooden Chalkboard Sign | Pretty Handy Girl

  • Scrap wood (3/4″ thickness works the best)
  • Chalkboard spray paint
  • Painter’s Tape
  • Red paint (I used Miss Mustard Seed Tricycle Milk Paint)
  • White paint pen
  • Chalk
  • Pencil
  • Eye hooks
  • Drill
  • Drill bit slightly smaller than the eye bolts
  • Ribbon
  • Pencil
  • Safety glasses


Instructions: Read more

You may remember when we created our Summer calendar and bucket list. The boys really responded well to being able to see what was coming up on the calendar. And I enjoyed not having to pull up my Google Calendar on the computer whenever I was put on the spot for a play date. So, continuing to use a calendar in the kitchen was a no brainer. But, creating new calendars on poster board each month — although fun — seemed a bit tedious.

In a sheer stroke of genius suggested by Pretty Handsome Guy I decided to paint a chalkboard calendar on our fridge: Read more

Chalkboard Tags for Gift Wrap

What is better than a creative gift wrapped package? A creative gift wrapping that can be re-used again and again and again! Chalkboard tags made from foam board are adorable and can be used after the gift has been opened.


Materials:

  • Chalkboard paint
  • Foam board
  • Chalk or chalkboard pen
  • Wrapping paper
  • Ribbon
  • Hole Punch
  • X-acto knife
  • Pencil
  • Ruler

Measure and cut out a 4″ x 6″ rectangle of foam board. The trick to clean cuts in foam board is to use a brand new x-acto blade! It is that simple.


To make perfect diagonal corners, measure 1″ from the corner (across and down) and make  marks. Then draw a diagonal line connecting the two points. Cut off the triangle.

Use the hole punch to put a hole in the middle of the top edge.

Spray paint or paint chalkboard paint onto the foam board. Let it dry.

Season the chalkboard rectangle by rubbing chalk all over the board. Then wipe it off. This will eliminate the chalk message “burning” into the chalkboard and will allow the recipient to re-use the board.


Write a message on the chalkboard tag.


Wrap the present with wrapping paper and a big bow. Attach the tag to the bow.


Now your gift recipient has a cute little re-useable chalkboard tag.


 Merry Christmas, Renee!


Materials:

  • Chalkboard paint
  • Foam core
  • Chalk or chalkboard pen
  • Wrapping paper
  • Ribbon
  • Hole punch
  • X-acto knife
  • Pencil
  • Ruler
  • Clothespin
  • Silver or Gold acrylic paint
  • Paintbrush
  • Hot glue gun (or Elmer’s glue spots)

Follow the instructions above for making a foam core chalkboard. Eliminate the steps on cutting diagonal corners and adding a hole for this one.

Take apart a clothespin and paint both sides using the silver or gold acrylic paint.

Wrap the present with wrapping paper.

Wrap ribbon around the present, but don’t tie a bow. Just make a knot.


Make a separate bow out of the same ribbon and use hot glue (or Elmer’s glue spots) to attach it to the clothespin.


Clip the clothespin over the knotted bow on your package and slide your chalkboard into the clothespin.


“Merry Christmas, Baby!”

Only one more day until Christmas! Better get wrapping people! I’ll have a final wrapping paper tutorial for you tomorrow, I bet you can’t wait!

Chalkboard Tags for Gift Wrap

What happens when you have more gift wrapping ideas than presents? I guess I could go buy more presents, but I think Pretty Handsome Guy might not be too happy about that. So, I’ll have to stick with just six days of Creative Gift Wrapping. That’s right, two more posts filled with creative gift ideas! I hope you like them.

Yesterday I showed you some nature inspired gift wrappings, today we’re delving into the popular toxic spraypaint hobby of chalkboard painting! I think 2010 can officially be declared the year of the chalkboard paint. I have seen it EVERYWHERE!

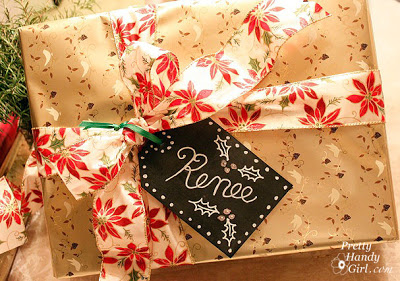
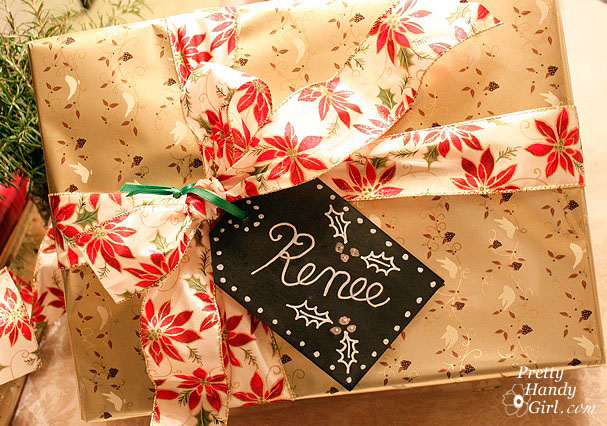
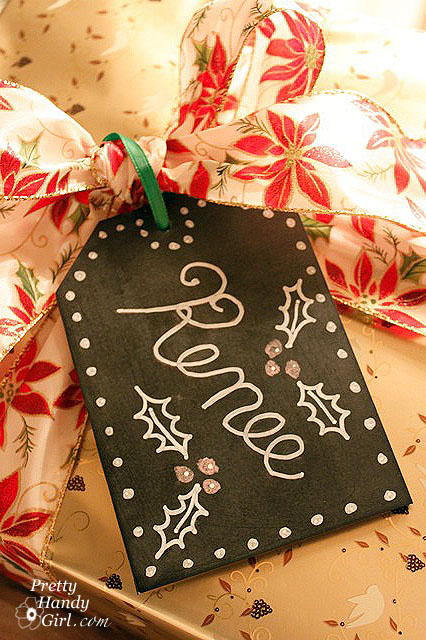
Chalkboard Note Gift

Materials:

Chalkboard paint
Foam core
Chalk or chalkboard pen
Wrapping paper
Ribbon
Hole Punch
X-acto knife
Pencil
Ruler

Measure and cut out a 4″ x 6″ rectangle of foam core. The trick to clean cuts in foam core is to use a brand new x-acto blade! It is that simple.

To make perfect diagonal corners, measure 1″ from the corner (across and down) and make  marks. Then draw a diagonal line connecting the two points. Cut off the triangle.

Use your hole puncher to punch a hole in the middle of the top edge.

Spray paint or paint chalkboard paint onto your foam core. Let it dry.

Season your chalkboard rectangle by rubbing chalk all over the board. Then wipe it off. This will eliminate the chalk message “burning” into the chalkboard and will allow the recipient to re-use the board.

 Write a message on the chalkboard tag.
 Wrap your present and attach the tag to your present’s bow.
Now your gift recipient has a cute little re-useable chalkboard tag.
 
 Merry Christmas Renee!
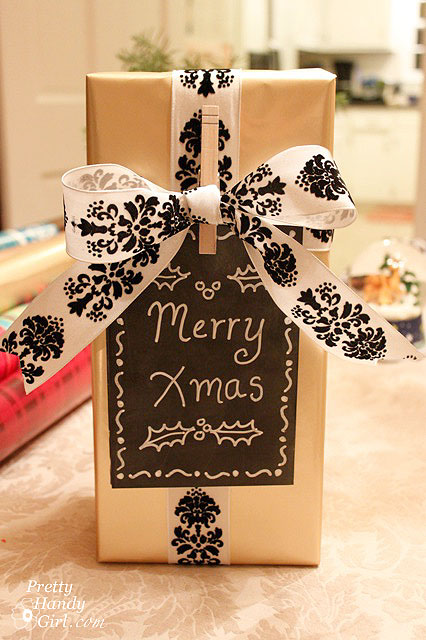
Clothespin Clipped Chalkboard Message Board

Materials:

Chalkboard paint
Foam core
Chalk or chalkboard pen
Wrapping paper
Ribbon
Hole punch
X-acto knife
Pencil
Ruler
Clothespin
Silver or Gold acrylic paint
Paintbrush
Hot glue gun

Follow the instructions above for making a foam core chalkboard. Eliminate the steps on cutting diagonal corners and adding a hole for this one.
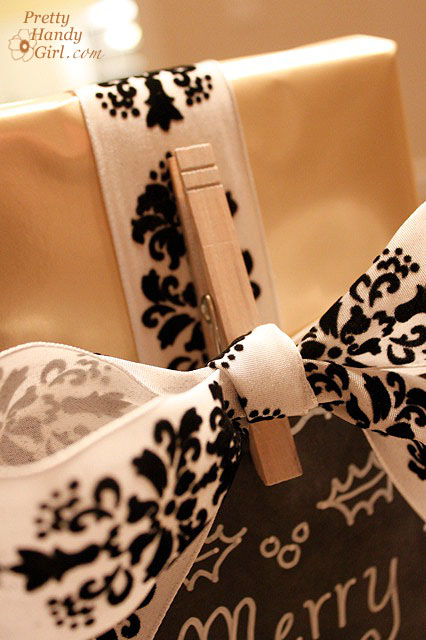
Take apart the clothespin and paint both sides using the silver or gold acrylic paint.
Wrap your present as you would normally.
  Wrap ribbon around your present, but don’t tie a bow. Just make a knot.
 Make a separate bow out of the same ribbon and use hot glue to attach it to the clothespin.

Clip the clothespin over the knotted bow on your package and slide your chalkboard into the clothespin.

 “Merry Christmas Baby!”

Bonus: I thought I’d share with you two more gift packages that were pretty simple and quick. The first one I hot glued crocheted snowflakes from Lillian Vernon onto them (thanks for bringing them to my wrapping party, Renee!)

The second one is an ovaltine can that I wrapped with gift wrap, added some monogram stickers and put a bow on top. Easy peasy!

I hope you will swing on by and check out Day #5 of my Creative Gift Wrappings!

busy day
…to another busy day in the life of Pretty Handy Girl!
I had fully intended on posting a tutorial on distressing furniture for you today. But, I got side tracked today and then let’s just say that my evening ended up with a visit from these guys:
busy day
 Thank you Raleigh Fire Department for putting out my oven fire! 

Let me tell you, it is a scary thing to see your heating element turn into a 4th of July super-sized sparkler! Luckily no one was hurt and our kitchen is still white (not smoky gray.) Needless to say, we will be in the market for a new oven this week. Any recommendations or “steer clears” would be appreciated. And a word of advice, if your heating element shorts out, sparks and catches fire, turn off your circuit breaker.

Not exactly what I planned on dealing with today! I did have plans for one tiny little project. This little project had me on a hunt for the illusive and extremely rare chalk marker. I have been looking everywhere for one of these exotic creatures.
Target – nope
Walmart – nope
Ace Hardware – nope
JoAnn’s Fabrics – nope
Jerry’s Art-a-rama – Ding, ding, ding! Finally found it!
If you’ve been around the blogosphere lately, you have seen chalkboard paint projects everywhere! I probably wouldn’t be surprised to see a chalkboard painted dog next week.
I had some leftover chalkboard wall decal material, so I cut a little label for our jar of colored pencils. But, I really wanted a chalkboard marker so I could write on the label and not worry about it smudging from little hands using it daily.
busy day
So, naturally after using my new chalkboard marker and LOVING IT! I decided to paint some more things with chalkboard paint and use my new marker.
I put up my homemade spray tent (I’ll have to show you how I made it later.)
busy day
And got busy. My mind played “Back in Black” in my head as I sprayed. (Any other AC/DC listeners out there?)  I decided to use automotive black primer (for better adhesion on the plastic spice lids.)
busy day
First up where these Goodwill candy jars all four and the rack for $6.99!
busy day
U-G-L-Y oak lids, but not for long…
busy day
Blackified, labelled and now looking good.
busy day
Next victim was a spice rack and jars (I’m embarrassed to say)
that I repainted years ago.
busy day
That’s right, back in the sponge-era.
The gold ink labels are impossible to read.
busy day
I carefully lined them up and made a list of the order 
they were in to make re-labelling them easy.
Seemed like a great idea, UNTIL my oven caught fire.
Then I swept everything off the counters and away from the stove.
busy day
 After testing my sense of smell, I put the lids back on. And now that I can read them,
I shouldn’t mix up red pepper and paprika anymore.
busy day
The rack received several layers of treatment to give it a distressed look.
busy day
Finally, I spray painted a Goodwill picture frame heirloom white and distressed it.
I cut a piece of foamcore to size (since I accidentally broke the glass) and sprayed it with chalkboard paint. Easy framed chalkboard.
busy day