Master Bedroom Reveal | Pretty Handy Girl

Master Bedroom Reveal | Pretty Handy Girl

When I mentioned to Pretty Handsome Guy that I was going to give our master bedroom a makeover, he thought I was nuts. I did paint this room when we first moved into our home seven years ago. And I gave it a mini-makeover in 2011.

master_bedroom_photo

But, it was exciting to be able to repaint and give the room a fresh new look with an ombré wall technique.

Master Bedroom Reveal | Pretty Handy Girl

I saved a lot of cash by repainting the nightstand (and adding feet to it),

Master Bedroom Reveal | Pretty Handy Girl

the vanityRead more

Painted Vanity Nightstand | Pretty Handy Girl

Painted Bedside Vanity | Pretty Handy Girl

In the quest to makeover our master bedroom and save money, I’ve been painting several pieces of furniture to coordinate with the new bed I built.

One of the pieces I painted was this small desk that doubles as a nightstand. Our bedroom isn’t very large and our master bathroom is even smaller than what can be described as a “master” anything! Doing my hair and makeup in our bathroom isn’t a viable option, especially when both Pretty Handsome Guy and I wake up at the same time. When I saw this little desk at a local thrift store, I grabbed it. Especially because she was only $20!

Painted Bedside Vanity | Pretty Handy Girl

She had lots of age, but not much character.

top-of-wood-vanity

However, she was the perfect size and had just enough storage for a makeup vanity.

With a light sanding, primer and a coat of Benjamin Moore Advance paint, she is now showing her more glamorous side. Read more

Facelift for a Knotty Pine Dresser | Pretty Handy Girl

Facelift for a Knotty Pine Dresser | Pretty Handy Girl

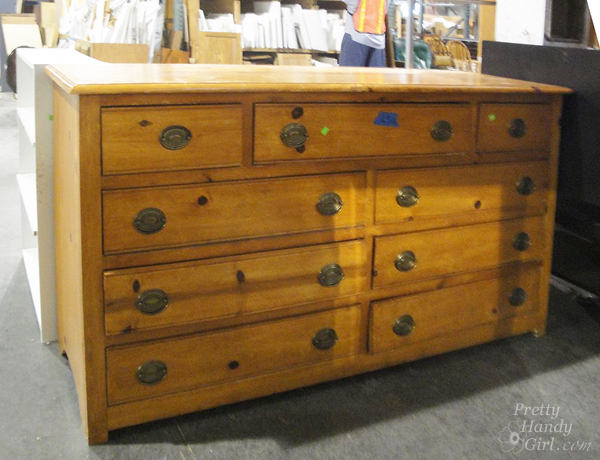
You know you’ve seen those knotty pine dressers from yesteryear. Their spotlight has faded and they are finding themselves at thrift shops, ReStores or worse yet…at the curb.

Facelift for a Knotty Pine Dresser | Pretty Handy Girl

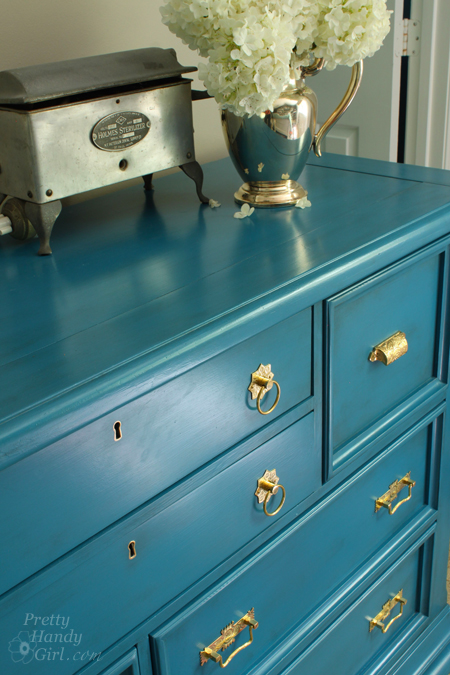
I’m begging you to let this knotty eyesore back into your home. It doesn’t have to be banished. It’s KNOT her fault she was built from cheap pine. All this dresser needs is a new coat of paint and some beautiful brass knobs and all her flaws and knots will be forgotten.

Facelift for a Knotty Pine Dresser | Pretty Handy Girl

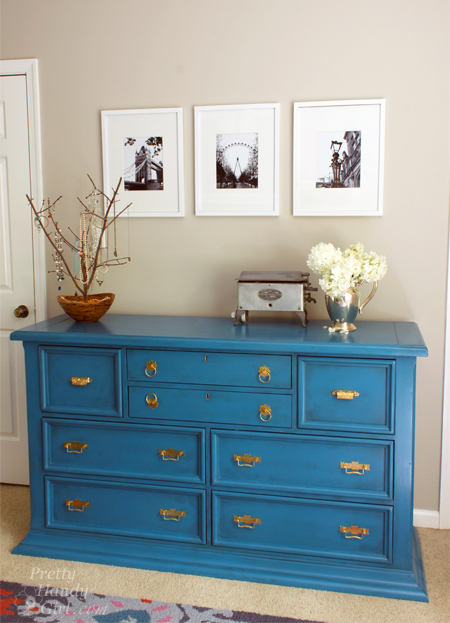
Extra observant points to anyone who realized that this blogger forgot to take a good before picture! She looked very similar to the knotty pine dresser shown above, except she had wooden circle knobs and an unfortunate set of bun feet. I did remove the bun feet from the dresser when I first brought it home. Mama ain’t got no need for buns in this oven (or on my dresser.)

Here are the details on how to refinish a knotty pine dresser and give it a complete makeover!

Materials:

  • Sandpaper
  • BIN primer
  • Damp rag
  • Paint brush
  • Foam paint roller
  • Quart of Benjamin Moore Advance paint (Deep Ocean)
  • Valspar asphaltum glaze
  • Brass hardware (I bought mine from House of Antique Hardware)
  • Drill with bits
  • Screwdriver
  • Level

Instructions:

This tutorial will be fairly brief, if you need more photos and explanation, you can view my previous dresser painting adventure.

Begin by removing all the drawers and knobs. Lightly sand the dresser and drawer fronts. Wipe off any sanding dust. Read more

5 Minute Ceiling Fan upgrade | Pretty Handy Girl

5 Minute Ceiling Fan Update | Pretty Handy Girl

When I was updating my son’s bedroom, I gave the ceiling fan a 5 minute update! You can easily change the look of a ceiling fan by quickly swapped out the light shades. I removed the scalloped edged glass shades and replaced them with square ones for a more “gender neutral” look.

5 Minute Ceiling Fan upgrade | Pretty Handy Girl

New glass shades cost anywhere from $3 – $10 each at Lowe’s or other home improvement stores. The shade size is pretty much universal, but make sure you are buying the smaller shades versus larger ones that are sold for pendant lights. To be sure, bring one of the old shades with you or measure the diameter of the mouth on the existing shades.

Here’s the quick 5 minute how to swap out your ceiling fan light shades: Read more

milk jug side table

Jaime here from That’s My Letter sharing a DIY repurpose project that works great outside or inside.

Take a vintage milk jug, add a pre cut circular wood top and you have a functional and stylish side table.  If you want to get fancy I’ll show you how to add the personalization too!

milk jug side table before after

I started this project with some crusty old milk jugs that really serve no purpose these days and after a little paint and adding a wood top we have a beautiful and useful piece of furniture.

milk jug side tables 1

Together the two milk jugs make a great pair on either side of our diy outdoor sofa but ‘S’ is not my last name, these milk jugs will be going to a friend’s home.

milk jug side table 3

The personalization is icing on the cake, if you have a steady hand you can add any letter in nearly any font you desire. Ready to get started? Read more