Building a Window Seat with Storage in a Bay Window
 Building a Window Seat with Storage in a Bay Window
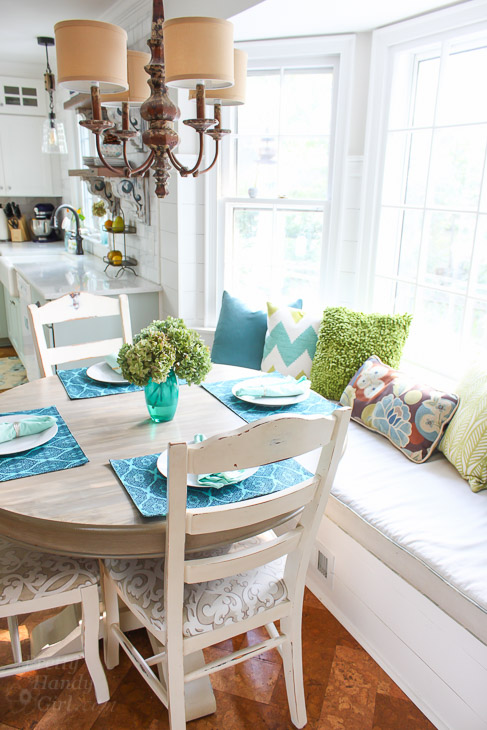
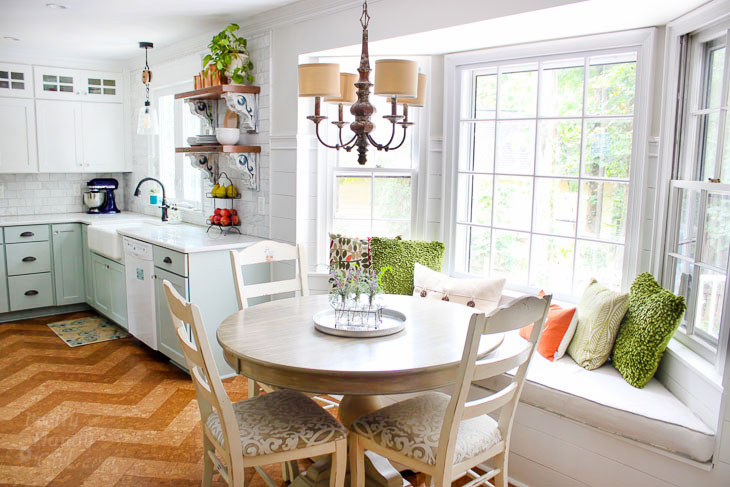
You know when you dream about the finished product on something that you’ve been planning for a long time? And then you finish and your dream becomes a reality? And you think to yourself, am I still dreaming? All those sentiments and more have been going through my head since I finished the building this built-in window seat with storage in our bay window. This window seat is divine! In fact, I’ve begun calling it the Queen’s seat in the hopes that it will deter any male folks from claiming it in our household.
Several of you have asked for the tutorial to build the window seat. I have that for you, but I want to mention that this is a slightly more advanced project. Halfway into writing this tutorial, I realized there was no way I could show you each and every cut, step, and trick without this being the world’s longest blog post/tutorial. If you have some basic carpentry skills (you know how to hammer, nail, use some power tools and you know how to attach a 2×4″ securely to a wall), you should be able to handle this. With that being said, I do want to offer any help if you should have any questions during the process of building this bench, please feel free to email me and I will do my best to help you.
I also want to mention that I did have to move the HVAC vent forward so it came out the front of the window seat. Here’s the tutorial to move a floor vent. I do want to caution you against building over a vent. We have a bookcase that was built over the register and the wood inside grew mold because there wasn’t enough force to blow the air and moisture out the front of the bookcase. Just a warning, don’t take the easy way out.
Basics for Building a Built-in Window Seat in a Bay Window:
Materials:
(I’ve included affiliate links for your convenience. I earn a small percentage from a purchase using these links. There is no additional cost to you. You can read more about affiliate links here.)
(Subject to your own window dimensions and needs.)
- 6 – 2x4x96″ studs
- 1 – 4’x8′ MDF sheet
- 2 1/2″ finish nails
- 4′ Piano hinge
- 12d Framing nails
- 2.5″ Wood screws
- 3″ window stool
- 5″ window stool
- Drywall for front of bench
- Construction glue
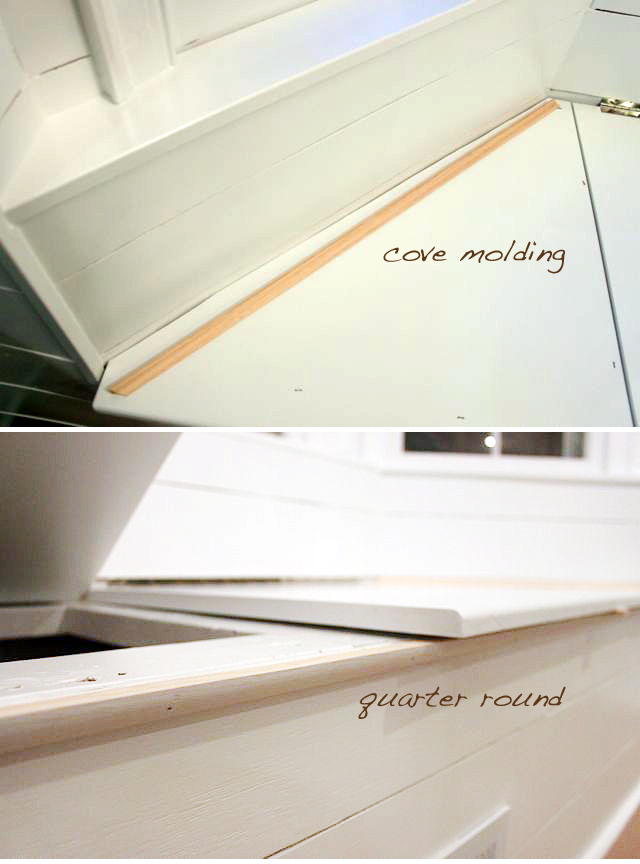
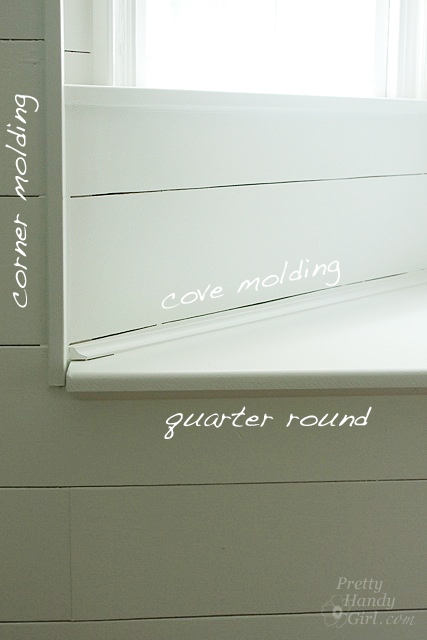
- Cove molding
- Corner molding
- Quarter round molding
Optional:
- 3/16″ plywood for floor inside storage bench
- Dremel with metal cutting wheel
Tools:
Instructions:
Remove any baseboard molding and window stools and other molding in your work area.
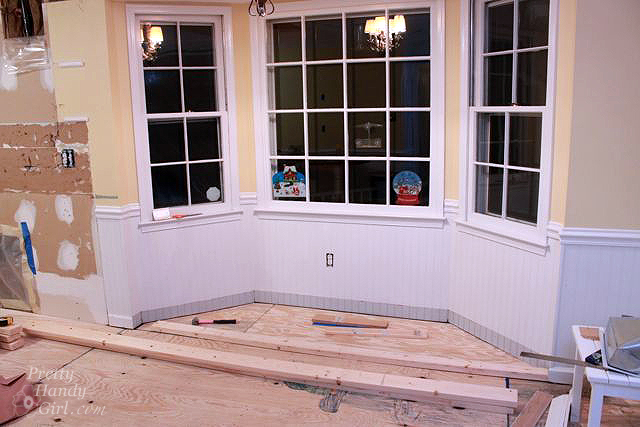
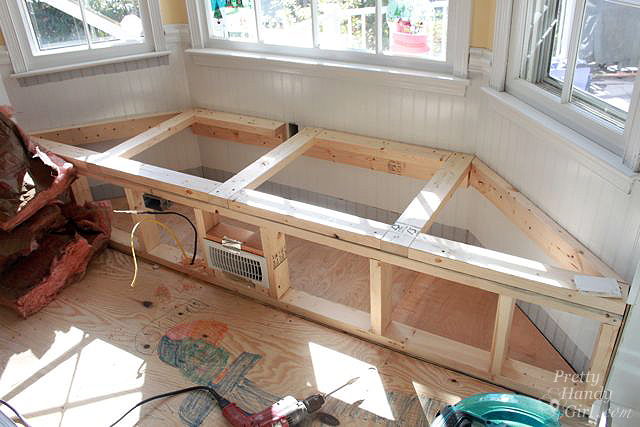
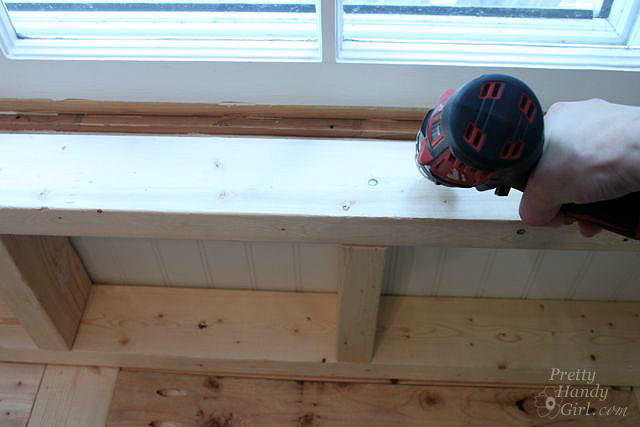
Build a small framing wall with 2×4 lumber that fits perfectly in the front width of the bay window. The wall should be approximately 15″ tall. The finished height will be 17″ tall after the lids and reinforcing studs are added. After adding a cushion, the height will be a standard 18″ chair height.

Set the framing back to allow for the thickness of drywall.
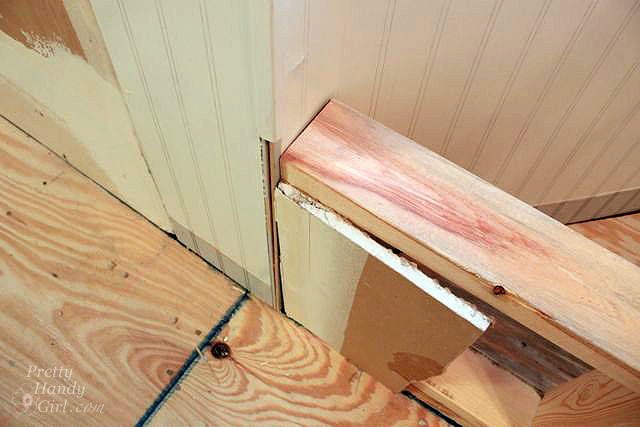
Attach the framing to the floor with screws or framing nails. Toenail (nail in at a 45 degree angle) the ends of the framing into the wall.
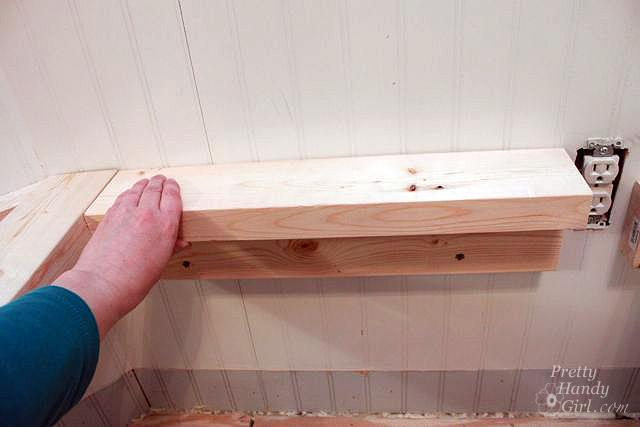
Attach 2×4 studs to the back of the bay window. Make sure that they are level with the framing wall.

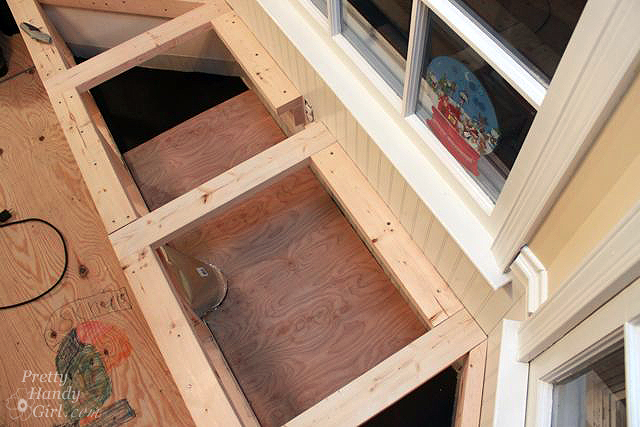
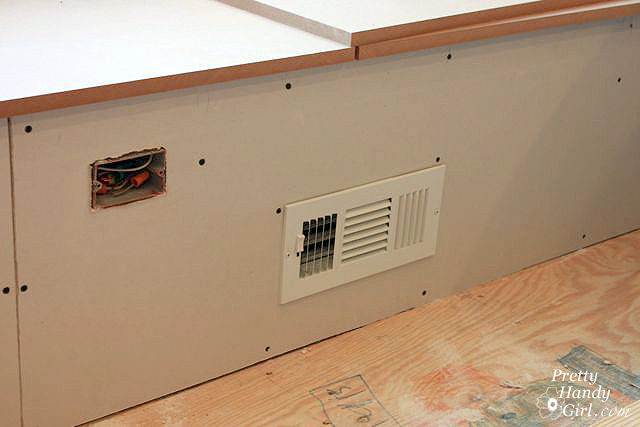
Measure the distance between the front of the framing wall and the back wall. Cut three 2×4 supports to this depth. (You will notice that I have an outlet that still has to be moved by the electrician. By code, you cannot cover an outlet or even a junction box. The remedy was to move all the wiring to the front of the window seat.)

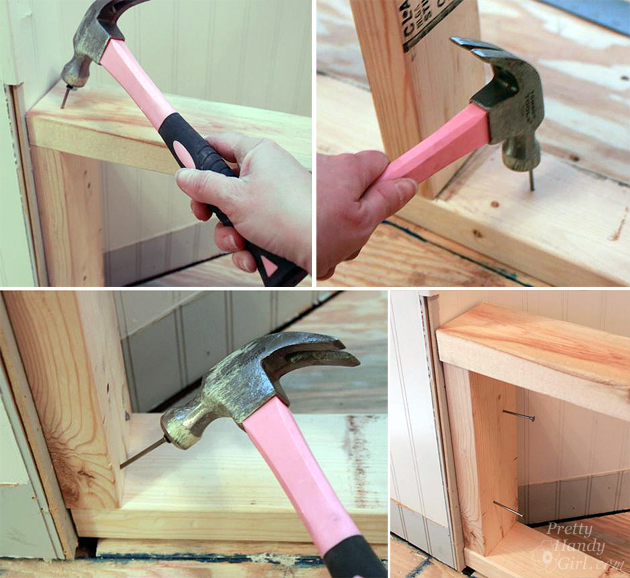
Cut and attach 2×4 boards on the angled walls of the bay window and stop them at the front framing wall. This support is at the same height as the 2×4 supports that you just cut, so be sure to attach it 1.5″ above the framed wall. Next cut a 2×4″ board to fit between the side wall and the first support board. Repeat for the opposite side.
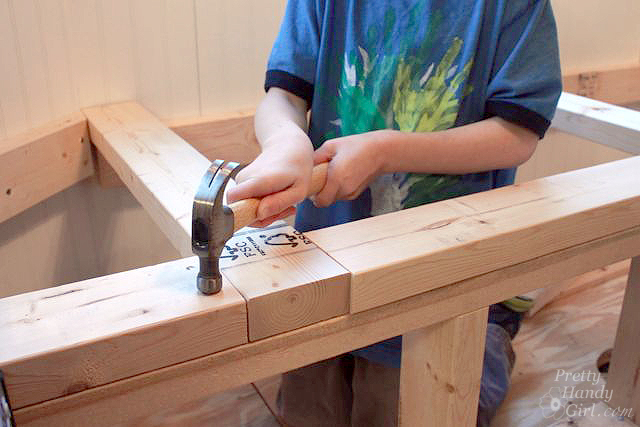
Cut two more 2×4 boards to fit between the support 2×4’s. Make them snug, this will reinforce the support boards and the framing wall. Hammer these boards to the top of the framing wall using framing nails.
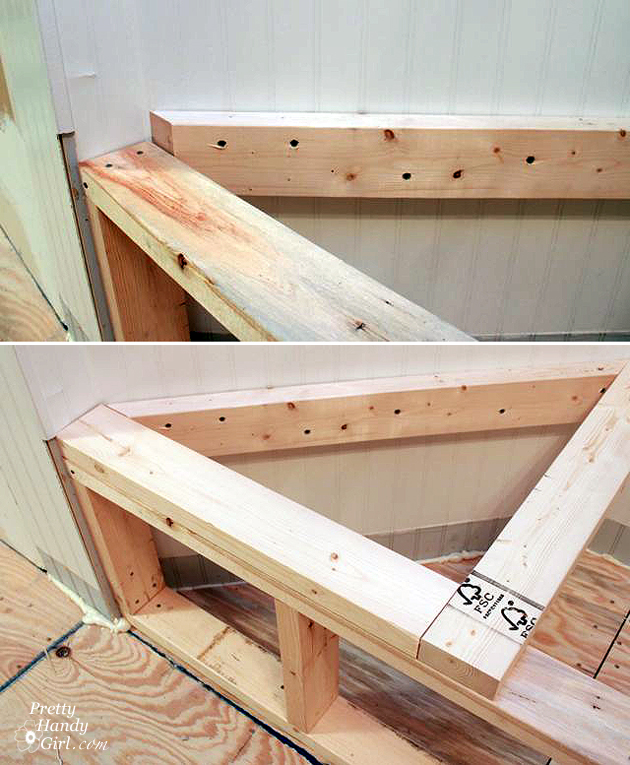
Cut two more 2×4″ boards that will sit on top of the boards attached to the back of the bay window.
Nail these two board into place. They will sit on top of the secured cleats at a perpendicular angle. You bench should look similar to this, when viewed from above:
Before you attach those support 2×4’s permanently, you might want to consider adding a finished flooring inside your window seat. Especially if you will be using it for storage. (I installed tar paper on top of our subfloor and screwed thin plywood pieces to the floor.)
You can now attach those support 2×4’s with framing nails. Nail them to the front framing wall and the back wall cleats. This is also the time to move any wiring and HVAC. (As you can see, the electrician ran the wires for the new outlet, and I installed the new vent into the front of the bench. Tutorial at a later date.)
At this point in my build, I decided I wanted a shallower seat and wanted to bring the back forward a little, so I added additional horizontal supports between the front to back supports. I used a kreg jig (tutorial for using a kreg jig) to create pocket hole joinery to secure the supports.
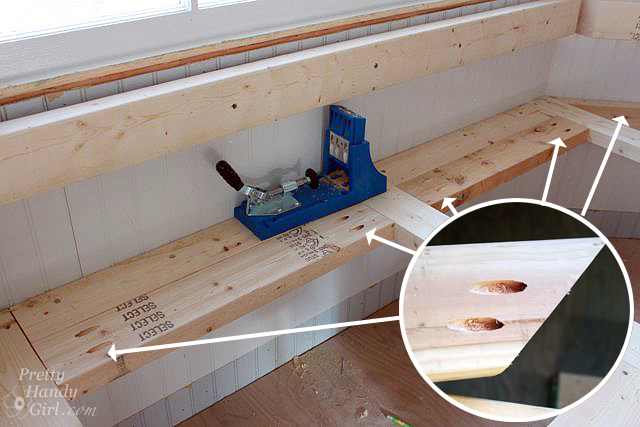
I also added more support to the side angles using 2×4’s with pocket hole joinery on the ends.
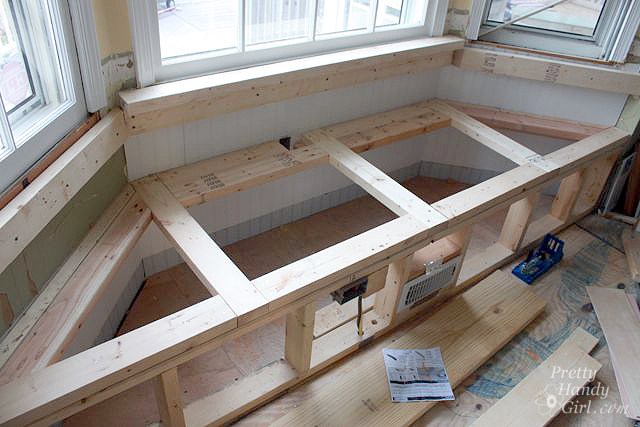
Frame a small support wall for under the large middle window. Cut vertical studs to frame the back support for the side windows. This allowed me to have more width overall, but a shallower seat. (If you have a sharp eye, you’ll notice I ditched the idea of the horizontal supports in the previous picture.)
Drive screws into the back support frame to secure it to the wall and the bench supports. Nail or screw the other 2×4’s (under the smaller windows) to the wall.
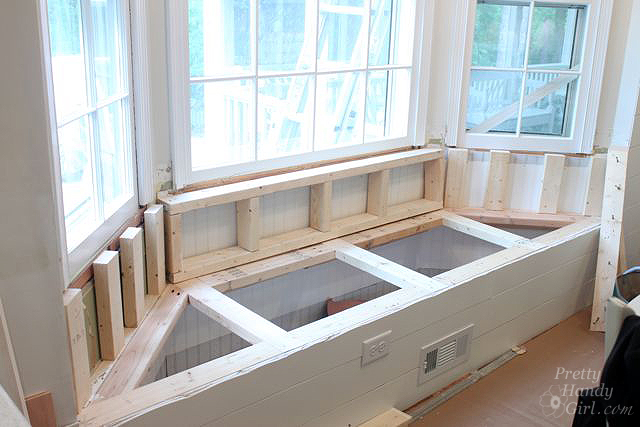
Add drywall to the front of the bench (Tips for installing drywall. How to mud a drywall seam.)
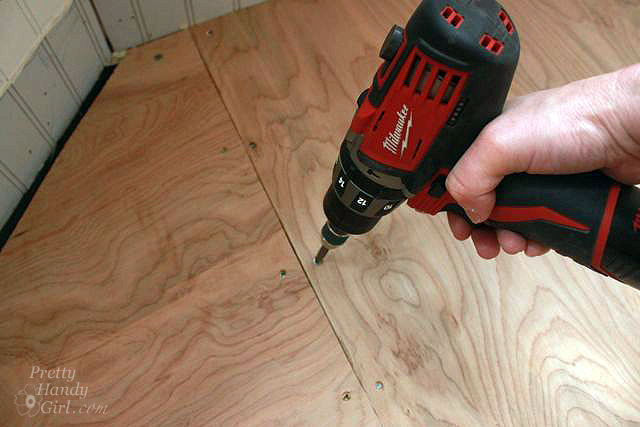
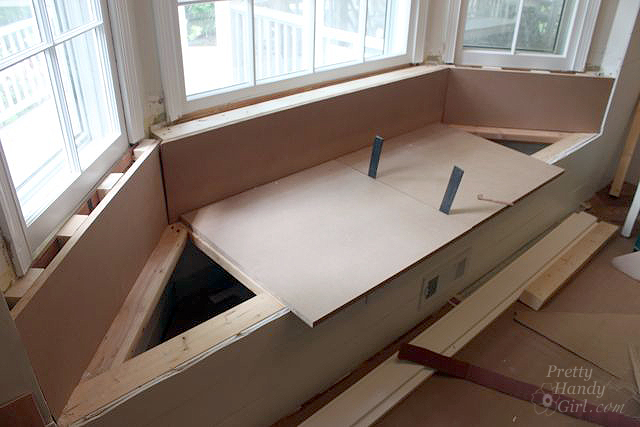
Time to cut the MDF panels for the bench top and back. It is a really good idea to map out your cuts ahead of time. All my panels fit on the one sheet of MDF, but it was a tight fit.

Unless you have a helper, the best way I found to cut a heavy MDF sheet is to prop it up on 2×4’s. Then clamp a straight edge to the sheet. Use a circular saw to make your long rip cuts. Then you can use the table saw or continue to use the circular saw to make the smaller cuts.

The shims in between the two seat panels (shown below) are holding a slight gap between the seats while I measured the triangular spots. This will allow the panels to expand slightly after I paint them.
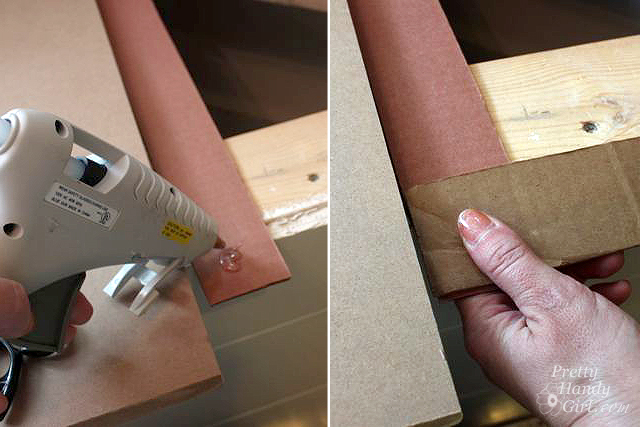
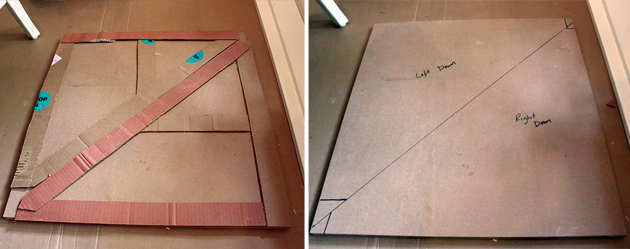
Speaking of measuring those side triangular spots. I learned a really cool trick from the countertop installers.

They used thin strips of plywood to create a template. I used strips of cardboard to do the same thing. Simply cut cardboard strips and line them up against the perimeter of the triangle.

Use a hot glue gun to join the strips at the corners.
Remove the templates and trace them onto the MDF board. Cut them out with a jigsaw. Be sure to label which side is which.
Layout the MDF panels on the bench. Attach the back panels with finish nails (drive nails into the studs behind it.)
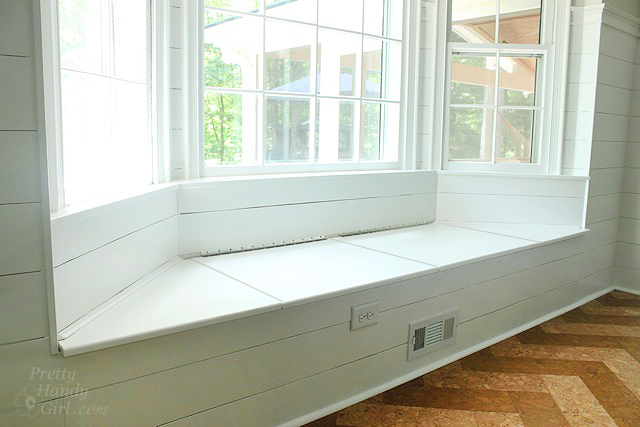
The bench should look something like this (I still needed to trim down the seat panels, but wanted to make sure they were flush with the side panels.):

Cut the two middle seat panels down to size and route all the front bench panel edges with a router and a rounded bit.

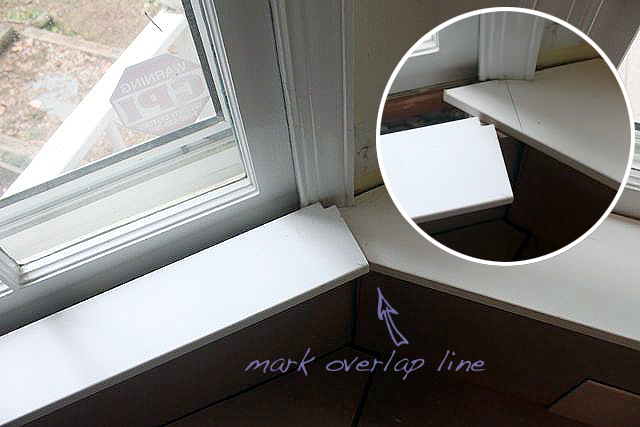
Use a jigsaw to cut the profile for the new window stools (if you saved the old ones you can use them as a guide). Use smaller 3″ stools for the sides and a 5″ for the middle window. Overlap sections and mark where they overlap to get a tight seamless fit.
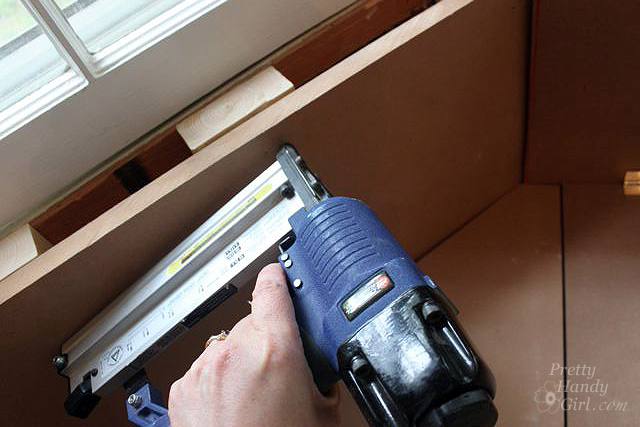
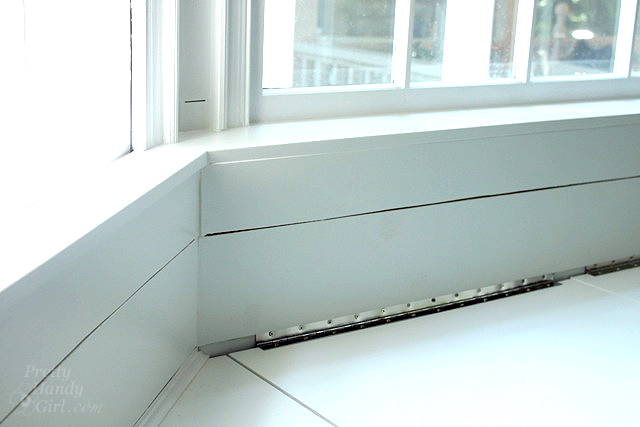
Nail the stool into the top of the back support with a finish nailer. Caulk all edges (except where the stool meets the window sash.)
At this point in the window seat build, we ran our plank walls up the sides of the windows, and capped them off with Howe casing. You can read about installing plank walls in this tutorial.
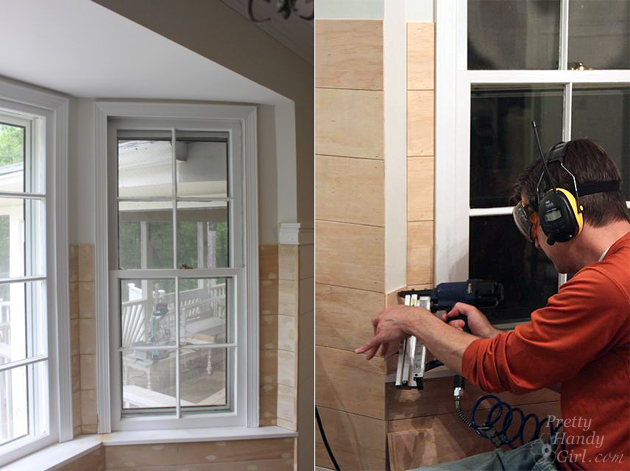
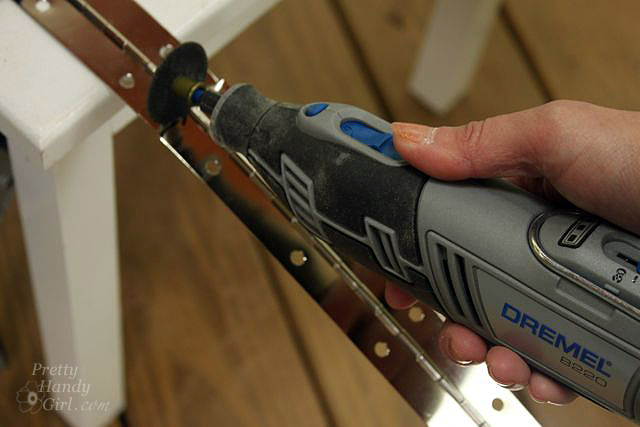
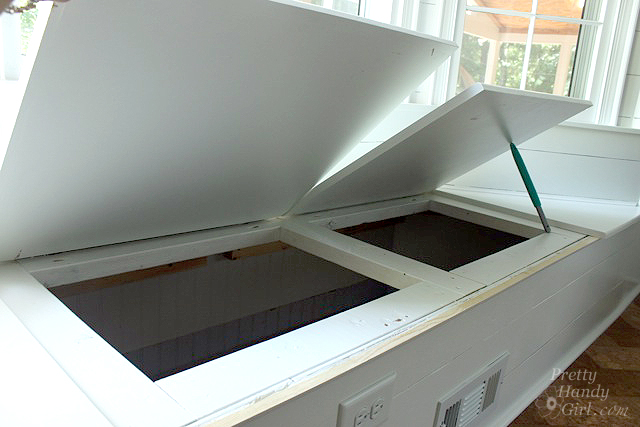
To save money, I purchased a long piano hinge and cut it in half with a metal cutting wheel on a Dremel. You could purchase two smaller hinges if you don’t want to cut the hinge.
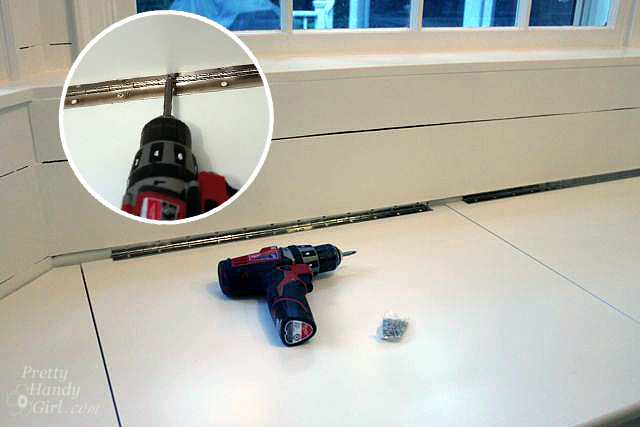
Attach the piano hinge to the back support and the top of the lids using the screws provided with the hinge.
Glue and finish nail the side triangle panels to the supporting 2×4’s.
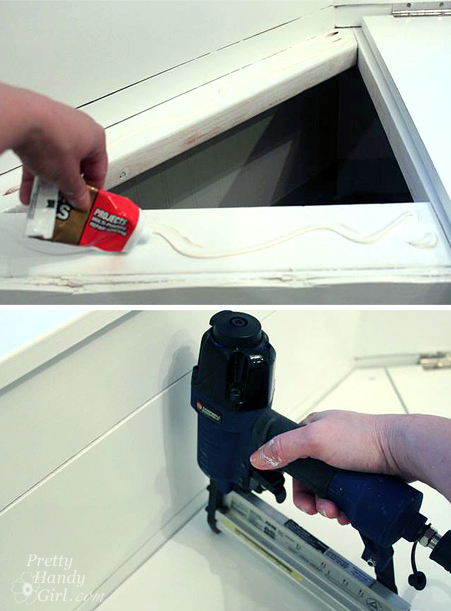
Add cove molding to cover the gaps on the side of the triangular panels. Add quarter round just under the lip of the seat panels to finish off your bench.
You can add corner molding on the sides of the wall where it meets the back support.
Wood putty all nail holes. Let dry, prime and paint.
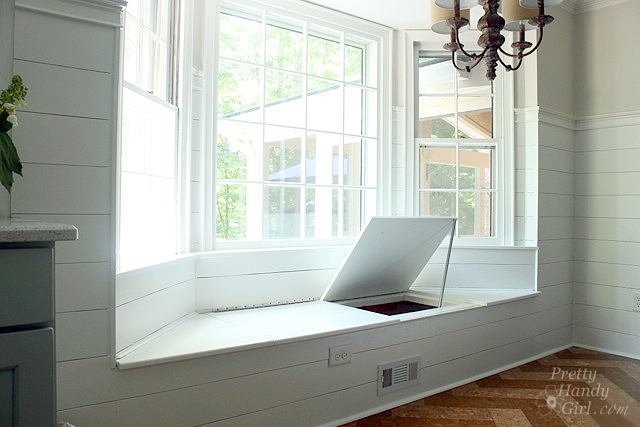
The bench has loads of storage inside.
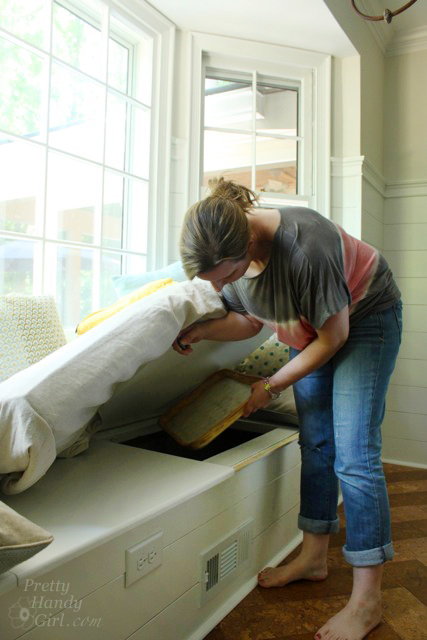
I will probably add some type of lift support at a later date.
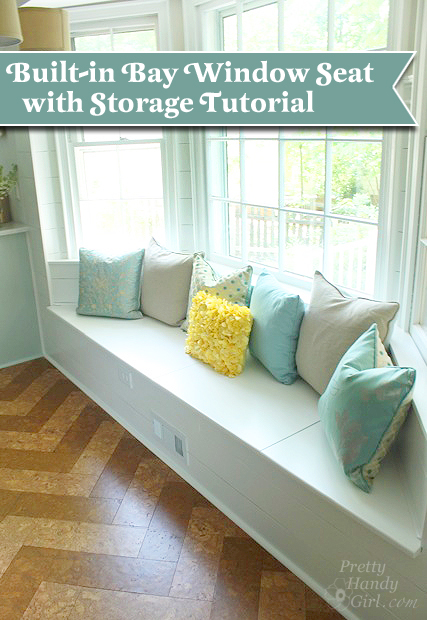
Here’s the bench before I made the cushion.
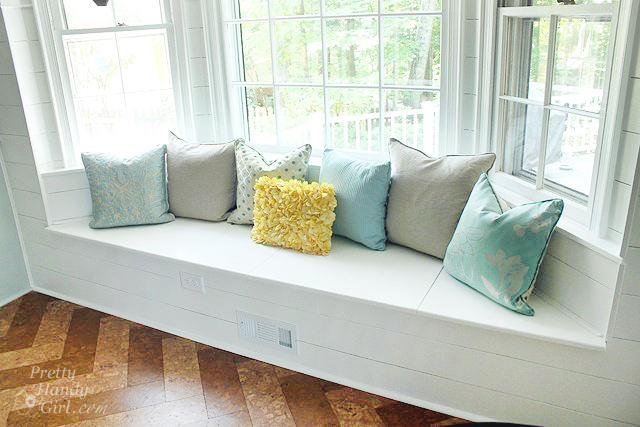
Ahh, adding a custom bench cushion with piping was the way to go. Learn how to sew your own bench cushion with piping here.
I’m really enjoying this seat fit for a Queen!
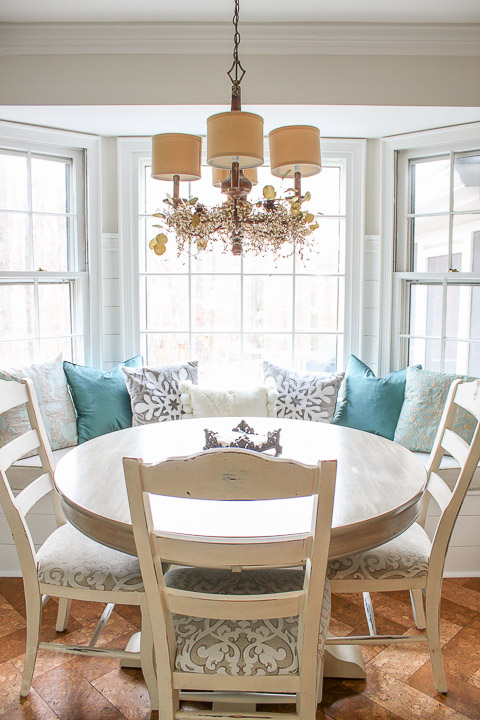
The extra floor space in our kitchen helps make the kitchen feel bigger.
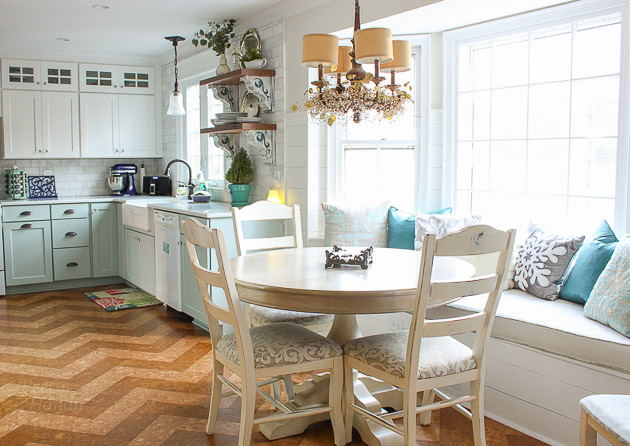
The ledge under the windows is wide enough for me to add plants or herbs if I want.
What do you think? Do you have a bay window that is dying for a window seat? Now you can add one!
 Like this post? Here is a collection of 10+ Dreamy Window Seats:


Any idea what to do on the inside? Did you paint it? Did you line it with felt or anything? Thank you for any tips!
Lisa, I left it bare wood. We currently use it for game storage. Putting bins or baskets inside would make for easy storage that you can lift out.
Great tutorial! Randomly I found something similar on Pinterest and then googled “bay window seat DIY” and this blog post came up. I am always amazed by your talent. Now lets see if I can do one in my house too.?! Awesome blog Brittany!!
First time visiting your site! Recently did a post about the beauty and function of window seats:http://blog.christmastreemarket.com/2013/05/lovely-window-seat-ideas/ Never thought of tackling this type of project on my own, but you’re inspiring me! Thanks for the instructions!
Jennifer, oh I do hope I inspired you ;-).
Congratulations on another incredible job well done! Bravo to you Brittany. It looks stunning & the pillows are so beautiful. What a pleasant queenly addition. You are a wonder woman in addition to being a pretty Pretty Handy Girl!!!
Thanks Colleen. I don’t think I qualify for the Wonder Woman comment.
You continue to amaze me with your ability and willingness to tackle anything! I like that you put the height of the window seat the same as a standard chair. So many window seats are too high in comparison to the height of the table, unless you are seating small children there.
I was looking at the 10 Dreamy window seats that you posted and noticed several, if not all, are the taller height, even taking the thickness of cushions into consideration. Good eye! Great job!
Libby
Libby, how weird, I never noticed, but I knew we’d use this one with our table, so it had to be chair height. Thanks so much for your comment.
This is awesome! I am wanting a u-shaped banquette style seating in our dining area but have had nothing to follow or teach me. This may be just that!
Best of luck Shannon. If you do build one, send me pictures, okay?!
Ahh I love this! I wish I had a window in my kitchen I could make a corner seat out of!!
It looks great! I’m jealous that you took out the sill of the windows. My hubby wouldn’t let me do that to our window in our dining room which is why our banquette looks the way it does! But yours looks fabulous!
Boo to your hubs Lori ;-). Just kidding. Why didn’t he want to let you do it? You can build anything!
LOL I agree with you! He’s all about resell. I keep telling him that since it’s paid for it’s going to the kids not being sold! He was worried that the “next owner” wouldn’t want a banquette or that I would get tired of it. But it’s all good. The cats love the walk around and they like the hiding spot! It’s their own personal viewing area!
In the right hands look at what a little wood, paint, and love can become! Beautiful window seat, Brittany 🙂
Love your “Queen’s Seat” – relax – I see a lot of peeled grapes in your future!
Thanks Koliti! LOL, peeled grapes. And maybe a palm frond waving a cool breeze at me.
Pleeeeez post the how-to on moving the AC vent. Teach me how. I have really been wanting to do it since we moved in, but just can’t figure out how to do it. Love the new dining space. Perfect!!!
HK, I will but it will be a later date, probably in July. Stay tuned my friend!
AMAZING!! The perfect fit for your bay window and kitchen! Thanks for the clear instructions, pinning! 🙂
Thank you Sarah! And thanks for the pin ;-).
It looks great! I don’t have a bay window, but a window seat is still in my future at some point… pinning for later!
Ahhh, Korrie, you can build a window seat in front of any window! Just build a box frame like the front wall and add two side walls to it.
The bench turned out to be awesome, but from your notes it sounds like a very advanced project. Great job.
Irina, don’t be discouraged though. Just save it for when you have a few woodworking projects under your belt ;-).
It turned out great. I especially like the ledge and the planks. Can you tell me why you didn’t put the piano hinge inside the seat?
Excellent question. You know, I don’t know ;-D. I might have to swap it and see if it works that way.
A hinge usually goes on the inside, that way you only see some of the middle ridge, not the side plates and screws.
Thanks Julie! I’m going to have to switch it now. I really appreciate y’all setting me right ;-).