
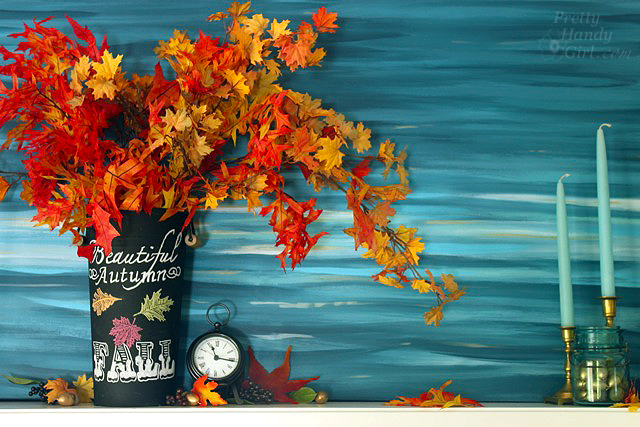
Abstract Art Ocean Painting Tutorial {Video Tutorial}

As promised, I created a tutorial to show you how you too can paint a giant abstract ocean painting. The easiest way for me to show you how was to share the video of the process. If you are viewing this post in your email, you will need to click on the link to view the video.
Materials:
- Giant canvas (tutorial to build your own here)
- 2″ – 2.5″ paint brushes
- 1″ paint brush
- Small flat paint brush
- Latex paint: White paint
- Peacock blue paint (matched to Valspar Everglad Deck 5011-3)
- Aqua paint (matched to Valspar Betsy Ross House Blue 5002-8A)
- Sea Foam Green paint (matched to Valspar Heartland Frosty 5008-5C)
- Gold metallic paint
- Spray bottle with water
- Damp rag
- Drop cloth
Instructions:
Video (click here to view the video on YouTube):
A summary of the video:![]()
- To start, you’ll want to spray the canvas with water.
- Add random stripes of peacock blue on the canvas. Allow some of the stripes to be full concentration paint, and other stripes can be a water diluted peacock blue stripe.
- Don’t forget to paint over sides, top and bottom of the canvas.
- Slowly add white to the paint, mixing with the peacock blue.
- Evenutally adding straight white paint.
- For more dimension and visual interest, add stripes of bright aqua and sea foam green. Mix them with the peacock blue as you lay them on the canvas.
- It’s easiest to work quickly so your paint mixes with the existing wet paint strokes.
- For good artistic composition, place your lightest stripes 1/3 of the way from the bottom of the canvas.
- After you are happy with the painting, add some small spots and dashes of metallic gold to the painting. Think of these as small highlights from a setting sun.
- Let dry and hang it on your blank wall!
Or prop it on your mantle.

What do you think? Is this something you could do? I totally believe you can!


I enjoy gathering useful information, this post has got me even more info!
Gracias, maravilloso trabajo.
Also in his live-rig really are a Boss OC-2 Octaver together
with SD-1 Super Overdrive. Mark Knopfler was born in Glasgow,
Scotland, but grew up in Newcastle, England. This is
best done by holding the small pointed scissors at a right angle to the back of
the fabric and snipping randomly over the area.
Can you please reply with a link to the video. It isn’t pulling up on the article.
Thanks!
Kimber, here’s the link: https://www.youtube.com/watch?v=PjodyOhUWsA
Hi Brittany,
I did do It!….you gave excellent directions. Didn’t come out quite like yours. Mine was much darker… but I do like it!. What can I do to lighten it? when I add more white, green, light blue….my blending….well…its not looking right, so I decided to leave it alone. But it is a little dark. Please help.
Also, hope the next tutorial is just as easy!
This is Awesome! Ive been looking for some art with these colors for my bedroom walls for sometime. I going to do this! I’m going over to Lowe to get the paint today. I already have a canvas that I will repurpose, I will just have to paint over it. You are talented, thank you for a great tutorial and I look forward to creating additional wall art! Maybe something with sand and water next. I’ve subscribed, and glad I found you!
Rene’, so glad you found me. I have an itch to do another painting soon. I’ll video the process and hopefully post it on the blog.
Great tutorial exactly what I was looking for. Do you think I could do the same with some lighter blues
Absolutely! Have fun with it.
Ahhh I’ve been saving this for future use and the time has finally come! I’m in the process of updating my room to a blue theme and this is perfect to hang on the wall! Great tutorial and great website! Keep up the fantastic work 🙂
This turned out very well Brittany, love the mix of all the blue-ish colors..WELL DONE!
I think this is just wonderful what you have created & sitting here I think yes maybe I can do this but I I know if I had the setup all ready & in front of me I would probably freeze up totally! This has happened to me before so that is why I say that. lol Thank you so much for the tutorial it was great
Renee, why do you freeze up? Are you afraid of messing up? I have good news, it’s only paint and you can paint over it ;-). Please do try it.
Aaah! Came out SO great! I love all the blues, great tutorial & great job!
Jesse, thanks. Love that color blue too. I actually mixed it ahead of time and the Lowe’s paint guy helped me match it ;-).
Thanks Jesse!
That is gorgeous! You make it look so easy! Somehow I think if I were to attempt this it wouldn’t turn out as pretty.