How to build an industrial hat rack to keep all your hats organized. | prettyhandygirl.com

How to build an industrial hat rack to keep all your hats organized. | prettyhandygirl.com

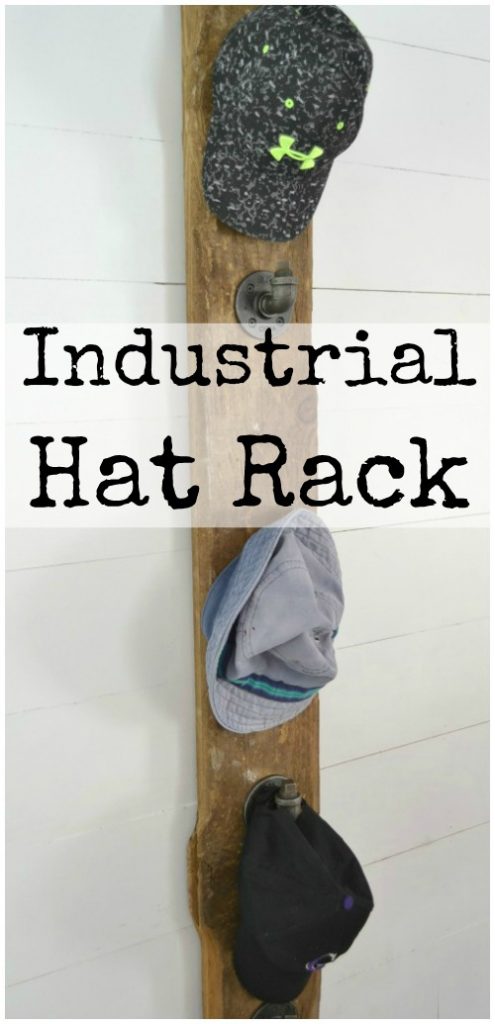
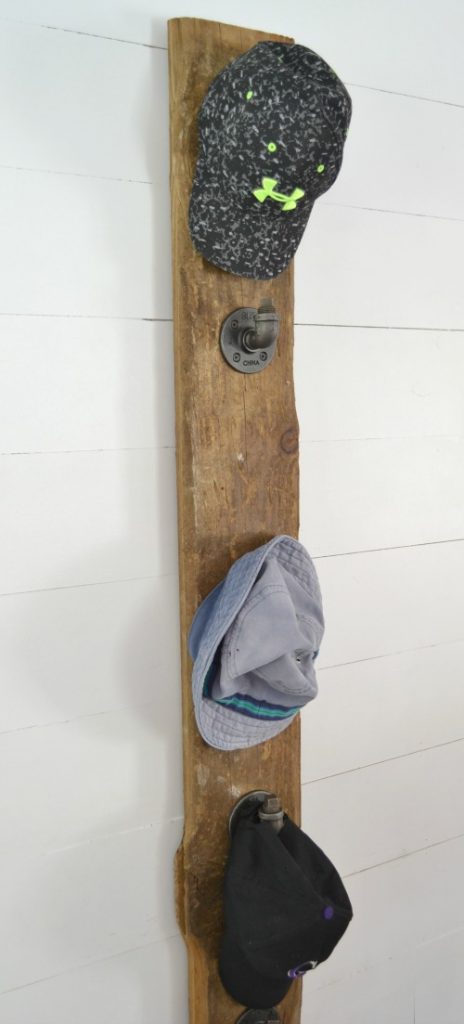
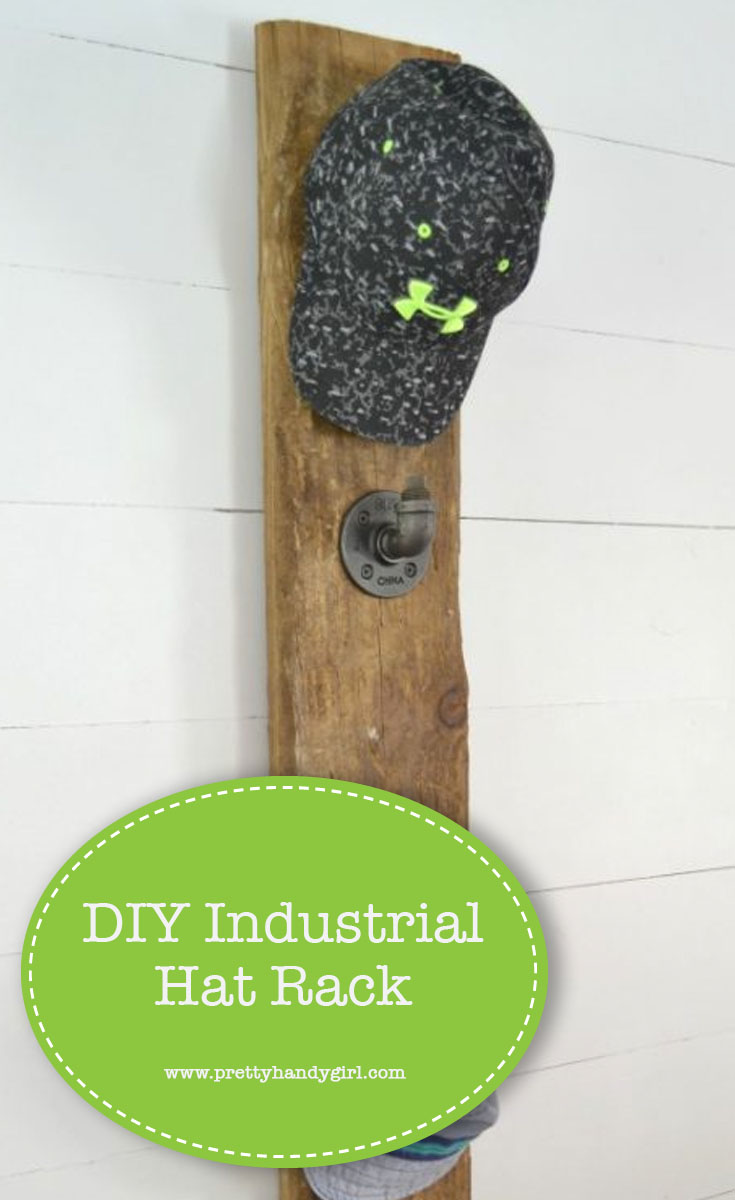
Hi Pretty Handy readers, it’s Jillian from I Am a Homemaker. I’m here to show you how I finally wrangled all the baseball hats my son has collected, with an industrial hat rack.

I absolutely love to add some unexpected touches to my projects and the plumbing aisle is a fantastic place to get those unique ideas.

My latest idea was hatched while trying to figure out what to do with my son’s ever growing baseball hat collection.  Iron pipes are used for everything from shelf brackets to table legs, and now we can add hooks to that list of usefulness.

How to build an industrial hat rack to keep all your hats organized. | prettyhandygirl.com

My son’s room already has some industrial decor, so using the pipes for this hat rack works perfectly.

Here’s how to DIY your own industrial hat rack.

Materials:

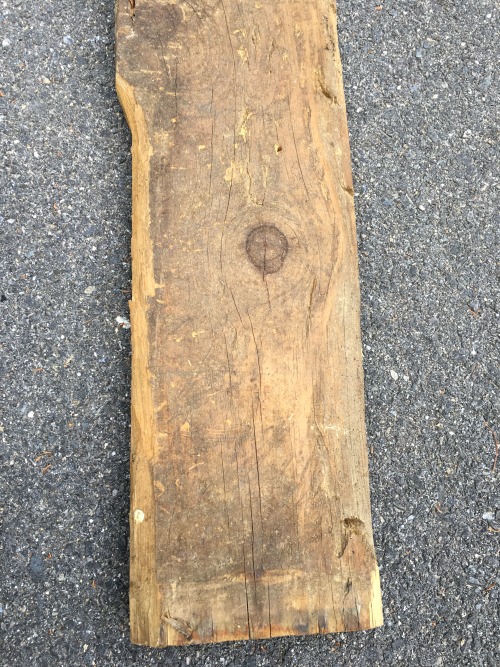
  • 1  1″ x 6″ board at 5′ long (The length can be altered to suit your needs but will also alter the number and placement of the flanges so adjust accordingly.)
  • 2 D-rings for hanging
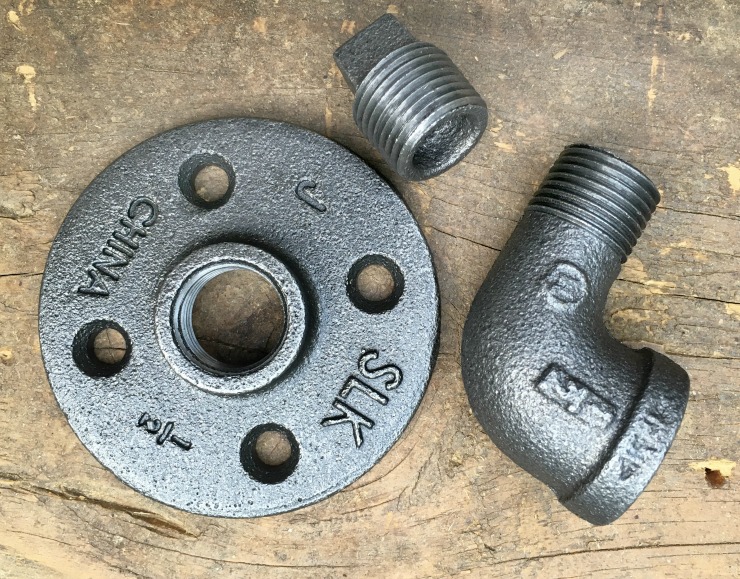
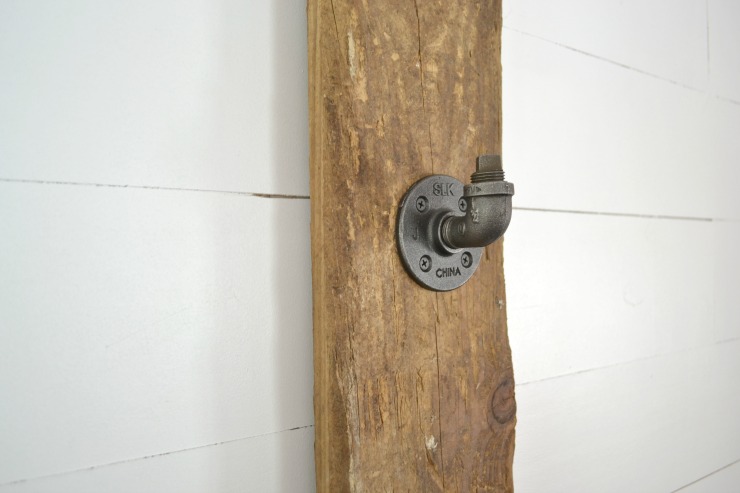
  • 5   1/2″ iron floor flanges
  • 5   1/2″ iron 90 degree street elbows
  • 5   1/2″ iron plugs
  • 20  1/2″ screws (choose a finish that matches your flanges or spray paint them to match)

Instructions:

Step 1:

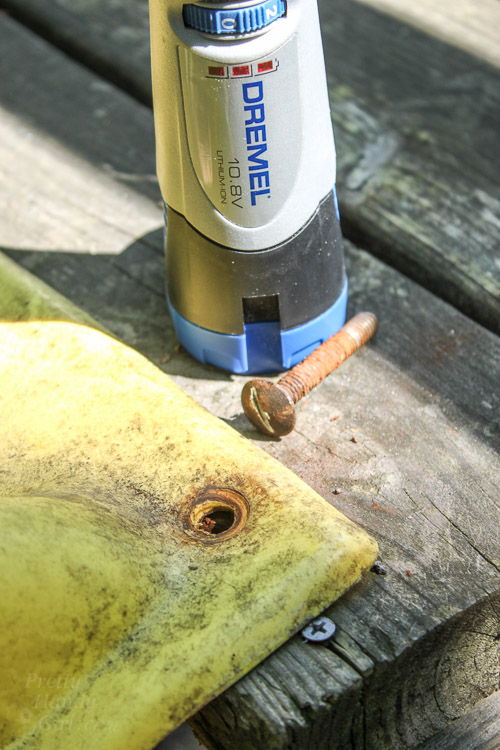
Cut the 1″ x 6″ board to the desired length. Sand the edges and finish to your style.

How to build an industrial hat rack to keep all your hats organized. | prettyhandygirl.com

Step 2: 

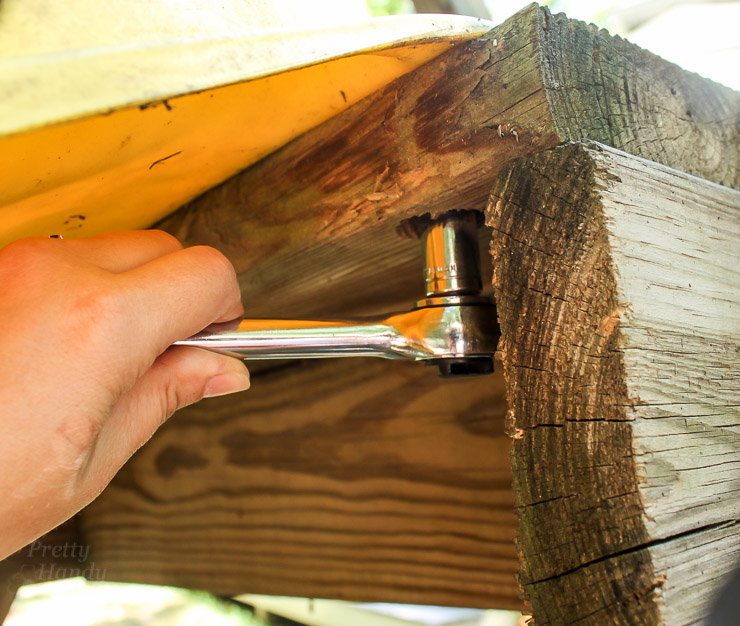
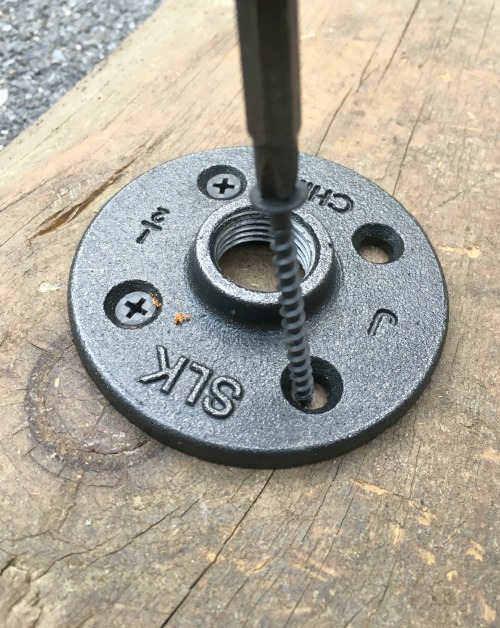
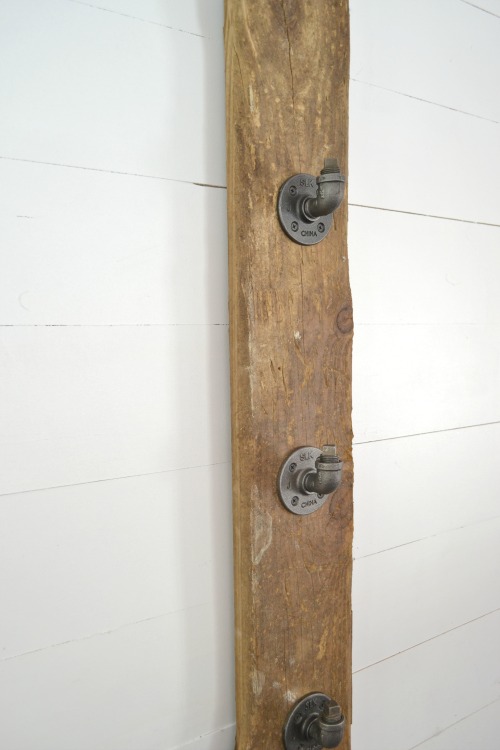
Place the top flange 1″ below the top of the board. Attach to the board with screws. Attach the remaining flanges to the board 8½” apart.

How to build an industrial hat rack to keep all your hats organized. | prettyhandygirl.com

Step 3:

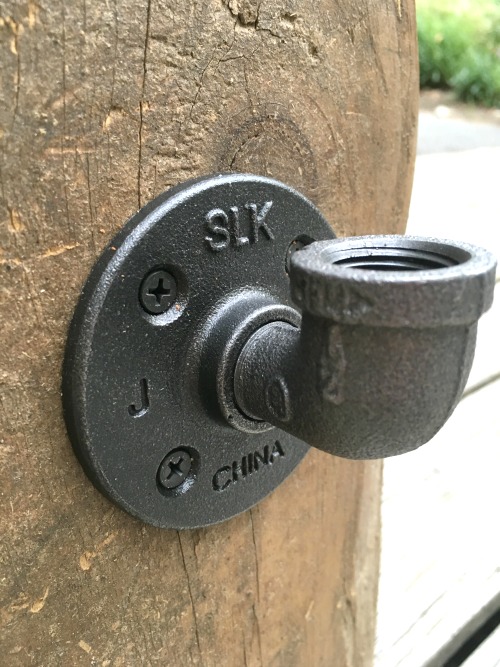
Add the street elbows to the flanges. (I chose to make this rack to hang vertically to make the best use of a narrow wall space.)

How to build an industrial hat rack to keep all your hats organized. | prettyhandygirl.com

Step 4:

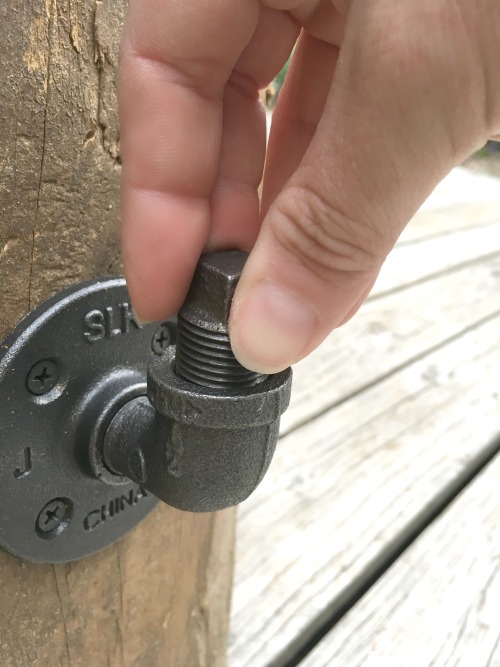
Add the plug into the top of the elbow and screw it in tightly.

How to build an industrial hat rack to keep all your hats organized. | prettyhandygirl.com

Step 5:

Attach the D-rings to the back for hanging.

How to build an industrial hat rack to keep all your hats organized. | prettyhandygirl.com

Another display option is to skip the D-ring and just lean it against the wall. I like it this way, but I don’t think free standing is the safest option for a child’s room. A furniture tether could be used to prevent tipping while still allowing it to stand on the floor.

All that’s left to do is gather up all your hats and have fun hanging them on their new, industrial hooks.

How to build an industrial hat rack to keep all your hats organized. | prettyhandygirl.com

With different D-ring placement and a little turn of the 90 degree elbow, you can easily hang this rack horizontally. You can also hang almost anything on this rack. How about towels? Flowers? Jewelry or purses? Use your imagination and get organized.

How to build an industrial hat rack to keep all your hats organized. | prettyhandygirl.com

I hope you enjoy this idea. Hopefully it pushes you to use your imagination and explore the hardware store.

Jillian's Signature

-Read more of Jillian’s Tutorials-


Pin for later!


How to build an industrial hat rack to keep all your hats organized. | Industrial DIY project | DIY hat rack | Pretty Handy Girl #prettyhandygirl #DIY #industrialdecor #homeorganization

How to build an industrial hat rack to keep all your hats organized. | Industrial DIY project | DIY hat rack | Pretty Handy Girl #prettyhandygirl #DIY #industrialdecor #homeorganization


Easiest Way to Restore Automobile Headlights | Pretty Handy Girl

Easiest Way to Restore Automobile Headlights | Pretty Handy Girl

Do the headlights on your car look foggy? I know, like me, you have very little time to deal with these pesky issues. I’m excited to share with you The Easiest Way to Make Automobile Headlights New Again! A year ago I spent about an hour and a half sanding, buffing and restoring our 2004 Honda CRV’s headlights. The kit was from 3M and it was pretty much what most people recommended. It worked great, but that was almost two hours I could have spent doing something else. Worst of all, it has been a year and the headlights have already begun to haze again. Ugh!

Easiest Way to Restore Automobile Headlights | Pretty Handy Girl

When I was at the Haven Conference in Atlanta last month, I was talking to a Rustoleum rep and she told me about Wipe New Headlight Restore. She told me that it was a cloth and you wiped it over the headlight for instant results. I was honest and said I was skeptical, but told her to go ahead and send me a sample. Last week, I received the sample and decided to give it a try.

(I’ve included affiliate links for your convenience. I earn a small percentage from a purchase using these links. There is no additional cost to you. You can read more about affiliate links here.)

Materials:

Optional: Mild soap to clean headlight

Instructions:

I opened up the package and quickly scanned the directions. I groaned as I read that I might need to buff the headlight. But, I was committed to give it a try. Keeping in mind that I had already buffed this headlight a year ago, I was hopeful.

1. First test the headlight with water. If the headlight is clear when wet, you don’t have to buff and can skip to step 4 (you do need to clean the light with soap and water before proceeding.) If the light still has a haze continue to step 2.

Easiest Way to Restore Automobile Headlights | Pretty Handy Girl

2. While the headlight is still damp, pull out the lens polish pad. It has two sides (green and gray). Use the green side to sand the headlight and remove the oxidation.

Easiest Way to Restore Automobile Headlights | Pretty Handy Girl

3. Re-wet the headlight and use the gray side to buff off any additional oxidation and further smooth the lens.

Easiest Way to Restore Automobile Headlights | Pretty Handy Girl

4. Clean the headlight with a clean damp rag, then wipe dry with the provided microfiber cloth.  Inspect the headlight and look for any remaining signs of oxidation.

Easiest Way to Restore Automobile Headlights | Pretty Handy Girl

5. Now for the magic! Put on the provided nitrite gloves and remove the Wipe-It cloth from the wrapper. Carefully wipe the headlight (avoiding other parts of your car.) Only wipe once over the lens, folding and rotating the cloth to use an unused portion on each headlight.

Easiest Way to Restore Automobile Headlights | Pretty Handy Girl

You will be amazed at the change in appearance! You can clearly see the difference between the area that has been wiped with the Wipe New product and not yet wiped:

Easiest Way to Restore Automobile Headlights | Pretty Handy Girl

Finish wiping the headlight and use a wet rag to remove any Wipe-It that got on your automobile hood or bumper.

Easiest Way to Restore Automobile Headlights | Pretty Handy Girl

Here’s the difference between one headlight that has been treated and one that hasn’t!

Easiest Way to Restore Automobile Headlights | Pretty Handy Girl

Repeat the process for your other headlight and admire those shiny new headlights! Can you believe this is a 13 year old car?!

Easiest Way to Restore Automobile Headlights | Pretty Handy Girl

I still had some Wipe-It that wasn’t used so I ran to my neighbor’s house and told her how thrilled I was with the results of Wipe New. She let me treat her car’s headlights (which were more oxidized than our’s.) She joked that I sounded like an infomercial (I was that excited.) In all seriousness, this truly is The Easiest Way to Make Automobile Headlights New Again that I have found! I’ll be sure to check back in a year and let you know how it holds up. The Wipe New literature offers a warranty that says your automobile’s headlights will pass inspection for life the life of the car after using the product. Even if it starts to haze again, this process took me about 10 minutes per headlight. That’s so much easier than hours of sanding and buffing. And the cost is almost the same for the 3M kit I used a year ago.

I think all of the automobile owning family members will be getting one of these kits in their stocking this year!

PHGFancySign

Disclosure: This is a product review of Wipe New Headlight Restore. I was provided with a complimentary Wipe New Headlight Restore kit to try. I was not compensated for this post. I was not told what to write or say. This post contains affiliate links. As always, you will always be notified when reading a sponsored post or product review on this blog.

Painting with Alcohol Inks | Pretty Handy Girl

Painting with Alcohol Inks | Pretty Handy Girl

I’ve been indulging in my own art therapy lately. It’s been a stressful month and I’ve found a new outlet for all that tension. Alcohol! Well, alcohol inks to be accurate. These brightly colored inks feed my love of colorful art. And the free flowing drops are hard to control so I just give in to what they want to do. I found if I try to overwork the inks into an image I have in my head it doesn’t come out. In a subtle way working with alcohol inks is like a therapist telling me to go ahead and give a little and let life do with me what it will. Maybe I’m overthinking it, but I do know that I feel a lot better after some fun painting with alcohol inks. And I’m loving these little greeting card size paintings I’m creating lately.

Want to learn how to paint with this brilliantly colored medium? Here are some fun tips and tricks for painting with alcohol inks:

(I’ve included affiliate links for your convenience. I earn a small percentage from a purchase using these links. There is no additional cost to you. You can read more about affiliate links here.)

Painting with Alcohol Inks Materials:

Optional: 

Painting with Alcohol Inks Instructions:

Cover your work area with the plastic drop cloth. Cut 9″ x 12″ Yupo paper into quarters. Use a small piece of painter’s tape to attach the Yupo paper to the center of the chipboard. This will control any mess and allow you to pick up and move the paper as you work without disturbing the ink.

Painting with Alcohol Inks | Pretty Handy Girl

Drip or drizzle a few drops of alcohol ink onto your paper. A little ink goes a long way.

Painting with Alcohol Inks | Pretty Handy Girl

Use compressed air to spread the ink around.

Painting with Alcohol Inks | Pretty Handy Girl

You can also use a paint brush dipped in alcohol to continue to spread and work with the ink.

Painting with Alcohol Inks | Pretty Handy Girl

Or try using the palette knife to spread the ink for a different look.

Painting with Alcohol Inks | Pretty Handy Girl

Continue adding more ink and spreading the ink until you like an area.

Painting with Alcohol Inks | Pretty Handy Girl

To re-activate dried alcohol ink, spritz it with the misting bottle filled with isopropyl alcohol.

Painting with Alcohol Inks | Pretty Handy Girl

Use a hairdryer to gently move the ink or dry the ink more quickly.

Painting with Alcohol Inks | Pretty Handy Girl

Add a different color ink and continue working your painting.

Painting with Alcohol Inks | Pretty Handy Girl

Painting with Alcohol Inks | Pretty Handy Girl

Add more drops and blow or brush the ink into areas you want painted.

Painting with Alcohol Inks | Pretty Handy Girl

Lay a straw on its side and roll on the paper to create ripples.

Painting with Alcohol Inks | Pretty Handy Girl

Painting with Alcohol Inks | Pretty Handy Girl

I love adding white to the tops of my painting to mimic cloud formations.

Painting with Alcohol Inks | Pretty Handy Girl

Blot off any excess ink with a damp baby wipe.

Painting with Alcohol Inks | Pretty Handy Girl
gently-spread
To create speckles, I add several drops of ink directly onto a paint brush, then tap the brush onto another brush or a stick. This is the perfect way to create a random pattern reminiscent of stars.

Painting with Alcohol Inks | Pretty Handy Girl

Painting with Alcohol Inks | Pretty Handy Girl

I like to finish my paintings with a very light spritz of alcohol to give it a dappled look.

Painting with Alcohol Inks | Pretty Handy Girl

To add some extra elegance, drag metallic gold ink over your painting.

Painting with Alcohol Inks | Pretty Handy Girl

Let your painting dry. Seal the painting by spraying Krylon UV Archival Varnish over the surface (about 12″ away) and let the spray settle onto the painting to avoid disturbing the painting.

Use double stick tape to adhere your mini painting onto a blank greeting card and give it to someone special (or keep them for yourself.)

Painting with Alcohol Inks | Pretty Handy Girl

I love the metallic gold touches on this card.

Painting with Alcohol Inks | Pretty Handy Girl

Watch my video to really see the techniques I use with alcohol ink. I hope you find some time to de-stress by painting with alcohol inks. It’s really an easy art form and no two painting look alike.

I think the key to getting a beautiful painting with the alcohol inks is to limit your colors to 3 or 4 (white and black don’t count.) Also, try to resist perfection. Let the alcohol inks move and don’t try to fight it. Finally, I like to choose complimentary colors and follow this guide to choosing harmonious colors. I’m particularly drawn to the analogous palette.

A big thank you to my mom, who introduced me to alcohol inks. They certainly are addictive and they are pushing this gal to give up her perfectionist ways.

PHGFancySign

How to Repaint a Metal Door

How to Repaint a Metal Storm Door

Fall is coming and that means the trick or treaters will be on your doorstep soon. How scary is your entrance? We live in an area that gets harsh winters and hot summers. The elements really take a toll on outside doors. This is a good time of year to take care of any of those “scary” maintenance projects on your home. Today I’ll show you how to repaint a metal storm door.

In the front of our home, we have a wooden door and a white metal storm door with glass panes. It has gotten rusty over the years. Add in a lot of dirt from the traffic on the street and we were in need of a face lift.

Metal doors are easy to re-paint. There are a lot of color options to seal it and give it a new look. We decided to replace the mail slot, but repainted the door and door knobs. Of course, after you paint your door it may look so good that you’ll be inspired to replace those old door knobs.

Whether replacing or repainting your knobs, here are some easy steps on how to repaint a metal storm door.

(I’ve included affiliate links for your convenience. I earn a small percentage from a purchase using these links. There is no additional cost to you. You can read more about affiliate links here.)

Repaint a Metal Storm Door Materials

How to Repaint a Metal Storm Door Instructions

As you can see below, there was a lot of rust coming through the white paint. The doorknobs and mail slot were tarnished, and the glass desperately needed cleaning.

How to Repaint a Metal Storm Door

How to Repaint a Metal Storm Door

To prep the door, take off any hardware you will repaint (by spray painting) or cover it with painters tape and foil.

How to Repaint a Metal Storm Door

Take out any glass or screens, if your door has them. It’s easier to clean and prepare the door for painting without them. Cover the surrounding area with drop cloths. Cover a wide area since spray paint can travel and cover many surrounding surfaces.

How to Repaint a Metal Storm Door

Sand the door as best as you can. I used a random orbital sander and sanding blocks.  The goal is to get rid of any loose paint, dust, debris and rust from the door to prepare it for paint.

How to Repaint a Metal Storm Door

Using a rag and TSP cleaner, spray down the door and wipe it dry. This prepares the surface so new primer and paint will adhere well. Now you are ready to prime and paint the door.

Prime with a good oil-based spray paint using thin coats. Let it dry the recommended time. Paint your door with a gloss enamel paint in the color of your choice.  (I used one can of paint and one can of primer to paint this door on both the inside and out.) Let the door dry over night.

How to Repaint a Metal Storm Door

After the door dries you can put on your new hardware (if you chose to replace it.) I took the initiative to replace the tarnished mail slot with a new one in oil rubbed bronze. You can find these at your local home improvement store or online.

How to Repaint a Metal Storm Door

I chose to re-paint instead of replacing the outside of the door knob and deadbolt. Using a brush and a can of paint means you don’t have to tape off or remove the door knob to repaint it.  If you are spray-painting, you might want to remove the knob first. It took two light coats to cover tarnished brass. Make sure to adhere to the drying time for this kind of paint.

How to Repaint a Metal Storm Door

Clean up all of your supplies and enjoy your newly painted metal door. I’ve done this on another door in our house and it saved us hundreds of dollars since we didn’t have to replace the whole door. Painting is an easy DIY project you can definitely do in a weekend.

How to Repaint a Metal Storm Door

See you at Decor Adventures soon and happy painting.

Decor Adventures Blog

~ Read more of Jessica’s tutorials ~


Pin for later!

Easily update your front door with this tutorial on how to paint your rusted, metal storm door. | DIY tutorial | How to paint metal | Pretty Handy Girl #prettyhandygirl #DIYtutorial

How to Remove a Rusted Carriage Bolt | Pretty Handy Girl

how-to-remove-rusted-carriage-bolt

Have you ever run into a carriage bolt that is rusted and doesn’t want to come out. A first approach would be to spray WD-40 on the nut to try to lubricate it. But, if that doesn’t work, I have a simple solution! Here’s How to Remove a Rusted Carriage Bolt while keeping your sanity.

(I’ve included affiliate links for your convenience. I earn a small percentage from a purchase using these links. There is no additional cost to you. You can read more about affiliate links here.)

How to Remove a Rusted Carriage Bolt | Pretty Handy Girl

If the bolt still won’t release or the bolt just spins while you try to unscrew the nut, you’re going to need to try something else. Especially because grabbing the head of a carriage bolt is next to impossible. And trust me, I tried using pliers and vice grips to no avail.

How to Remove a Rusted Carriage Bolt | Pretty Handy Girl

The easiest solution is to cut a groove into the top of the carriage bolt. If you have a Dremel with a metal cutting wheel, you can make quick work of this task.

How to Remove a Rusted Carriage Bolt | Pretty Handy Girl

Be careful to stop cutting when you have a groove in the head of the bolt. You don’t want to cut all the way through the head.

How to Remove a Rusted Carriage Bolt | Pretty Handy Girl

Use the socket wrench on the nut and begin turning the nut while holding the bolt still with a large flat head screwdriver.

How to Remove a Rusted Carriage Bolt | Pretty Handy Girl

If the nut still won’t budge, spray more WD-40 on the nut and wait a few minutes. Than use a hammer to tap on the nut and bolt to try to break some of the rust.

How to Remove a Rusted Carriage Bolt | Pretty Handy Girl

And that’s a simple way to Remove a Rusted Carriage Bolt!

PHGFancySign