sliding mirror title

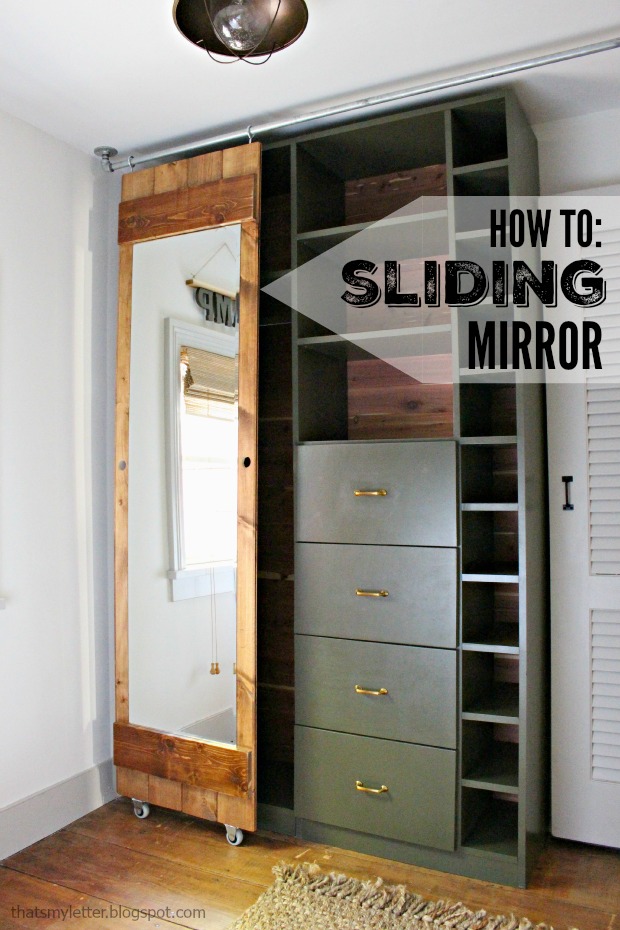
How to build a sliding mirror door:

Hello Pretty Handy Readers!  Jaime here from That’s My Letter and today I am sharing a sliding mirror project that is the finishing touch on my newly made over walk-in closet.  I will show you how to build a sliding mirror door using wood, wheels and pipe fittings.

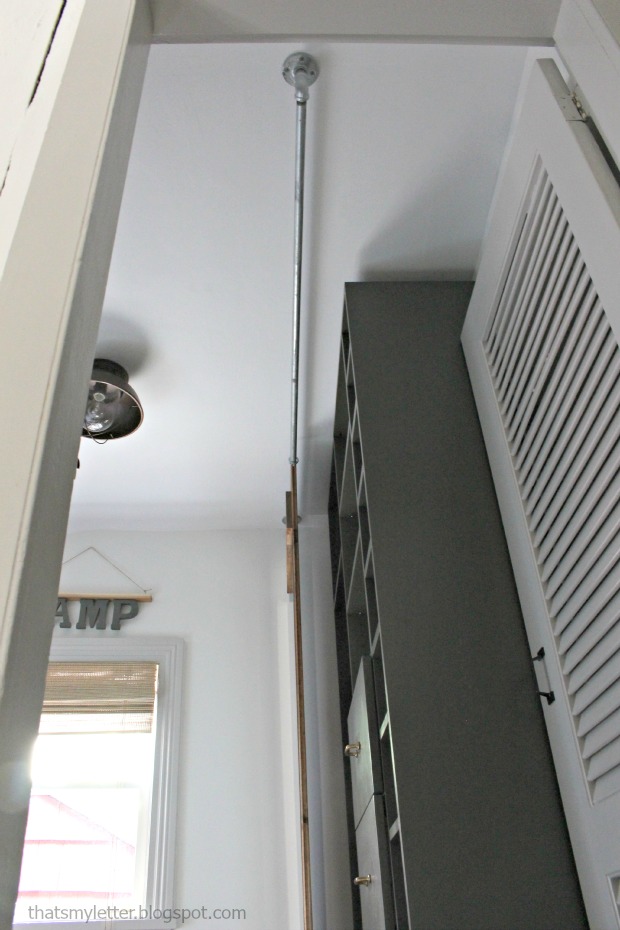
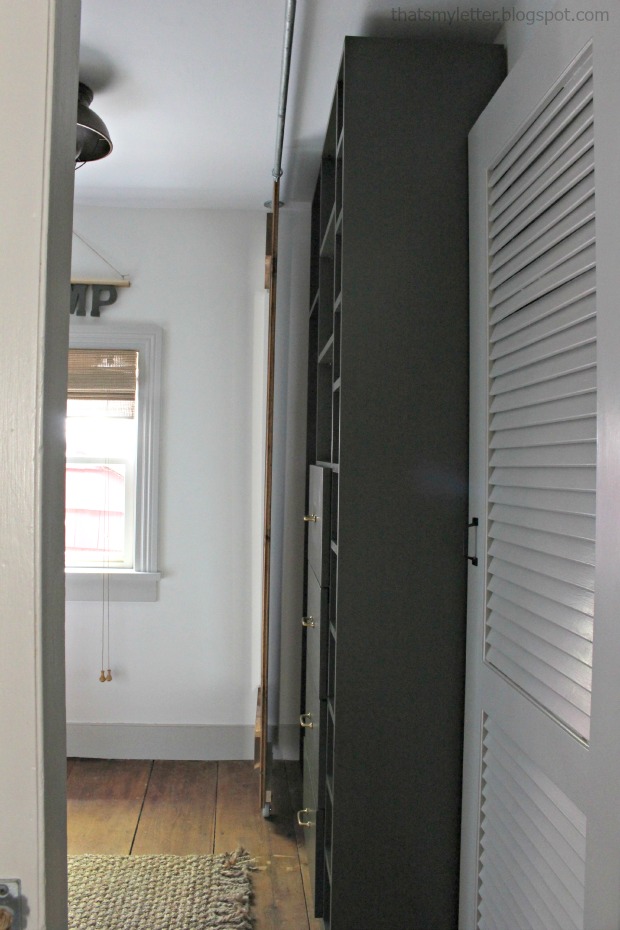
This sliding mirror is my solution to a small walk-in closet with no wall space and no back of the door option for a mirror.  The mirror slides across the room on stationary wheels and a galvanized steel pipe track.

sliding mirror 3

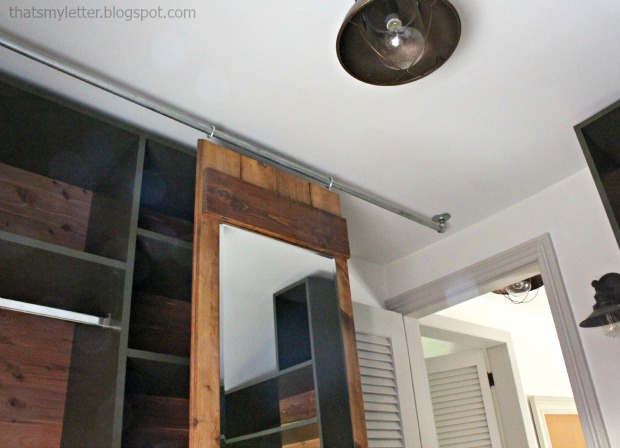
My pipe extends beyond the built-ins (mainly because that’s the pipe I had on hand) but this also allows for full access to the built-in compartments.

sliding mirror 5

In the photo below you can see the pipe extends beyond the built-ins at the ceiling:

sliding mirror hardware installed

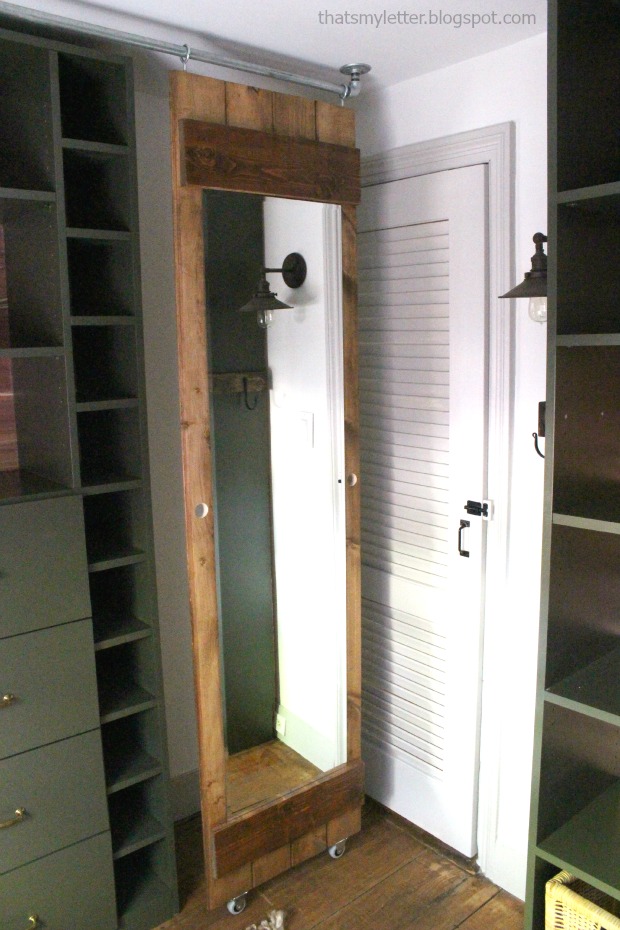
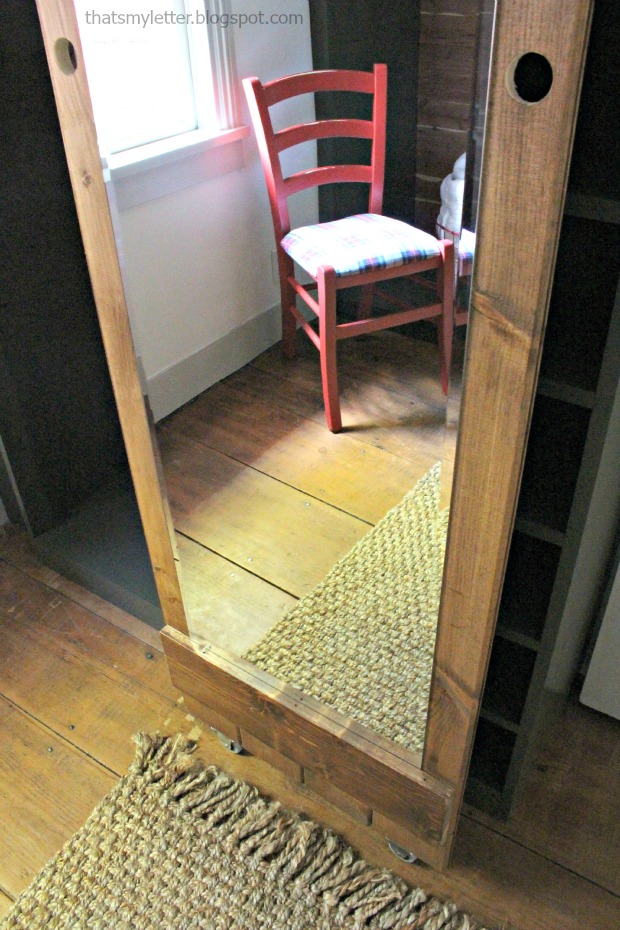
Simple finger pull holes allow you to glide the mirror along the pipe.  You could get fancy with hardware here but I took the minimalist approach.

sliding mirror 2

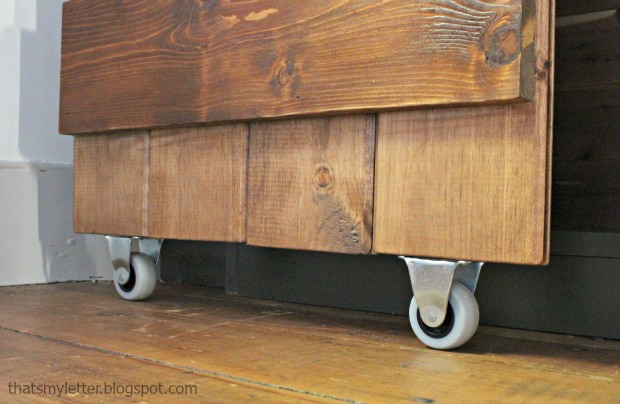
Stationary wheels keep the mirror in place while eliminating the need for any lower track system.

sliding mirror wheel detail

Hello super slim profile!  The whole mirror and wood support is only 1 1/2″ thick so the mirror does not protrude out into the room.

sliding mirror profile

Ready to make this clever sliding mirror? Let’s get to it… Read more

my-repurposed-life-navy-blue-small-headboard-bench

Today’s Rockstar is one of the bloggers that I aspired to be when I started blogging. This gal truly paved the way for DIY Bloggers. Gail is here to show us how to make a headboard bench. Watch closely as she deftly converts an old headboard into a cozy entryway bench.

Gail is the rockstar behind the wildly famous My Repurposed Life! She has the ability to see beyond the ugly junk and trashed items on the curb. She has a way of seeing the beauty in all of it!

Rockstar DIY Series

I hear the sounds of hammering, Gail is ready to take the stage! Give it up for this rockstar!

page_break_2

Hi there Pretty Handy Girl readers. I am so happy to be here, because I’m a huge fan of Brittany. I’ve followed her blog for a long, long, time.

I’m Gail from My Repurposed Life. If you don’t know me, the blog name sort of gives it away. I mostly blog about repurposing items; saving them from the landfill; and giving them a new purpose in life. Many people who find me through Google, do so by looking for headboard benches. It’s pretty much what I’m known for. Today, I’m going to share one of my all-time favorite headboard benches with you.

my-repurposed-life-small-entryway-bench

A supply and tool list is at the bottom for your reference.

bunk bed

I got two sets of these bunk beds for a steal at a thrift store. They’re not typical of the headboards I normally pick up—I prefer larger headboards.

You can see the piece in the back is slightly larger than the one in the front. That identifies it as the headboard.

twin-bench

You can see the headboard is in tact, but the foot board was cut on the miter saw right above the brace, leaving the top half of the foot board for another project.  At this point you decide how deep you want the seat of your bench to be.

kreg-pocket-holes

I used scrap 1×4’s for the side that connects the headboard to the foot board. All of my boards are secured using a Kreg Jig and pocket hole screws.

side-skirting

See how easy? the bench is already formed with a few simple steps, you could stop right here and add a seat. However, I knew I wanted to do a little something extra for this petite bench. Read more

Pantry with Coffee Bar and Hidden Wine Storage | Pretty Handy Girl

Table Saw Safety Guidelines | Pretty Handy Girl

Friends, it’s Nick from over at The Sawdust Maker! A site devoted to helping others take their woodworking skills to the next level. While I am in the middle a joint series on my website, I wanted to take a minute to talk to you about table saw safety.

The table saw is the most used tool in my shop. It also happens to be the most intimidating tool for most beginners to use. So lets get a grasp on these basic safety guidelines to follow.

Before we dive into this, I want to urge you to find your table saw manual and read it. Wait, what? Yes people… actually read these things. It will cover the basic safety rules as well as any safety features specific to your saw.

Now, before you turn your saw on, do the following:

  • Make sure you’re not wearing loose fitting clothes. This doesn’t mean you need to wiggle into your skinny jeans… just make sure nothing is accessible for the blade or work material to catch.
  • If you are wearing long sleeves, roll them up past your elbow’s.
  • Keep shirt pockets free of items.
  • Remove any jewelry.
  • Wear non-skid, well fitting shoes… last thing you want is to slip or trip into the blade!
  • If your hair is long, pull it up into a ponytail.
  • Wear ear and eye protection.
  • Don’t operate while tired or under the influence. Keep those creative juices for your design process!
  • Unplug your machine and do the following:
    • Visually check your saw for damaged components:
      • Check the power cord
      • Check the Blade
        • Look for Gum or Pith on the blade, clean it if it is dirty.
        • Check the carbide and make sure it isn’t chipped or missing teeth.
        • Keep it sharp. It is a lot cheaper than replacing them and will help keep those burn marks down!
      • Check to make sure that the guards, splitter, riving knife are in place and free of damage.
    • Check the alignment of the fence, ensuring it is parallel with the blade. A quick reference is to line it up with the t-slot and visual check to see if it is aligned.
    • Ensure the blade is tight.
    • Check the belts for excessive wear.
    • Check the alignment of the splitter/riving knife.
    • Is there enough room around you for the board you are wanting to cut? There is nothing more annoying than getting part way through a cut and realizing that you don’t have enough room to finish the cut!

DIY Table Saw Stand and Collapsible Off Feed Table

Now we are almost ready to cut a board! Here are some things to keep in mind when stepping up to the whirling beastly hunk of iron.

  • Keep the splitter and riving knife in place at all times to help prevent dangerous kickback.
  • Use a table saw blade guard whenever possible, this will help keep your fingers out and dangerous wood chips/knots in.
  • Lower the blade below the table surface when the saw is not in use.
  • The table saw blade height should be set so that the carbide teeth of the blade extend a little beyond the height of the work piece. Between 1/4 – 3/8”.
  • Don’t reach over or behind the table saw blade.
  • Never position your hands or fingers in the path of the table saw blade.
  • Keep a 4-6” margin of safety all the way around your table saw blade. This is a DO NOT ENTER zone!!!!
  • Never back a board out of a cut.
  • Cutting a bevel? Place the rip fence on the side opposite of the bevel cut. (see below)

Table Saw Safety Guidelines | Pretty Handy Girl

  • Know what you are cutting into to avoid nails, loose knots, etc.
  • Always have additional out feed support in place at the back of the saw table.
  • Don’t release the work piece until it is all the way past the back of the table saw blade.
  • Don’t cut stacked material.
  • Keep your work area clean. It would be a shame if those scraps sitting in front of your saw caused you to face plant into your saw.
  • Unplug the saw when you are changing the blade.
  • Do not stand behind the blade or the work piece. Trust me, if a board is going to kickback, it will come out of there like a bullet. Last thing you want to do is stand in its flight path!
  • Use a push board, stick (GRR-Ripper) when making rip cuts narrower than 6 in.

Ways to Prevent Kickback

  • Don’t use the miter gauge and the rip fence together. This is a guaranteed invitation for the board to bind and kickback.
  • Use the miter gauge or a sled for all crosscutting and the rip fence for ripping.
  • Never rip wood that is twisted, warped or doesn’t have at least one straight edge.
  • Don’t saw a piece freehand.
  • Use a sliding table for cutting large sheet goods or cut down to a manageable size with a track saw, panel saw. There are several ways to accomplish this. You can clamp a board down to the sheet good and use that as a straight edge for your circular saw.
  • Use feather boards when ripping.
  • Use zero clearance inserts not only will this help keep your cuts crisp, it will also help keep small pieces of wood from meeting your pretty face. Again trust me, getting hit in the face with a loose knot is not fun.
  • Use the proper blade for the job, Most of us use a combination blade. which is good for both ripping and cutting boards. Don’t know your blades? Check out my post here. I did an in depth tutorial on selecting blades.
  • Don’t overfeed your blade. If you are bogging down your saw, you are probably pushing your workpiece through your saw too fast. This is another way to have a board kick back.

Pantry with Coffee Bar and Hidden Wine Storage | Pretty Handy Girl

I found that a lot of individuals are nervous to operate a table saw for the first time. I get it… there is something about hearing the motor start, seeing the blade spin and feeling the wind off the blade. If you feel this way, find someone knowledgeable to supervise and practice!

I know this is a lot of information all at once. But if you respect your investment, keep it tuned up, keep your body parts away from the blade and get out of the way from those flying parts… all that’s left is to go out have FUN!!!! and build something today.

Thanks, It has been an honor to borrow Brittany’s platform today!

PHGFancySign

Pin for later!

Read these Table Saw Safety and Guidelines to help keep you and your fingers safe! | Power tool safety | Pretty Handy Girl #prettyhandygirl #powertoolsafety #tablesawsafety

Personalized Rustic coasters sawdust2stitches for www.prettyhandygirl.com

Today I have the ever fabulous and always vivacious Corey on stage. She will be sharing how to make these Personalized Wood Slice Coasters.

Rockstar DIY Series

Corey is the rockstar designer behind Sawdust 2 Stitches. As if you had any doubt, this girl is multi-talented with her building and sewing skills! You’ll definitely want to check out her amazing gallery of tutorials.

Hey, I think I hear a chainsaw? Take it from here Corey!

page_break_2

Hey all, this is Corey from Sawdust 2 Stitches. I am one of THOSE people, that when I get an idea, I run with it… and I run fast. One day I decided that I didn’t like the tree in our front yard. Long story short, I had a small supply of wood logs at my disposal.

As the Holiday Season is quickly approaching, I decided to slice up the stump and use them in a plethora of festive decor. One such idea was Personalized Wood Slice Coasters. These are great for anyone attending and/or hosting a holiday dinner! This little tutorial will have you prepared to make the atmosphere absolute perfection. Or if you are attending an event these would make thoughtful hosts gifts.

Rustic coasters sawdust2stitches for www.prettyhandygirl.com

Materials:

  • Log or Wood Slices
  • Pencil
  • Fine Tip Sharpie
  • Poly Acrylic
  • Foam Brushes

Instructions:

As I stated earlier, I had wood logs at my disposal and I chose to slice them about 1/4″ thick on my compound saw. One thing to consider, if you are using fresh wood they will be undergoing a drying process for a few weeks, and they can crack! I had some of mine do this, but truth be told, I kind of liked it. It added a little character. However, if you would prefer them not crack-less variety there are ways to lessen the possibility. I have been told that if you store the wood slices in in a double bagged brown paper sacks, it will prevent them from drying to quickly. Simply open the bag every day to let in fresh air, and then reseal it.

HOWEVER if you don’t have time for that, many craft stores have wood slices available and ready to use.

wood slices

Once the slices are ready to use, I began by drawing on my design with a pencil first. ( If you hate your handwriting you can always use a stencil or transfer paper. ) Read more

Building-Custom-Bookshelves

Matt & Jacque are here today to show you an amazing feat. They will show you how to build custom built in bookcases. You may remember this DIY Performing duo as former contributors. I know you’ve missed them and I’m sure you’re excited to see Matt & Jacque back again!

matt-jacque

Matt & Jacque are the powerful DIYers at The DIY Village. They tackle all types of home improvement projects while raising their daughter Josslyn. These are some busy renovators.Rockstar DIY Series

I believe that’s the whine of two drills that I hear! Let’s give it up for Matt & Jacque.

page_break_2

Matching-Built-In-Bookcases

I’m a firm believer that one can never have enough storage within their home! Especially, when you’re talking about a craft room! When we purchased our current house, my husband and I agreed would convert one of the bedrooms into a room where I could let my craft “freak” flag fly. Looking back on that decision, I still wonder what he was thinking, but nonetheless, fast forward three years. I have accumulated quite the inventory of supplies and came to the conclusion that the only storage solution would be the addition of matching built-in bookcases.

First off, let’s take a quick look at the basic structure that will make up the bookcase. (I won’t be including any dimensions, as you’ll need to work within the spatial constraints of your own home) The basic frame of the bookcase can be built using 1×12’s, along with a small platform that is made from 1×3. I have a large double window in this room so the best place to install the bookcases is on either side of the window, flanking the window.

Custom-Built-In-Bookcases

One of the easiest ways to assemble your bookcase frames is by using pocketholes.

Pocket-Hole-Joinery

Using a pocket hole jig will make easy work of your assembly. With all of your lumber cut to length, you’ll need to drill pocketholes at the top and bottom of each side. Read more