Baseboard Trim – How to Remove and How to Install

I’m back to work on the bonus room makeover, and I couldn’t be happier with the results of the project.
I had to prep the back wall for a little something special. And it required removing the baseboards. I saved them to re-install afterwards.
Materials:
- Utility knife
- Thin pry bar
- Hammer
- Coping saw
- Universal hand saw
- Hammer (or finish nailer)
- Finish nails
- Pliers
- Scrap of wood
Instructions to Remove the Baseboards Cleanly:
Start by running the utility knife along the top edge of the baseboards to score the caulk.

Slip the pry bar behind the baseboard (this thin pry bar is invaluable for so many tasks! If you don’t own one, buy one immediately.)

Once the baseboard nails are out of the wall, gently pull up the baseboards from the corners.

To easily remember which baseboard goes where, label the wall and the back of the baseboard. I like to start with “A” and continue down the alphabet as I move clockwise around the room.

Removing the nails from baseboards:
Grab the pliers (these Irwin Vise Grip Pliers are my go to pliers) and a scrap of wood.

Grab the nail from the pointed end. Rest the pliers on the block of wood (placed close to the nail) and rock the pliers back using the scrap wood for leverage.

And remarkably, when you remove nails from the back of the baseboards, it leaves no marks on the front side!

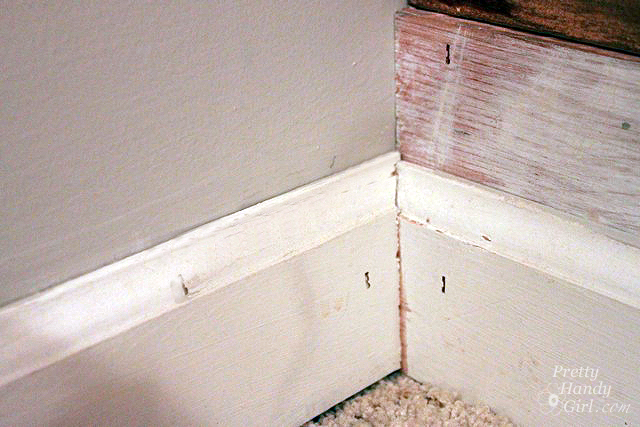
Fitting Baseboard Trim into Corners:
The best way to fit baseboard trim to a wall with many angles is to cut the exterior bevel first.

Then measure the amount of excess that is sticking out. In my case, I knew that I had bumped my wall out the width of this scrap of wood. So, I knew how much to trim from the interior corner.

Now, this is the trick to get super tight fitting interior corners. Grab the universal handsaw and coping saw for this step.

Turn the baseboard upside down and cut at approximately a 30-45 degree angle from the corner. Stop right before you cut through the top profiled edge (the curvy section.) Use your coping saw to cut from the top of the baseboard into the curve, making a “C” shape.

Your moulding should look similar to this:

Check the fit in the corner. The baseboard trim on the right side was cut with straight 90 degree angles that meet the wall. Slip the beveled cut baseboard up against the straight cut trim and you should have a nice tight joint.
If the other corner looks good, secure your baseboard with finish nails or use a finish nailer.

Caulk all the seams and nail holes. Paint your trim and that’s it.
Hey, did you peek? Did you see a little section of my wall project? Sheesh, well here’s another teaser:

Come back on Friday and I’ll give you the details on the back wall. I’m in love with the results!


Thank you so much for sharing such a nice and very informative blog about base b9ard trim.
Hi Brittany,
Why do you do coping on the inside corners? Can you not just do 45′ cuts on the inside, too?
Do you always have to paint it or can you buy pre painted stuff?
Thanks!