White-washed Window Box from a Wine Crate

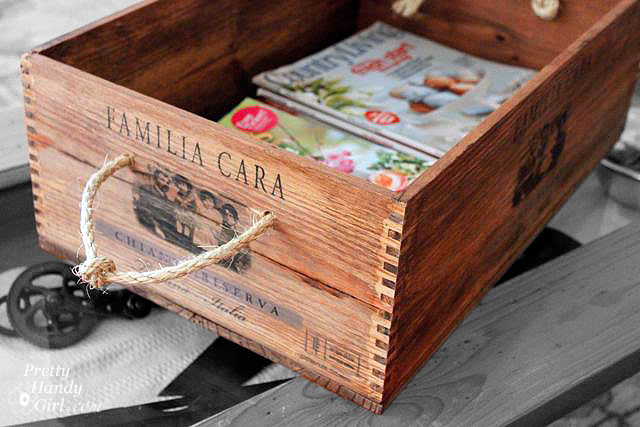
The other day I was wandering aimlessly shopping at Costco and spied an empty wooden wine crate. The angel stamped on the side was beckoning me to take her home. Actually, I read Funky Junk Interiors’s post about making tool boxes last year and have been looking for just the right wood to make one. The angel may not have calling me, but I wasn’t about to leave the store without her.

I thought about tucking it under my coat and making a break for the front door, as I was sure there were other crafty ladies eyeing up the lonely wine crate. But, I resisted the urge and asked the manager if I could have it, and he graciously let me take it home. I was exuberant because I’ve been missing my rustic wine crate that Cherie won.
I was also looking for a little creative project to use my new Tomboy Tool Impact Driver on. (This little power tool is perfect for small craft and building projects! AND, it is on sale for $79 this month!)
 Making a little window box from the wine crate seemed to fit the bill. Originally, I had plans to make two window boxes out of the one crate, but because my son developed an unexpected case of norovirus, I only got one done. (Lots of laundry this week y’all!)
Materials:

- Wine crate
- 1″ x 6″ x 4′ pine board
- Tomboy Tools impact driver (On Sale through March 2012!)
- Safety glasses
- Drill bits
- Pry bar
- Hammer
- Tape measure
- Pencil
- Wood glue
- Brad nails
- 1″ Wood screws
- Pliers
- Clamp
- Paint brush
- Flat white paint
- Cup of water
- Power towel or rag
- Scissors
- Fat ribbon or rope
- Plastic sheet
- Staple gun with 1/4″ staples
Difficulty: Medium (some use of power tools necessary, but not required.)
Step 1: Pry apart the wine box using the pry bar. Gently tap the pry bar into the seams.

The bottom of the wine crate was made from two pieces of wood and I could have used them for my box construction, but I wanted to beef up the strength of the window box, so I set them aside for another project.

Step 2: Remove any exposed nails with the pliers.

Step 3: Remove the wine bottle supports using the pry bar and hammer. Again, gently tap the pry bar under the support until it pops off.

Step 4: Time to cut a new bottom and sides for the wine box. (I used one of the original bottom pieces for the back of the window box.) Take the front of the wine crate and lay it on top of the 1″ x 6″ board. Mark the length with a pencil.
Cut the board at your mark.
Using the 1″ x 6″ board you just cut for the bottom, mark the width on the scrap 1″ x 6″.

Cut two pieces of wood at that same width for the sides of your box.

Step 5: Dry assemble the sides of your box and mark the height of the back piece (formerly one of the bottom pieces of the wine crate) with a pencil. Use the miter saw to cut down the side to that height.

You should have five piece of wood now. The front and back (was the bottom of the wine crate) are from the original wine crate. The sides and bottom are newly cut from a 1″ x 6″ piece of lumber.

Step 6: Run a line of wood glue along the sides of the base piece of lumber. Clamp the front and back of the box to the base.

Use your drill or impact driver to pre-drill holes for your brad nails. Hammer the nails into the pre-drilled holes. I used four nails on the front and four on the back.

Step 7: Run a bead of glue along both sides of the side of the box. Clamp the box together. (I chose to inset the sides slightly.)

Step 8: Pre-drill two holes per side on the front and back of the window box. And pre-drill one hole per side into the bottom (in line with the side panels.)

Use the impact driver (or drill) to drive the wood screws into the pre-drilled holes. Sink the screws just below the surface of the wood.

Your window box should look like this:

Step 9: Measure 1.5″ in and down on the sides and make marks for the handles.

Use a 1/4″ drill bit and drill holes where the marks are.

Step 10: Take out the paint, paint brush and a cup of water. Poor the white paint into the water to create a 1:1 paint to water mixture.

Brush on the watery paint mixture onto the box.

Lightly wipe off the paint with a paper towel or rag.

Step 11: After the paint has dried, thread the ribbon or rope into the two holes on the sides. Tie a double knot on the inside to secure the handles.

Step 12: If you are using live plants in your window box, you should line it with heavy duty plastic. Lay the plastic sheet inside the box and push the corners down into the bottom. Make sure you have enough sheet to fully line the box. Then trim off the excess, leaving about an inch to fold under.

Fold the top edge of the sheet under to create a double thickness (this will keep the staples from pulling through the plastic.) Secure the plastic by stapling around the top edge. Do not put any staples at the bottom of the box or you will create a hole that will allow water to seep through.

Step 13: Add your plants. I kept mine in the pots and used spanish moss to hide the pot edges.

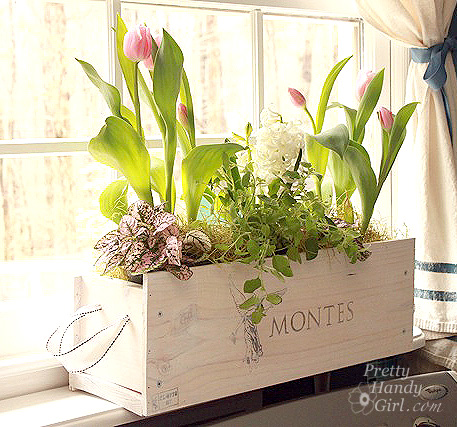
That’s it! Now you have a really cute window box.

Fill it with seasonal flowers and herbs.

Set it in a sunny window.

The flowers are keeping me company when I do laundry (which as you know I’ve been doing a lot of this week!)

I might rotate her as centerpiece or to hold laundry supplies after I finish our laundry room renovation.
What do you think? What would you use this little box for?
![]()
Hey y’all! I wanted to give you a few notes about that Tomboy Tools Impact Driver that I tried. I really like the size and heft of this little power driver. It weighs exactly 1 lb. 12 oz.

This puts it in the featherweight category, when compared to my 18 volt Ryobi Impact driver that weights 4 lbs. 9 oz. Ooof! I don’t know about you, but I really don’t have the arm strength to hold an almost 5 lb. weight over my head for more than a few minutes. That being said, at 8 volts, I don’t think the Tomboy Tools driver would be the tool of choice for building a house. This tool is perfect for small home improvement and craft projects (which is more in line with about 75% of my projects.)
The impact driver has a nice pull forward collet that releases the bit and accepts any standard hex bit. No need to spin to open the chuck and spin to close it. This makes for quick bit changes on the fly!

The Tomboy Tools impact driver comes with a built-in lithium-ion battery. This basically translates to a battery that doesn’t have a memory and therefore can be charged at any time and it won’t lessen the life of the battery. Plus, the battery charge lasts longer and doesn’t get weaker as it nears low charge. While charging, a light on the handle glows red and will turn off once it reaches full charge.

The only downside to the built-in battery is when your charge is gone you don’t have an extra battery to pop in. But, charging it up doesn’t take much more time than a little snack break. 😉 And the lack of the removable battery is what gives it the featherweight status compared to the other impact drivers with a removable battery.
I also really appreciate the work light that automatically comes on when the trigger is depressed. This makes it easy to see if you are working in a dark spot like under a cabinet or in the crawlspace (shudder.)

You may notice in the photo above, that true to all the Tomboy Tools products, they are made for a woman’s smaller grip! Gotta love that!
If you are interested in getting your grubby hands on one of these awesome power drivers, order this month! Tomboy Tools is offering a special on the Tomboy Tools Impact Driver for $79 ($10 off normal price.)
Rock on and I’ll see you in a few!
 Disclosure: This is a sponsored post and is part of the Blissdom conference sponsorship package paid for by Tomboy Tools, Inc. I was sent a complimentary impact driver to review. However, I was not told what to write or what project to create. In fact, I requested the impact driver specifically because I thought it would be a good tool for my readers. The opinions expressed are my own. I promise to always be truthful and open to my readers.

Trackbacks & Pingbacks
-
The Best DIY Aging and Antiquing Techniques - Pretty Handy Girl says:
October 9, 2017 at 8:14 am
-
71 Practically FREE Scrap Wood Projects - Pretty Handy Girl says:
September 1, 2017 at 7:00 am
-
15 Gorgeous DIY Window Box Planters – Diys To Do says:
June 25, 2017 at 6:38 am
-
Fioriera creativa! Ecco 20 idee... Lasciatevi ispirare (tutorial) says:
April 3, 2017 at 2:18 pm
-
How To Make An Elegant White-Washed Window Box | Oke News Viral says:
March 3, 2017 at 4:50 pm
-
How To Make A Window Box From An Old Wine Crate – Oke Viral says:
February 26, 2017 at 7:59 pm
-
Una fioriera fai da te creativa! 20 idee + Tutorial... Ispiratevi! says:
February 23, 2017 at 6:24 am
-
12 Awesome Crate Recycling Projects | The Craftaholic Witch says:
February 21, 2017 at 2:33 am
-
How To Make An Elegant White-Washed Window Box says:
January 21, 2017 at 8:21 am
-
How To Make An Elegant White-Washed Window Box – Netizen Life says:
January 20, 2017 at 4:12 am
-
How To Make A Window Box From An Old Wine Crate says:
January 20, 2017 at 1:11 am
-
How To Make An Elegant White-Washed Window Box - Best Stories in The World says:
October 5, 2016 at 1:50 am
-
Unique Window Boxes says:
October 4, 2016 at 9:55 am
-
25 Ways to Decorate with a Wood Box Year Round - Leap of Faith Crafting says:
September 17, 2016 at 7:04 pm
-
How To Make A Window Box From An Old Wine Crate | HeroinSounds Buzz says:
June 5, 2016 at 6:15 pm
« Older Comments[…] out this White-washed Window Box and see how to get this finish on your next […]
[…] this White Washed Window Box from a discarded wine […]
[…] What an adorable window box. Tutorial at Pretty Handy Girl […]
[…] fonte (tutorial) […]
[…] White-washed Window Box from a Wine Crate […]
[…] White-washed Window Box from a Wine Crate […]
[…] fonte (tutorial) […]
[…] White Washed Window Box from a Wine Crate from Pretty Handy Girl […]
[…] White-washed Window Box from a Wine Crate […]
[…] White-washed Window Box from a Wine Crate […]
[…] White-washed Window Box from a Wine Crate […]
[…] White-washed Window Box from a Wine Crate […]
[…] prettyhandygirl. […]
[…] You can use it as a herb garden along with spring flowers! Check this one out here from Pretty Handy […]
[…] White-washed Window Box from a Wine Crate […]
Leave a Reply
Want to join the discussion?Feel free to contribute!