I get a lot of emails asking me if I want to try XYZ or ABC product. If the products work with my blog or I think I can use them in a project, I accept. However, if I don’t like the product, you won’t hear about it here. So, when a Bogs representative contacted me, I was skeptical if I would be writing a review. Especially because I have a hurt big toe from a common malady: Cute Shoe Syndrome. That’s right, I found some cute boots and wore them until I think I did damage to my foot. Therefore I’ve switched back to my clogs and “healthier” shoe options for my feet. But who knew that I could have both cute and comfortable in one shoe!
I have another confession about my feet, well rather my ankles or lack thereof. It’s true, I am genetically cursed with cankles (you know, where your calf just ends into your foot leaving no cute thin ankles.) So, boots and some higher backed shoes don’t always fit my feet.
Sorry about all the whining, but I just wanted you to understand where my feet are coming from so you can fully appreciate these boots.
I think Bogs were designed by higher beings, because these boots are heavenly!
I wore them all weekend while working on my garage makeover. The temps were in the high 60’s so at the end of the day my feet were sweating a bit (truth be told I was sweating all over because I was doing some mad building.) BUT, my feet weren’t cold from the sweat.
AND, my feet weren’t sore; they weren’t tired; they were happy feet!!!
The boots I tried are the Classic High Tuscany boots. I wore them in the creek. I wore them while working in the workshop. I even wore them on a very cold and rainy Halloween night.
The Bogs tread is designed to wipe itself clean.
But, if they do get dirty, all they need is a little rinse and they are as good as new!
I didn’t have any chafing, no sore toe, and the boot doesn’t pinch or squeeze my cankles. 😉 In fact, they hide those unsightly things.
To walk in a pair of Bogs is like walking on clouds. The best analogy I can make about the Bogs is that they are like a very comfortable boot that wears and feels like a croc. Yet, you can look fashionable while wearing them. I’m wearing them every chance I get now.
There are many different styles to choose from! Bogs make shoes for your whole family! Small ones, tall ones, short ones, and stylish ones. I dare you to pick just one pair!
When Courtney (The Joy of Decorating) organized the Raleigh group for I <3 Thrifting Day she took us to an “off the beaten” path shop. Tucked into an industrial zone off Capital Blvd. in Raleigh, you would miss it unless you were specifically looking for it.
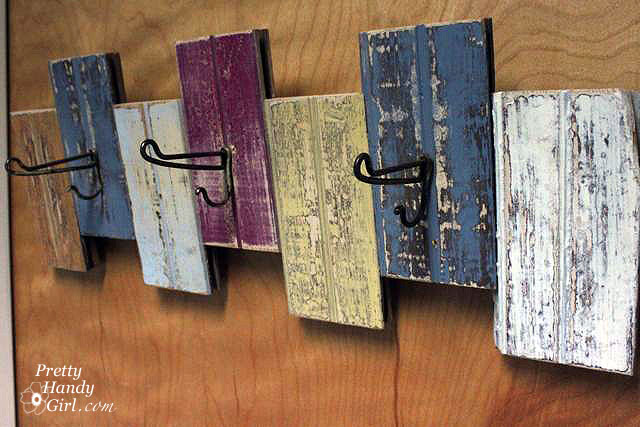
Old bead board or flooring pieces cut, painted and turned into a coat rack!
A pendant light made from corrugated cardboard!
Here’s a closer look at the cardboard.
Give me chippy paint or give me death! Okay, I know I’m being dramatic, but I seriously love anything rustic with chipping paint.
Decorative scroll embellishment on an armoire.
Just think how easy these ampersand pillows would be to make!
Hello, does this vignette remind you of Miss Mustard Seed? Me too.
Painted and numbered chippy buckets.
Another scale and a buggy wheel. Makes my wheels churn thinking what I could make with it.
I just love the detail on this drawer pull (and of course the chippy paint.)
Bare wire framed pendants are very popular right now.
I think I like the pendant even more because of the antique light bulb.
Antique cameras are sculptural and easy to decorate with.
I spotted this shelf made from old shutters.
Or you could turn an old shutter into a coat rack.
This armoire is too stunning for words!
If I owned this dresser, her name would be buttercup.
Old typewriter keys are just graphic goodness.
This tool caddy is adorable, but I bet it would be easy to make. I think I could use Julie’s (Follow Your Heart Woodworking) tool caddy tutorial that appeared on Funky Junk Donna’s.
A cute little nook shelf. Complete with (you guessed it) chippy paint and beadboard.
This birdcage photo display gives me a few ideas. How about you?
2nd only to chippy paint, I love blue bottles!
Little antique crates can be found everywhere at ReVival Antiques.
A buoy birdhouse! How adorable.
{Yawn!} That’s it for today, I’m ready for my cat nap.
If you liked anything you saw in this post, be sure to visit or contact:
Revival Antiques & Accessories
1505 Capital Blvd, Suite 14-A
Raleigh, NC 27603
Disclaimer: This is NOT a sponsored post. Revival Antiques doesn’t know me, they didn’t poke or prod me to write this. It is just one of those places that I thought you might like to visit with me. So, I brought you along for the visual tour.
Welcome back for another Tool Tutorial Friday – How to use a jig saw. Today I have two lessons for you. The first will cover the basics of using a Jig Saw. THEN….I’ll show you a professional trick for cutting a hole inside a piece of wood without sawing from the edge!
Let’s get this party started…well, this tutorial at least.
(This post contains affiliate links. To learn more about affiliate links, you can read my disclosure page.)
A jigsaw is a good introductory power saw to own. Being small and handheld, makes it a bit less intimidating than the bigger power saws. The jig saw can cut straight lines (when pushed up against a guide like a long level or board.) But, it really excels at cutting curves, profiles and circle cuts.
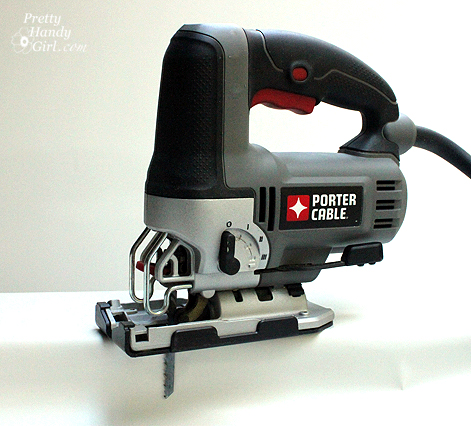
Below is a picture of my jig saw (a Porter Cable orbital jigsaw that I highly recommend) and its parts. Not every jig saw will look the same or have the same features, but this gives you a good idea.
I have used a jig saw to cut curved handles into a crate, cut profiles in panels to fit around an outlet or the baseboards and a few other craft type projects. Jig saws are modestly priced starting at $25 up to over $150. When buying a jig saw, look for strong and solid construction. One of the features that I really like on a jigsaw is an LED light that automatically comes on when the trigger is depressed. My first jig saw was a cheap model. I regretted that purchase because it really did a poor job when cutting through anything thick or hard. Learn from my mistake and invest in at least a middle of the road model and save yourself the need to buy a new one when the cheap one doesn’t cut very well.
Most jigsaws have a speed control. Sometimes it might only be a high – low switch. The speed control is located on top of my jig saw, but this will vary depending on the jig saw you buy.
The jig saw has a straight blade that moves up and down to cut. The teeth of the blade always face forward to cut into the wood as you press it into the cut.
Most modern jig saws have a quick release blade. This is how to remove the blade on the Porter Cable jig saw:
I have not needed to replace this blade yet, and I’ve been using it for 2 years.
Before we watch the video, a little reminder:
DISCLAIMER
The viewer assumes all responsibility and liability associated with the hazards of woodworking. Pretty Handy Girl is not responsible for any errors or omissions that may be present in this tutorial. She also assumes no liability for any action or inaction of a viewer.
Please use extreme caution when using power tools. Read your tool manual thoroughly and wear protective safety gear. Take your time familiarizing yourself with a tool before using it. (If you are missing the manual, you can easily find it online by going to the manufacturer’s website or google your saw’s make and model + manual.)
Please recognize that I have tried to put together a basic jig saw usage tutorial to get you started. I have tried my best to show the safest way to use a jig saw. That being said, I am not a professional (I only play one on this blog .)
And now, the basics of using a jig saw!
Here is the video:
Now for my professional tip. Let’s imagine that you want to cut a large hole in the middle of a piece of wood. For example, a curved handle hole in a crate or an outlet opening in a sheet of beadboard. Obviously you don’t want to cut in from the side. That wouldn’t look very professional, now would it? But, how do you do it? I’m going to use the outlet hole as an example today.
You’ll need a few tools first:
Jig saw
Drill with a spade bit slightly wider than your jig saw blade
Pencil
Dark lipstick (bear with me)
Outlet cover
Cut your beadboard to size (make any adjustments and profile cuts before proceeding.)
Instead of measuring where the hole is and then transferring those measurements onto the board, you can use this trick instead! (1) Rub the lipstick around the outer edge of the outlet sockets. (2) Press your bead board up against the outlet. Gently pound your fist onto the outlet through the bead board. When you remove the beadboard, you will see the location of the outlet. (3) Lay your outlet cover in line with the socket impressions. (4) Trace around the outlet cover.
Draw a second line about 1/8″ inside the first. This will be your cut line.
Insert the spade bit into your drill. Position the spade bit inside one corner, and drill a hole.
Repeat for the other three corners.
Position your jig saw blade inside one hole, move the blade to the back of the hole before you start your saw up. Otherwise, the teeth will grab at the front edge and could cause the saw to jerk out of your hands.
Cut from hole to hole along the cut line until the square hole for the outlet is completely cut. Here is a quickie video showing exactly how to cut the hole:
https://prettyhandygirl.com/wp-content/uploads/2011/10/jig_saw_promo_image.jpg426471Brittany Baileyhttps://prettyhandygirl.com/wp-content/uploads/2021/07/PHG-logo-tagline-2020-1030x211-R.jpgBrittany Bailey2011-10-28 07:00:082021-08-06 16:18:33How to Use a Jig Saw
Hey y’all, I spent the weekend clearing out our garage, painting it and building custom storage. If there was a nook in that garage, I utilized it! Like the storage underneath my router table, I added shelves and casters and now it is a rolling power tool storage and router table. Ha! I’ll give you some tutorials at a later date.
In the meantime, my friend Amy asked me to participate in A Swell Noel, two months worth of DIY gift ideas for the holidays. There are some fantastic bloggers participating and sharing their best gift tutorials! You should take a peek.
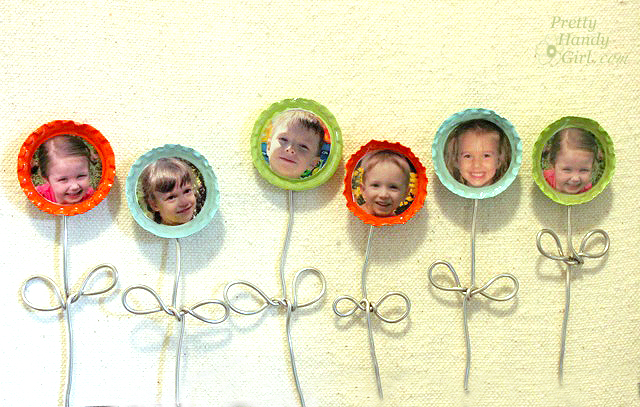
Aren’t they adorable?! I mean the kids, of course ;-).
In other news, if you missed my post on Friday, The Tool Tutorial Friday series just started. We learned how to use a miter saw. AND, Tomboy Tools is giving away a magnetic hammer. All you have to do is comment on my Tool Tutorial Friday post to enter to win.
Did you remember? This week is Trick or Tip Week! I’m teaming up with some other great bloggers to give tips all week! Friday will be a link party where you can share your own tip or trick!
https://prettyhandygirl.com/wp-content/uploads/2011/10/Bottlecap_magnet_promo.jpg407640Brittany Baileyhttps://prettyhandygirl.com/wp-content/uploads/2021/07/PHG-logo-tagline-2020-1030x211-R.jpgBrittany Bailey2011-10-24 08:34:252021-08-21 18:17:21Guest Posting at Positively Splendid – Swell Noël Gift Idea
Today I’ll teach you how to use a miter saw safely. We’ll learn the difference between a miter and a bevel cut. Plus, I’ll also show you the different features and functions of miter saws.
How to Use a Miter Saw
Hello and welcome to the very first Tool Tutorial Friday (a series of tool tutorials)! Come right in and have a seat. If you give me less than 10 minutes of your time, I will empower you with a new power tool skill! Today, I’m going to show you how to use one of my favorite power tools. Before I owned a miter saw, I used a hand saw and a cheap plastic miter box. But, they were really putting a cramp in my DIY style (if you know what I mean.)
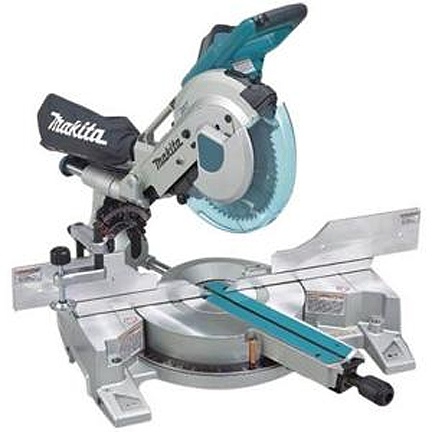
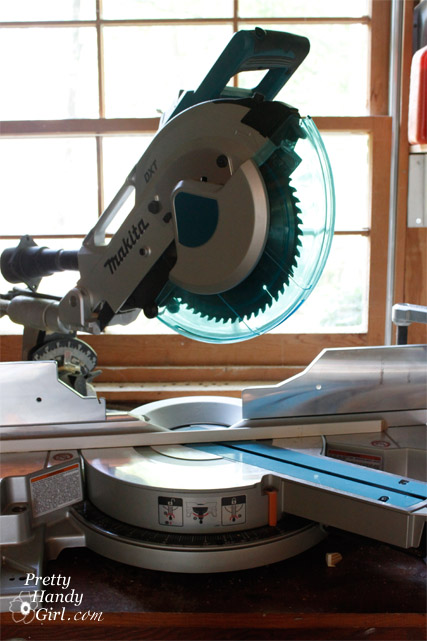
About two decades ago, my husband gifted me my Makita 10″ Sliding Compound Miter Saw. That’s right, I don’t ask for jewelry for big occasions, Pretty Handsome Guy knows to ask one thing before an upcoming holiday, “So Honey, what power tool do you want now?” It’s true, I’m a power tool junky.
Ready to learn how to use a miter saw? Okay, let’s get started…
Working with power tools can be dangerous, but your risks drastically eliminated if you give the tool some respect. Today I’ll show you how to use a miter saw safely.
About Miter Saws:
Miter saws come in many shapes, sizes, and colors. The size (usually from 7.25″ up to 12″) refers to the diameter of the blade on the saw. The larger the blade, the wider the material it can cut. However, if you purchase a “sliding” miter saw, you can cut several inches wider than your blade diameter (the specifications on the saw should tell you this cutting distance). Miter saws run anywhere from $80 up to $800 depending on the features and brand you choose.
Sliding Miter Saw:
I highly recommend a sliding miter saw if you can afford it. Being able to cut lumber a few inches wider means the difference between using your miter saw or having to break out the circular saw or table saw.
On a non-sliding miter saw, the saw head will not slide forward and back. Most of the entry-level models will cut a miter and a bevel. You may have heard miter saws without the ability to slide referred to as chop saws. They will work great for “chopping lumber” but without sliding, dual miters, and dual bevels, you will spend some time flipping the lumber to make your compound cuts.
Speaking of miters and bevels, let’s talk a little more about what is a miter and a bevel cut.
Type of Cuts:
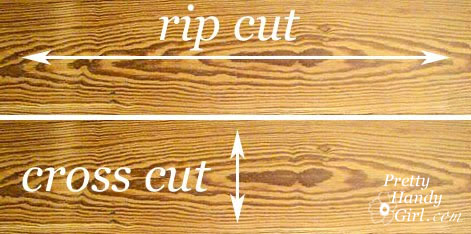
Miter saws are perfect for cross cuts, miter, and bevel cuts. Miter saws cannot make rip cuts. Rip cuts are easier cut on a table saw or track saw (or using a variety of other handheld saws.)
Rip – ripping a board is cutting with the grain along the length of a board. This is usually done with a table saw but can be done with a variety of handheld power saws and a straight edge.
Crosscut – a type of cut that is perpendicular to the grain or along the width of your board. Crosscuts are usually made with a miter saw or circular saw, but can also be made with a track saw, jigsaw, band saw, or hand saw. You can make crosscuts with a table saw, but you will need a crosscut sled to perform a crosscut cut safely.
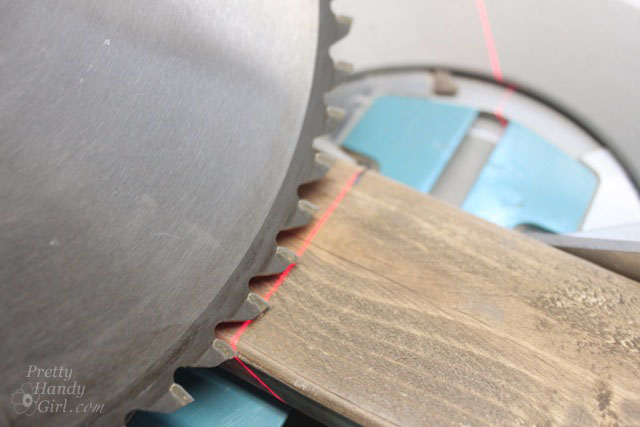
Miter Cut:
A miter cut is made when you change the direction of your blade from straight ahead (90˚) by moving it from side to side. Think of pizza wedges. For example, in the image below, the saw is set up to cut a 45˚ miter, and no bevel because the blade is still straight up and down.
Bevel Cut:
A bevel cut is made when you angle your blade tipping it to the left or right. As an example, in the picture below, I’m making a 45˚ bevel cut into the wood.
Compound Cut:
A compound cut happens when you make a miter and a bevel cut at the same time. Essentially you are cutting two angles simultaneously. This is particularly useful when you are cutting crown molding for a room.
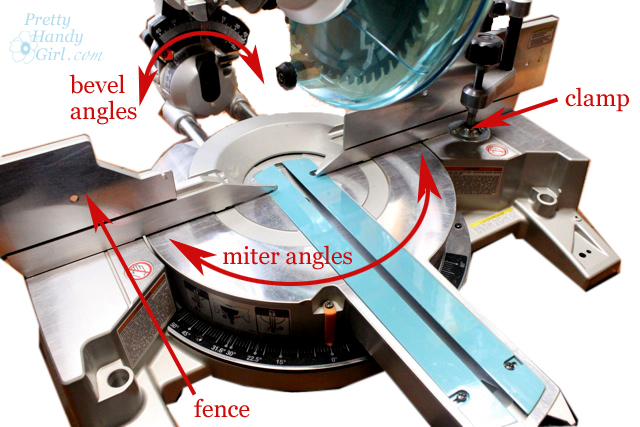
You can see in the diagram below how to set up your saw for bevel angles, miter angles, or both.
Safety Features and Operating a Miter Saw:
All modern miter saws have a trigger built into the handle. Most miter saws also have a safety button that you must push with your finger or thumb before you can squeeze the trigger. To start a straight downward cut, press the safety button, squeeze the trigger and wait for the saw to reach maximum rotation. Then slowly lower your saw into the board you are cutting. Never force the saw through the wood. Let the saw cut and then guide it downward. Once you have completed the cut release the trigger while the blade is in the wood. Let the saw come to a stop before lifting it out of the wood.
Most miter saws have a fence. The fence lets you rest the position your lumber against a straight edge. It keeps the wood steady and helps your miter saw cut true to the degree setting you have chosen.
Some miter saws have a detachable clamp. This is a nice option and helps keep your hands away from the blade during cuts. Let the clamp be your right-hand man (or left-hand man). If you don’t have a clamp on your saw, be sure to always position your hand as far away from the blade as possible. Do not attempt to make cuts where your hand is close to the blade. AND NEVER reach under the saw while it is rotating! Even when you have finished your cut, your hand is not safe until the blade has completely stopped.
Three Safety Tips for Using a Miter Saw:
Blade down until it stops! You should always end your cut and release the trigger while the blade is down and in the lumber. Let the blade come to a stop before raising the blade.
Always make sure the lumber is supported on both sides. And never clamp both sides of your lumber. One side should be free so as not to pinch the blade during the cut.
Never cut small pieces of wood where your fingers are too close to the blade. If you absolutely must cut a tiny piece, clamp or attach it to a larger piece of lumber.
Making a Safe Sliding Cut:
When using a sliding miter saw, there is a proper way to make a sliding cut (used to cut wider boards):
Make sure your saw is positioned fully on your workbench. Test the blade in its full reach toward you to make sure it won’t tip as you lower the blade.
Put your lumber up against the fence and clamp it on one side (if you can).
Before you start the blade, pull the saw toward you until the blade is directly over the board’s edge closest to you.
Squeeze the trigger to start the saw and wait for it to reach peak rotation speed. Then lower the blade down into the wood.
While the blade is still rotating, slide the saw back and away from you as your blade cuts through the rest of the wood (see photo below.)
Once the blade has finished cutting through the wood, release the trigger and let the blade stop before raising the blade.
I created a video, so you can see how to safely use a miter saw. Before you watch the video — a few necessary words of caution:
DISCLAIMER
The viewer assumes all responsibility and liability associated with the hazards of woodworking. Pretty Handy Girl is not responsible for any errors or omissions that may be present in this tutorial. She also assumes no liability for any action or inaction of a viewer.
Please use extreme caution when using power tools. Read your tool manual thoroughly and wear protective safety gear. Take your time familiarizing yourself with a tool before using it. (If you are missing the manual, you can easily find it online by going to the manufacturer’s website or google your saw’s make and model + manual.)
Update: Please recognize that I have tried to put together a basic miter saw usage tutorial to get you started. I have tried my best to show the safest way to use a miter saw. Two safety revisions I want you to be aware of:
You should wear appropriate Personal Protective Equipment when using a miter saw. (Ear protection, eye protection, and a dust mask.) I should have been wearing a mask.
When I first learned to use a miter saw, no one told me to keep the blade down until it came to a stop. This is now standard practice when I work.
And now, let’s get you more familiar with using a miter saw!
https://prettyhandygirl.com/wp-content/uploads/2011/10/my_miter_saw.jpg432432Brittany Baileyhttps://prettyhandygirl.com/wp-content/uploads/2021/07/PHG-logo-tagline-2020-1030x211-R.jpgBrittany Bailey2011-10-21 07:00:022020-05-15 18:23:22How to Use a Miter Saw