Brrrr! Anyone else experiencing the dipping temperatures? I really don’t like the cold unless it is going to snow. If it snows, I’ll put up with the sub-zero artic blast because I know we couldn’t have snow without the cold. But, if it isn’t going to snow, you can take your cold temperatures and get the heck out of here!

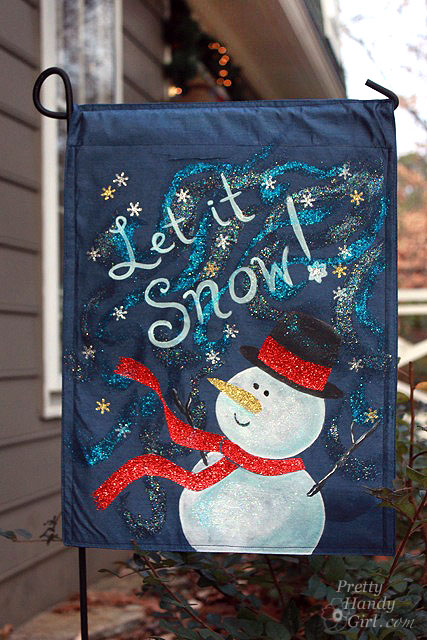
For this reason, I thought we needed to give Mother Nature a little hint, hint, nudge, nudge, and then a boldly displayed sign:

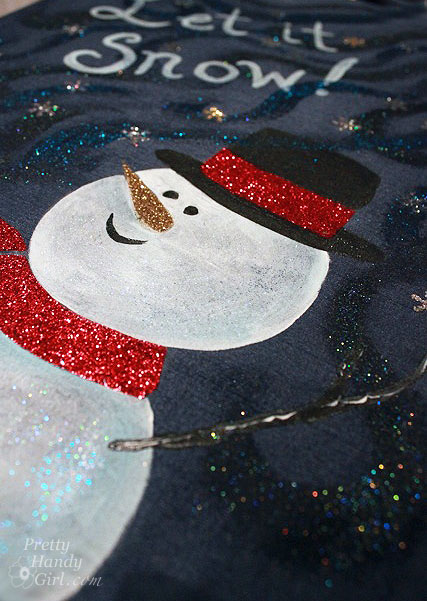
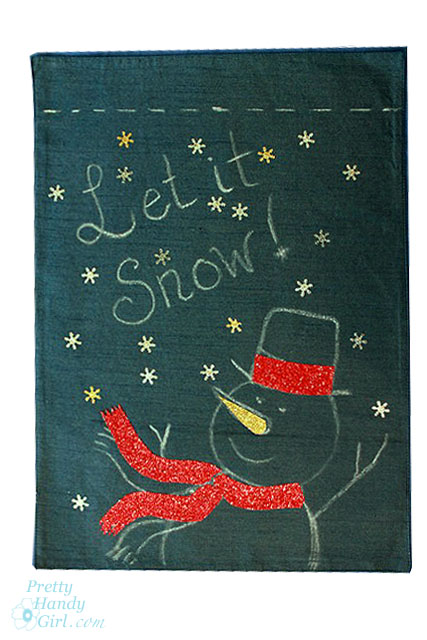
Cute garden flag, don’t you think?! Would you believe me if I told you that the flag is made from Dollar Tree placemats? Yup, I wouldn’t lie to you. I bought two because I wanted to decorate both sides and only one side of the placemat has a sheen to it. But, for $1 each, who can complain.

Stick around and I’ll show you how I made the flag. But, first, I have a confession to make…

…Do you secretly loathe glitter? Me, too!

When Pretty Handsome Guy sweeps up errant glitter from the kitchen floor, he’ll say, “The person who invented glitter never had children.” Then we both laugh. We were both in the camp of Glitter Haters Anonymous and detested any bedazzled art projects that came home from school. But, this week I snuck out of the camp under the radar and tried out a new product: Tulip® Fashion Glitterâ„¢ Shimmer Transfer Sheets and  Tulip® Fashion Glitterâ„¢ Shimmer Fabric Paint. Pretty Handsome Guy doesn’t know yet, but I think I’m changing my tune about glitter thanks to Tulip Shimmer products.

Why you ask? It is elementary, my dear Watson. The glitter stays put on the transfer sheets and in the fabric paint! No more sweeping up underneath the glittered project. No more random speck of glitter on the tip of my nose like a Rudolf wanna be. The shimmer products hold their glitter!

Materials:

Instructions:

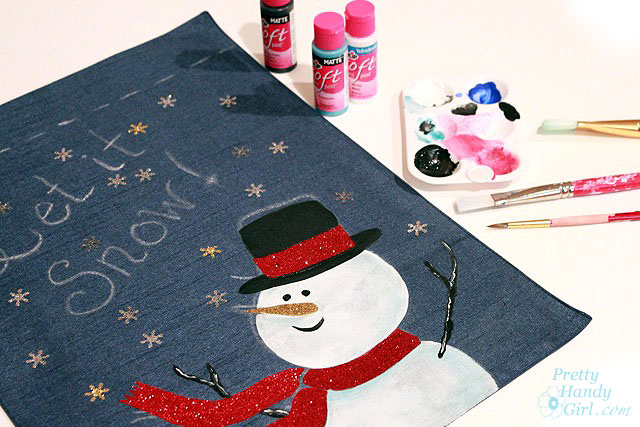
Mark  a line 2″ from the top of the “flag” placemat using the chalk (this will be your stitching line for the rod pocket. Then draw your design below the pocket line.

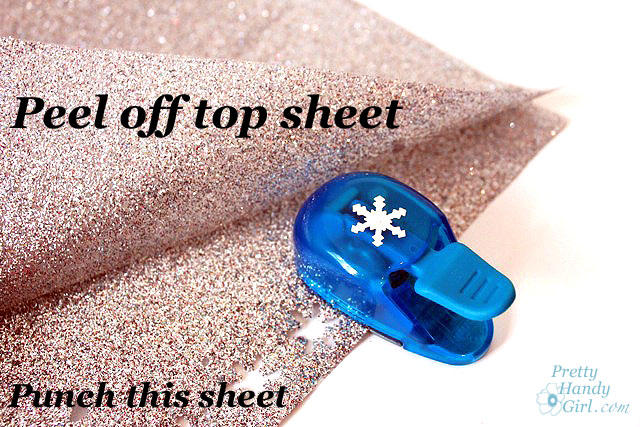
Punch out snowflakes from the Tulip Fashion Glitter Shimmer transfer sheet. Because the sheets are thick, it is easier if you peel up the top sheet and only punch through the transfer sheet.

Cut out the rest of your design (you can leave the top sheet on if you are cutting with scissors.) After the designs are cut out, remove the top sheets.

It can be confusing to determine which pieces you removed the top sheet from, so look at the pieces from an angle and look for any reflection or shine on the top sheet of plastic.

If you pull the top sheet off too quickly, it can pull the glitter with it (see below.) Go slow, and if it does happen — don’t stress it — just cut a new one.

Position all the snowflakes and any other transfer sheet pieces on top of the flag. Pay attention to make sure the glitter side is up and the glue transfer side is down. 
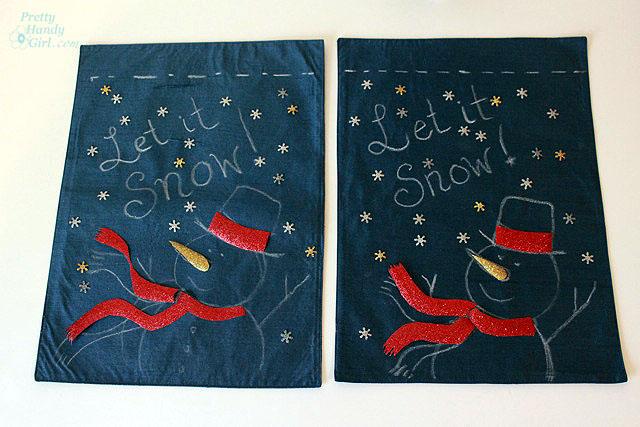
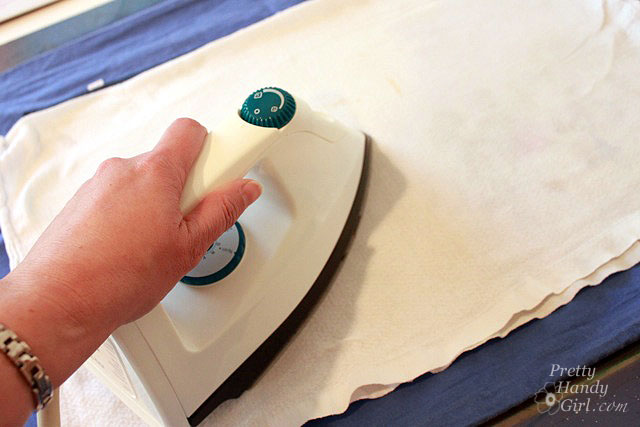
Lay a clean rag on top of the pieces and iron the design onto the placemats according to the directions. (The placemats I used are polyester, so I used that setting on my iron. And it took about 30 – 40 seconds to get the transfer sheet glue to heat up enough to stick to the placemats.)
Remove the cloth and check to make sure that the design is adhered to the flag/placemat.
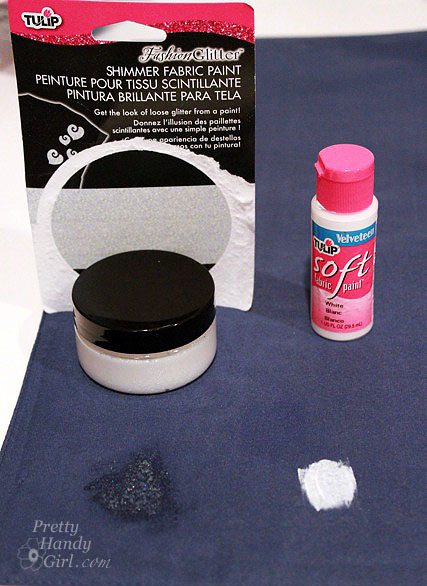
Before painting my snowman, I did a little test on the backside of my placemat to determine if the Tulip Fashion Glitter Shimmer fabric paint was transparent or opaque. It is transparent, so I chose the Tulip Soft fabric paint to fill in the snowman.

Paint your snowman, arms, hat, eyes and mouth using the Tulip Soft fabric paint. Using the smaller brush, paint the words too.

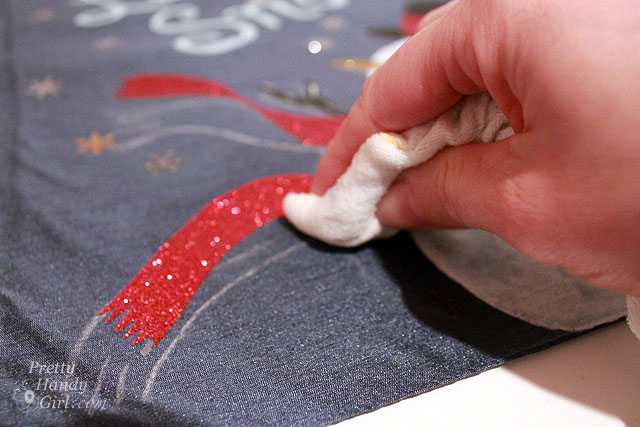
After the fabric paint has dried, dampen a clean cloth and gently wipe off the chalk.

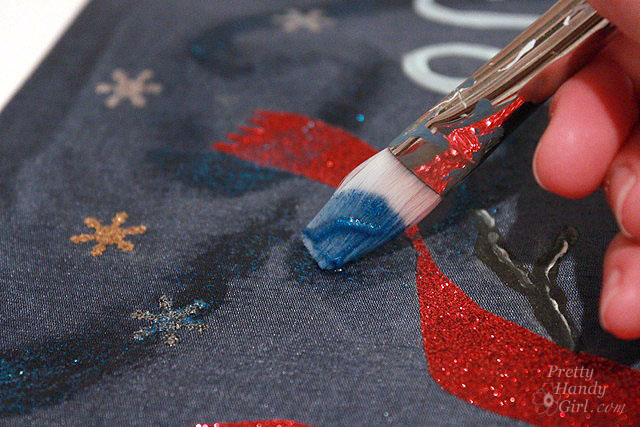
Now is the time to add the Tulip Fashion Glitter Shimmer Fabric Paint magical glitter dust! I call it that because it really looks magical and the gel slowly disappears as it dries and leaves the glitter trail behind. Tinkerbell would be proud. Brush on curves and curly-q’s. You can brush on top of the words and the snowman because it will dry transparent.

Look at that beautiful magic glitter dust!

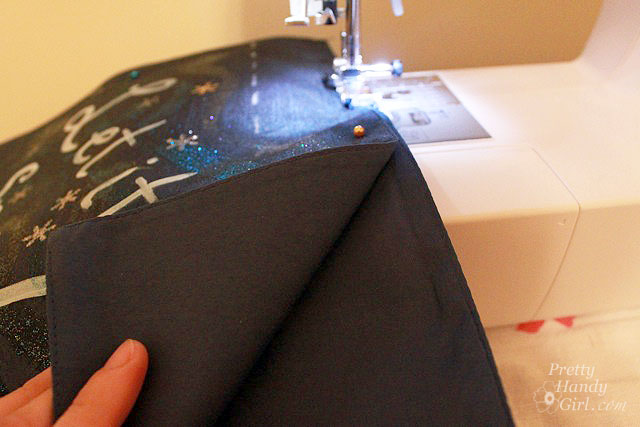
When the Tulip Fashion Glitter Shimmer Fabric Paint…ahem…I mean magical glitter dust has dried, pin your two placemats together rights sides facing out.

Stitch one line across the top. Stitch a second line across the marked pole pocket.

Leave the two sides of the pocket open and stitch down the sides and across the bottom (as shown.)

Thread the flag onto a standard sized decorative flag bracket.

And then challenge Mother Nature to “Bring it on!” (Be prepared, you might have to do a snow dance too. But that is a whole other tutorial!)

I have to tell you that the Tulip Fashion Glitter Shimmer products really surprised me. I truly loathe loose glitter, but these products really held the glitter in place. There might be a few pieces of glitter that are dislodged when you peel the transfer paper top sheet off, but honestly I didn’t notice and I never found any on me. I highly recommend these products. Especially if you have kids that love glitter!

You can find the Tulip product line at these retailers. Selections may vary per store.


Disclosure: This post has been sponsored by Tulip Products,  iLoveToCreate®, a Duncan Enterprises Company. I was sent some samples of the Tulip® Fashion Glitter™ Shimmer Transfer Sheets and Tulip® Fashion Glitter™ Shimmer Fabric Paint. I already owned the Tulip Soft Fabric paint. I was also paid a small fee in return for writing a post about my experience using the products. The ideas and opinions are strictly my own. I will never let any compensation (monetary or free product) keep me from giving you (the reader) a straight up and honest review.

When last we left our gal, Pretty Messy Girl was embarking on a journey into the bowels of her garage. There were crevices and corners that hadn’t seen a shop-vac in years. Dead spiders and centipedes lurked in their dark and dusty hideaways. Fearlessly, she dove head first into the task at hand and with her hero, the Bagster at her side, she overcame the clutter despite the odds!

How did she do it you ask? Well, come with me (if you dare) to see how she took a cluttered disaster of a garage and made it into a serene DIY work haven (okay, that might be stretching it a bit.)

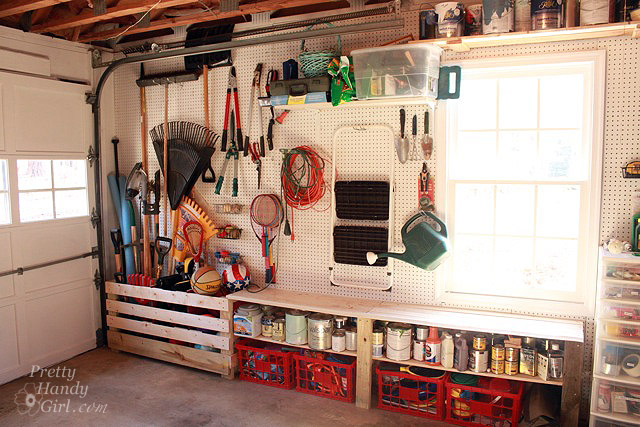
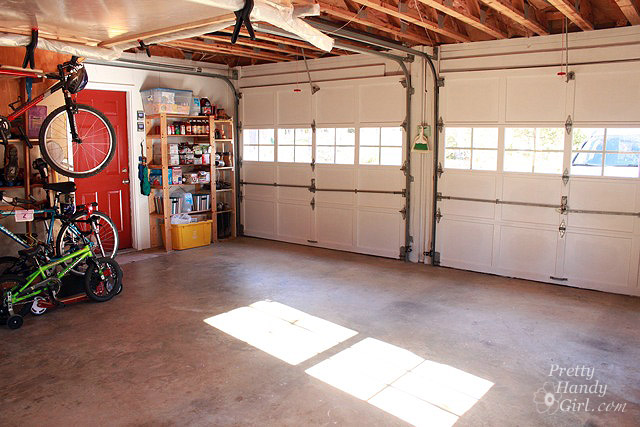
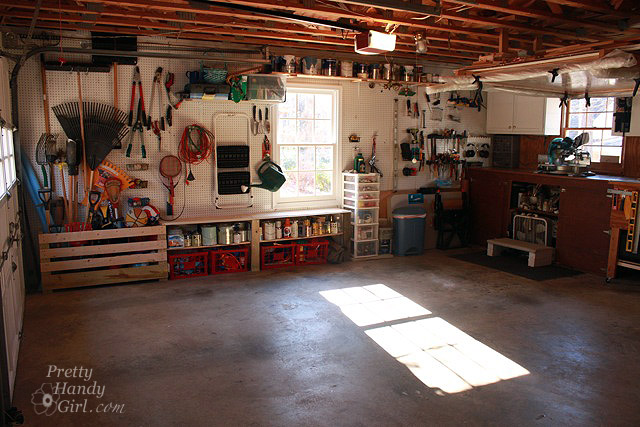
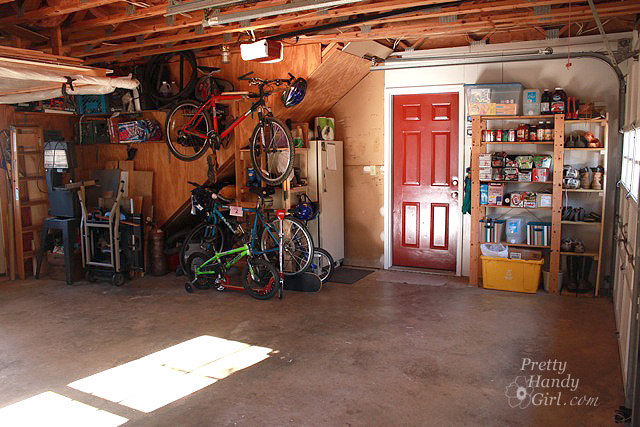
Here is how she shoe-horned lawn equipment, garden tools, four bikes, two scooters, safety gear, sports equipment, balls galore, games, swim and outdoor activities, beach things, shoes, food storage, paint, paint and more paint …(deep breath)…AND an entire power tool laden workshop into this small space.

First she cleared out the entire garage. What was left was a dusty, dirty, and dark cave. All the “crapola” was placed into the Bagster. A little comment from Pretty Messy Girl:

I must say that I really didn’t mind having Mr. Bagster hanging out next to our driveway for a few months. It weathered the rain and wind. And gladly accepted anything I put into it (with the exception of certain items that you can’t dispose of: paint, appliances, and a few other hazardous waste materials.) Now, if I had a big dumpster blocking the view and creating an eyesore for the neighbors, that would be a different story!

The bag was super easy to set up and it held the items inside. Occasionally a side would flop over, but if I put big and ridgid items inside the edges, the sides would stand up better.

A few trips were made to Goodwill and a few more trips into the attic (don’t ask what lurks up there. Gulp!) Once the garage was cleared, she gave it a good cleaning with the shop-vac.

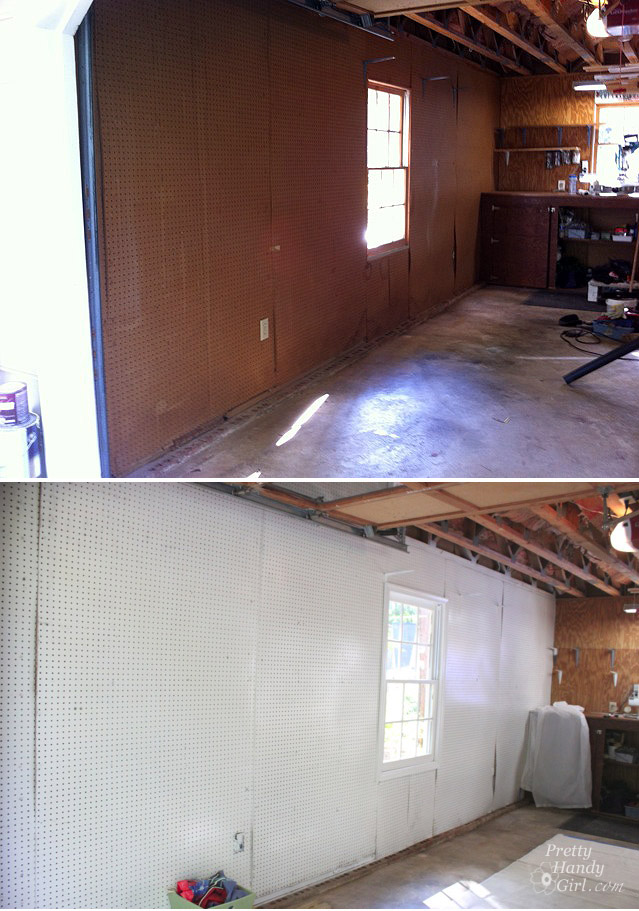
Then she decided that she MUST paint the walls of the garage. Pretty Handsome Guy thought she’d fallen off her workbench. I mean, why paint the inside of a garage? Well, let’s just say that you can thank her later. The results speak for themselves. The amount of light in the garage now makes it a lot easier to photograph tutorials.

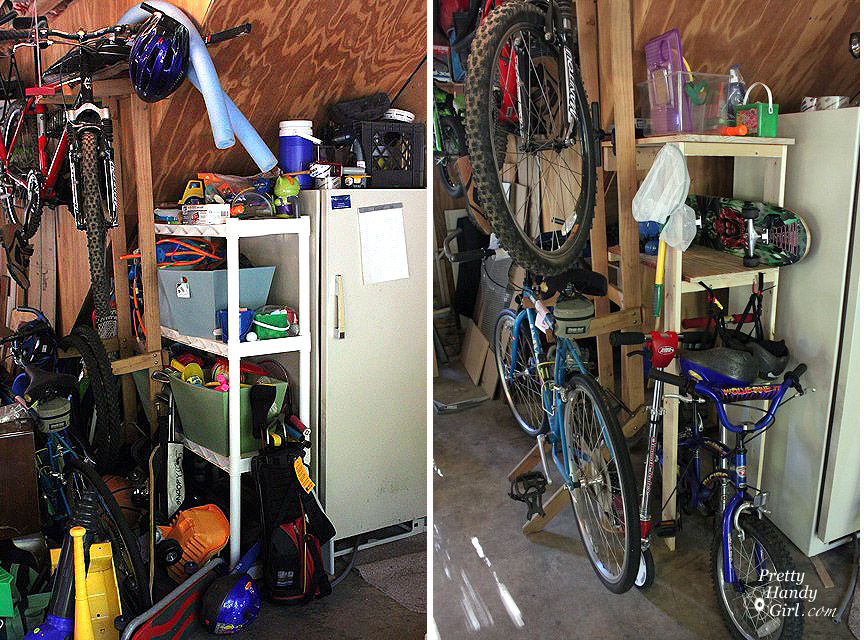
Next came the quest to squeeze a gallon worth of stuff into a quart sized container. Pretty Messy Girl uncovered several nooks and crannies that were not being utilized in the garage. And she built several custom shelving units to take advantage of the wasted space. One for the bikes and safety equipment:

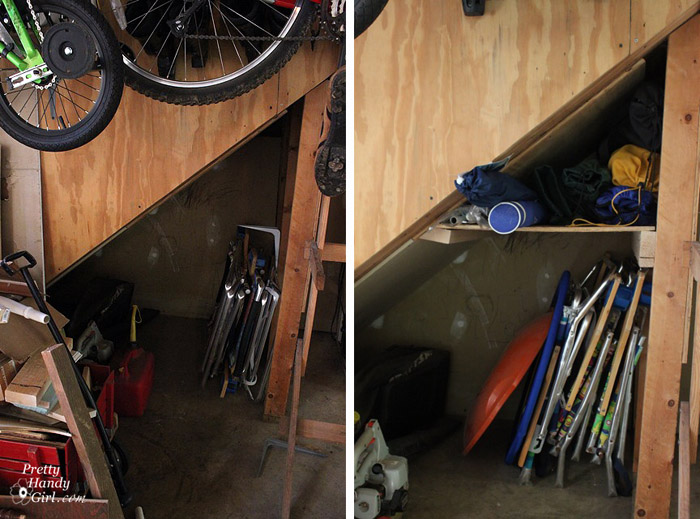
A shelf for the beach umbrellas and folding chairs (did you see that empty space above the beach chairs! That was a crime! Wasted space has no business in this garage.

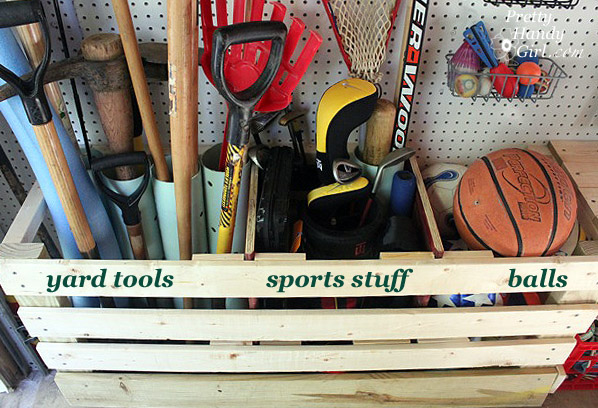
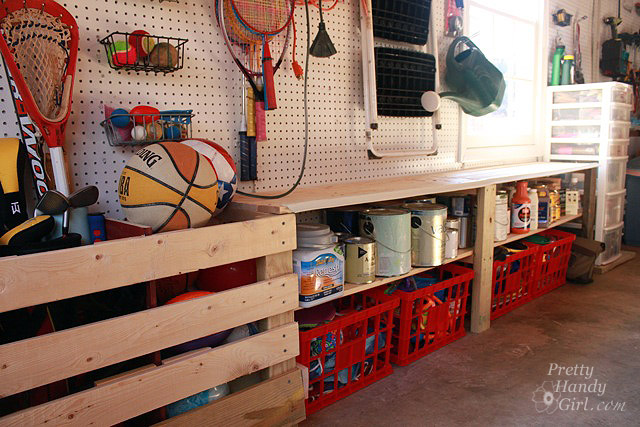
She also designed a yard-a-sport-o-ball collector. But, it is easier to just say the corral.

The corral was created to maximize storage for those items that are always grabbed for on a regular basis. The rakes and yard tools used to each have separate hooks on the peg board, but that took up a whole wall worth of space! Now, they take up a small 4′ x 2′ space.

To hold the tools upright, she bought the cheapest and widest piece of PVC pipe she could find. Then cut the drainage pipe into 4 equal lengths. After bolting them together at the top and bottom, screwed them to a 2″x4″ that was attached to the wall. Voila! Perfectly upright storage for yard tools!

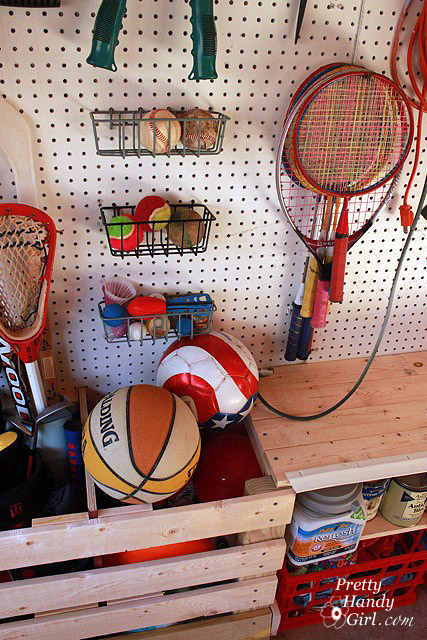
Two more compartments were created in the corral by nailing small scraps of 1×4″ boards and then cutting a piece of plywood to slide between the scraps and create a separate compartment for sports “sticks”. And another compartment for all the balls that come standard with two small boys! What is it with boys and their balls? (Wait, don’t answer that!) I don’t think I owned more than two balls as a child. (Now I’m getting myself into innuendo-trouble.)

Attached to the corral are two built in shelves specifically sized for all the paint. Yes, she has an ever growing paint collection! (An artist has to have options, ya know!) And plastic milk crates below store water toys and games.

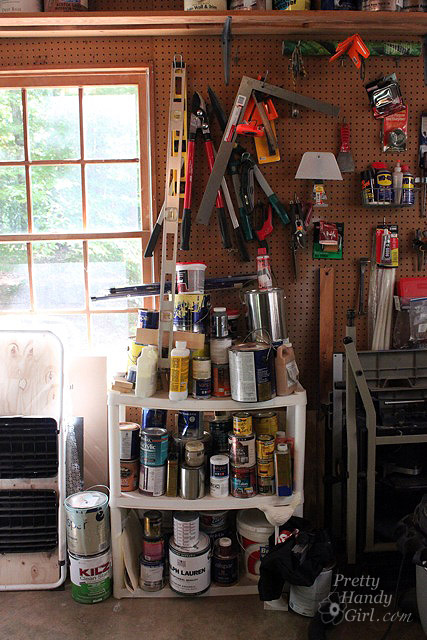
Do you remember the paint storage before? She’s extremely lucky no one called the Shelf Protective Services Division. That is just cruel and unusual punishment!

The plastic storage shelves have been sent out to pasture to retire in a life of ease (holding empty plant pots under the deck.)

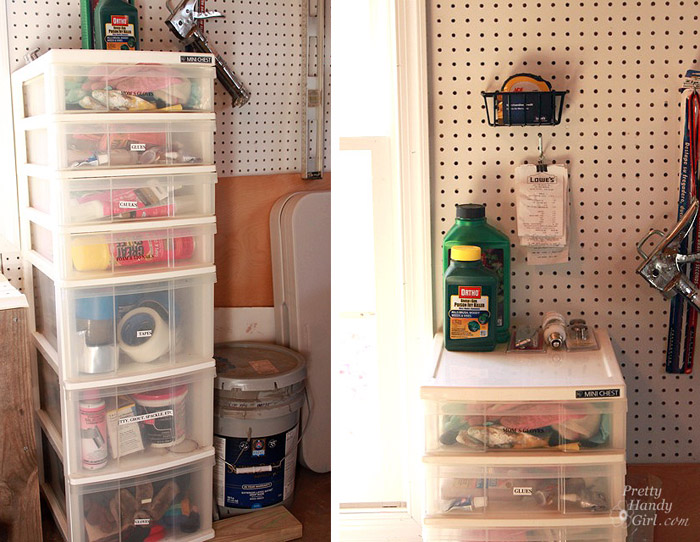
Where the paint used to be, she pulled  a plastic storage chest from the attic (Yes, there is an entire store to shop from up there.)

The plastic drawers are perfect for housing tape, caulk, glue, gloves, etc. And in a stroke of genius — not really, but why she didn’t think of this before, we’ll never know — she added a binder on a hook to hold all the home improvement receipts. AND this is also where all the items to be returned wait (for the one day that they will be reunited with their family on the store shelves.) When that day arrives, and months have past, she can store all the merchandise credit cards in the little wire shelf. (She does a little jump kick every time she raids that stash of pre-paid cards.)

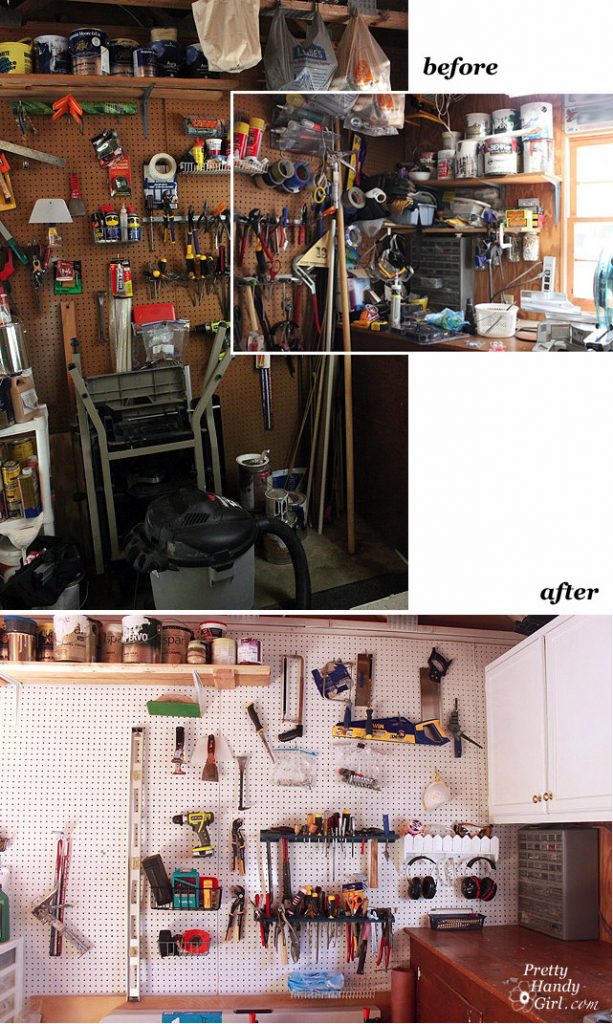
Moving right along, this was definitely the most disorganized section of the garage. The tool storage near the work bench. What a crying shame. What DIY woman could live with that? (Obviously Pretty Messy Girl, that’s who.) Well, it is a mess no more. With some new tool storage and some thought put into tool useage, she tamed the tool clutter.

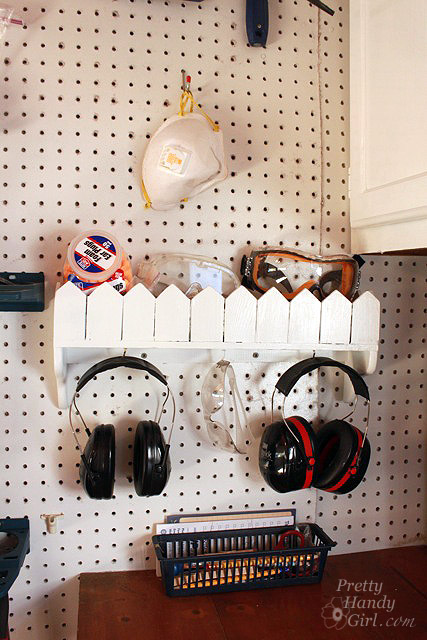
And a special spot was chosen for all the safety gear (to be a constant reminder of how important it is to wear them)! Right Meri-K?

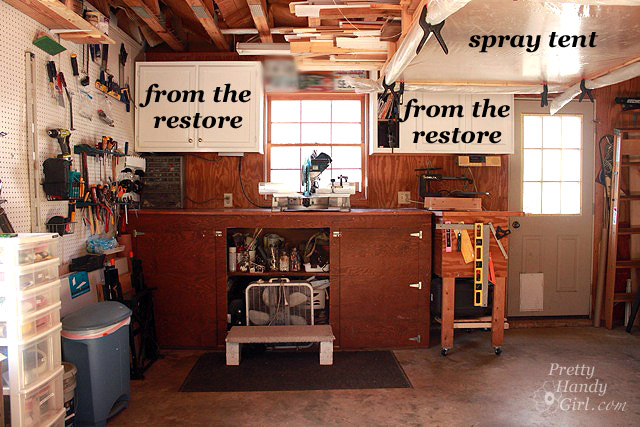
We come now to the dust protection area. With the miter saw being Pretty Messy Girl’s right hand man, this area had seen mountains of sawdust. Cans of paint, and anything that was on the open shelving always had a 1/4 – 1/2 inch of accumulation. But, not anymore! Two cabinets were purchased from the Habitat ReStore and hung on the wall. (The price was a real steal! $50 for both.) A fresh coat of paint gave them new life. Someday she hopes to paint the wall and workbench to match. Some day (a girl can dream can’t she?) In addition to sawdust, paint dust can become a real problem in her lair. One time she and a friend spray-painted some chairs and the entire garage and everything in it looked like a coal mine. A spray tent was added to the underside of some rafters. Plastic sheeting simply tacked up with 1×2″ boards and the sides are rolled up and secured in place with extra large clamps. (PVC pipes inside the plastic help make rolling up neat.)

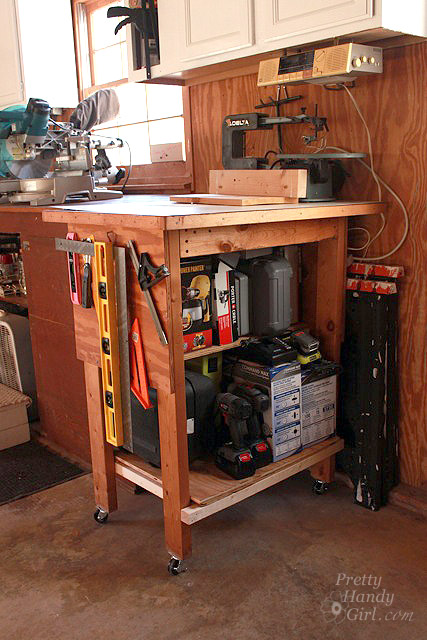
The rolling tool caddy is tucked away on the right side of the workbench. Moveable storage for all the power tools.

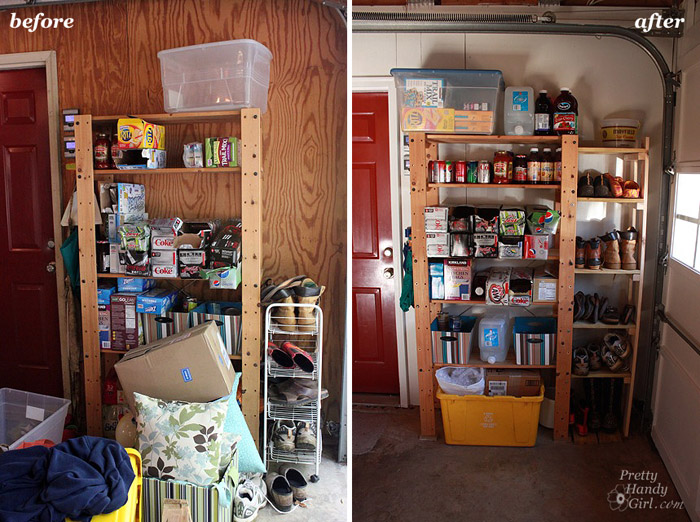
An annex was built onto some IKEA shelving for shoes and boots. (And excess food storage.)

And that brings us back to the beginning.

This is one useful garage once again.

And Pretty Messy Girl has now reclaimed her title of Pretty Handy Girl! Woot!

What do you think? Did you get any ideas for storage solutions? Is there anything that could work for your garage or workshop? If you need to clean out some serious “junk”, think about buying the Bagster. It is like a dumpster in a bag! For $29.95 you can purchase it at your local hardware or home improvement store. Pick up charges vary from about $79 – $159 depending on your location. It was really nice to be able to just toss the stuff inside and call a handsome young man to come haul it away!

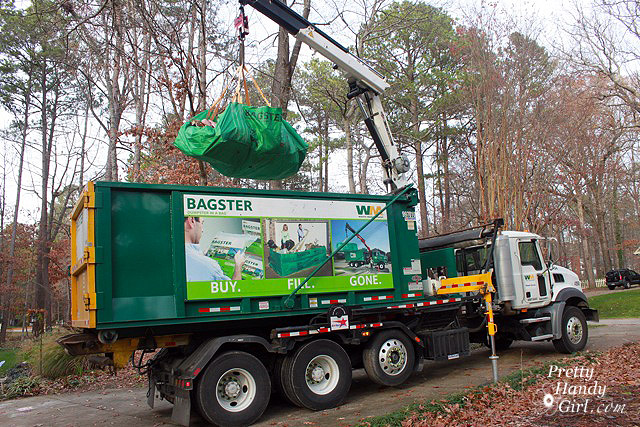
And the bonus comes when the truck arrives to provide entertainment for mom your children. Watching the crane arm pick up the Bagster is really really cool!

And now the moment y’all (well at least me) have been waiting for: a video of the Bagster Bag being lifted up and taken away by crane. Pretty Handy Girl says,

I am seriously such a geek, I was über excited to watch this. I even told Waste Management to have the driver call my cell phone so I could be there to watch. My 5 year old son had to hold my hand and keep me from jumping up and down. Eeeeeekkkk!

I almost forgot the best part: There is now room for Pretty Messy Mobile! I don’t think there is any hope for the car. Any mom knows that there is no such thing as a clean car when you have kids. Old cheerios and raisins have a final resting place in between the seats of this carpool vehicle.


The End!

Here is a little more information about our superhero, The Bagster:

While households look for ways to save money, more homeowners are tackling projects themselves from bathroom remodels to flooring projects to spring cleaning. The Bagster® bag is an innovative, convenient and affordable solution for smaller home improvement projects.

The Bagster® bag is a highly durable, woven bag designed for disposing as much as 3,300 pounds of debris and is big enough to hold full sheets of plywood, doors and even a bathtub.

The Bagster® bag is a convenient choice for any home improvement project.

  • – Often times construction debris can’t be picked up from the curbside, so consumer now have a great solution when a dumpster is too large for the project.
  • – The Bagster® bag is ready when you are – great for last-minute projects or ones that need an extended period of time to complete.
  • – Consumers can use the bag for as long as they like, then schedule a collection when the bag is full or their project is finished. The bag and collection service are always ready, putting consumers in control of their projects.
  • – Collection can be scheduled online at www.thebagster.com or by calling 1-877-789-2247, and Waste Management will collect the bag within three business days.

The Bagster® bag is an affordable solution for homeowners and a great way to save money on do-it-yourself projects.

  • – Bagster® bags cost just $29.95 and the flat rate collection fee ranges from $79 to $159 per bag, depending on your area – 50 to 70 percent less than a dumpster rental.

Waste Management has made the Bagster® bag a simple solution for waste and debris removal.

  • – Consumers can purchase the lightweight bag at more than 2,000 locations across the country, use it for as long as they like, then schedule a collection online or over the phone whenever they are ready.
  • – The Bagster® bag is sold at local home improvement and hardware stores, including participating The Home Depot, Lowe’s, Ace Hardware and True Value. To find a local retailer near you, visit www.thebagster.com.

* For more information, visit www.thebagster.com.


Disclosure: Waste Management partnered with bloggers such as myself to participate in its The Bagster® Bag Blogger Challenge. As part of the program, I received compensation. They did not tell me what to purchase or what to say about the products used for the The Bagster® Bag Blogger Challenge. Waste Management believes that consumers and bloggers are free to form their own opinions and share them in their own words. Waste Management’s policies align with WOMMA Ethics Code, FTC guidelines and social media engagement recommendations. You should know by now, that I will never write about a product that I didn’t like.


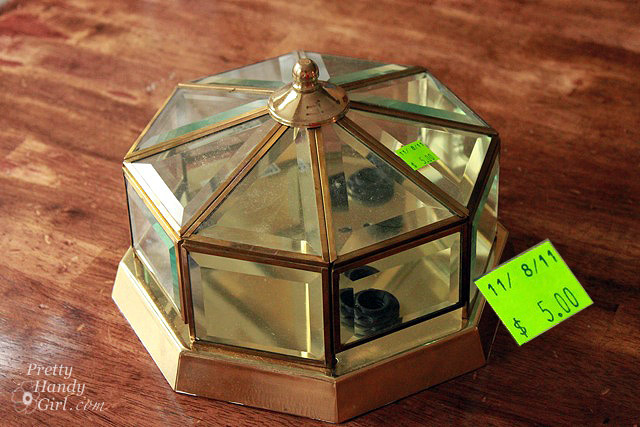
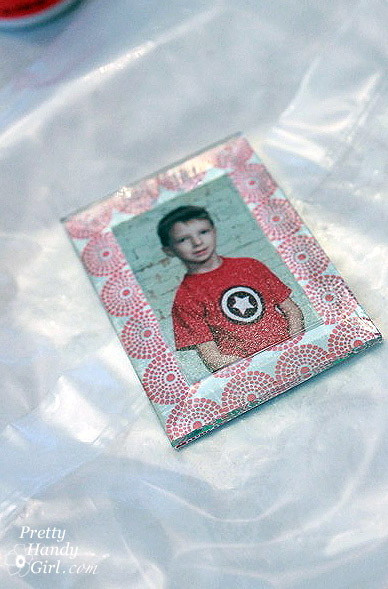
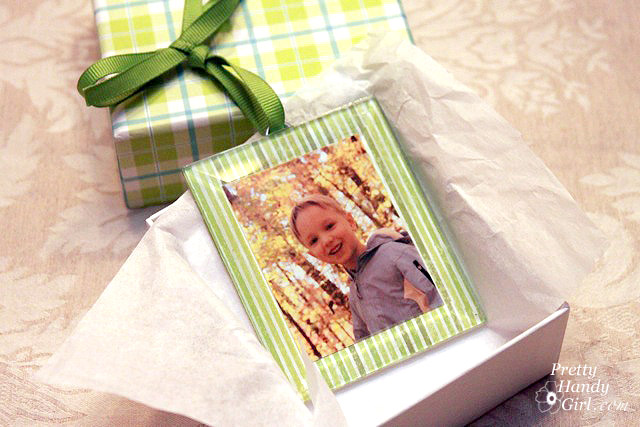
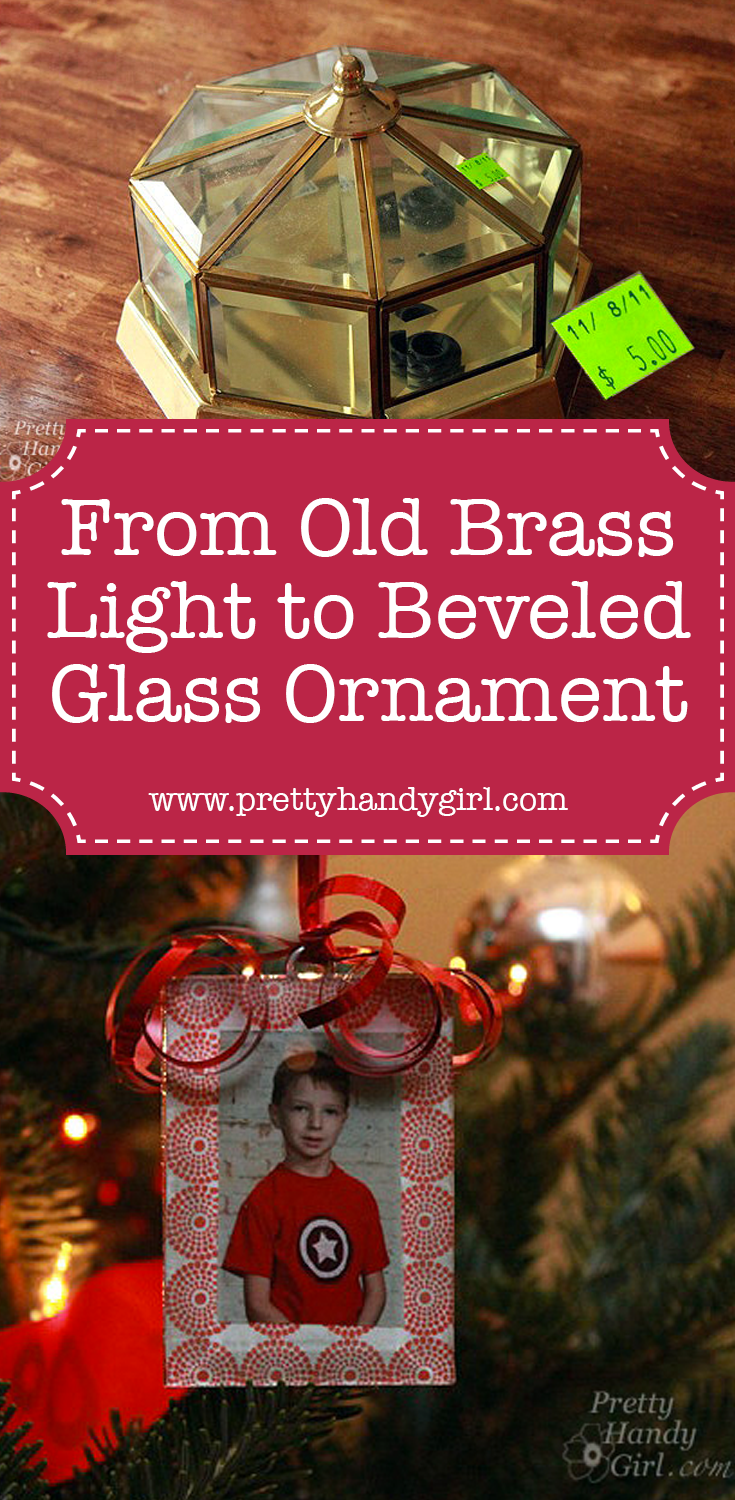
I had so much fun at the Habitat ReStore talk this past weekend. My favorite holiday decorations were these adorable beveled glass ornaments. Would you believe me if I told you that they began life as a dated octagon brass light fixture?

Well, they did! And here is the best part, for $5 you can score one of these fixtures at your local Habitat ReStore and make 16 ornaments from the one light!

Materials:

  • Beveled glass octagonal light fixture (the flimsier the brass the better)
  • Needle-nosed pliers
  • Wire cutters
  • Small flat head screwdriver
  • Gloves
  • Glass cleaner
  • Soft cloth
  • Scrapbook paper
  • Printed photos
  • Mod podge
  • Paint brush
  • Screw eyes
  • E-6000
  • Wax paper to protect work surface
  • Ribbon
  • Scissors


Instructions:

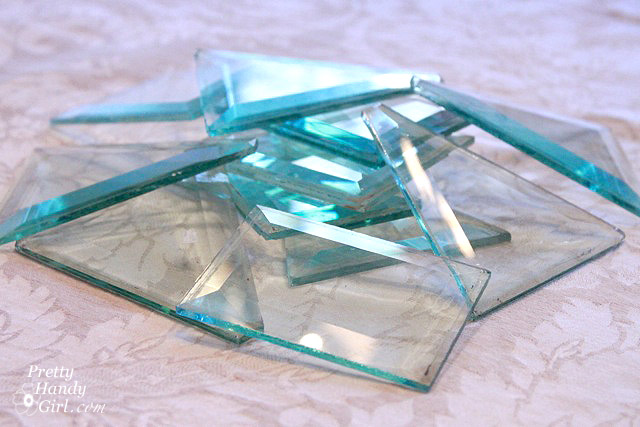
Put on your gloves for this first task! To free the beveled glass, you’ll need to poke, prod and cut at the brass surrounding the glass. Inserting a flat screwdriver will help to pry up the edges. As the edges come loose, cut into the metal with wire cutters, and pull it apart using needle-nosed pliers. All the while, use caution so as not to break the glass pieces.

After all the glass is free, clean both sides of the glass with windex and a soft cloth. Scratch off any dirt with your fingernail (or a razor blade).

Cut photos to fit inside the middle of the beveled glass piece.

Trace around the glass and cut a piece of scrapbook paper the same size as the glass.

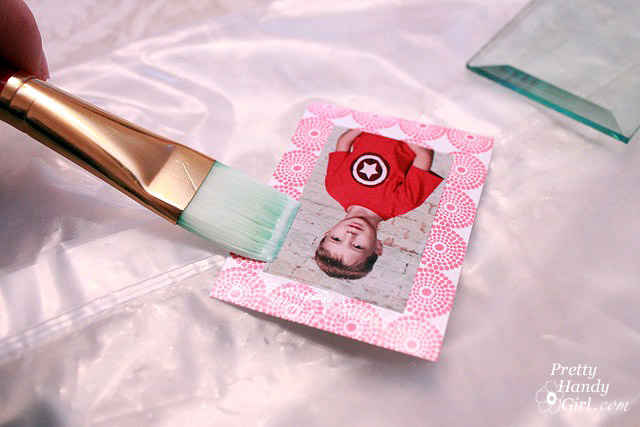
Coat the back of the photo with mod podge and center it on the scrapbook paper.

Gently coat the front of the scrapbook paper border with mod podge (do not paint mod podge onto the photo or streaking can occur.)

Press the flat side of the beveled glass on top of the scrapbook paper/photo.

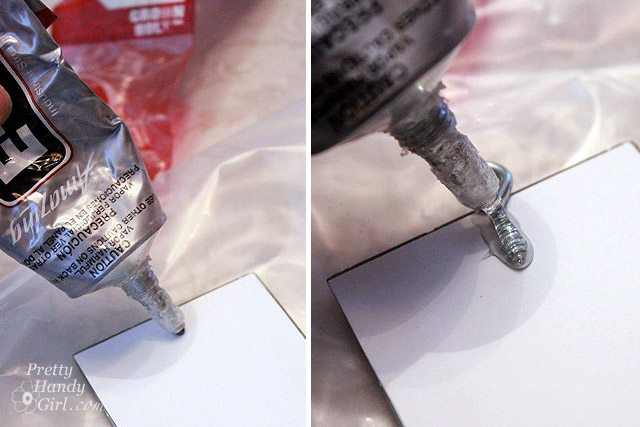
Flip the glass over and put a dollop of E-6000 at the top center of the scrapbook paper. Lay one screw eye into the glue, then cover the screw with a small dollop of E-6000 glue to secure the screw eye.

After the mod podge and E-6000 has dried, cut some pieces of ribbon and thread them through the screw eye. Make a loop with the ribbon and hang it on your tree!

Or give them as gifts to the Grandparents!

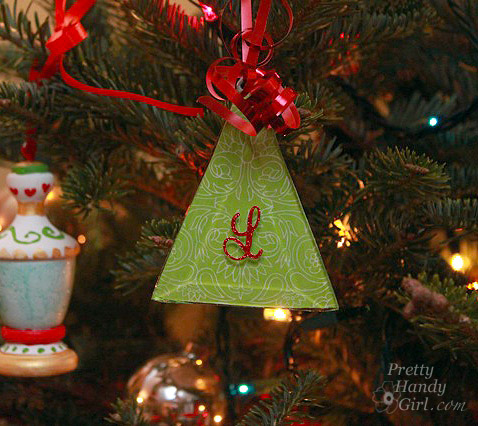
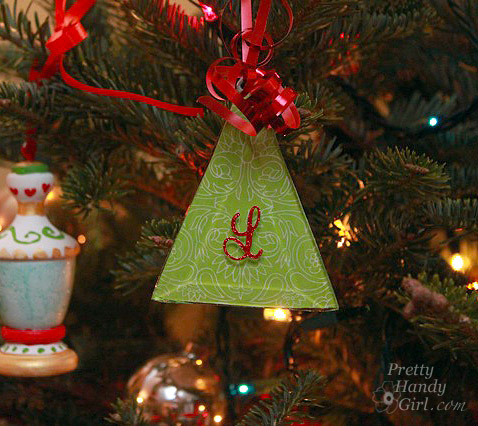
I made another ornament using scrapbook paper and stuck a monogram letter sticker on top of the glass. I also added a small quote on another ornament. The possibilities for this project are numerous!

I had to share with you a few other transformations that I showcased during the talk at the Habitat ReStore:

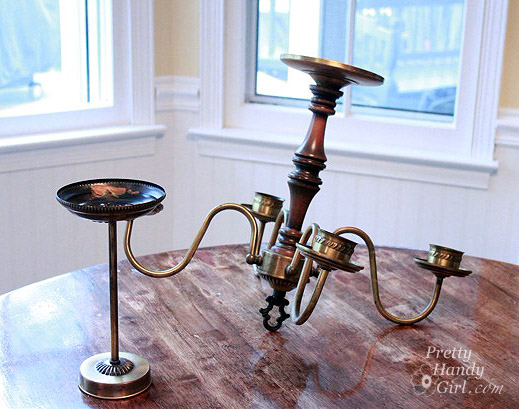
I took an old chandelier and flipped her over, coated her with primer, heirloom white spray paint and then added some distressing and finished with some antique gold Rub n’ Buff.

Now she’s a beautiful candelabra for our dining room table!

I used the canopy (round flat disk that attaches to the ceiling) as the base for the candelabra. When you take apart a light fixture, you can get creative by flipping and switching around parts and pieces.

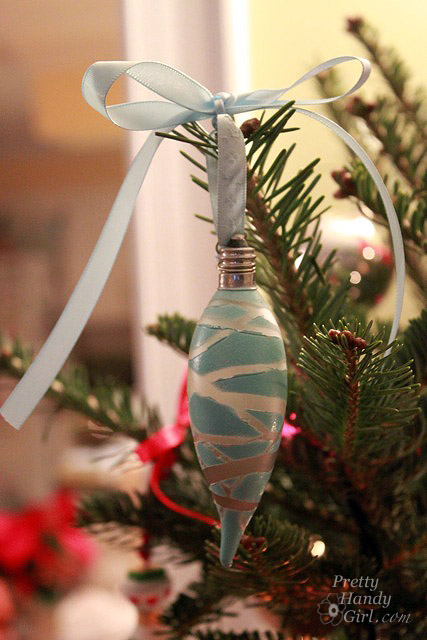
Old lightbulbs became adorable little ornaments with a few stickers and a coat of spray paint. My favorite is this clear bulb that I added a heart sticker to. When I peeled off the sticker a little heart shaped window remained. Peek inside to see the filament.

If you’ve ever wrapped an easter egg with rubber bands before dying it, you’ll recognize this pattern.

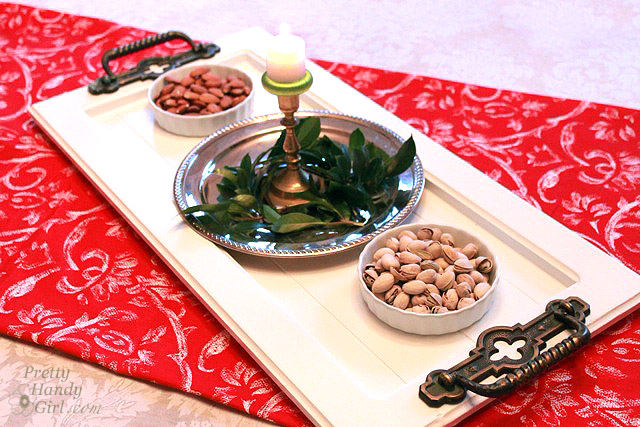
A $2 cabinet door and some chunky cabinet handles partnered to form a holiday serving tray. The handles also got a little Rub ‘n Buff for shine.

I’m sorry I don’t have the tutorials for you right now. Most likely at a later date, I’ll post them for y’all.
I have two announcements:

#1 – The winner of the RIT dye giveaway is: Judi! She said,  “Dye WOOD –really !!!! Can’t wait to see what all else you (and I) can dye !! Loving it !!”

RIT Dye

#2 – My son let me paint his cast like a candy cane! I used KILZ Clean Start (zero VOC) primer and a flat brush to give his cast the stripes. One of my facebook fans had the genius idea of asking Santa to sign it!


Let’s just hope that he can keep this cast for more than a week!


Linking up to Home Stories A2Z Tutorials & Tips TuesdaysCentational Girl’s Holiday Home Craft Link PartyNot Just a Housewife’s Show Me What Ya GotFunky Junk Interiors SNS


Pin for later!


Today is Friday! And you know what that means…it’s time for another Tool Tutorial Friday! Today I’ll be introducing you to the circular saw.


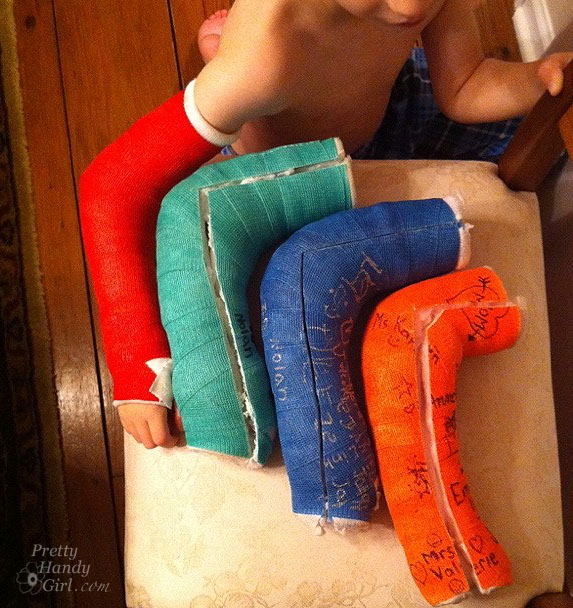
But first, how are you? I don’t know about your week, but I’ve had a busy one. If you follow me on Twitter (I’m not sure why anyone would), you would have been privy to the rainbow of color casts my son has been collecting. He received his 4th cast yesterday. But, who’s counting, right?! Anyway, I learned two things about casts in the process.

  1. Little boy arms will swell to adult proportions post surgery, but will eventually return to normal size…eventually. At that point, a new cast is desired to keep the arm from finding a way to wiggle out.
  2. If you put two brothers in the bathtub and leave the room for one nano-second they will find a way to water log a tightly plastic bagged and saran-wrapped cast that is merely 5 days old!

Mr. Green up there, he only lasted a mere 5 days! You could probably tell by the one signature on it. My mom is trying to convince us to paint white stripes around his current red cast to make it into a candy cane. Hee, hee.

And now let’s plug in some power and start this tutorial!

A circular saw is essentially a portable power saw that can make easy cross cuts like a miter saw. But, it can also rip long boards like a table saw. This little hand held bad boy is a necessity if you are working on an exterior project like a deck or a fence, or anything that is too big to put on the miter saw or table saw work surface. Trimming the varied lengths off newly laid deck boards would be near impossible without a circular saw.

Before I owned either a table or miter saw, this was my power saw. And this baby has cut a lot of wood in its life.

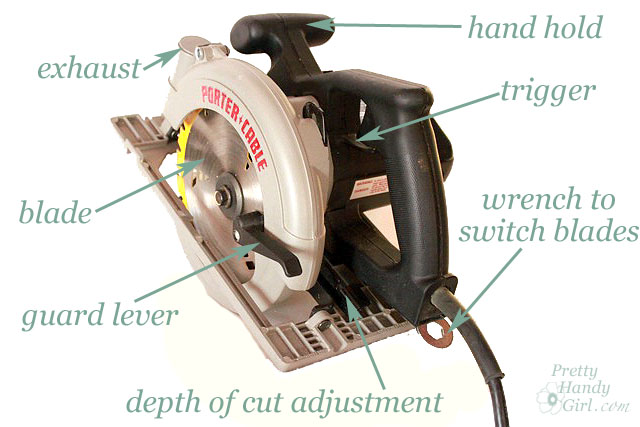
If you are familiar with circular saws, this particular model may look a little bit backwards to you. That is because this is a left-sighted circular saw. I think Porter Cable is one of the few companies (if not the only one) to make one. I am right handed, but for some reason, this saw seemed more comfortable to me. When I was shopping for my circular saw, I spent about an hour or so picking up, holding and imagining using the saw. What I liked about the Porter-Cable is that it had a smaller grip and I was able to span my hand width between the hand hole and the guard lever while cutting.

If you go shopping for a circular saw, spend some time holding them and see what feels most comfortable to you.

Circular saws range in price from as low as $30 up to $300 or more. They come in a variety of  sizes (5 3/4″ – 9″) which refers to the blade size. The most common size people buy is a 7 1/4″.

Before you make any cuts with a circular saw, you must set your depth of cut. If cutting through a board, set the blade about 1/8″ – 1/4″ lower than your lumber. Support your lumber on saw horses or a raised surface (4″ x 4″ posts on the ground work well.) It is imperative that you think through your cut before you actually saw a board. Make sure that your waste end will fall away from the saw after it is cut. Otherwise, the blade will get pinched between the boards and can kickback (see the example in the video.)

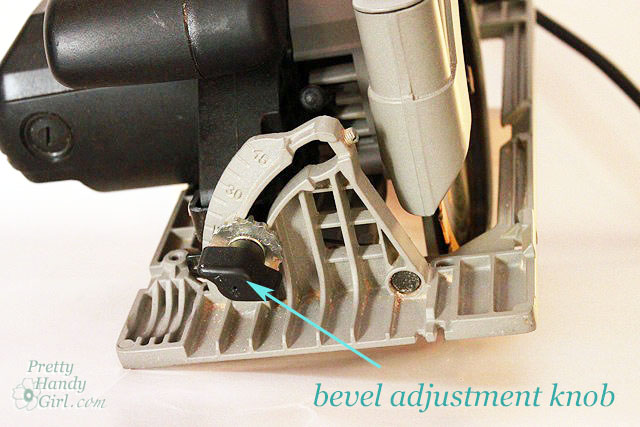
You can also change the bevel angle of your cut by adjusting the base of the saw after loosening the bevel adjustment knob.

As with any other power tool. Take the time to familiarize yourself with your power tool. Read the manual and only use a power tool when you are alert and not distracted.

DISCLAIMER

The viewer assumes all responsibility and liability associated with the hazards of woodworking. Pretty Handy Girl is not responsible for any errors or omissions that may be present in this tutorial. She also assumes no liability for any action or inaction of a viewer.

Please use extreme caution when using power tools. Read your tool manual thoroughly and wear protective safety gear. Take your time familiarizing yourself with a tool before using it. (If you are missing the manual, you can easily find it online by going to the manufacturer’s website or google your saw’s make and model + manual.)

Please recognize that I have tried to put together a basic circular saw usage tutorial to get you started. I have tried my best to show the safest way to use a circular saw. That being said, I am not a professional (I only play one on this blog ;-) .)


The holidays are at full throttle speed and my boys couldn’t be more excited. Myself? I still haven’t decorated the house — in fact — truth be told I let Pretty Handsome Guy and the boys bring in the tree and decorate it. But, I did want to get into the holiday spirit so I poured a little eggnog into my coffee (Dee-lish-ious!!!) and sat down to make a humorous holiday shirt for my eager little ones.

If you’ve ever used silk screens before you know how wonderful they are for making duplicates. Team t-shirts, family reunion shirts, signs, banners, gift bags, pillows and linens are only a few things that you could silk screen. But, getting fine details and creating a screen that has text on it was usually reserved for the professionals who had the proper equipment. Well, those days are gone! Plaid has developed a DIY silk screen kit that allows you to create a screen using any black and white design printed on your home computer using regular printer paper. No transparencies and no need to reverse your image! Plus, for those of us eco-conscious crafters, the simply screen inks are acrylic and non-toxic! The  Simply Screen kit retails for $39.99 and you can purchase the refill screen pack for $19.99. The kit can be found at Hobby Lobby or online at shop.plaidonline.com.

Plaid was kind enough to send me a kit to try. And thankfully, several bloggers (especially Crafts by Amanda and Mrs.Greene), worked out the kinks and shared their knowledge. Gotta love that creative blogger network ;-).

This video will give you all the tips and tricks you need to know to get a perfect screen exposure when creating a Simply Screen silk screen:

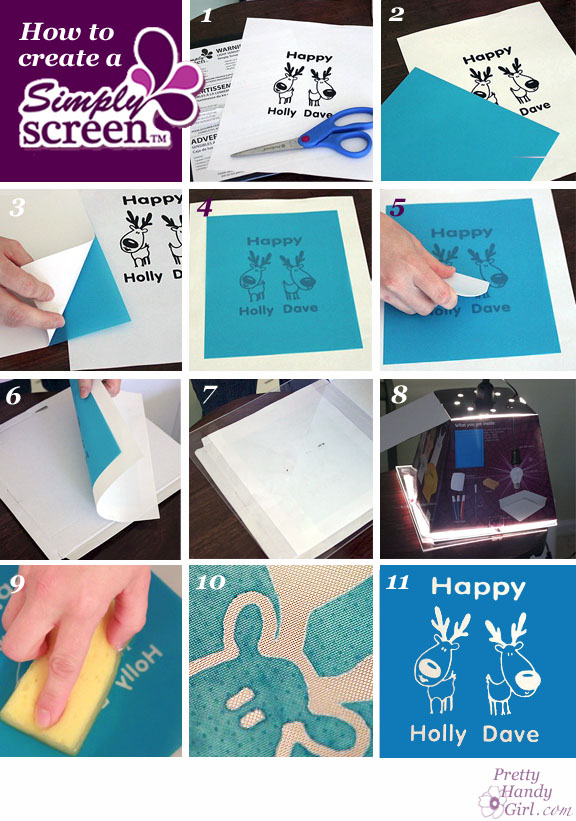
If you have trouble viewing the video, here are the steps to create the screen:

1. Print out your black and white design on regular printer/copier paper. Touch up any white spots with a sharpie marker.
2. Remove one screen from the black plastic envelope. Cut the screen down to size (leave at least 2″ on all sides of the design.) Put the unused screen back into the black plastic bag.
3. Peel the backing off the screen.
4. Flip it over and lay the sticky side onto your image.
5. Use the squeegee to firmly press down on the screen and to affix it to the design.
6. Turn the image and screen over so the screen is on the bottom. Lay it onto the bottom of the Simply Screen box.
7. Lay a piece of plexiglass or glass on top of the screen and printout.
8. Close the lid, turn on the light, and set your timer for approximately 25 minutes.
9. Turn off the light, remove the screen and immerse it in tepid water for 30 seconds. Gently rub the design with a sponge.
10. Continue rubbing both sides of the design until there is no blue emulsion in the graphic areas. The graphic should be a clean see-through image.
11. Dry your screen and follow the directions below to make your screen prints.


Printing Using your Silk Screen:

Now that you have learned how to create the screen, printing with it couldn’t be easier! This is truly the fun part.

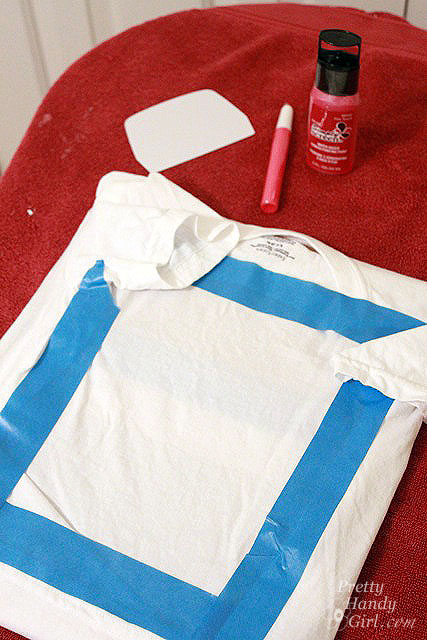
Start by taping your fabric to a piece of cardboard or foam board. If you are printing shirts, pillow cases, or anything that is double thickness, put the cardboard directly behind the layer you are printing on to protect from any ink bleeding through.

Position the screen where you would like the image to appear.

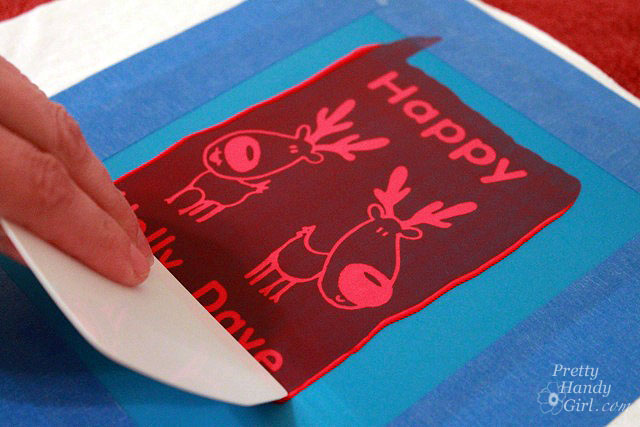
Tape the screen down with masking or painter’s tape.

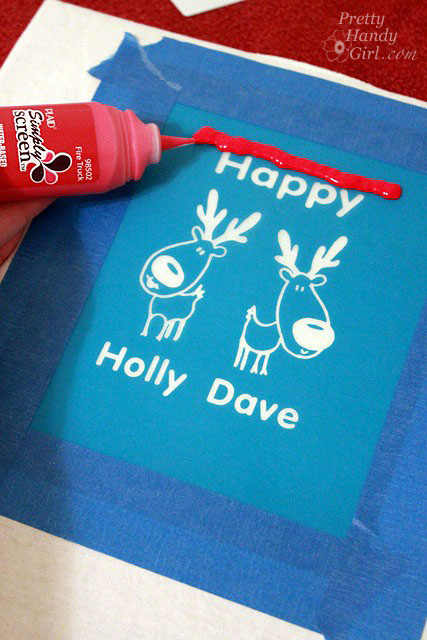
Run a thick line of Simply Screen silk screen ink at the top of your image.

Hold the squeegee at a 45° angle against the screen.

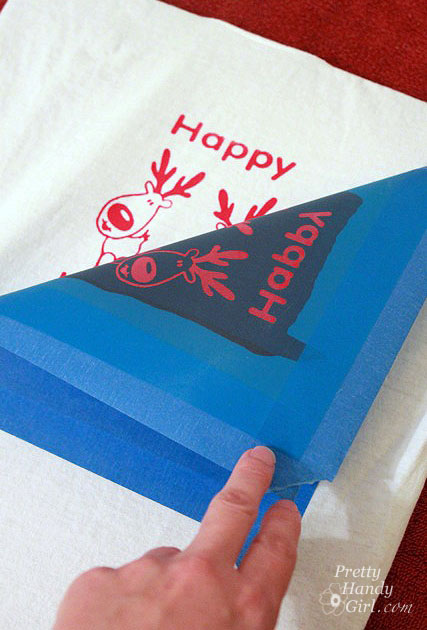
Press down firmly and pull the squeegee towards you. Focus on pressing the ink through the screen and scraping it off the screen at the same time.

Immediately remove your screen being careful not to get any ink on anything when you lift. Lay it down on the next item  you want to silk screen. (It is a good idea to clean the screen after every third impression, as the ink starts to stick around the edges and the image quality will decline.)

Let the ink dry.

Heat set the image with a hot iron. Wash on cold and air dry to protect your image.

I think this is the perfect kit for making holiday gifts! I’m on a big sew your own gift bag kick and I think I’ll make some more bags and screen print a graphic on it for gifts.

If you like my “Happy Holly Dave” design, feel free to download the printable pdf file and use it for your own personal use.

Or you could also download an earlier incarnation of the design with three reindeer!

Hope you all have a Happy Holly Dave! LOL!


Disclosure: This post has been sponsored by Plaid Simply Screen. I was sent a Simply Screen Kit and paid a small fee in return for writing a post about my experience using their product. The ideas and opinions are strictly my own. I will never let any compensation (monetary or free product) keep me from giving you (the reader) a straight up and honest review.