15 of my Favorite Painting Tips, Tools and Paint
I have painted almost every room in our home now. Make that almost every room in two homes! You could say that over the years I’ve learned a few tricks of the trade and have acquired quite a few painting tools. But, only a handful are my tried and true gear that get pulled out for every painting job.
(I’ve included affiliate links for your convenience. I earn a small percentage from a purchase using these links. There is no additional cost to you. You can read more about affiliate links here.)
Here they are:
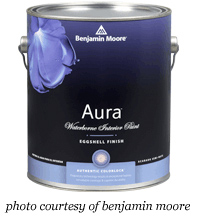
I have to tell you that I’m a bit of a paint snob. When we bought out first house, I got to know our local paint guy because I practically lived at the paint store. He pulled me aside one day and told me that Benjamin Moore Aura was his favorite paint. Since that day, I’ve been a big fan. The price is definitely higher than most, but for the time savings and finished product, it is worth it! I have been able to paint two rooms with only one coat, and let me tell you we never scrimp on coats. Normally we paint two coats regardless, but our dining room and living room honestly didn’t need the second coat because the before color wasn’t too different and there were no spots showing! This year I’ve tried several other brands, but I keep coming back to good ole Benjamin. The Aura paint has really great coverage and a very even finish. Plus, the durability and scrubability (is that a word?) for removing smudges and gook from the walls is unsurpassed. In all fairness, I know several other DIY bloggers that swear by Sherwin Williams — I just haven’t tried it yet.
2. Benjamin Moore Satin Impervo (water-based):

If you have little boys you know how rough they can be on doors, doorways, and all the trim in your house. Our baseboards alone have stood up to many matchbox demolition derbies. When I choose a paint for our trim, I know it has to have superhuman properties. Luckily I’ve found the Impervo paint by Benjamin Moore is up to the challenge and stands up to a lot of abuse.
3. ScotchBlue Tape:

Painter’s tape is a necessity for clean lines AND for securing drop cloths to the floor right up to the baseboard. I’ve been using ScotchBlue for years and I can tell you that the painter’s tape you used 5 years ago has changed. I know 3M is working on improving for better seal with less stick! We always have a supply of ScotchBlue in my tape drawer and we definitely go through it!
4. Pro Masker 2000:
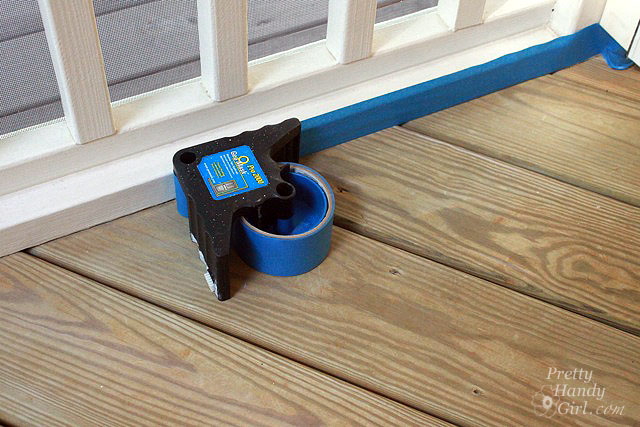
I used to be a taper and taped off every room we painted. (Now, I’ve gotten much better at cutting in with just a brush.) In a desperate attempt to save time, I bought this paint tape dispenser and was thrilled to shave some time off my taping tasks. You can watch a brief video here. I still tape off some edges when I know it will take me more time to be meticulous than to tape off some trim.
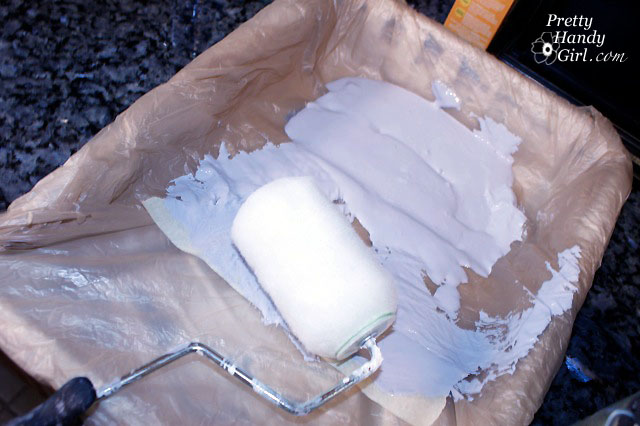
5. Metal Paint Tray with Hooking Legs (and Plastic Bags):
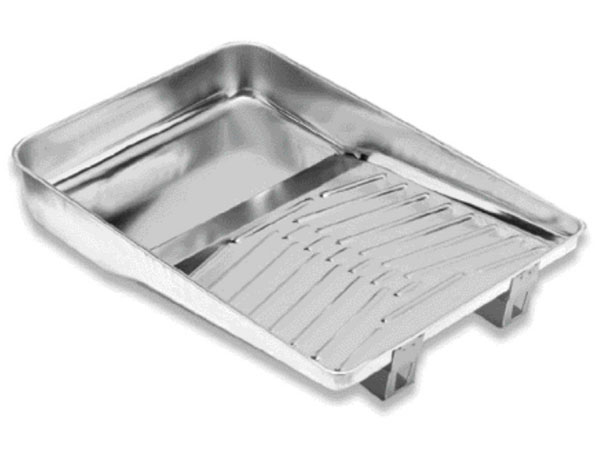 I have a no-frills metal paint tray. It has legs that can hook onto a ladder, which comes in handy when painting high on a ladder. This paint tray is the first and last tray I’ll ever need because I like to line it with plastic grocery bags for easy clean up and for protecting the tray from a multitude of layers of paint (did I mention how many rooms I’ve painted in our home?)
6. Paint Mixing Drill Attachment:

Okay, I know you already know how much I love my cordless drill. Which is why you’ll understand why I jumped at buying this paint stirrer drill attachment just to have an excuse to pull out my drill for another project! Honestly, unless you like the slow process of thoroughly mixing old paint or blending colors, you’ll want one of these for your own!

Having a small pail to hold paint for painting trim while balancing on a ladder just makes sense (unless you like step aerobic.) This handheld paint pail has a magnet inside that will hold your paint brush from being completely submersed. I haven’t tried this upgraded version myself, but that seems like a great addition.
8. Rolling Edger:
I’ve tried so many edging gadgets that I could build a wing on my garage just for paint gadgets. I always come back to this basic edger. It is a simple tool that does a great job with a clean edge on inner corners…
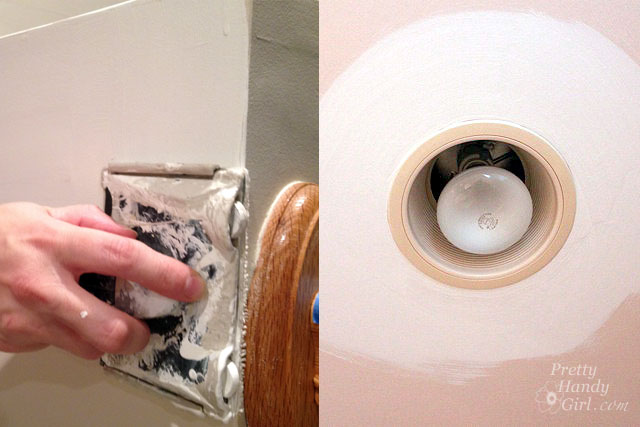
…outer corners and around objects. The bristled pad is removable for easy cleaning. We’ve never had to replace ours because I don’t let the paint dry in it. When buying a basic edger, there is one option that you really should consider: a hole to accept an extension pole.
9. Extension Pole:
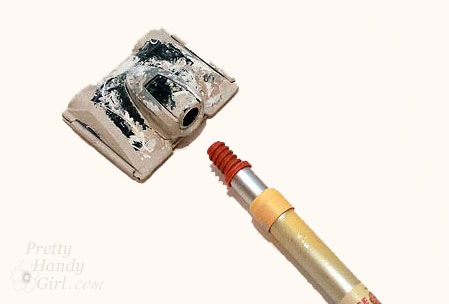 An extension pole is a necessity for high walls and ceilings in general. The extension pole can screw into any paint roller base and edgers that have a hole for the extension pole. Buy one today, your neck will thank you but your chiropractor will miss you.
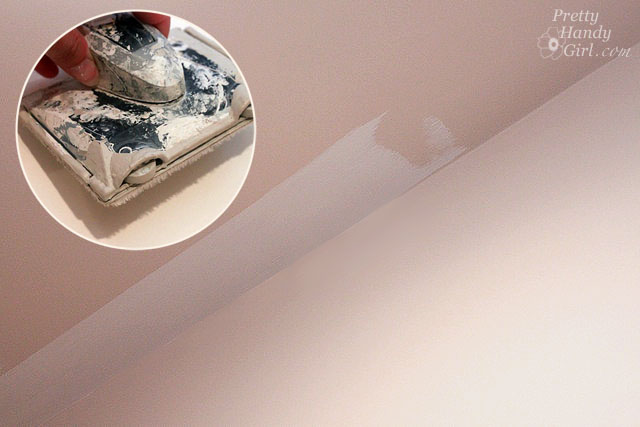
10. Drywall Tape Knife:
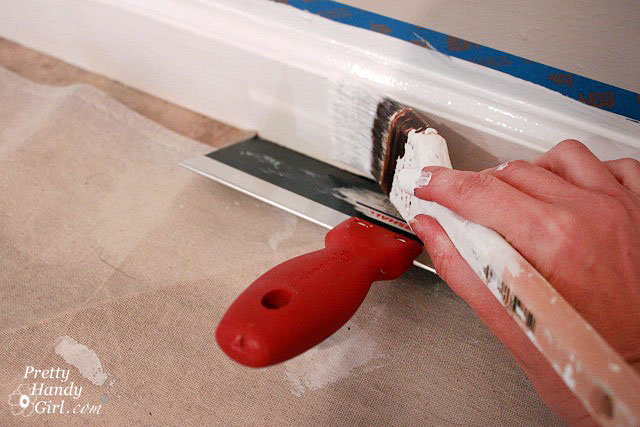
Painting trim is the final step in painting a room. At this point you see the light at the end of the tunnel and are ready to finish already. I recently gave up taping off the carpet and flooring and use a drywall taping knife as a painting guard instead. It was quick and easy to use. Simply push it under the baseboard, paint and wipe off the blade once in a while.
11: Two Step Stool with Tall Handle:

Unless you are 6’4″, like my brother, you’ll likely need a step stool for painting crown molding and the top of the wall. I have a Cosco brand that has a long handle for grasping at that moment that you realize you leaned too far to one side. (Not that that ever happened to me. No Way!)
12. Lined Drop Cloth:

Have you ever dripped paint? No? Liar!! Have you ever stepped in and tipped over an entire gallon of paint? Ummm, yes, I did do that once. Several years ago we bought a double-sided drop cloth set from Costco. I’ve been thrilled with the security of knowing that I can dip my shoe in paint at any given moment and my floors will be safe. One side is canvas and the back is coated with vinyl. This is the closest match I could find. A double-sided drop cloth may cost a little more, but they are re-useable and never need to be thrown away. 😉 Happy Earth Face!
13. Rustoleum Spray Paint Handle:
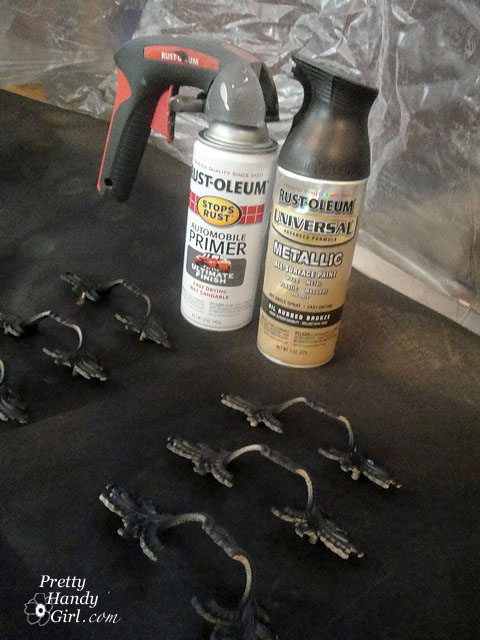
Ever have trigger finger? No, not the itchy kind. The kind that cramps up after spray painting a fleet of furniture. That’s the same moment you realize you forgot to wear gloves. Only now it looks like you are wearing a black glove — but you’re not — it’s paint. The Rust-oleum Spray Handle is the best thing since spray paint! It fits on almost all spray paint cans except the ones with the built-in-trigger top like show on the right above.
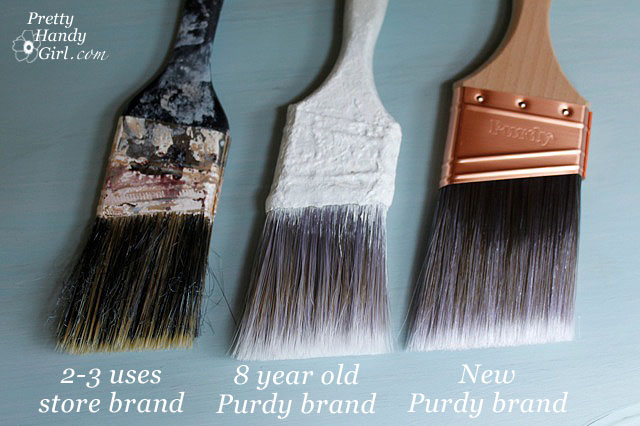
14. Purdy Brushes:
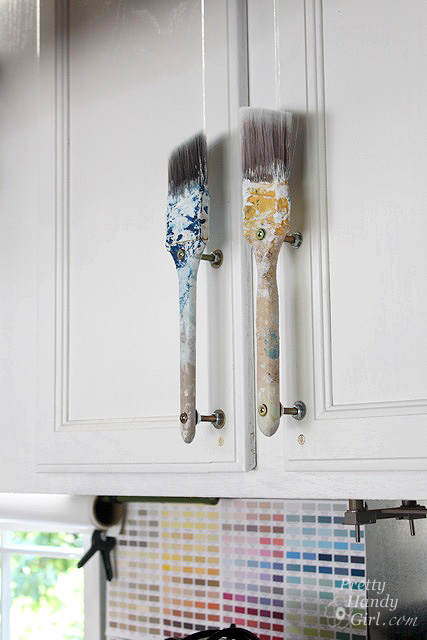
My love affair with Purdy brushes may be considered a little extreme. I love them so much that I immortalized two as cabinet handles in my garage:
These are seriously good brushes! I’m still using the Purdy brushes I bought when we lived in our old house. (And did I mention how many rooms we’ve painted?) Sure, they cost a little more, but they hold their shape and if you clean them right, you will never have to buy new ones! One 2.5″ and a 1″ brush are all you really need (unless you are good at recruiting friends to help you paint.)
15. The Paintbrush Cover:

The Paint Brush Cover is the newest addition to my painting tool box. Sal emailed me about half a dozen times to try to get my attention about the Paint Brush Cover. (Yup, if you don’t get a reply from me right away, try try again.) I’m so glad he was persistant because I love this painting accessory. When I get interrupted while painting with a phone call (or more likely to break up some brotherly bickering), it is so quick and simple to set the brush in the cover and seal it up. The Paint Brush Cover is like tupperware for your paint brushes. And if you are going to spend money on good brushes, you better make sure that you don’t let the paint dry out in them!
I was truly pleased when after a week with pneumonia, I returned to the room I had to abandon painting, to find that the brush I had stored in the Paint Brush Cover was still wet and the paint was ready to use! I was one happy DIYer!

On my wishlist:
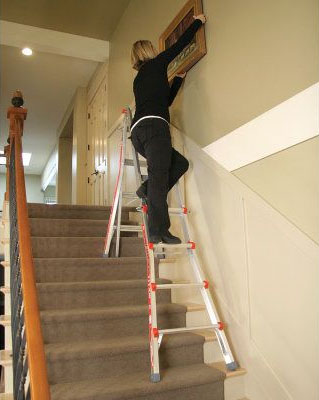
As a big painting enthusiast, I’ve gotten myself into some tight spots while painting. But, none are more awkward than painting over stairs. The edger on a pole works okay, but inevitably I’ll bump the ceiling or the wall that wasn’t supposed to be painted. I tried the Little Giant Ladder at the Southern Ideal Home Show last year. I am definitely very skeptical of infomercial type products, but from what I saw (and witnessed while climbing two stories up) was impressive. The ladder can contort into all types of configuration which makes it ideal for painting stairways.
Unfortunately I didn’t buy one at the show. Which resulted in my attempt at a DIY Ladder Platform:
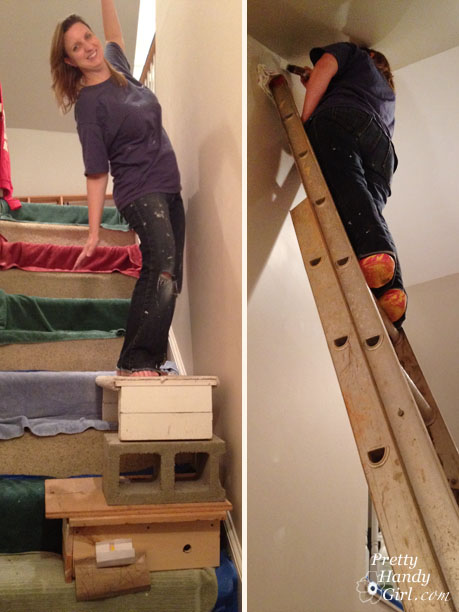
Why yes, that is a cinderblock; my DIY Aerobic step; and a few other scraps of wood. Although scary looking, it was actually sturdy, as you can see by my stair surfing antics. But, I don’t know that I can endorse my platform.
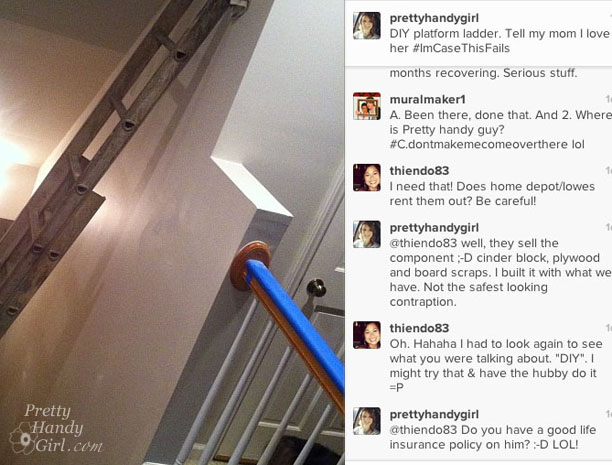
If you are into making your own, you can check out the platform that Matt & Shari made. It might be a little less risky.
Ready to start painting? Check out these tutorials on painting a room like a pro:
Step 1. 80% of a professional paint job is in the prep work.
Step 3. painting your room and finishing touches
 Disclosure: There are several links in the above post. They are affiliate links and I receive a small commission on any purchases made when clicking on the link. You are not charged anything extra.

I luv to paint rooms!!! Everything but ceilings – those I despise!!! I really like the idea of using the plastic bags for the roller tray, I will have to try that!! When a paint job is interrupted, I usually just wrap the paint brush in plastic wrap but those covers would sure be handier!
I liked the Paint Brush Cover on facebook 🙂 What a great idea!
I decided I DID NOT like the trick of wrapping a rubber band around the top of the paint can to wipe the paint-filled brush on! Imagine a paint-filled rubber band flying across the room as you try to carefully remove it from the can. Now I use a piece of duct tape across the top of the can to wipe the excess paint off the brush. Sturdier than a rubber band, and no more flying paint!
Gulp. I never tried that trick and now glad I didn’t.
We had just bought our house and I was 7 months pregnant. I told my hubby we could paint the house ourselves and save the money of hiring a crew. He didn’t want me to help him because of the fumes so he attempted to do it on his own. Well, two rooms and two weeks later, we decided we’d be hiring a crew after all!!
I guess sometimes it’s good to know your limits ;-D
So, I thought I was going to be smart and got one of those nifty pour spouts for my paint can. I’d shaken and stirred the paint and put the top on securely — or so I thought. When I turned the paint can upside down, off came the top and poured out all over my table. Luckily, it was a card table in my garage, but boy was it a mess. Funny now, not so funny then.
OH no Amy ;-(.
I’m not sure if this is really a very funny painting story but it was a good lesson learned….after we closed on our first house we had a painter come to paint the master and master bath just so that it would be all done and move-in ready for us, and then we could work on the rest of the place ourselves after moving in. I hadn’t learned anything yet about choosing paint colors and was naive enough to think that the paint swatch color was going to be exactly what the room would look like when it was done…well, now we have our lovingly-nicknamed master bathroom – the “Miller-lite Blue” bathroom because of it. If you don’t know Miller-lites, then you probably know tarp blue – bright and neon and completley unattractive. Lesson learned: ALWAYS try a paint sample on the wall in the room you are painting before paying someone to do the whole thing!
I think we’re all guilty of that the first time! Soooo, smurf blue?
When painting the deck last year, I wanted to keep the red deck paint from getting all over my hair, so I found the best thing ever- a cheapo plastic shower cap. My kids could not stop laughing at me! At least I didn’t have to wash red paint out of my hair for the next 3 days!
Better to make your kids laugh than ruining your hair ;-D
Really good tips on painting! I did not realize about the plastic bag thing, I am going to try that next time before I go blowing another fortune on pan liners. Edgers, though, are my new best friend. I love those things.
So a couple of months ago I was (attempting) to paint our wainscoting in the family room white. It is really rough and stained with an oil-based stain, so it was going all wrong for me. I had all the windows open to make sure it didn’t suffocate our three dogs while I painted, too, but it just. would. not. dry. It took FOREVER! Finally I gave up and went to bed.
The next morning, I came downstairs to make coffee and noticed something strange all over the walls. They looked like wavy fern patterns on my freshly painted living room walls. Looking closer, it looked vaguely like white mold (keep in mind… no coffee at that point). “What is THAT?!” I yelled, thinking our newly-bought house was sprouting some kind of mutant wall mold. My husband came down and looked, and we sat there for a good five minutes staring at it and touching it lightly, asking each other what we thought it might be (did we have ghosts? asbestos? did someone break in and throw paint on the walls? was it some kind of new genus of mold?) before my (black) Border Collie walked by with a big white streak on her side.
ROTFL!!! Our dog had a white tail for a while because of the same reason. ;-D
Oh my – I still have 2 rollers wrapped in plastic bags and a paintbrush wrapped in saran wrap in the downstairs fridge from when I painted the downstairs bathroom…summer before last! I guess I should probably just junk those suckers. I also managed to freak out several people the other day walking around with one (spray paint-covered) black hand. Everyone was like “omg, what *happened* to your hand!?!” Hee. My trigger thing is lost in the abyss of the garage.
Perl, I think your rollers passed their expiration date 😉
I liked The Paint Brush Color on facebook!
Great tips! No funny stories here… only I always have to remember to wear a bandana on my head while painting or the gray paint looks similar to the grays in my head I pay dearly to keep COVERED!
Painting story! I was painting our bathroom. I took down the medicine cabinet and patched the holes in the wall. While the patches dried, I trimmed out the room. So I wouldn’t forget where the patches were, I circled them with paint.
The next morning, husband asks, “Why did you paint boobs on the wall?” Heh, oops! (proof, fourth picture down!: http://www.ourbyrdhouse.com/2012/08/lights-paint-action-part-1/)
Paige, OMG! You had me laughing so hard!!! Thanks and still snickering over here ;-D. Good luck.
Funny story: When we built our house, my professional painter brother in law painted the outside for us. I wanted and bought BRIGHT, cheery yellow. When he opened the 5 gallon container, he gave me that “look”… you know, the one that says “yep, she really is crazy”? He stuck his finger in the paint and wiped a tiny mark on the side of the house, saying “Are you sure you want this?” I said “yes”. He then pulled out a small paint brush and painted a 6 inch square on the house. Again, “Are you sure you want this?” “Yes.” Now he dips into the paint and paints a BIG square of it on the house…”Are you sure you want THIS?” Now, I know what he’s thinking, since I’m pretty sure he’s always thought me to be just a wee bit “out there”…he’s giving me that “suspicions confirmed” look. Again I say yes, so he sticks his sprayer hose into the paint and paints a very large section of one side of the house….”Are you SURE you want this?” all the time giving me that “my poor brother” look. I assured him I did and he did go on to paint the whole house my beautiful yellow color. To this day, he and I laugh about this and he’s told me he really DID think was “out there” with my paint color choice, but has admitted that it did turn out great and he does like the color …..NOW. LOL!!!!
I love this story and I can see and here your brother-in-law’s voice asking you ;-D. Good luck.
lol…I can beat Sarah! I have more than paint freckles, right now I have painted fingers AND fingernails! I’m a paint fanatic and my friends always know what color I’m using because I always have some on me somewhere!
Paula, that’s the sign of a true DIYer when you know what color they are using by their hands/hair, whatever.
Hmm, something funny: I have white freckles on my forearm right now. From paint flecks that I was in too much of a rush to scrub off in this morning’s shower. Ha 🙂
Love it Sarah! I have white freckles everytime I paint the ceiling.