Summer Calendar and Our Bucket List

I don’t know whether to be excited or dread that yesterday was the last day of school for my boys. I have some summer camps lined up for them, but frankly our summer schedule is all over the place. So much so that I need help remembering where the kids are going and when.
I thought it would be a good idea to display the schedule so the boys could see what was coming up (to avoid the inevitable anxiety from different camps for different weeks.) To give them a little control over the schedule, we sat down and brainstormed our bucket list for the summer. Ice cream, swimming, and Carowinds are only a few of their bucket list items. I thought it was especially sweet that they wanted to spend time with our longtime sitter one or two days ;-).
While I was contemplating this displayable schedule, I received a box of goodies from Plaid. The boys were home when it arrived, so naturally they hovered like eager vultures as I opened it. And of course they immediately wanted to make something with the supplies. Sometimes timing is a serendipitous thing.

I set up the kitchen table with all the supplies and a plastic cover over the table. When I looked up, my oldest son had disappeared! I found him like this:

He had absconded with the DVD that was included with the Plaid paintbrushes and was comfortably watching it with rapt attention. The DVD has a number of painting techniques and tutorials.Once I pulled him away from the video tutorials (he was seriously absorbing all the lessons,) we were able to start creating our calendars.

Materials:
- poster board
- Pencil
- eraser
- ruler
- square piece of styrofoam (or sponge)
- paints
- glitter paint
- stencils
- paint brushes
- printed out calendar
- foam roller top
- foam brush top
- scrapbook paper
- printer paper
- magnets
Instructions:
Draw your calendar grid. Use the ruler and pencil to make light pencil lines. (If your 8 year old wants to do this and press REALLY hard on the poster board, you have to be ready to use some extra muscle when erasing the lines.)

Cut a piece of styrofoam 1/2″ smaller than the squares in your calendar.

Mix up your paint. I chose to lighten all the colors by adding white to get a pastel palette.

Brush paint on one side of the styrofoam.

Press it into the center of each day to “color” the block. Be sure to press firmly on all the corners. We decided to leave the “blank” days of the month empty for some special art.

Tape a pattern stencil to the top of the calendar. Choose a light color for the calendar header. Load up the sponge roller with paint. Roll the paint over the stencil. (Caution: Too much paint or lots of pressure will result in paint leaking under the stencil.)

Lift up the stencil and line it up next to the first impressions and roll more paint. Repeat until you have a beautiful header pattern above your calendar.
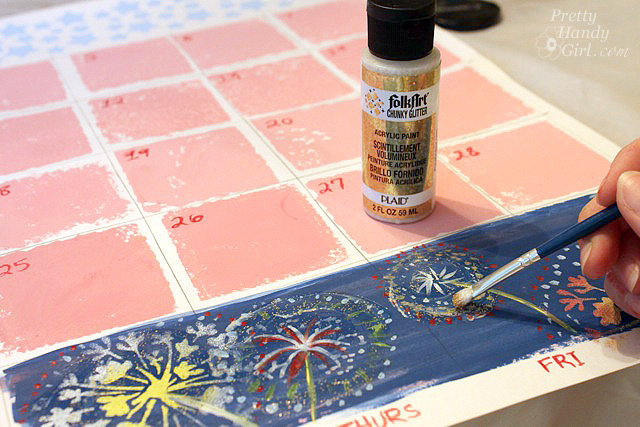
After the paint has dried, use letter stencils to imprint the name of the month. We found that the sponge applicators that fit on the bottles of paint worked perfect for this task.

Using a small round liner paintbrush, write the days of the week and the numbers on the calendar. (Alternatively, you could use letter and number stamps or stencils.)

Have some fun in the “blank” area by painting fun little scenes.
![]()
(A summer bug scene for June; fireworks for July and a beach scene for August.)

I used a little Folk Art chunky glitter paint to jazz up some fireworks!
Erase all your pencil lines. (This is when I’m sure you’ll be happy because you (or your child) used light pressure!) Let’s just say I have a hand cramp after trying to erase all those lines.

For the summer events, print out all the summer camps that are planned and the bucket list items on papers of your choice.

Use magnets to post the activities on the calendar. Let the kids fill in days with their choice bucket list items. The items that are “unchangeable” are posted using some glue spots. The bucket list are held with magnets so they can be moved if needed.

The calendar has been great for building up excitement for summer. It allows them to see what is coming up, but also lets them pick some activities that they are looking forward to!

Happy Summer Y’all !


Disclosure: I wrote this post as part of a paid campaign with Plaid Crafts and Blueprint Social. I was sent a box of supplies and given a gift card to purchase items from Walmart. I was not told what to write about or what project to complete. The ideas, tutorial and opinions in this post are solely my own. #WalmartPlaid
Check out some of these other art projects using Plaid products:

Brittany, this is brilliant! You created a neat piece of original artwork (thank you Brittany’s mom for inspiring your daughter!), organized your summer schedule, and included your kids all in one project! You are one smart mom.
Love that shot of your fellow watching the Plaid video! 🙂
When we visit my mom in SC we go to Carowinds too. She buys all of us season passes. We spend afternoons at Kookabura Bay, then go on rides when it gets a bit cooler in the evening. Glad they are open till 10 pm now.
Love your calendar project.
Thanks Brittany for the creative calendar ideas. Our girls (7 & 9) would love this project. Hope the boys are having a good start to the summer 🙂
Cute calendar! You are so creative 🙂 no more wasting money to buy one when you can make your own 🙂
Great job on the summer calendar! Lots of inspiration for other projects. Thanks for sharing all your talents!
Thanks for your sweet comment Becki ;-).
WOWZERS!!! That is fantastic! You are so creative. That calendar is truly amazing.
H.A.G.S!
Ginger
Thanks Ginger. I appreciate your nice comment. Have a great weekend.
Wow, girl! I knew you were talented but that looks like it came from a store!! You are quite the professional. We don’t have a single camp lined up right now but I’m looking at maybe a week or two in July…. I need the break from hauling everyone for now!
Erin, your comment was so flattering. Can’t wait to see you soon!
This is really impressive! I’ve read the blogs of others who received “the box” and what they did with them. While I like all of their ideas too, I REALLY like yours and the creativity you and your boys used! You go, Mom!
Thanks Megan. We had a lot of fun doing it. My boys love doing art projects, too. Have a great weekend!
Those are eye-catching works of art and wonderfully functional all at the same time. You are SO talented in your art. Have you ever thought of writing and illustrating a children’s book or two? 🙂
Mary Ann, what a kind thing to say ;-). Actually I studied illustration in art school. I would love to illustrate a book one day. Today is not the time, too little time ;-D. Have a great weekend!
WOW! That is some summer calendar!! Very impressive!
Thanks for the sweet comment Terrie!