How to Use Contact Paper and Pimp My Closet
For the past six weeks I’ve been taking the Simplify101 workshop: Organizing101. Aby has been a great instructor, and it has motivated me to take back my home!
A few of the projects I’ve completed are:

Bathroom Vanity Drawers

Underneath the Kitchen Sink

Hall Coat Closet
AND…
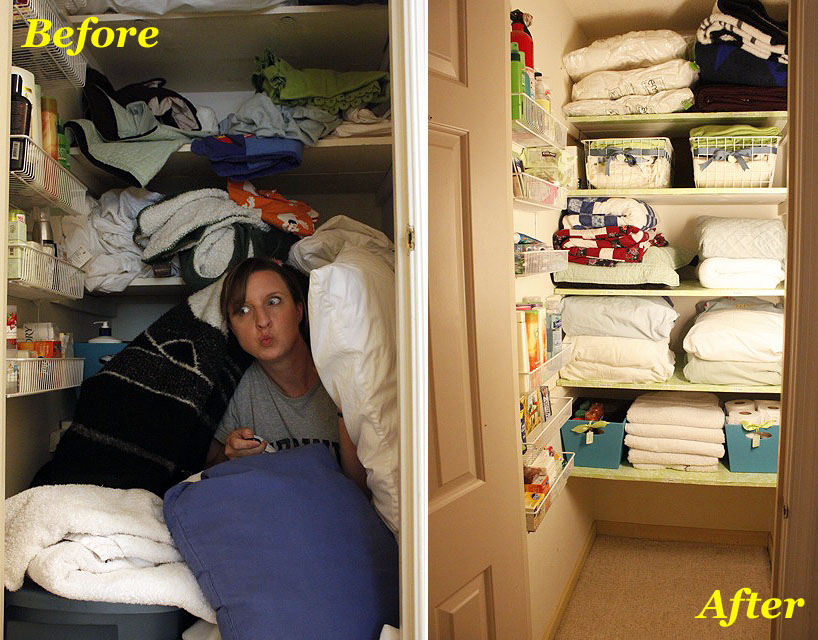
…Duh, du, duuuunnnn. Our linen closet:

This abyss is 5 feet deep with no light…I wasn’t sure what I’d find in there. Did I just see E.T. hiding in that closet?
Per Aby’s instructions, I emptied the entire closet.

Uh huh, all that stuff was in that one closet! I told you it was an abyss. Check out that tail in the upper right hand corner, Pretty Handy Dog is coming to the rescue.
Wow, look at all that room. I can store…two little boys? Does this photo remind anyone else of Hansel and Gretel?

Once I had the closet emptied, I cleaned the shelves with some Shaklee Basic H2 cleaner (still liking this stuff!)
Now comes the fun part! I got to pretty up those ugly painted shelves with decorative contact paper (found at Target.)
When I worked for a sign and banner shop (oh about 22 years ago), I learned how to lay down vinyl without bubbles and wrinkles. The same method works well for contact paper as well.
Materials:

- Contact paper
- Scissors
- X-acto knife
- Staple gun
- Safety Goggles
Instructions:
Begin by laying the contact paper on the shelf.

Cut it about 2 inches longer than the front of the shelf.

Flip the contact paper over and peel back about 3-4 inches and fold the backing down.

Now turn the contact paper back over so the adhesive is facing down. Line the paper up with the back edge and the wall. And press it down with your finger.

Gently pull the backing off the contact paper a few inches at a time.

At the same time press your hand in the middle of the paper and smooth the paper from the center to the outside edges. The goal is to push any air pockets out to the edge.

Pull the backing out a few more inches and use your hand to smooth forward and towards the sides again.
Repeat until the backing is completely removed.
If you need to, cut a notch out of the contact paper around the shelf supports.


Then fold the paper underneath the shelf.

Tack the paper in with the staple gun, one or two staples should hold it. Be very careful that the staple gun is shooting into the wood and not towards your face. In fact, Meri-K would tell you that you should be wearing eye protection while using a staple gun.

I chose to label the edges of my shelves (so Pretty Handsome Guy would obey the new closet organization rules!) I used some decorative baskets and bins to hold other odds and ends.


At the last minute I decided to add a plug-in style under-the-counter florescent light beside the door frame. I can’t tell you how wonderful it is to have a light in this closet now! No more boogie men hiding in there.

And they all lived happily ever after with their newly organized linen closet.

Check back bright and early Saturday morning. I have an important announcement for y’all! Get those noise makers, party hats and confetti ready. It’s PARTY TIME!


I am finding it almost impossible to separate contact paper from its backing. VERY frustrating. Any tips on how to do this??? (It’s a brand new roll.) Thanks very much.
Barbara, it can be tricky sometimes. I find if you take a small corner and repeatedly fold it back and forth, sometimes that will loosen a corner up enough for you to separate the layers.
Hello, I had a question, I just lined my closet, and the paper won’t
stay down. I will clean them again(making sure the area is dry) but I don’t want to use a staple.
Is there any advice you can give me in remedying the paper lifting up?
You might need to use double stick tape or a stickier contact paper (not sure if they make such a thing though.)
What a lovely blog and handy post! I recently moved from about 2700 sq ft of living space into 1400 sq ft and am now an organization fiend, trying to make the most efficient use of every square inch, thinking vertical and utilizing wall space, etc. I bought some cheap cardboard magazine holders at Ikea, 5 for $1.99, to hold plastic wraps, foils, bags, and found this site to get advice for finding pretty Contact paper to apply to the magazine holders.
But I especially love the tip about labelling the shelves once you’ve covered them. Unfortunately most of my shelving is wire, so I can’t really over those, but I’m sure there’s a way to hang a label or something. I’m researching labelling machines now!
ohgoodgolly, fabulous job!
Thanks for the contact paper tips…I’ve got rolls at the ready waiting for me to get to them. Your tips will help!
Cheers!
I love to when this for when I paint my kitchen cabinets white, I’ve heard this is a great product!
Thanks for the chance to win!
Rondell
Your closet looks great. You did a fantastic job on cleaning and organizing it. I really like the contact paper, too.
That’s so funny. I just cleaned our linen closet this morning, and my birthday is tomorrow! Great minds must work alike. I love your shelves with the contact paper. Ours are those wire shelves and make it a little more difficult for things to stack nicely. I may have to add some little shelves to the door like you have to hold those slippery little items. It’s pretty handy (heehee). Our next closet redo is our walk-in. Ewwww!
Hall closet and other spaces look fantastic. Wow!
Awesome transformation of the hall closet! And that contact paper is so pretty.
(Hmm, who knew I’d get excited about contact paper!)
Nice job!! It looks so much better!
Your closet looks great!
What! No baskets on the bottom underneath the last shelf? (That’s what I have in my hall closet. One basket holds table cloths and the other holds throw rugs.) (and sometimes they hold a little bit of each…) Love the boys being stored in there sometimes too! Looks great.
Yes, I’m sure that space won’t remain empty for long. But, for now, I don’t need the storage. I actually donated 3 Hefty bags worth of linens and stuff from the closet. Yeah me!
Oooh, I like that contact paper! You should feel good about your organized spaces- they look great. Now you just have to keep it that way…
Erin, Aby has a lesson on how to keep your home organized too ;-). So, HOPEFULLY it will stay that way.
Awesome! Is that a compost bucket under the sink? I like the basket idea, I will have to copy and paste that for sure, our closet scares me, and things sometimes fall out all the time, some things that have been missing for years……
Viviana, my what sharp eyes you have! Yes, that is a copper compost bucket I bought at Smith & Hawkin about 8-9 years ago. I still love it. Loads of patina now.
Glad you understand my fear of that “Before” closet!
I’ve used Basic H for about 30 years. Anyway, that big closet your organized – very impressive. Sure looks good.
– Joy