Circle Diamond Pattern Light Fixture – Updating a Brass Light Fixture

I have been dying to share this tutorial with you! This project was inexpensive and it made such a big impact in our mudroom. It started with a few Habitat ReStore light fixtures and some NEW! Martha Stewart glass paint and ended up adding some major “WOW Factor” to our entry.
You know when an unfortunate incident turns into a happy accident?
Exhibit A: Stained Ceiling

Like when it rains really hard and your roof leaks over your mudroom and it means that you suddenly have to bump up scraping and painting that ceiling to the top of your to do list?
Exhibit B: Boobish Light Fixtures

And, because you have to take the ugly light fixtures (that look like nippleless boobs) down, you might as well put something pretty back up. Yes, well that’s where I found myself several weeks ago. Let’s call it making lemonade with a heaping serving of lemons.
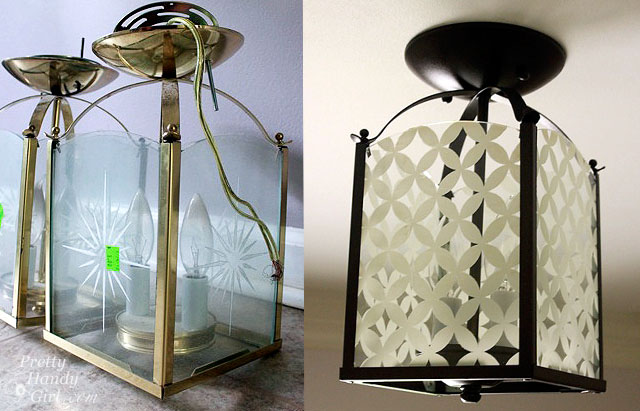
Exhibit C: Two Lemons (Habitat ReStore Brass Light Fixtures)

I purchased these two light fixtures at our local ReStore at the beginning of the year. One was $5 and the other was marked down to $3. They had great shape, but the unfortunate luck to have a starburst on the glass and a brassy color.
At first I thought I’d have to get new glass cut for the lanterns, but by accident I scratched one of the bursts off with my fingernail.
Dismantle Light Fixtures:
I immediately dismantled the light fixtures.

After soaking the panes of glass in hot soapy water for 3o minutes, the starburst decals simply flaked off. Any residual decal came off with a little scrubbing. Then I laid them on a clean towel to dry.

Spray Painting Light Fixture:
While the glass was drying I took apart the rest of the light fixture; removed the light bulbs and sleeves and covered the sockets with tape. A quick wiping with a clean rag and the fixture was ready for some spray primer and oil rubbed bronze spray paint. (Follow this tutorial for more details on spray painting light fixtures.)

Create Silk Screen Stencil:
Instead of watching paint dry (who has time for that?!) I began drawing out my pattern for the glass panes. I knew exactly the pattern I wanted to use. I drew up this moorish circle diamond pattern in Adobe Illustrator. (Feel free to download the pdf file for your personal use.)

I printed the pattern out on my laser printer, and filled in any white spots with a black pen.

Then I used the print out to burn a silk screen stencil using a Plaid Simply Screen Silk Screen Kit.

To create your own screens, follow this video tutorial for creating your own silk screen patterns. If you don’t have the silk screen kit, Martha Stewart crafts has a plethora of really stylish glass paint screen stencils to choose from!

Once the stencil was completed, it was time to get down to the fun part of this craft.
Screen Printing Martha Stewart Glass Paint:
Plaid’s Martha Stewart Crafts just introduced five different types of glass paint, stencils and tools for painting on glass surfaces. If you’ve ever tried to paint on glass, you know that not just any paint will work. These new paints are easy to work with and after cured will last a long time.
Materials:
(I’ve included affiliate links for your convenience. I earn a small percentage from a purchase using these links. There is no additional cost to you. You can read more about affiliate links here.)

- Plaid Martha Stewart Glass Paint
- Plaid Martha Stewart Glass Paint Squeegee
- Plaid Martha Stewart Glass Scraper
- Painter’s tape
- Glass Paint Stencil Screen
- Scrap Glass or Plexi-glass the same thickness as your glass panes
Instructions:
Sandwich the glass pane between two scraps of glass the same thickness as your pane.

Center the screen on the glass panel and tape the edges to the scrap glass.

Squeeze a line of glass paint onto the top of the screen. Gently and firmly pull the squeegee down over the entire screen. Pull from different directions to get full paint coverage. This video on on the Plaid Online site really helped show me the technique for spreading the glass paint with the squeegee over the stencil.

Peel off the stencil screen and look for any paint seepage. You can use the glass scraper to clean up any mistakes.

Allow the paint to dry.Wait 21 days as the paint air cures, OR cure it faster in the oven.

Put your glass panels in a cool oven. THEN heat the oven to 350F, allowing the glass to heat up slowly. Let it bake for thirty minutes. Turn off the oven and let the glass sit in the oven until cool. Remove your glass and it is ready to use!
Reassemble the light fixtures by putting the glass panels back into the metal frame and screw the ball end caps back on.

Install your light fixtures and flip the light switch to reveal:
Exhibit D: Beautiful Eye Candy Light Fixtures!

They are beautiful to look at when they are off:

But, I think they look like elegant sparkling holiday ornaments when they are turned on:

A close up view of the moorish circle diamond pattern:

Can you believe the transformation? I’m still a little speechless. I love the pattern so much that I’m thinking about stenciling the walls with Royal Stencil Design’s similar circle diamond pattern, wouldn’t that be fancy. I’ll just have to add that to my ever growing to do list.
Can you think of some fabulous uses for the NEW Martha Stewart Glass paint from Plaid? There are many types of paint, stencils and tools. You can purchase the supplies at Michaels.
Find more ideas and instructions by following Plaid’s Martha Stewart Crafts on Facebook, Twitter, and Pinterest.
In the meantime, check out these other fabulous ideas using the Martha Stewart Glass paint line:
Hasta manana (see you tomorrow) DIY peeps!

Disclosure: This is a sponsored post for Martha Stewart Glass Paints and Blueprint Social. I was compensated for my time and project creation. However, all opinions, ideas, projects and directions are my own.
Trackbacks & Pingbacks
-
25 Gorgeously Crafty Painted Glass Projects You Need To Try Today - DIY & Crafts says:
November 30, 2017 at 11:56 am
« Older Comments[…] Tutorial: prettyhandygirl […]
Leave a Reply
Want to join the discussion?Feel free to contribute!