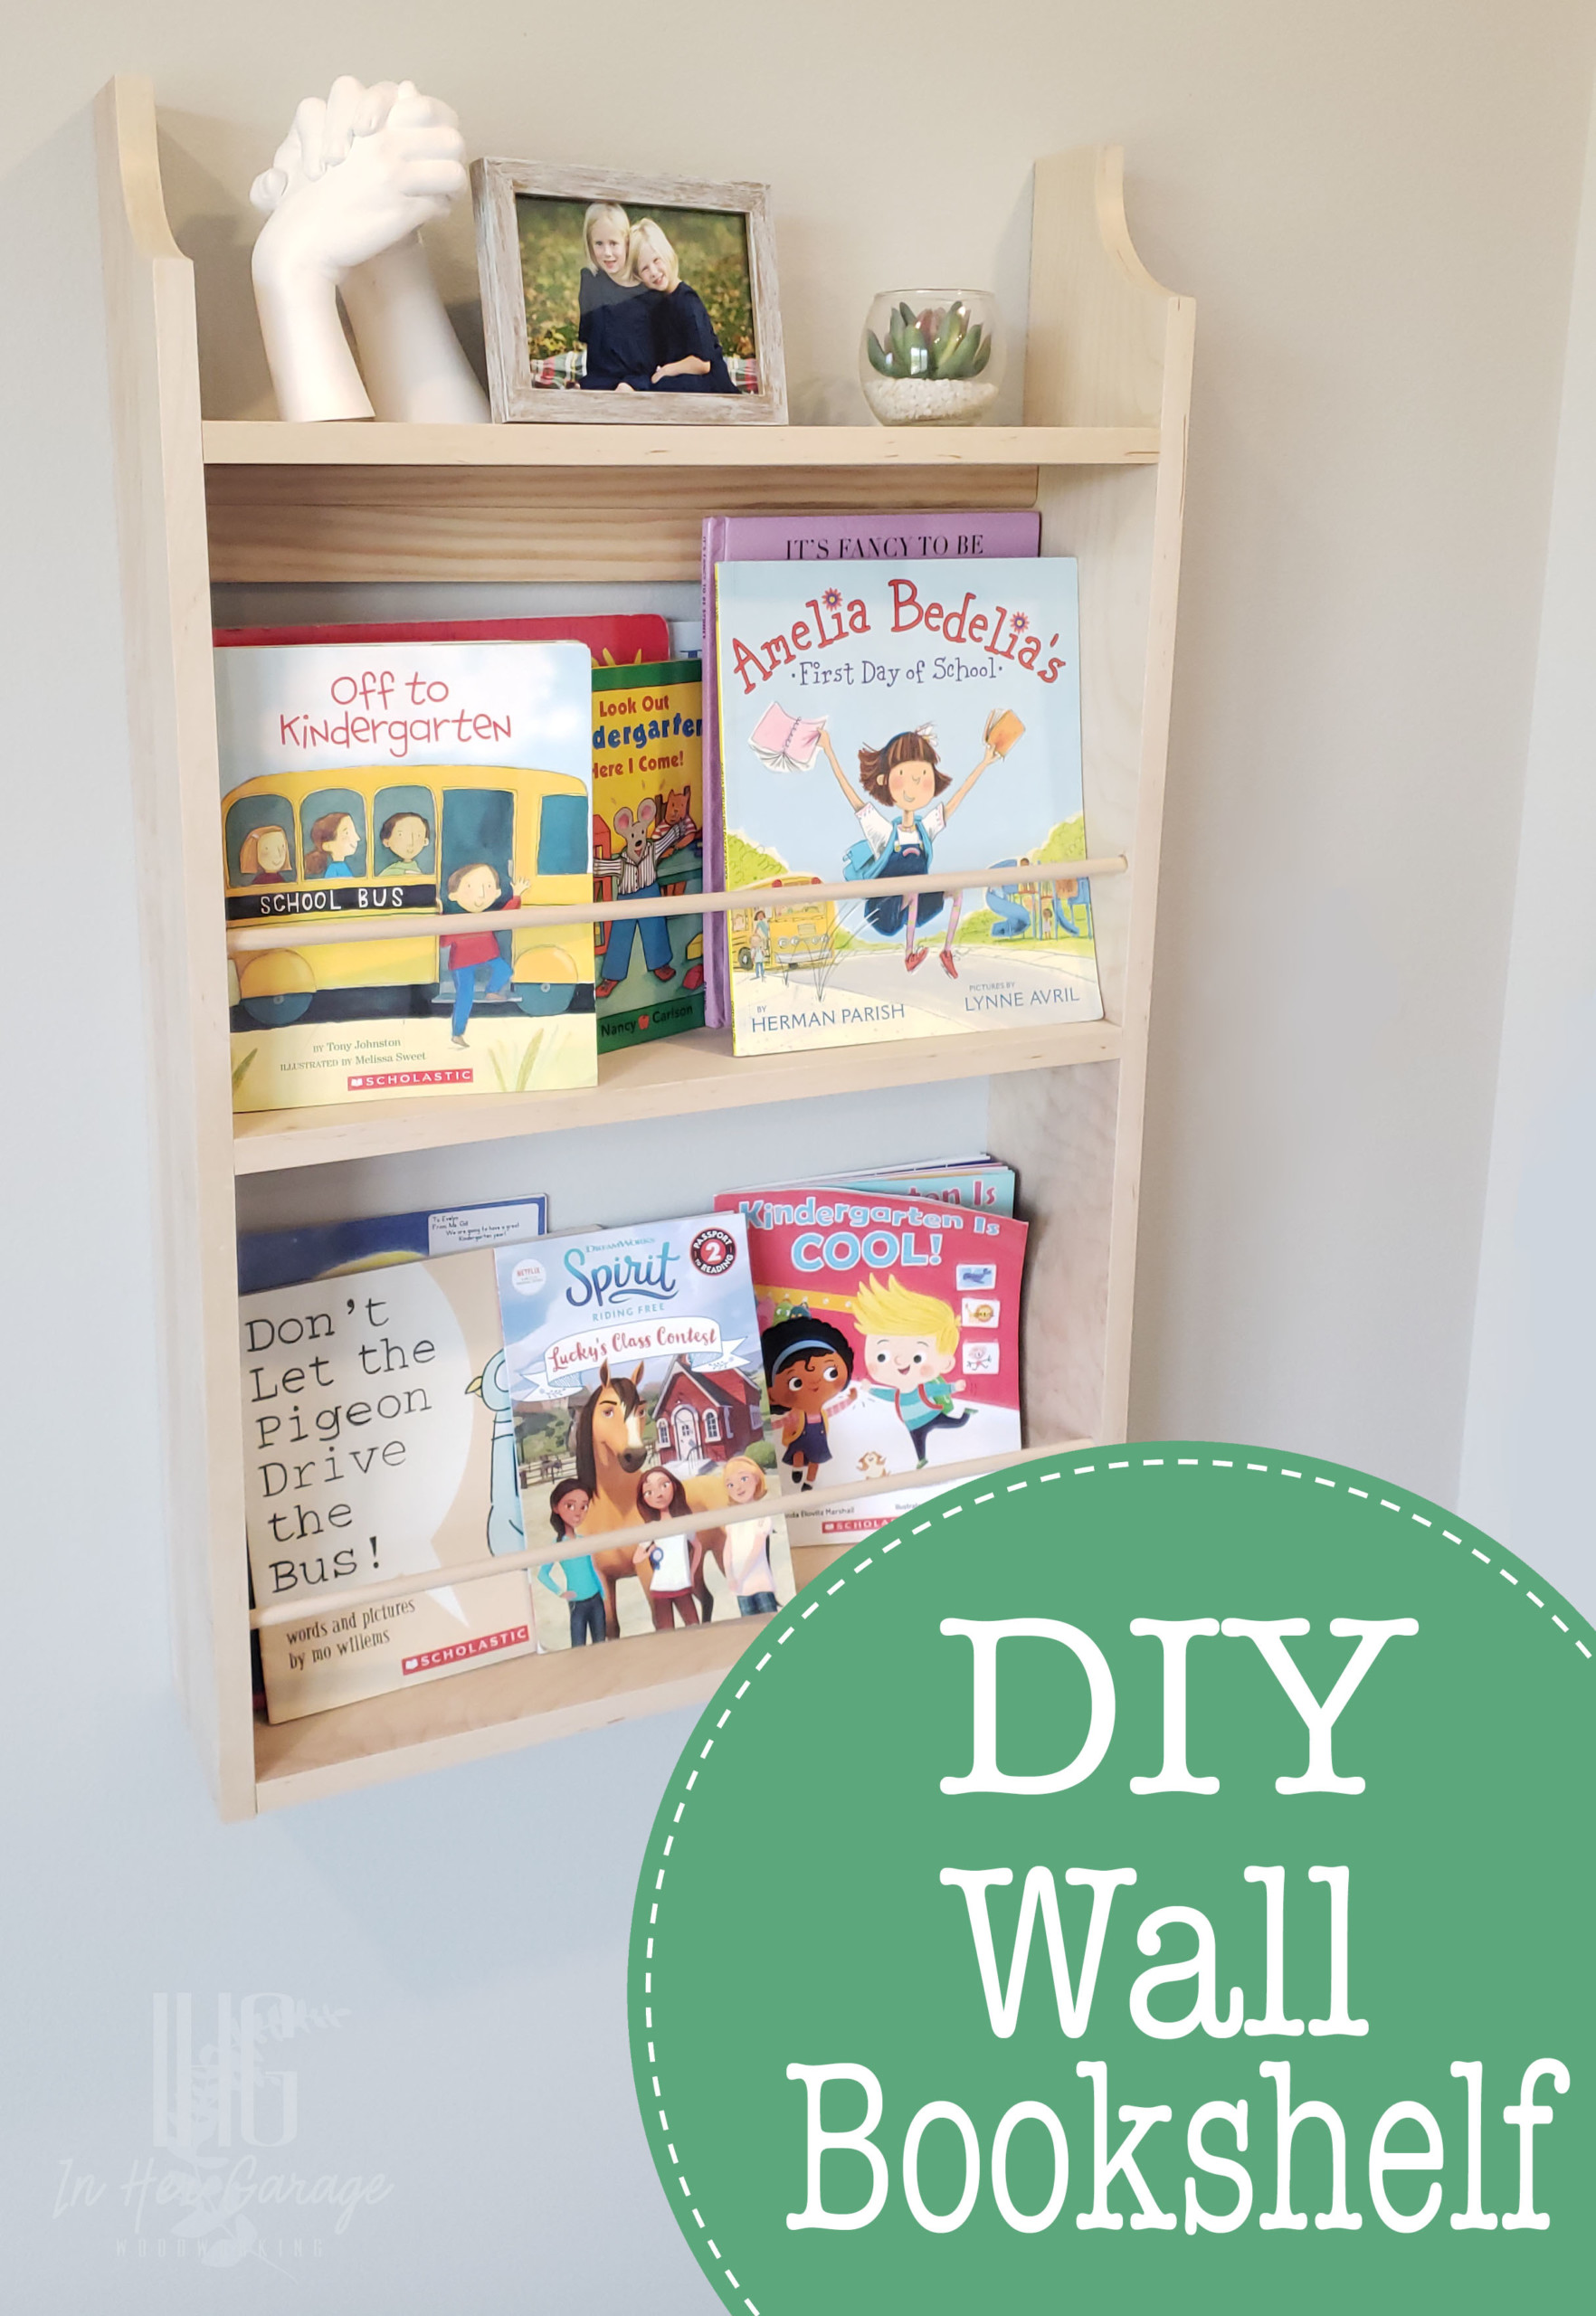
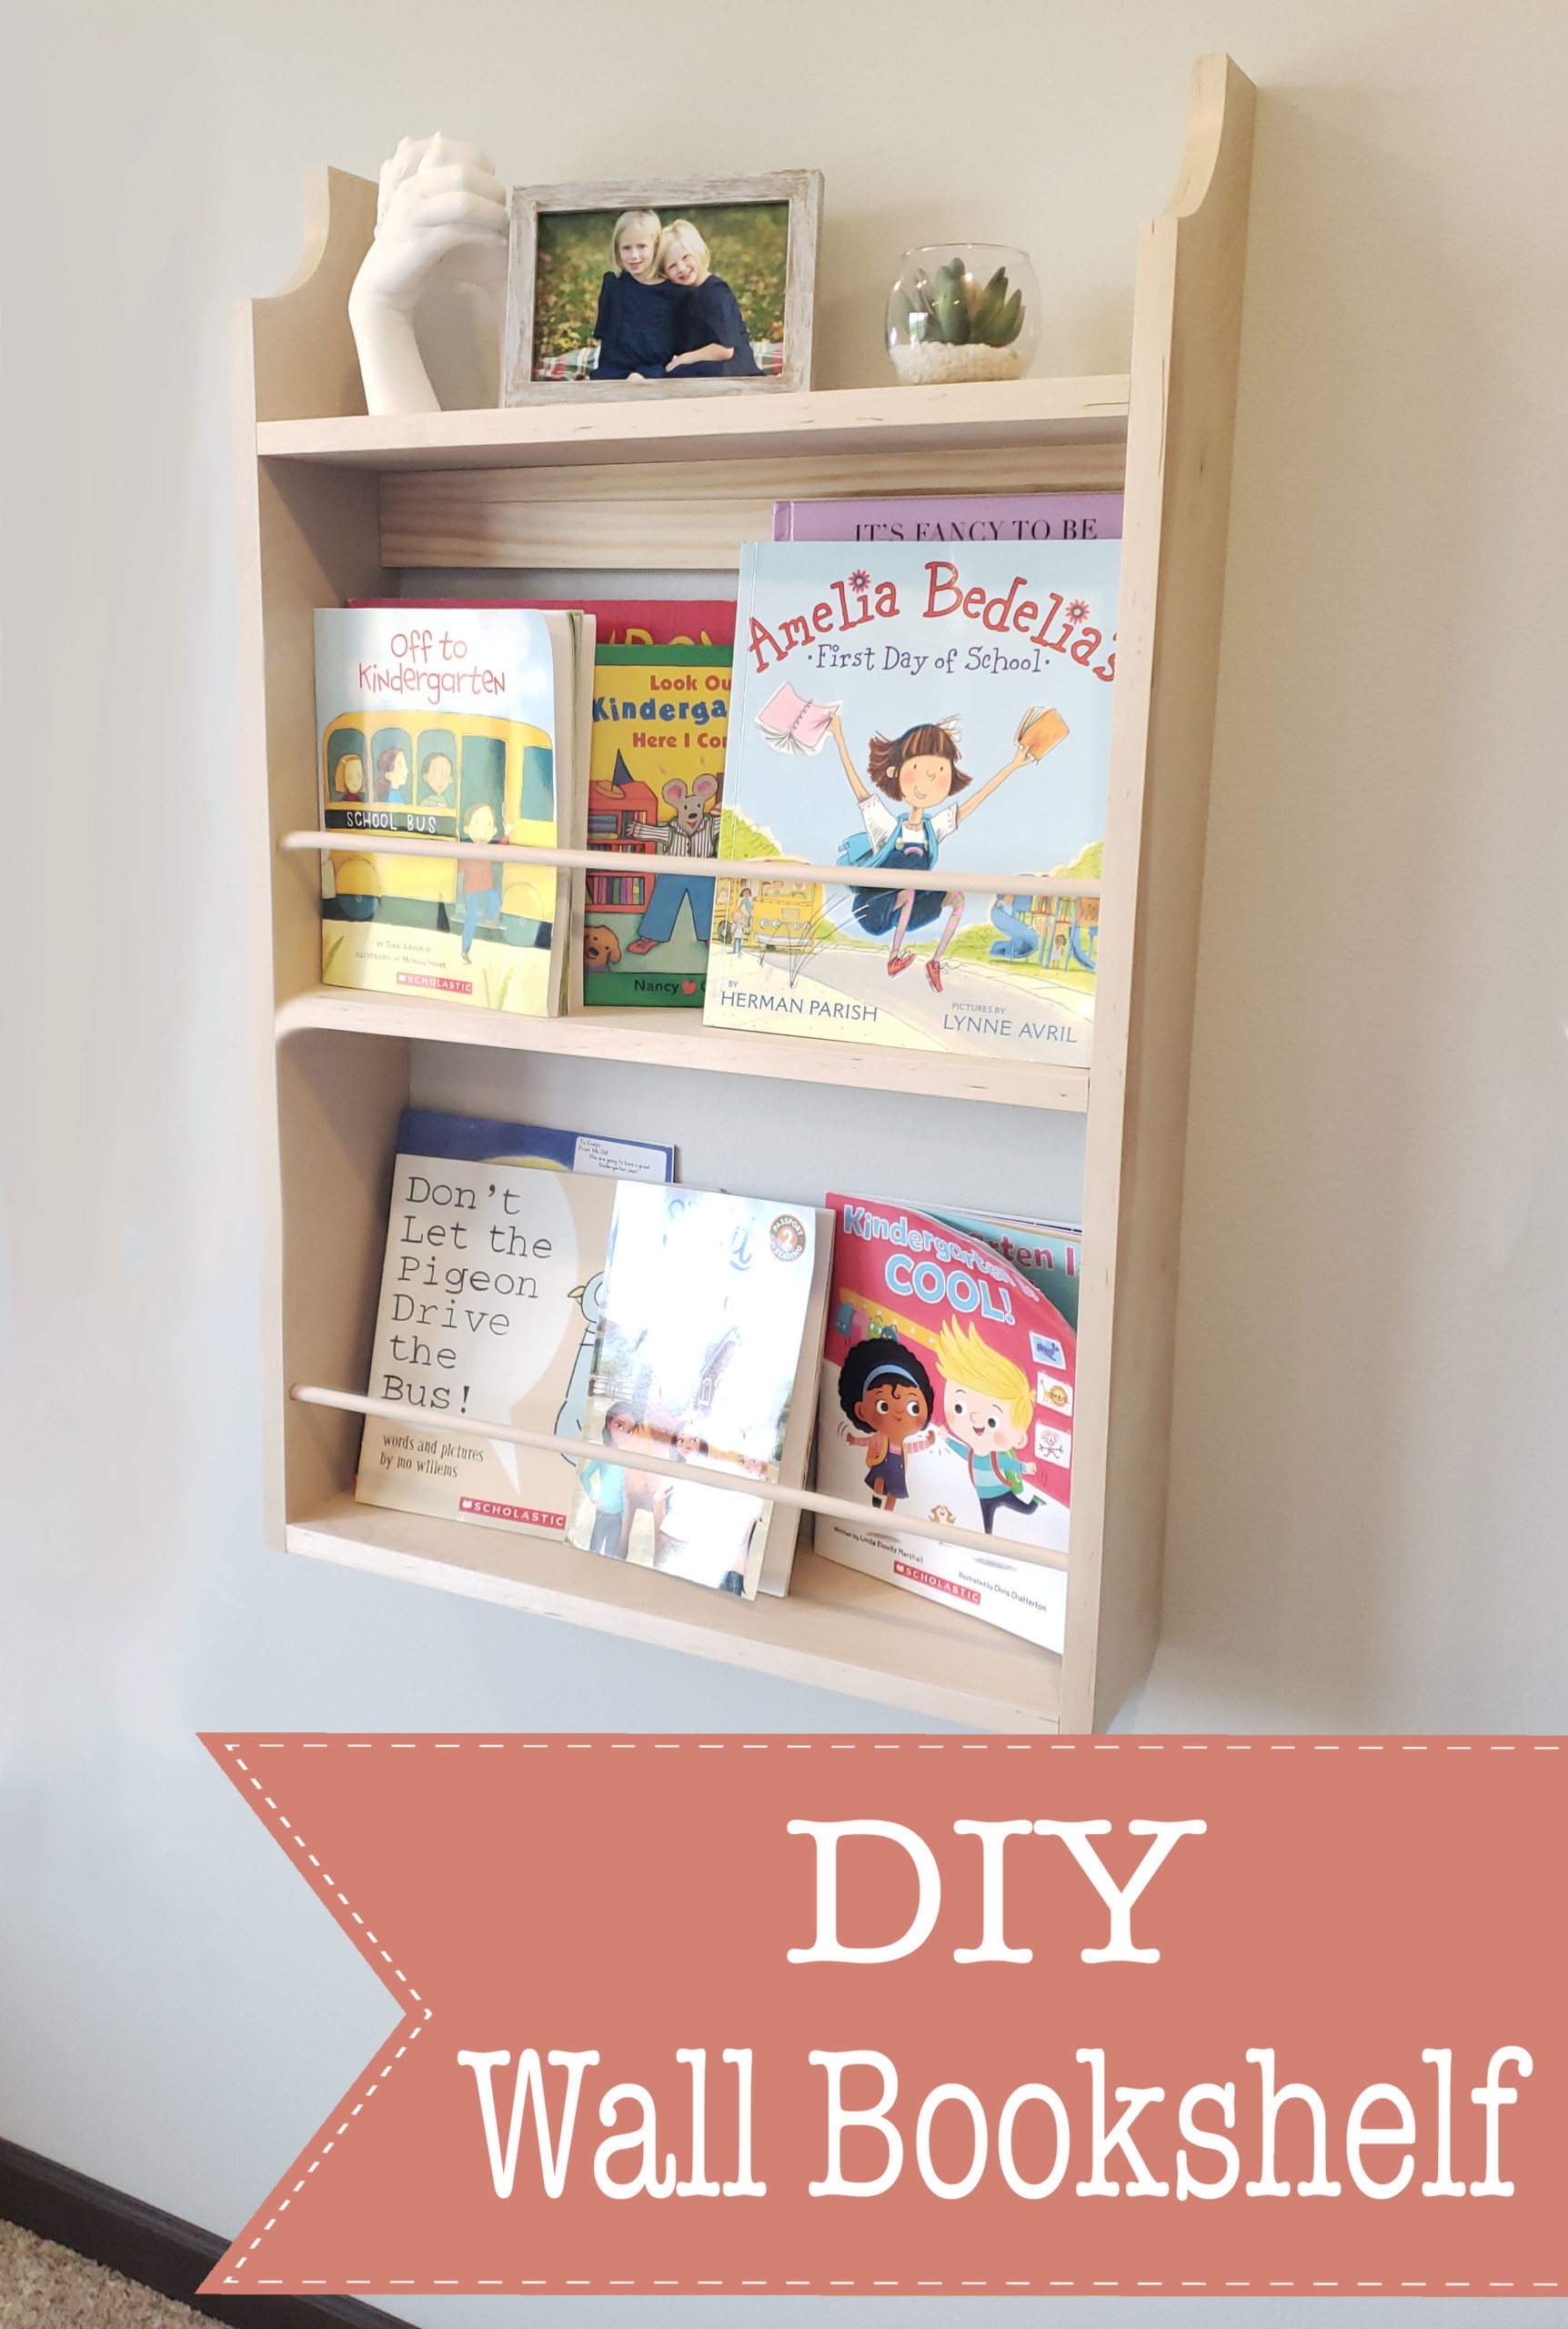
Looking for a way to organize and free up floor space in your home? Expand your DIY talents and build this adorable DIY wall bookshelf. I built this as the final addition to my daughter’s new room and although the joinery is slightly more advanced it still easy enough for a beginner DIYer.
 DIY Wall Bookshelf
This bookshelf was the perfect last piece that brought my daughter’s room together. I used dowel joinery to build the bookshelf (which may sound complicated but is fun to use and quite simple when you get the hang of it). To hang this shelf on the wall I used a French cleat which again sounds more advance is a convenient and secure way to install heavy objects on a wall. So stay with me and read through the instructions. I know you can do this! Let’s make it!
How to Make a DIY Wall-Mounted Bookshelf
Materials:
- 2- 1″ x 6″ x 8′ boards
- 1- 3/8″ x 4″ round dowel
- 1 box 3/8″ wooden dowels
- wood glue
Tools:
(I’ve included affiliate links for your convenience. I earn a small percentage from a purchase using these links. There is no additional cost to you. You can read more about affiliate links here.)
- Miter saw or circular saw
- Table saw or circular saw
- Doweling jig that can center over 3/4″ material
- Jigsaw (optional) used to cut curve design at the top of the shelf
- 3/8″ drill bit
- Drill
- 6″ combination square (optional but highly recommended!)
- Rubber Mallet
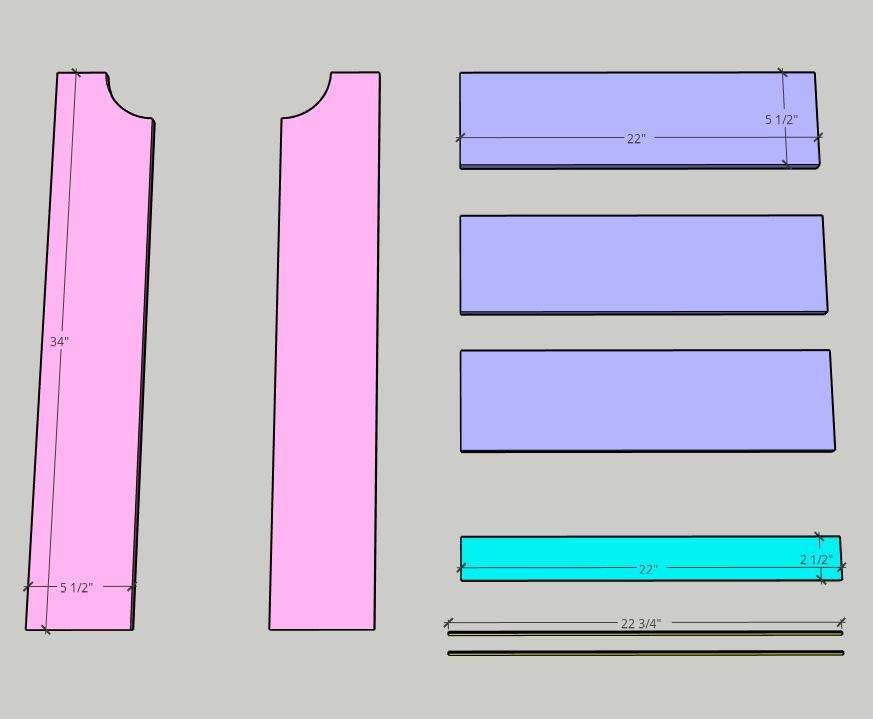
Cut List:
- 2- 1″ x 6″ @ 34″ – shelf sides
- 3- 1″ x 6″ @ 22″ – shelves
- 1- 1″ x 6″ @ 22″ ripped to 2½” width – shelf cleat for hanging on the wall
- 2- 3/8″ dowel @ 22 ¾” length
Instructions:
Step 1: Cut the curve at the top of the shelf sides (optional)
- Measure 3″ in from the front and 3″ down from the top on both 1″ x 6″ side pieces and create a curve connecting the two marks. (I used a plastic bowl that I found in my kitchen as a stencil.)
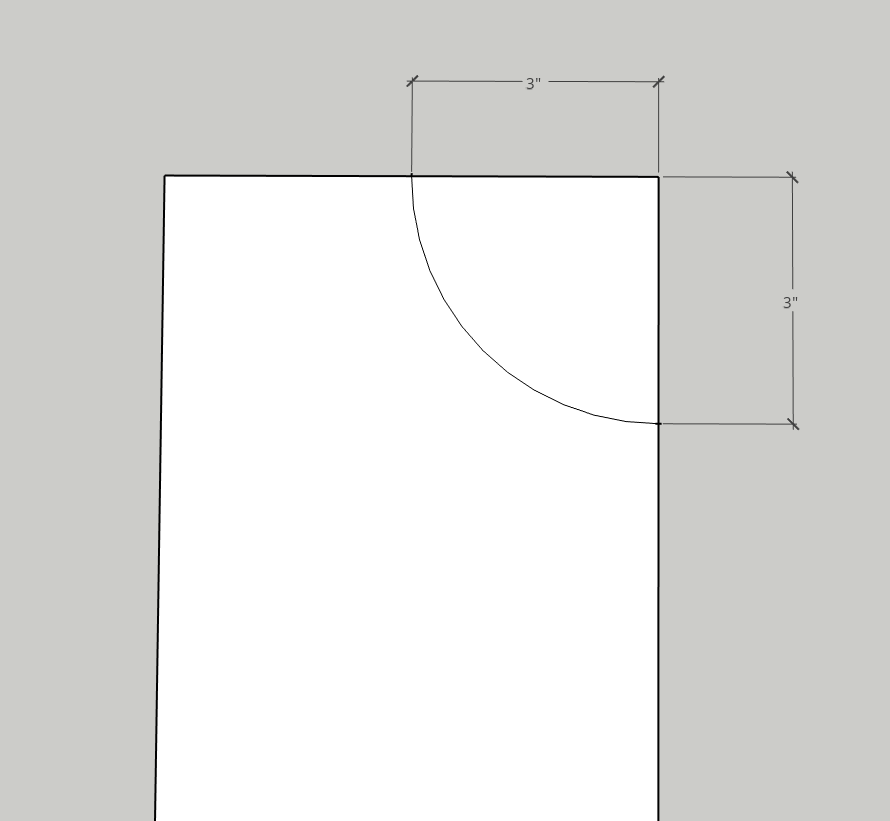
- Using your jigsaw, carefully cut along the curved line you’ve drawn until it is cut away.
- Repeat for both sides. Sand the curve smooth with sandpaper.
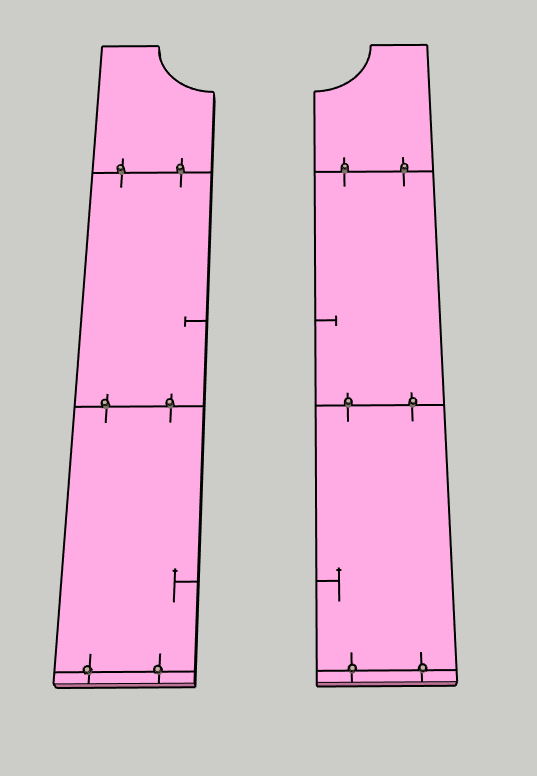
Step 2: Measure and mark dowel placement on the bookshelf sides
- This is the step where the 6″ combination square is a lifesaver!
- Lay the two side boards next to one another on your work surface so they are a mirror image of one another, insides facing up. (Like opening a book.)
- Use the diagram below for measuring and marking the placement of the dowels.
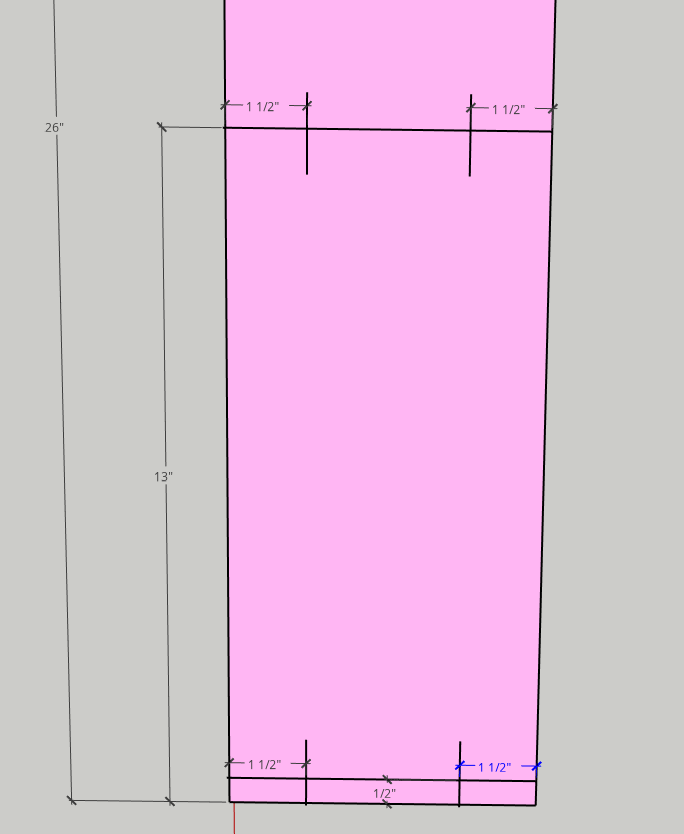
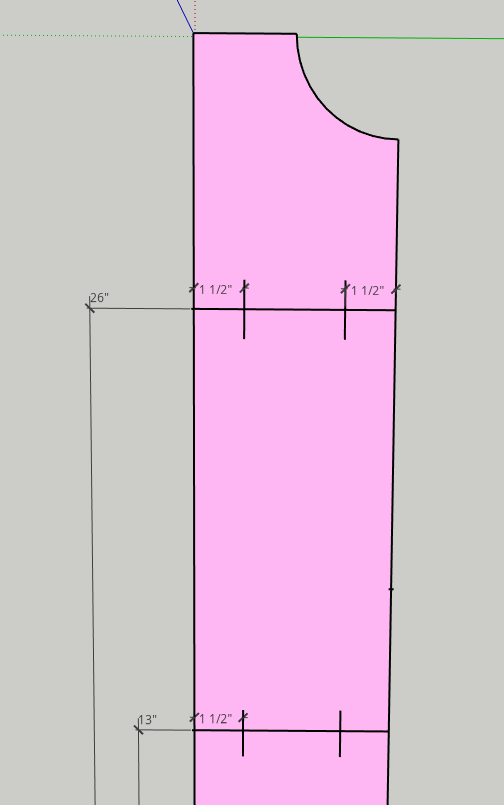
- Each shelf dowel will be 1½” in from the front and back of the board and measure up 1/2″, 13″, and 26″ from the bottom of the board as shown.
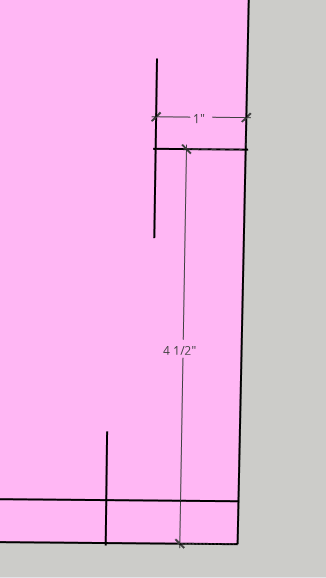
- Both long dowels will be measured and marked 1″ in from the front of each side and 4 ½” and 17 ½” from the bottom of the sides as shown
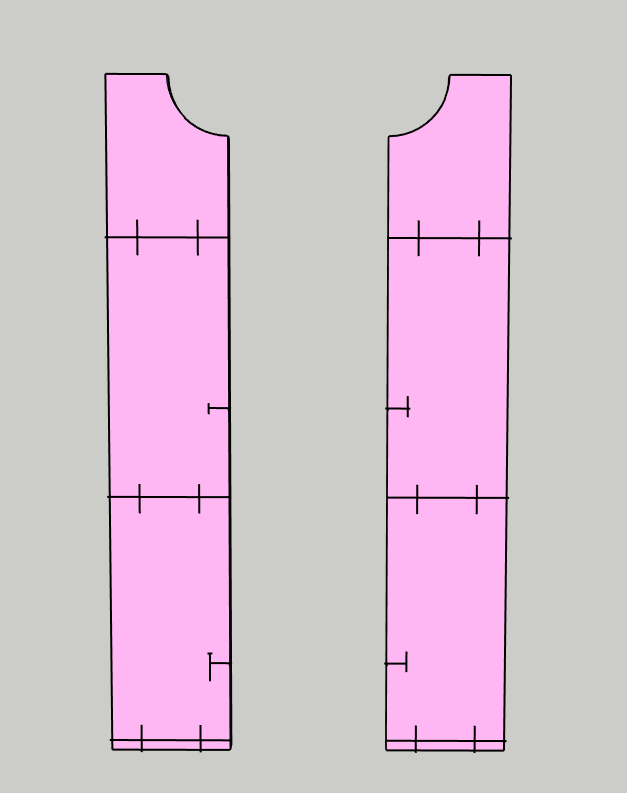
- Repeat these markings for both sides of the bookshelf.
- You should have a total of 16 markings. 8 for each side. 6 for the shelf dowels and 2 for the long dowels.
Step 3: Drill holes for dowels
- Using your 3/8″ drill bit place a piece of painter’s tape on the drill bit to mark a depth of 3/8″. You don’t want to drill through the sides of the bookshelf, just half-way.
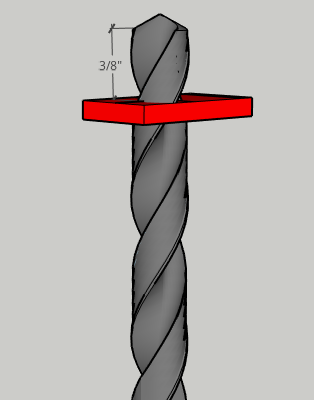
- With the drill bit securely in your drill (and material clamped to your work surface), drill straight down into each marking of the side board until the drill bit has reached the depth of the tape.

- You will create 16 holes in total, 8 for each side.
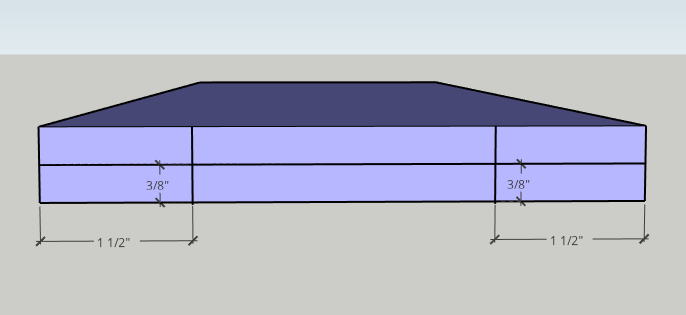
Step 4: Measure and mark dowel placement in shelf boards
- Using your combination square, mark the center of each side edge of the 3 shelf boards
- Next measure and mark 1 ½” in from the front and back of the 3 boards as shown. Make this same 1 ½” mark on the face of the boards as well for reference when using your doweling jig.
Step 5: Drill dowel holes in shelf boards
- I’ll let you in on my secret! I use my Kreg pocket-hole bit for this step because it is 3/8″, it makes drilling into the end grain much easier and has a collar that can be set to the depth I want!
- The depth of your hole = length of the dowel minus 3/8″ (the depth of the hole in the side boards.)
- Now, using your doweling jig and the reference marks you’ve created on the face of the board you can go ahead and drill the 12 holes to the depth determined above into the sides of the shelves.


Step 6: Dry fit!
- It is important when using dowels for joinery that you complete a dry fit test of the project first.
- You want to make sure the holes are large enough and deep enough for the dowel and that all pieces can securely fit together without gaps.
Assemble the Shelf!
Step 7: Install shelf dowels and shelves
- Using wood glue install all 12 shelf dowels into the holes of both side boards.
- Next, using wood glue, install the shelves over their respective dowels and gently tap into place using a rubber mallet.

Step 8: Install long dowels
- Place a drop of glue in both holes for the long dowels and insert dowels
Step 9: Install the remaining side board
- Carefully place the remaining side board over the shelves and long dowels have already been installed.
- Align the dowels and long dowel holes and gently tap the side into place with a rubber mallet.


- Check for square and clamp into place to allow the glue to dry.
Note: As you can see I forgot to insert the long dowels during assembly. I was able to add them later and I will have a scar to show for it!
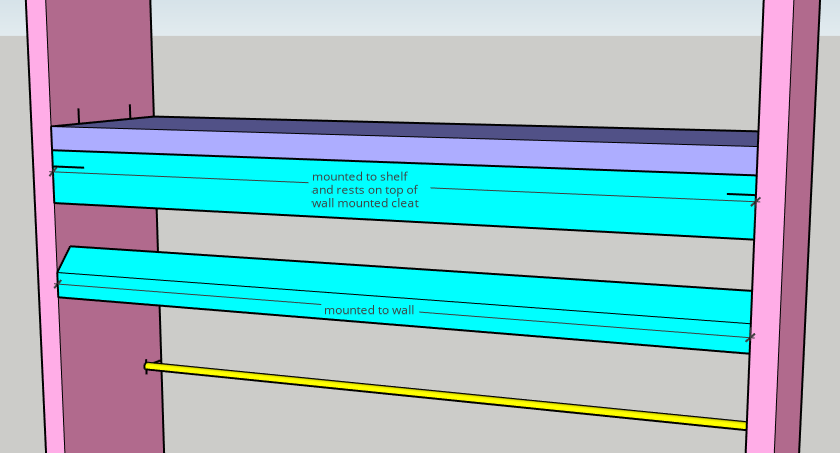
Step 10: Hanging the shelf on the wall
For this step, I chose to use a French cleat. I wanted the shelf to be flush to the wall and very secure which is what makes a French cleat the best choice. View the basic diagram below or for step by step instruction check out How to Make and Use a French Cleat.
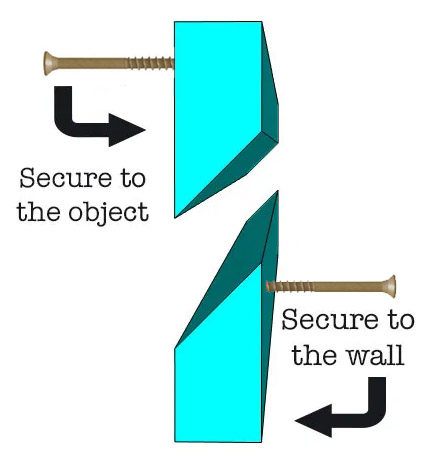
I used pocket screws to secure the top portion of the French cleat to the bookshelf.
Once the French cleat is secured to the bookshelf and the wall you will be able to hang the bookshelf securely on the wall and place as many books in it as needed. My daughter loves her new bookshelf and she always feels so special when Mom makes something just for her.
I hope this tutorial proves helpful in adding a little style and organization to your home.

![]()

Hi! I’m Kristen, from In Her Garage, and I am a self-taught woodworker and DIY fanatic from Minnesota where I live with my husband and our two daughters. Between being a wife, mom and, registered nurse, I try to make as much time for DIY as possible. My love for building came after our family built our current home in 2015. After we moved in, we needed furniture and instead of spending massive amounts of money to order the pieces we wanted I decided that I would build them myself. I started with a buffet table plan from the fabulous Ana-white and quickly set out to remodel my entire home office.
Since then I have started a side business building furniture for the people in my community. I love hearing my clients talk about the pieces they wish they had whether it be a rustic buffet table, a one drawer side table, or a toy box and then making it a reality for them. While starting my small business it made perfect sense that I would document my building journey so I simultaneously launched the In Her Garage blog and I love sharing my plans, tips and tricks.
Making something beautiful with your own two hands through a little preparation and determination is an amazing feeling and I hope to bring inspiration and know-how to those looking to tackle a big or small project.
I am so glad that you found me here and please feel free to connect with me on Pinterest, Instagram, Facebook, and Youtube to see what I am working on right now.


