DIY Rustic Wood Lanterns

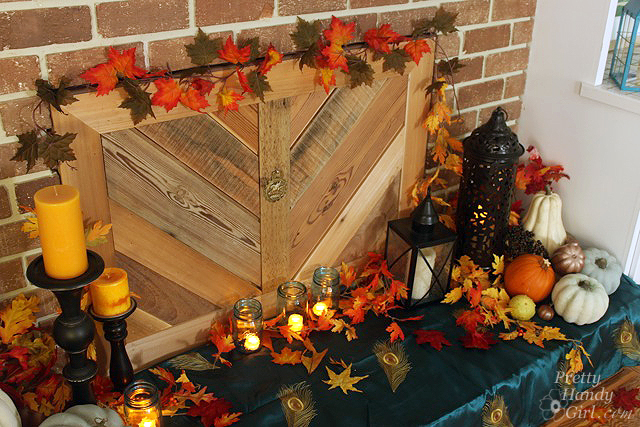
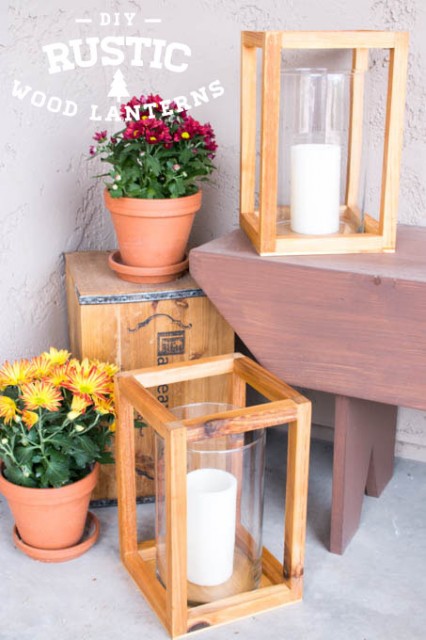
Lanterns are the perfect way to add warmth into your decorating. Today on the Rockstar DIY stage is Katie, with the tutorial to create these beautiful DIY Rustic Wood Lanterns.

Rockstar DIY Series

You probably already know this Rockstar, because Katie is part of the Pretty Handy Girl rockin’ group. She is also the phenomenal DIY creator at Addicted 2 DIY. This girl doesn’t just build small lanterns, she also builds gigantic workshop garages from the ground up! She’s one bad ass DIYer.

katie-contributor-headshot

I hear the rat-a-tat-tat of the nail gun, so she must be ready to take the stage. Take it away Katie!

page_break_2

Rustic Wood Lanterns

Hey everyone!  It’s Katie again.  I’m back to show you how to make these simple, DIY rustic wood lanterns.  I love wood lanterns and have been wanting some for quite some time, but they can be pretty pricey.  With some square dowels, a little plywood, and some nails, I was able to create these gorgeous lanterns in no time at all.  I made mine from cedar boards that I ripped down into square sticks, but square dowels will work just fine.  The sizes of these are based on 10″ x 6″ hurricane vases I bought at Michaels, but these can be easily customized to fit whatever size vase you have, or no vase at all!

Rustic Wood Lanterns Materials:

  • 3 – 4′ long x 3/4″ square wood dowels (6 if you’re making two)
  • 1/4″ plywood or hobby board*
  • 1 1/4″ brad nails
  • 5/8″ brad nails
  • wood glue
  • wood sealer (I used Thompson’s WaterSeal Timber Oil in Natural)
  • hurricane vases (optional)
  • candles (optional)

*NOTE:  I used scrap 1/4″ plywood for the bottoms.  You can purchase small pieces of plywood or even 1/4″ hobby board at your local home improvement store.  It’s not absolutely necessary to use 1/4″ thickness.  If you happen to have 1/2″ or even 3/4″ plywood lying around, I’d definitely use that.  It makes this project even cheaper and everyone loves that!

Rustic Wood Lanterns Instructions:

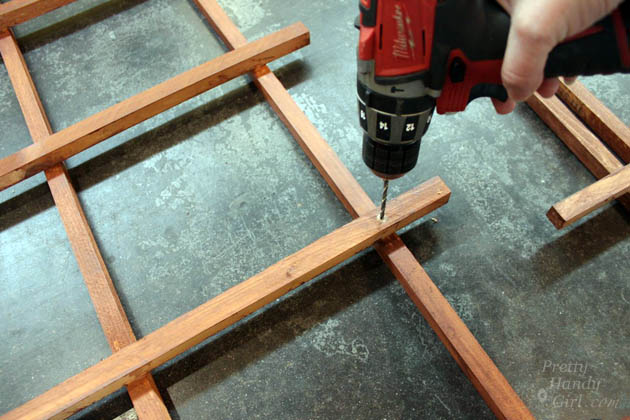
Let’s get started assembling the lanterns.

For each lantern, cut 4 – 12″ sticks of wood and 8 – 6.5″ sticks.  Cut the base of the lantern into an 8″ square.

cut-wood-for-lanterns

Assemble the frame of the lanterns using wood glue and 1 1/4″ brad nails.

IMG_0756

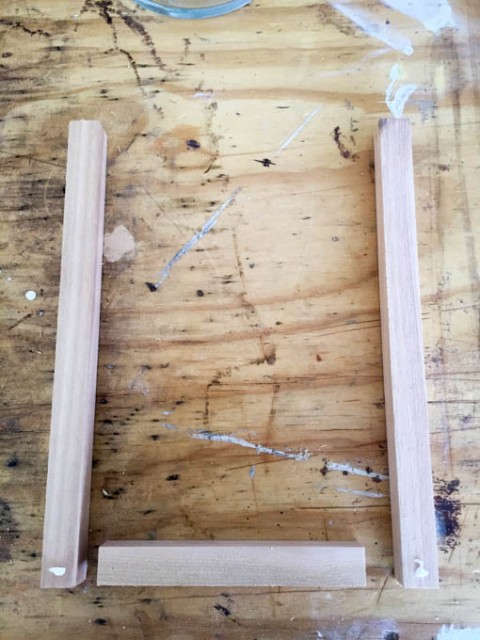
Clamp the frame to hold the frame square while you shoot the nails into the wood.  Read more

Build a Temporary Pergola with Trellises | Pretty Handy Girl

Build a Temporary Pergola with Trellises | Pretty Handy Girl

This tutorial to build a temporary pergola is perfect for a wedding, photo shoot, for some shade, or for your garden if you are okay with it not lasting forever.

My sister and I constructed it for our Thompson’s WaterSeal Bali Dream Deck to provide some romance and shade from the hot Bali sun.

Bali Dream Deck for Thompsons Water Seal | Pretty Handy Girl

Materials:

Build a Temporary Pergola with Trellises | Pretty Handy Girl

  • 2 Trellises (with double vertical construction)
  • 1 Trellis
  • 4 – 2 1/2″ wood screws
  • Drill bit
  • Drill
  • Clamps

Optional:

Instructions: 

Dry fit your trellis pieces together to create the pergola shape. Make note of where the top trellis intersects with the two side pieces.

Build a Temporary Pergola with Trellises | Pretty Handy Girl

Pre-drill holes through the top trellis piece at the four intersecting points.

Build a Temporary Pergola with Trellises | Pretty Handy Girl

Pre-drill holes into the top outer pieces of the vertical side trellises (where they meet the top trellis.) Read more

Autumn Mantle Décor and Vignettes | Pretty Handy Girl

Autumn Mantel Décor and Vignettes | Pretty Handy Girl

Fall is here! Hip Hip Hooray! I’m not exactly a summer gal (although I was born in June.) I prefer the cooler temperatures, the colorful landscape and jean weather! When the first cool day rolled into North Carolina, I was ready and waiting! But, my living room was still stuck on 4th of July (you know I’m a procrastinating decorator, right?!) I trudged up to the attic to pull down some fall décor. But, frankly, I wasn’t excited about putting the same stuff out again. I wanted a new look, something with bright colors and BLING!

Come on inside to view my Fall mantel and living room vignettes and cozy up near the hearth.

Autumn Mantel Décor and Vignettes | Pretty Handy Girl

I knew upfront that I wanted to use an aqua and vermillion color scheme. I really love the bold contrast of colors.

Autumn Mantel Décor and Vignettes | Pretty Handy Girl

I ordered a lantern and some faux leaves, for decorating. While I waited for them to arrive, I spent an hour building a giant canvas with scrap 2″ x 2″ pieces of lumber and cheap fabric.

blank_canvas

The next day I created a giant abstract water painting. You’ll be thrilled to know that I’ll indulge you with a video tutorial so you can create your own!

Autumn Mantel Décor and Vignettes | Pretty Handy Girl

When my order arrived, I integrated the Pottery Barn items (see if you can spot them) with several other objects that I already had. The two leaf branches I ordered weren’t enough on their own, so I grabbed a few bunches of dried leaves at the grocery store (check in the floral department.)

Autumn Mantel Décor and Vignettes | Pretty Handy Girl

The brass medallions are vintage British horse bridal medallions. They are actually a gift from a friend upon her return from England. (The perks of dog sitting!)

Autumn Mantel Décor and Vignettes | Pretty Handy Girl

Autumn Mantel Décor and Vignettes | Pretty Handy Girl

On the hearth, I added more faux leaves and candles to further decorate the fireplace.

Autumn Mantel Décor and Vignettes | Pretty Handy Girl

I also popped some gourds and pumpkins onto the hearth.

Autumn Mantel Décor and Vignettes | Pretty Handy Girl

Can you spot the fakes? (If you’re having trouble, good because I have a tutorial on how to fake a fake pumpkin.)

Autumn Mantel Décor and Vignettes | Pretty Handy Girl

The fabric was a last minute purchase that I made at Pier 1 Imports. It’s actually a curtain panel. The color coordinated perfectly with my painting on the mantel.

Autumn Mantel Décor and Vignettes | Pretty Handy Girl

The Pottery Barn lantern fit in nicely on the other side of the hearth and added some needed height to the arrangement (it is tall despite being the small-sized lantern!) I added in my DIY PB inspired lantern for a collected look.

Autumn Mantel Décor and Vignettes | Pretty Handy Girl

Autumn Mantel Décor and Vignettes | Pretty Handy Girl

Do you have a drafty fireplace? If so, you’ll want to learn how to make this rustic fireplace insert to stop drafts!

No more drafty winter evenings and the insert is a beautiful backdrop instead of a big black hole.

Autumn Mantel Décor and Vignettes | Pretty Handy Girl

Autumn Mantel Décor and Vignettes | Pretty Handy Girl

This tray was literally a quickie makeover using an old tray I had on hand. I’ll be sure to show you this transformation in the coming weeks.

Autumn Mantel Décor and Vignettes | Pretty Handy Girl

Recognize these log pillar candles from the tutorial I gave you last Christmas?

Autumn Mantel Décor and Vignettes | Pretty Handy Girl

Autumn Mantel Décor and Vignettes | Pretty Handy Girl

Autumn Mantel Décor and Vignettes | Pretty Handy Girl

Autumn Mantel Décor and Vignettes | Pretty Handy Girl

This was one of my souvenirs I brought back from our vacation in England. A printing block. I thought it was for sari printing, but I was told it was for making an impression on furniture that would then be relief carved. It was dark black until I rubbed some gold Rub n’ Buff over the raised areas.

Autumn Mantel Décor and Vignettes | Pretty Handy Girl

The black bucket was a yard sale find that I spray painted with chalkboard paint and added a fun message that I designed.

Autumn Mantel Décor and Vignettes | Pretty Handy Girl

Finally, I want to leave you with this little gift.  Feel free to download this Autumn inspired printable to use in your own home:

Chalkboard Autumn Free Printable - Autumn Mantel Décor and Vignettes | Pretty Handy Girl

Which was your favorite item or vignette? Are you on pins and needles waiting for a specific tutorial? Do tell.

PHGFancySign

I have been dying to share this tutorial with you! This project was inexpensive and it made such a big impact in our mudroom. It started with a few Habitat ReStore light fixtures and some NEW! Martha Stewart glass paint and ended up adding some major “WOW Factor” to our entry.

Read more

Thanks to my Facebook fan, Heather H., for the ultimate compliment on this lantern. She asked if I got it at Pier 1! Nope Heather, I got it at the Habitat ReStore and it found its way into my hands in this condition:

After a Women Build meeting at the Habitat ReStore a month ago, I spied that dusty relic. An old discarded hanging light fixture. I grabbed it and promptly paid $5 for it. Then I got to chatting with the clerk at the ReStore and absentmindedly walked out without my lantern. By the time I remembered, the ReStore had already closed. It was sad… it was tragic… I didn’t know when I’d be reunited with my light fixture because the ReStore is about 25 minutes away from my home. But, there is a happy ending to my story, my mother-in-law (who gives a good name to all MILs out there) offered to swing by the ReStore the following day to pick up my lantern for me. Hugs to her for reuniting us. But, I had to laugh at the look of skepticism she gave me as she handed over the dusty light. She couldn’t see its true potential, but I could.

How about you? Would you have passed this light fixture by? Or would you have seen the potential?

Well, next time you see a light fixture like that, grab it and I’ll show you how to transform it.

Materials:

  • Old lantern style light fixture
  • Pliers
  • Wire cutters
  • Two screwdrivers (at least one needs to be flat head)
  • Damp rag
  • Sandpaper
  • Plastic drop cloth
  • Kilz spray primer
  • Rustoleum Lagoon spray paint
  • Rub n’ Buff Gold Color
  • Paper towels
Difficulty: Easy
Step 1. Disassemble the lantern by unscrewing all the parts.

Step 2. Use wire cutters to cut the wire to the light housings.

Step 3. Pull the light sockets, bulbs and lighting out of the lantern.

Step 4. Remove the finial from the bottom of the lighting and set it aside with the lantern. Discard or keep the lighting parts for some other project.

Step 5. If there is a chain attached to the lantern, insert the two screwdrivers into the link attaching it to the lantern. Rotate the two screwdrivers in opposite directions as shown to pry the chain link apart.

Step 6. Pry up the tabs on the lantern that are holding the glass in place. Remove the glass panels and set them aside.

These are the parts that I kept for the lantern:

Step 7. Wipe all the parts with the damp rag to remove any dust and debris. Then scuff the lantern parts with sandpaper and wipe off any remaining dust.

Step 8. Set the lantern and parts outside on the drop cloth.  Spray them with Kilz primer, flip the pieces over and spray again.

Step 9. When the primer has dried, inspect the lantern for any paint drips that need to be sanded smooth.

Step 10. Spray paint the lantern and parts with Rustoleum Lagoon. Flip everything after the first coat is dry and spray a second coat of paint.

Step 11. After the lantern has dried thoroughly, reassemble the lantern.

Screw the finial onto the inside of the lantern where the lighting used to attach.

Step 11. Wipe a small amount of rub n’ buff on a dry paper towel. Rub it on the cross bars of the lantern.

Step 12. Clean the lantern glass with windex and a clean rag. Then insert the glass panels back into the lantern.

Admire your new aqua beauty!

The hardest part of this project was trying to decide where to display my lantern. I could see it in every room of our home!

But, ultimately I gave it a place of prominence on our mantle. And included an old picture inside it.

Have you seen these old light fixtures? Could you ever guess that they could be turned into beautiful decorating gems?
Have a great weekend y’all. I hope you make a trip to your local Habitat ReStore and search for your own lantern.

I hope you’ll join Heather and some other friends on Facebook so you can see what I’m up to next!

Sharing with Tater Tots and Jello Weekend Wrap Up Party