How to Winterize Your Rain Barrel

How to Winterize Your Rain Barrel

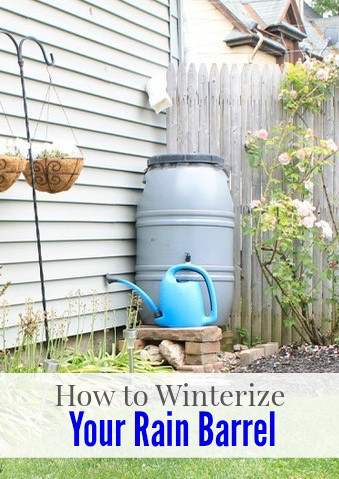
Hello friends. It’s Jessica, from Decor Adventures with some easy tips to get your home ready for the cooler months ahead. I’ll show you how to winterize your rain barrel, which goes perfectly with Brittany’s recent guides on ways you can keep your home warm this winter and how to protect pipes from freezing.

Rain barrels have been growing in popularity and are now a common way to save money on water use for your landscaping. They are also great for corralling water way from certain areas of your property. If you have been looking for a rain barrel, check the local environmental non-profit organizations in your area. They often sell them at a discount.

Now that winter is approaching, those barrels must get properly put away so they can last for many years to come.  We’ve been using our barrel for five years to collect water from the 1-car garage and help water the garden all summer long.

How to Winterize Your Rain Barrel

Here are a few tips on how to winterize your rain barrel:

Connection of a rain barrel to the gutters of a building can be via a few methods:

  • Gutter diverter – an attachment you can connect to a downspout to easily close off the water supply to the barrel and return it to a straight downspout once you aren’t using the barrel over the winter or when it gets full.
  • Flexible gutter – connects the downspout from the gutters on the garage to the rain barrel. These are also called flex-a-spout or vinyl elbow at the home improvement store and are very handy for diverting water in a non-straight path.

Read more

Lowe's Spring Makeover Reveal Tour | Pretty Handy Girl

Have you been following all the Lowe’s Spring Makeovers? There were 10 in all, and each one is truly a miraculous transformation. If you remember, there were 10 bloggers who were sent to 10 different areas that were hardest hit by this past winter. We all combed through hundreds of applications to select 10 homeowners who deserved a fantastic makeover. There were challenges; there were lots of Lowe’s heroes who stepped up to help with those challenges; and there were lots of happy tears in the end. You’ll definitely enjoy reading each story and seeing the reveal!

If you’re ready to start the tour, grab a cold drink and head this way—>>> Read more

DIY Firepit and Seating | Pretty Handy Girl

DIY Firepit and Seating | Pretty Handy Girl

Firepits are very popular right now. You can purchase a simple firepit at your local home improvement store, or put in a little sweat equity and create a DIY Firepit with Seating.

When we had several hardwood trees taken down in our yard, I asked the tree guy to cut some of the base pieces of the tree trunk into 18″ segments to use as stumps to sit on.

Then I set about creating a DIY firepit and seating in our back yard.

Materials:

  • Shovel
  • String
  • Stake
  • Stick
  • Rocks or fire ring
  • Sand
  • Bag of drainage gravel
  • Slate, stepping stones or pea gravel
  • Mulch or crushed stone
  • Stumps or seating
  • Wood to burn

Instructions:

Begin by locating a level location to build your fire pit. Take note of any overhanging branches and trim them away from the firepit area. Hammer the stake into the center of your firepit area. Attach string and make a loop in the string at 6 feet. Insert a stick into the loop and walk around pulling the string taut while dragging the stick in the earth to mark a 12 foot diameter circle. Create another loop at 4 feet and repeat marking an inner circle. Finally, create a loop at 1 foot and drag the stick to mark the firepit ring area.

DIY Firepit and Seating | Pretty Handy Girl

Dig a hole in the 2 foot firepit ring area. Remove any roots from the dirt. Dig about 12″ down. Fill the bottom of the hole with gravel. Add a layer of sand on top of the gravel. Line the 2′ firepit area with a fire ring or rocks (or both).

DIY Firepit and Seating | Pretty Handy Girl

Pour sand around the 8 foot diameter circle and set your stepping stones or pea gravel in this area. Read more

Install a Post Mounted Birdhouse | Pretty Handy Girl

Install a Post Mounted Birdhouse | Pretty Handy Girl

Hey y’all! I’m back with another easy tutorial. This is another #DIYCourage project sponsored by Duluth Trading Co. Do you love birds? Want to add some birdhouses to your property without attaching them to trees? Today I’m going to share a super simply DIY project that will make the birds happy and make you smile. Learn how to install a birdhouse on a post within an hour.

Install a Post Mounted Birdhouse | Pretty Handy Girl

My sons and I love watching the birds come to our kitchen window feeder. We want to make our yard a welcome place for all birds. We wanted to add more birdhouses to the yard by adding a two-story birdhouse. We already have two birdhouses (one that is a little wacky and made with knives), but I’ve always admired the two story birdhouse condos that house eight nests. When I saw one at the Southern Ideal Home Show (with a discounted price tag) I snatched it up.

Install a Birdhouse on a Post Materials:

(I’ve included affiliate links for your convenience. I earn a small percentage from a purchase using these links. There is no additional cost to you. You can read more about affiliate links here.)

Install a Post Mounted Birdhouse | Pretty Handy Girl

How to Install a Birdhouse on a Post Instructions:

Select a location to install your birdhouse. Try to find a spot that will get a decent amount of shade during the day (to keep the birdies from getting too hot.)

Install a Post Mounted Birdhouse | Pretty Handy Girl

Twist the post anchor into the ground. When it becomes difficult to turn, insert the pry bar for added leverage.

Install a Post Mounted Birdhouse | Pretty Handy Girl

Set your 4×4 post into the anchor.

Read more

WORX 56v Hedge Trimmer Review | Pretty Handy Girl

WORX 56v MaxLithium Hedge Trimmer Review | Pretty Handy Girl

We have a very wooded and heavily landscaped lot with lots of mature bushes. Some of the bushes were starting to achieve monster proportions. Do you see the resemblance? Today we are going to be talking about this awesome hedge trimmer. Check out this WORX Hedge Trimmer review.

WORX 56v Hedge Trimmer Review | Pretty Handy Girl

This is why I needed a bad boy hedge trimmer on my side. WORX sent me the 56V MaxLithium Cordless 24″ Hedge Trimmer  to try out. It turned out to be the perfect tool for our yard. Previously I tried the 20V MaxLithium Cordless 20″ Hedge Trimmer, but it didn’t have the muscle I needed to power through our landscaping. The 56V WORX hedge trimmer definitely had the power to cut easily through all our shrubs and bushes. But, the extra power is the result of a large battery which does weigh more than its 20V sibling. However, I’d much prefer a little extra weight because the trimmer can cut through bushes and shrubs much faster (saving on arm fatigue in the long run.)

WORX 56v Hedge Trimmer Review | Pretty Handy Girl

The WORX 56V MaxLithium Cordless 24″ Hedge Trimmer requires the assembly of the handle and shield when you first remove it from the box. You will need a philips head screwdriver.

WORX 56v Hedge Trimmer Review | Pretty Handy Girl

The battery pack should not be in the trimmer during assembly. Simply slide the shield into place (just above the blades) and secure it with the screws shipped with the tool.

WORX 56v Hedge Trimmer Review | Pretty Handy Girl

The handle requires some outward force to snap over the trimmer.

WORX 56v Hedge Trimmer Review | Pretty Handy Girl

The handle is secured with one bolt on one side.

WORX 56v Hedge Trimmer Review | Pretty Handy Girl

Snap the battery pack in place and you’re ready to tame that jungle you call your yard.

WORX 56v Hedge Trimmer Review | Pretty Handy Girl

Trimming the pampas grass used to be a tedious job using manual hedge shears and I inevitably lost the battle with lots of scratches. Read more