Pros and Cons of 4 Types of Picture Hangers

Pros and Cons of 4 Types of Picture Hangers

Hello! It’s Jessica, from Decor Adventures and I’m back this month with some very handy tips to help hang items up on the wall. Do you ever wonder which picture hanger to use? Did you know there are several ways you can hang things up? From curtains to art and mirrors to lightweight decorations — there are many options for hanging (and sometimes you don’t even have to put a hole in your walls.)

I live in a 115 year old house that has both plaster and drywall, and I’ve experimented with many types of ways to hang items on the walls. Today I’ve compiled The Pros and Cons of 4 Picture Hangers.

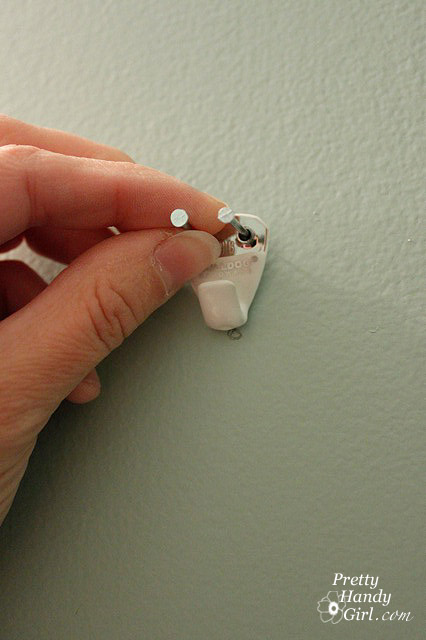
1. Picture Hooks and Nails:

This is probably the most common way to hang up items. Simply mark where your item will go and hammer in your nail and hanger. Brittany shows you how to hang up items when putting together a gallery wall here.

insert-nails-into-hanger

Pros:

Hooks and nails come in many lengths so they can work well in most walls and are easy to use. They are also affordable and go into a wall quickly. All you need is a hammer.

Cons:

Hooks and nails don’t always work in every wall type and can rust. They can’t be used in plaster walls. When hanging heavier art, you need to find a stud to nail into. Read more

Build a Temporary Pergola with Trellises | Pretty Handy Girl

Build a Temporary Pergola with Trellises | Pretty Handy Girl

This tutorial to build a temporary pergola is perfect for a wedding, photo shoot, for some shade, or for your garden if you are okay with it not lasting forever.

My sister and I constructed it for our Thompson’s WaterSeal Bali Dream Deck to provide some romance and shade from the hot Bali sun.

Bali Dream Deck for Thompsons Water Seal | Pretty Handy Girl

Materials:

Build a Temporary Pergola with Trellises | Pretty Handy Girl

  • 2 Trellises (with double vertical construction)
  • 1 Trellis
  • 4 – 2 1/2″ wood screws
  • Drill bit
  • Drill
  • Clamps

Optional:

Instructions: 

Dry fit your trellis pieces together to create the pergola shape. Make note of where the top trellis intersects with the two side pieces.

Build a Temporary Pergola with Trellises | Pretty Handy Girl

Pre-drill holes through the top trellis piece at the four intersecting points.

Build a Temporary Pergola with Trellises | Pretty Handy Girl

Pre-drill holes into the top outer pieces of the vertical side trellises (where they meet the top trellis.) Read more

Over the weekend I finally cleaned up our garage. This is our multi-purpose space, so it had multi-multi-multi items strewn everywhere. Check out this cool Hanging Jar Storage.

Because our garage is small (fits 1.5 cars) space is a premium and I knew where I could find more space. One place I found space is under the shelves. Another place was inside my workbench (but, I’ll show you that in another post.)

I had been saving jars and lids (which I had to fish out of the trash a few times. Ewww!) for storage of odds and ends in the workshop/garage.

This project turned out to be a super easy and quick project (unlike taming the wild multi-beast our garage had become.

1) First I put the jar lid on top of a scrap piece of wood. 2) Then I centered my drill. 3) And drilled through the lid (check the size of your screw to make sure you choose a drill bit that equals the diameter of the screw, but not large enough for the screw head to go through.

Then I used a screwdriver and attached the lid to the underside of my shelf.

Then simply screwed the jar into the lid! Repeated that process three more times and filled the jars with the odds and ends that needed a place to be stored.

Ultimately, I finished cleaning the garage so I have room to set up a spray tent and start working on this sad little chair I found on the curb. Look here to see her transformation! I have to tell you, it is going to be quite a job. I took her completely apart, but I can rebuild her. I have the technology. Better, stronger, faster than before! (oops, The Six Million Dollar Man started playing in my head.)

Update: I was feeling pretty embarrassed after showing you my messy garage. So, here is proof that I really did clean it up. We still have a lot of stuff to fit in a small area, but at least I can walk around and find things now!