Turn a Chair into a Stool

Upcycled Stool from a Chair

I love this upcyled project from Jessica! Today’s Rockstar is probably familiar to you because she performs as a monthly contributor on Pretty Handy Girl. Jessica is here with the tutorial to Upcycle a Stool from a Chair.

JessicaBioPic

When Jessica isn’t performing here on Pretty Handy Girl or playing with her adorable new baby, she is blogging at Decor Adventures. Jessica and her husband have been renovating their old home since they bought it in 2010. Jessica is right at home behind the power tools and can create the most amazing transformations! I can honestly say that Jessica and I have been blogging friends since we both started blogging in 2010. Rockstar DIY Series

I hear the sound of a reciprocating saw! Jessica is storming the stage now!

page_break_2

We all have unused furniture around our house right? Whether it’s a table that no longer fits in your room; or a chair you’ve grown tired of; or maybe something that’s broken and you can’t bring yourself to throw it out. Well now you don’t have to, you can turn some of those old pieces into something new with just a few supplies and some DIY skills.

Turn a Chair into a Stool

For the longest time we had a set of these wooden chairs in our house. Although three of them are in great shape, one was broken and couldn’t be used anymore. Instead of getting rid of it, I decided to turn it into a fun and functional stool. Here is a quick tutorial on how to turn a broken chair into a stool.

Materials

  • Broken chair
  • Pencil
  • Reciprocating saw
  • Safety glasses
  • Sanding block
  • Spray paint
  • 1-inch foam
  • Spray adhesive
  • Scissors
  • Fabric
  • Hot glue gun and glue sticks

Instructions

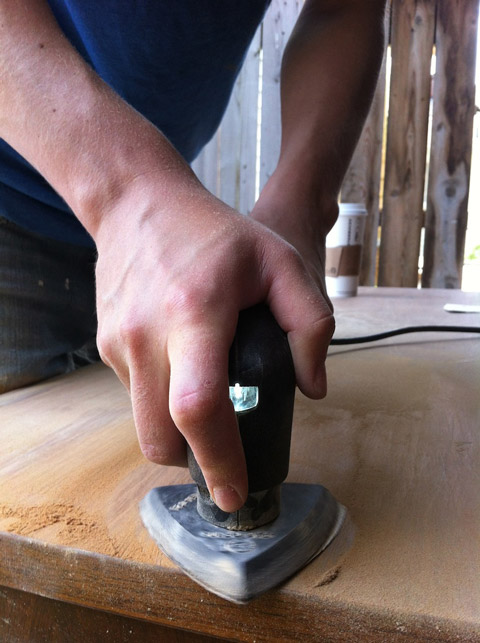
For this project, you’re going to cut off the back of the chair to reuse the seat and legs. All chairs are different, so you can cut or even dis-assemble the chair to your liking. Mark the chair with a pencil where you will cut it.

Upcycled Stool fro a Chair

Read more

A refinished wooden sideboard left with a natural stain – not painted! Learn how to refinish this sideboard.

Have you ever turned down a piece of furniture that looks ruined? Aha, today’s rocker is Emily and she has the superpower to make furniture look brand new again!  On the Rockstar DIY stage today is a performance you won’t forget. Emily will single-handedly take you through the steps of Refinishing a Mid-Century Sideboard.

Rockstar DIY Series

If you haven’t met Emily yet, she is truly a Rockstar! Emily lives in Rochester, NY and is ALWAYS working on an amazing home improvement project.

Emily-MerryPad

Emily can be found with a hammer, saw or drill in her hands at MerryPad. She has painstakingly renovated two homes. And, as if she wasn’t busy enough with home projects (and taking care of a baby and her step-daughter), she can also be found blogging at DIYNetwork’s Made + Remade. That girl is a machine!

Oh, I hear the sound of a sander, so put your hands together and give it up for Emily!

page_break_2

Hey guys! Super nice to meet you. If we haven’t already met, I figured there’s one thing you should know about me: I really like getting my hands dirty. Building furniture can be fun, and learning how to maintain my home has brought me a lot of pleasure, but if you see me and you notice my hands and arms are coated by stain? Well, you’ll know that I’ve been having a really good time (and I’ve probably run out of mineral spirits, again). Refinishing and restoring furniture–and cabinets, and floors, among other things–is one of my favorite DIY endeavors, always a fun learning experience, and always an opportunity to bring new life into an item that was once beautiful. I’ve had some lucky secondhand finds over the years, from bedside tables to chairs, but one of my favorite transformations was this Bassett Sideboard that I scored from a garage sale for $15.

How to refinish a vintage midcentury sideboard with scratches and water damage.

T’was one of my first refinishing projects, swoon.

If you’re tackling your first refinishing project (or just looking for tips), here are the products and tools I used for this makeover:

  • Detail palm sander and normal sandpaper to get into small crevices
  • Rags (general clean up cloths, and old rags or socks for applying the stain)
  • Tack cloths (the tack cloths are wonderful for cleaning all evidence of sanding dust before staining)
  • A paint brush and high-density foam roller (for application of the conditioner and polyurethane topcoat)
  • Pre-stain wood conditioner
  • Oil-based stain (for this piece I chose English Chestnut by Minwax)
  • Gloss polyurethane

An extraordinary amount of sanding went into eliminating the damage that had existed in the top surface. Scratches are relatively easy to cure, but you never know how bad the water damage is until you start sanding deep, as evidenced by this progress photo:

How to refinish furniture with scratches and water damage.

Elbow grease and a few more courses of low-grit sandpaper (80-120) helped to transform the surface of the sideboard into a raw wood state and eliminate the visible water rings. You might find that your water damage runs deeper – every case is different. Read more

Pretty Handy Girl Living Room Reveal | Pretty Handy Girl

Cory Rolling Storage Ottoman from La-Z-Boy | Pretty Handy Girl

I’m so excited to finally reveal our living room makeover to you. I partnered with La-Z-Boy to furnish our living room almost exclusively with La-Z-Boy furniture and accessories. The furniture from La-Z-Boy arrived a while ago, but the rug was backordered for several months. My La-Z-Boy in store designer asked me twice if I wanted to chose another rug, but I’m so glad I decided to wait. I love the rug and can honestly say that it was well worth the wait!

Before we get to the tour, I think it’s only fair to show you a few pictures of the progression of the living room over the years. About a year after we bought the house in 2007, I painted the walls a lighter sage green and added sconces. We also paid a contractor to double the width of the opening to the kitchen. That made a huge difference. You can see the missing flooring where the small opening used to be below:

doorwayopenedup

The sofa was a hand-me-down from my Godfather’s parents.

Xmasmorning

Underneath the red slipcover was this fabulously reupholstered sofa. Can you tell what year I re-covered it?

plaid_sofa

Ummm, hello 1990’s hunter green plaid. I don’t have a photo, but under this plaid monster is the original fabric from the 60’s. It was a floral woven tapestry fabric. I still can’t believe we sat on this sofa that was over 50 years old. It was hard as a rock.

In 2009, I pulled up the wall-to-wall carpeting and installed antique heart pine wood flooring. I also painted the previously painted white fireplace to look like brick again.  You read that right, the brick is painted!

livingroomdone2

In 2011, I covered the sofa with a new slipcover, but it was still the same uncomfortable hard sofa. We also tried positioning the sofa at an angle in the room.

living_room_vertical

This past winter we moved the furniture around again and for the first time we felt that we had found an arrangement that worked for us.

Pretty Handy Girl's Holiday Home Tour 2014

If you recall, I took a little field trip to our local La-Z-Boy furniture gallery back in December. I met with Lexie, the designer, who was invaluable with her expertise and design advice. Then you all helped me by voting for your favorite fabric selection (big virtual kisses and hugs from me to you for that!)

The voting was a tie, so I combined fabrics from the two winners and ultimately chose this combination:

La-Z-Boy Living Room Mood Board | Pretty Handy Girl

Ready to see how they look in the living room? Are you telling me to shut up already and get to the reveal? Your wish is my command, here is our living room reveal:

(I’ve included affiliate links for your convenience. I earn a small percentage from a purchase using these links. There is no additional cost to you. You can read more about affiliate links here.)

Read more

Cory Rolling Storage Ottoman from La-Z-Boy | Pretty Handy Girl

Daphne Ottoman from La-Z-Boy | Pretty Handy Girl

I’m in love with Cory and all the things he does for me. I can’t believe I just wrote that sentence, but it’s true. Cory has been with me for about two months now and he has easily won over my heart.

Daphne Ottoman from La-Z-Boy | Pretty Handy Girl

Honest, I’m not cheating on my husband. Cory is our rolling storage ottoman from La-Z-Boy. He scoots up close to our sofa and holds my feet after a long day. During the day, we spend a lot of time together, because this has become my favorite spot to blog.)

Cory Rolling Storage Ottoman from La-Z-Boy | Pretty Handy Girl

Before I go on gushing about Cory, I should tell you that this is a sponsored post for La-Z-Boy and they let me custom design Cory for my home. But, I never realized how much I would love him until he came into my living room.

When the La-Z-Boy design consultant first recommended an upholstered ottoman, I was hesitant. I worried that we wouldn’t have anywhere to set our drinks. But, she told me that I just needed to give Cory a tray to hold drinks and other necessities. Read more

Installing a Wall Mount Flat Screen TV + Hiding Cords | PrettyHandyGirl

Installing a Wall Mount Flat Screen TV + Hiding Cords | PrettyHandyGirl

Do you have a flat screen TV? Do you have children? Wish you could mount your TV on the wall for space and safety? Or have you already mounted your TV, but the wires are visible and hang below your screen? GASP—not the dreaded visible wires syndrome!

Installing a Wall Mount Flat Screen TV + Hiding Cords | PrettyHandyGirl

Today I have a tutorial to show you How to Install a Wall Mount for your TV AND How to Hide those Unsightly Wires in a cable management system. SANUS sent me their Full-Motion TV Wall Mount and In-Wall Cable Management to use for this tutorial. Before you start thinking that you can’t do this, or that you have to hire an electrician to run power behind the TV, you don’t! And this is a very easy DIY project! The SANUS In-Wall Cable Management System is the coolest product. It allows you to hook up to an existing outlet elsewhere (within 60″ horizontally from your TV)! (Per FTC regulations, you should know that this is a sponsored post for SANUS, but I approached them after researching TV mounts and cable management systems. )

Genevieve Gorder has some good information about why you want to use a SANUS mount in this short video:

Why did I want to use the SANUS mount? Here’s just a few reasons:

Installing a Wall Mount Flat Screen TV + Hiding Cords | PrettyHandyGirl

You can pull your screen out from the wall or press it back to just a few inches away. (The arms extend a full 20″. Further than shown, because our cables are too short to fully extend.)

The power cord plugs into an ultra low profile in wall cable system. All wires are hidden behind the TV.

Installing a Wall Mount Flat Screen TV + Hiding Cords | PrettyHandyGirl

The TV can also extend and swivel from left to right. This allows us to be able to watch TV from the adjacent room! Which means the kids can eat pizza AND watch a movie because they can safely sit at the kitchen table and view the movie in the living room. Score one for Mom!  No more pizza stains on the rug or sofa.

Installing a Wall Mount Flat Screen TV + Hiding Cords | PrettyHandyGirl

Ready to learn how you can easily mount your flat-screen TV on the wall AND hide the wires? Let’s get to it! Read more