31 Days of Handy Home Fixes | Pretty Handy Girl

Welcome to Day 2 of my 31 Days of Handy Home Fixes. Today I’m going to show you a tip for fixing a rubbing or sticking door.

Day 2. Fixing a Sticking Door

Do you have a door in your home that rubs on the frame or gets stuck certain times of year? Our bathroom door used to stick in the summer (but not the winter.) The excess humidity in the air caused the door to swell just enough that it rubbed at the top of the frame. The fix literally took less than five minutes!

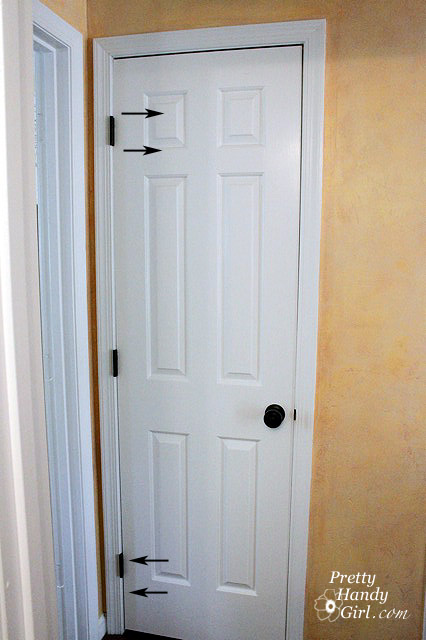
Take a look at your door and determine where the door is rubbing. Assess which direction you need to nudge the door to break the contact.

The simplest fix is to try loosening or tightening the door hinge screws. Take a look at the door below. The door was too tight in the upper left corner. To relieve the rubbing loosen the screws a half turn in that top hinge. Test the door again. You may also need to loosen the screws on the middle hinge and tighten the screws on the bottom hinge.

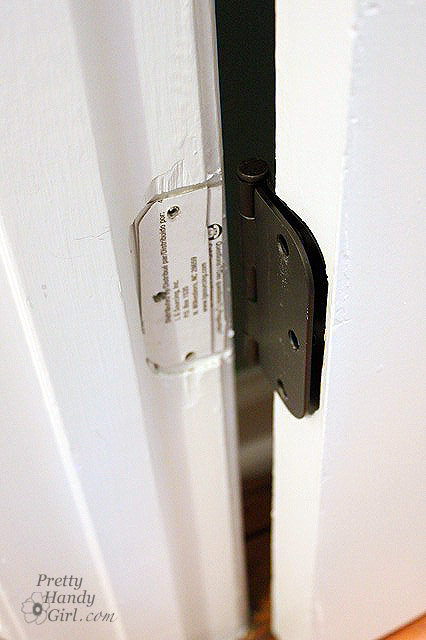
Is your door still sticking? Try removing the screws completely from the door frame. Instead of shimming with a wooden shim (which would be too thick) cut a piece of thin cardboard (think cereal boxes and product packaging) and inserted it behind the hinge. Then drive the screws back in.

Shim a door hinge

95% of the time the above two tips will resolve your issues. If your door is still sticking, you may have to take more drastic measures like routing out more material from the door frame with a Dremel or using a power planer to trim down your door.

PHGFancySign

Check out other participants in Nester’s 31 Days Challenge.

31 Day Writing Challenge

Don’t miss a single tip! Sign up to get all the tips in your email:


Sign Up for Email Subscription


Other tips in the 31 Days of Handy Home Fixes series:


How to Add Security Film to Glass Doors & Windows | Pretty Handy Girl

How to Add Security Film to Glass Doors & Windows | Pretty Handy Girl

The folks at Allstate Insurance have graciously sponsored this post, which will help you learn how to install security film to safeguard your doors (or windows) from a potential break-in! It’s a simply DIY solution that could potentially save you the heartache of having your home burglarized.

I’ve noticed an unsettling trend in our area. There are more thefts popping up around our neighborhood. Luckily the majority of them are burglaries with no violence. But, it’s still unsettling. If you want the latest on crimes around you, sign up for SpotCrime.com. Simply enter your address and you’ll get emails when crimes are reported around you. Then again, this could lead to a bit of paranoia {raising hand.}

SpotCrime.com map

Regardless, there are two doors in our home that have always caused me some concern. We have two half window doors that needed some added security measures. The first one is the entrance to our mudroom. The second one is the back door to our garage (and you know I’d be heartbroken if anyone stole my power tools!)

How to Add Security Film to Glass Doors & Windows | Pretty Handy Girl

If you have a door like this, a burglar can simply break the pane of glass closest to the knob, reach in and turn the deadbolt and handle. One option is to install a two-sided keyed entry deadbolt lock. Because we have little children, I worried about them not being able to find the key and get out of the house in the event of a fire.

How to Add Security Film to Glass Doors & Windows | Pretty Handy Girl

This past week I happened to hear about security film and did a little research. I was skeptical until I tested the material myself. The results seriously amazed me! You can watch my test in the video later in this post.

In the meantime, here are the supplies you’ll need and the very simply installation instructions!

(I’ve included affiliate links for your convenience. I earn a small percentage from a purchase using these links. There is no additional cost to you. You can read more about affiliate links here.)

Materials:

 Instructions:

1. Begin by removing the grill if you have one solid piece of glass with faux dividers (see my video below for more details on removing the grill.) If you have true divided light, move on to the next step.

2. Measure your windows. Reduce the size by 1/8″ to leave space at the edges for the water to escape. Transfer the measurements onto the film with pen. Cut the window film with the x-acto knife and ruler. (You could use scissors in a pinch.)

How to Add Security Film to Glass Doors & Windows | Pretty Handy Girl Read more

Beef Up Door and Window Casing with Back Band | Pretty Handy Girl

Want an easy way to add more architectural interest to your standard colonial door and window framing? Adding an extra piece of moulding, called back band, can add that extra boost of architectural interest.

Add Architectural Interest to Casing | Pretty Handy Girl

And the good news is that you can do this to your existing trim moulding. No need to remove or start fresh! The only thing you will need is paint on hand to paint the moulding after you BEEF it UP! In essence, We’re gonna PUMP it UP!

Materials:

  • Back band moulding
  • Finish nailer
  • 2″ finish nails
  • Caulk
  • Paint
  • Miter saw or  hand saw with miter box

Instructions:

There’s really not much to this tutorial. Line up the back band against your existing door or window frame. Measure or mark the back band where you need to cut your miter. Read more

Painted Vanity Nightstand | Pretty Handy Girl

Painted Bedside Vanity | Pretty Handy Girl

In the quest to makeover our master bedroom and save money, I’ve been painting several pieces of furniture to coordinate with the new bed I built.

One of the pieces I painted was this small desk that doubles as a nightstand. Our bedroom isn’t very large and our master bathroom is even smaller than what can be described as a “master” anything! Doing my hair and makeup in our bathroom isn’t a viable option, especially when both Pretty Handsome Guy and I wake up at the same time. When I saw this little desk at a local thrift store, I grabbed it. Especially because she was only $20!

Painted Bedside Vanity | Pretty Handy Girl

She had lots of age, but not much character.

top-of-wood-vanity

However, she was the perfect size and had just enough storage for a makeup vanity.

With a light sanding, primer and a coat of Benjamin Moore Advance paint, she is now showing her more glamorous side. Read more

Facelift for a Knotty Pine Dresser | Pretty Handy Girl

Facelift for a Knotty Pine Dresser | Pretty Handy Girl

You know you’ve seen those knotty pine dressers from yesteryear. Their spotlight has faded and they are finding themselves at thrift shops, ReStores or worse yet…at the curb.

Facelift for a Knotty Pine Dresser | Pretty Handy Girl

I’m begging you to let this knotty eyesore back into your home. It doesn’t have to be banished. It’s KNOT her fault she was built from cheap pine. All this dresser needs is a new coat of paint and some beautiful brass knobs and all her flaws and knots will be forgotten.

Facelift for a Knotty Pine Dresser | Pretty Handy Girl

Extra observant points to anyone who realized that this blogger forgot to take a good before picture! She looked very similar to the knotty pine dresser shown above, except she had wooden circle knobs and an unfortunate set of bun feet. I did remove the bun feet from the dresser when I first brought it home. Mama ain’t got no need for buns in this oven (or on my dresser.)

Here are the details on how to refinish a knotty pine dresser and give it a complete makeover!

Materials:

  • Sandpaper
  • BIN primer
  • Damp rag
  • Paint brush
  • Foam paint roller
  • Quart of Benjamin Moore Advance paint (Deep Ocean)
  • Valspar asphaltum glaze
  • Brass hardware (I bought mine from House of Antique Hardware)
  • Drill with bits
  • Screwdriver
  • Level

Instructions:

This tutorial will be fairly brief, if you need more photos and explanation, you can view my previous dresser painting adventure.

Begin by removing all the drawers and knobs. Lightly sand the dresser and drawer fronts. Wipe off any sanding dust. Read more