diy french cleat

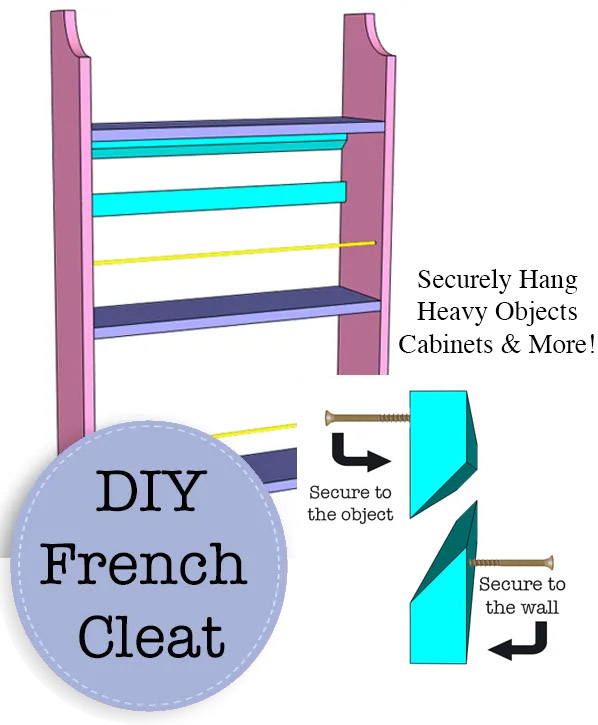
I am going to teach you how to securely hang heavy objects on the wall with a board and a few screws. Using a French Cleat has been a tried and true method for hanging heavy objects and is used by professional cabinet makers and DIYers alike. It can be incorporated into the item being built or added after the fact.

DIY French Cleat

How to Make a French Cleat

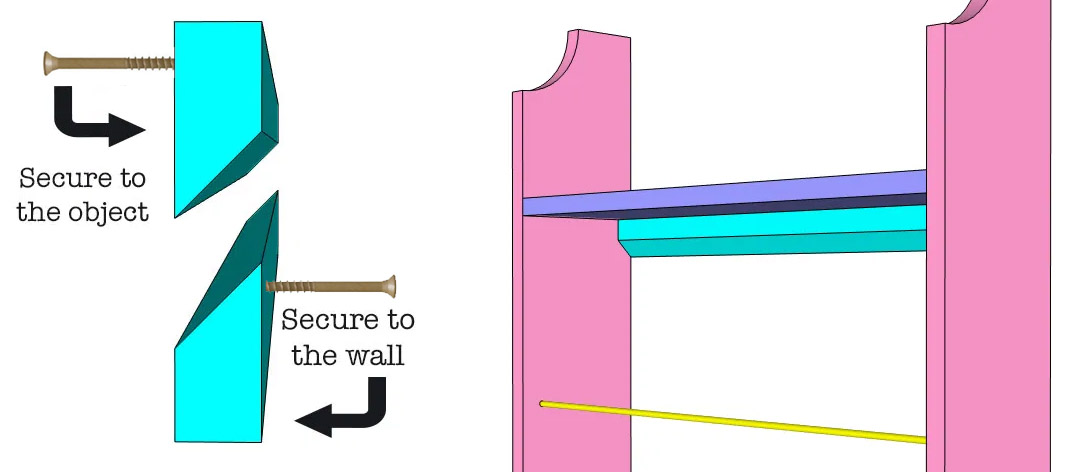
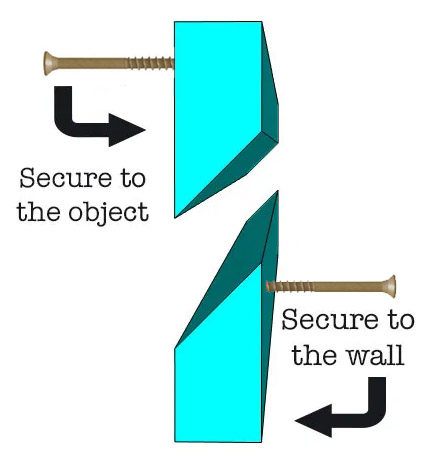
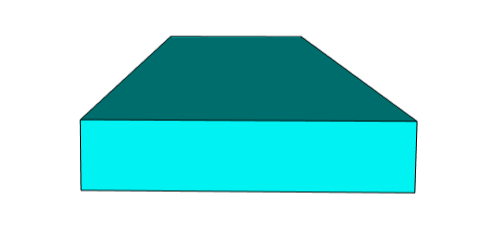
What is a French Cleat?  A French Cleat is a board or molding with a 30°-45° bevel cut attached to the wall along with a corresponding beveled board or molding attached to the object to be hung on the wall. That sounds a little confusing but check out the diagram below and it will all make sense. First let’s grab a few supplies.

DIY French Cleat

Materials:

(I’ve included affiliate links for your convenience. I earn a small percentage from a purchase using these links. There is no additional cost to you. You can read more about affiliate links here.)

  • 1″ x 3″ board or 3/4″ plywood strip (3″ minimum width)
  • 2″ screws

Tools:

Instructions:

Step 1:

Measure the length that you need your French cleat to be. Typically a french cleat is the length of the item to be hung on the wall and spans the length of at least 2 studs in the wall that the item will be secured to.

Step 2:

Adjust your table saw or circular saw to a 30°-45° bevel and rip your board along the center. (For tips on using a table saw safely, read this article.)

Step 3:

Secure the top piece of the cleat to the item to be hung (see diagram shown below). This can be done with pocket-holes, glued under a shelf, or with screws to the back of the item. (You may want to pre-drill your holes to avoid splitting the wood.)

DIY French Cleat

Step 4:

Choose the height at which you want to hang the item on the wall and mark where the bottom cleat will be placed. Mark the studs that the cleat will be screwed into and secure the cleat to the wall using wood screws and a level in the orientation shown above. (Again, you may want to pre-drill your holes to avoid splitting the wood.)

Step 5:

Gently place the object above the wall cleat and lower until the two pieces are securely nested together.

Often times the weight of the object and the angle of the beveled cleat is enough to keep the object securely in place. But, if you’re worried about children lifting the item, you can add a screw through the hanging object into the cleat or a wall stud for peace of mind.

DIY French Cleat

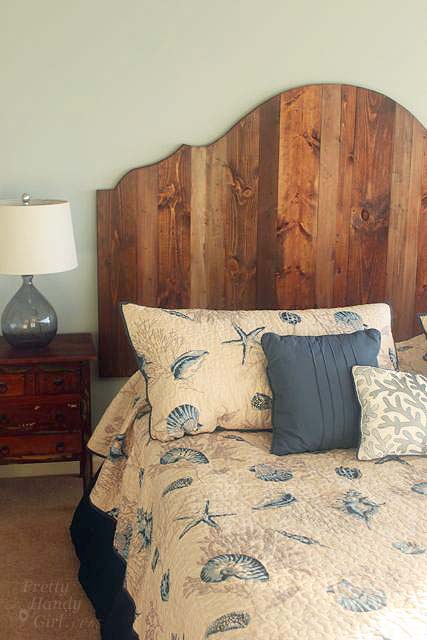
And if you’re excited about using a French Cleat, you might like to make a headboard that is hung on the wall using a French Cleat!

rustic-king-headboard-side-view

This is a great tip for hanging cabinets on the wall as well. I hope you try your hand at making and using a French Cleat soon. Let me know how it goes!

Hi! I’m Kristen, from In Her Garage, and I am a self-taught woodworker and DIY fanatic from Minnesota where I live with my husband and our two daughters. Between being a wife, mom and, registered nurse, I try to make as much time for DIY as possible. My love for building came after our family built our current home in 2015. After we moved in, we needed furniture and instead of spending massive amounts of money to order the pieces we wanted I decided that I would build them myself. I started with a buffet table plan from the fabulous Ana-white and quickly set out to remodel my entire home office.

Since then I have started a side business building furniture for the people in my community. I love hearing my clients talk about the pieces they wish they had whether it be a rustic buffet table, a one drawer side table, or a toy box and then making it a reality for them. While starting my small business it made perfect sense that I would document my building journey so I simultaneously launched the In Her Garage blog and I love sharing my plans, tips and tricks.

Making something beautiful with your own two hands through a little preparation and determination is an amazing feeling and I hope to bring inspiration and know-how to those looking to tackle a big or small project.
I am so glad that you found me here and please feel free to connect with me on Pinterest, Instagram, Facebook, and Youtube to see what I am working on right now.


On Wednesday, I had the morning to myself since the kids were in summer camp.  I decided not to work since it was my birthday. Most people would probably take the free morning to get a massage, or a pedicure, or go shopping. I chose the later. But, the shopping mall wasn’t calling me. My destination was far from the marble floors and glittering displays. I was headed to the industrial part of town where warehouses and construction equipment rental stores reside. I visited my local Habitat for Humanity ReStore.

I am always amazed by the things that are donated to the ReStore. When I enter those doors, my mind begins to whirr. Before me are shelves and aisles of discarded items. Each one calling to me to transform him or her from an ugly frog into a beautiful prince or princess. I happen to possess the magical powers to do just that! It starts with the ability to see into the future (well, maybe just a vision of what could be.) Then it takes some concentration and before you know it…bippity boppity boo! There before me stands a beautiful object and no one can guess at its humble beginnings.

I’d like to give you a look at some of the visions I had.  Won’t you join me on my tour?

First I headed down the furniture aisle. This little knotty pine night stand whispered to me, “Psst, look at my beautiful handles!” She had only been at the ReStore for a few days, so her price was a little steep. But, her drawers were solid and on gliders. Structurally she was solid.

I closed my eyes and when I opened them, I saw this beautiful off white dresser. Freshly painted a crisp white and her handles had a satin black finish. Beautiful!

Then I heard the sounds of water splashing on a classic marble sink. I turned the corner and saw this builder’s special white vanity with brand new brushed nickel faucet.

It didn’t take much to invision this gentleman with a black tuxedo coating of paint and brushed nickle knobs and handles. At $75, he is a diamond in the rough. The sink set alone would cost that!

But, the best is yet to come. Continuing down the cabinet aisle, I see this poor late 70’s kitchen cabinet set. Her handles are charming and exotic. She has some nice curves and pretty lines.

I squint my eyes and begin to see a miraculous transformation! Antique gold handles pop out. Legs grow at her base and a table top sprouts on her head. Oh she will be the belle of the ball as a sideboard in anyone’s dining room.

The next cabinet can not be ignored with a $5 price tag. He begs for someone to take him home.

Imagine a built in cabinet and window seat in a dormer window. Fresh white paint and slate blue trim with black handles.

It doesn’t take too much imagination to see these old newel posts cut down and fitted onto a plain jane desk to add more curvaceous legs:

Now it’s your turn. Imagine these items transforming before you very eyes:

I have a friend who has an old set of lockers by her door. It is her upright family organization center. Each child has a locker and he/she can store shoes, book bag, etc. inside.

I can just see this set of red lacquer cabinets in a retro modern dining room or living room:

A little black paint on the shelves and some feet. Maybe a black marble or granite top?

The ReStore has a large selection of donated lights. Chandeliers twinkle in the light above your head. Envision the shiny gold fading to a beautiful oil rubbed bronze. Another friend shared this link with me detailing such a transformation with Krylon spray paint.

The ReStore staff actually has a display model that someone has transformed into a shiny black chandelier with crystals dripping off her arms.

With an $8 price tag, it is hard to walk away from these beauties. But, I’m seeking something in particular. A new hanging fixture for our foyer.

I find these two potential hanging lights.

At $5 a piece I should bring them both home. But, I decided I prefer the one on the right with his open base and seedy glass. Check out the transformation here!

This glass globe used to be a large exterior hanging light fixture!

Can’t you just see it as a cloche in your garden? At $35, her price was a bit steep for me, but maybe she will still be there in a few weeks with a lower price tag. (Update: I went back to buy this exterior light and the second lantern above, but they were both gone. My loss, but hopefully someone else’s gain.)

As I gather my treasures (the hanging light, an old rickety ladder, some decorative moulding and a copper wall sconce) I am nearly bowled over by the detail on this solid armoire. At $450, it would be a nice addition in someone’s bedroom, but alas our rooms are too small for this towering king.

I hope you enjoyed the tour and check back soon to see the magic I am going to perform on the treasures I bought: copper sconce, decorative moulding, ladder, and hanging lantern.

In the meantime, I have a busy weekend ahead building a built in reading bench with storage in my youngest son’s extra closet.