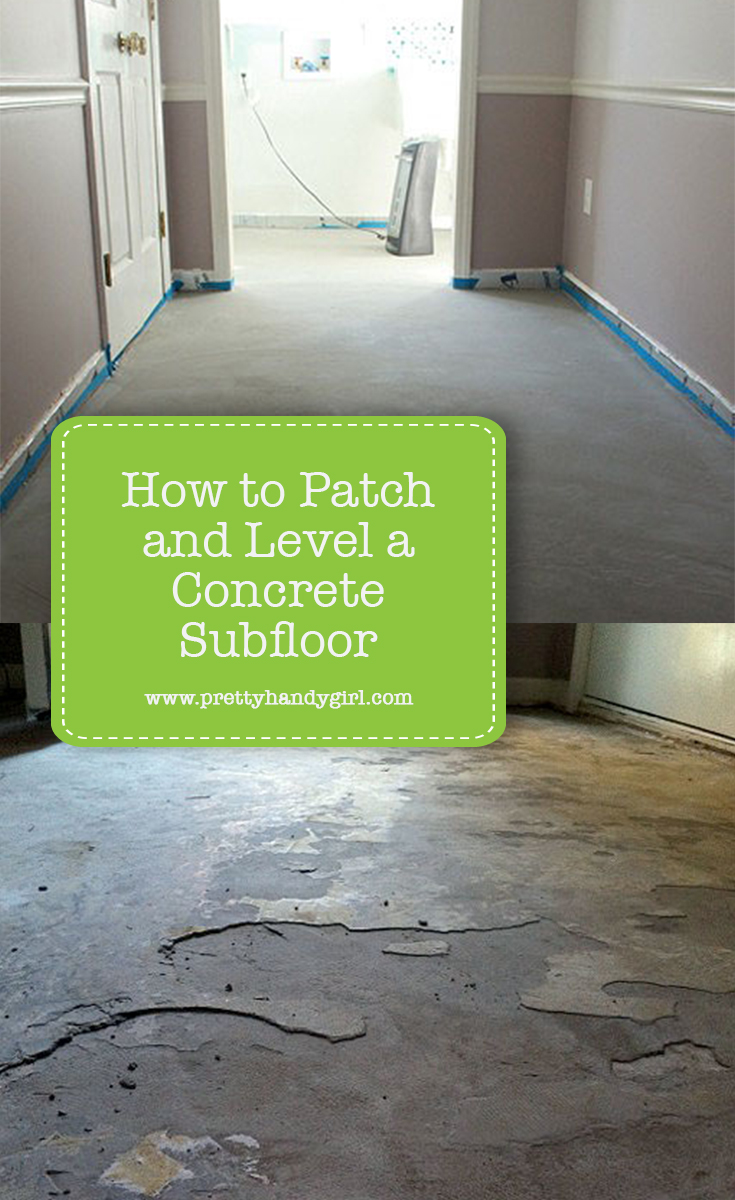
How to Patch and Level a Concrete Subfloor

We are well on our way to putting Humpty Dumpty back together when it comes to our mudroom and laundry room. The kitchen, it’s still a blank canvas.
After the water leak, the linoleum flooring had to be removed. What was left was a plethora of problem areas. Cracks, crumbled concrete and an uneven surface resembling the moon.

Before putting down any new flooring, we had to have a smooth and level surface. Adding a self leveler was the best answer to the problem. We purchased most of the supplies from Lowe’s and borrowed a large drill. And here’s how we did it:
Patch and Level a Concrete Subfloor Materials:
- Mapei Ultraplan (Self Leveler)
- Mapei Primer T
- Flat Trowel
- 5 Gallon bucket
- 4′ x 8′ Foam insulation sheet
- Utility knife
- Painter’s Tape
- Paint roller
- Paint tray
- Quart measuring cup
- Warm water
- Drill with a large chuck and attachable second handle
- Concrete mixing paddle
- Concrete patch (if you have a crack)
- Knee pads

The picture above shows two drills. The smaller one won’t accept the mixing paddle. You need a drill with a larger opening. And, adding a handle to the side will help mix the heavy self leveler without it taking you for a “spin”.
Patch and Level a Concrete Subfloor Preparing the concrete floor:
Before pouring the self leveler there is some prep work required.
First remove any loose and chipping concrete. I used a scraper and lightly hammered any spots that sounded hollow underneath to loosen any weak pieces.
It is recommended that you rough up the concrete. I skipped this step because our subfloor was far from smooth.
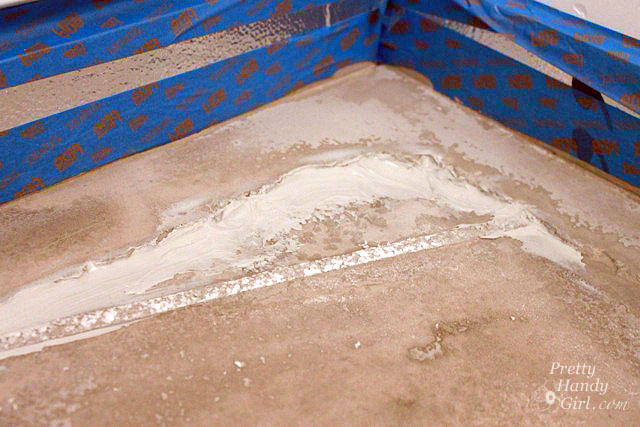
Cut rigid foam insulation strips with a utility knife to use around the perimeter of the room.

The insulation serves two purposes. 1. To create an expansion joint as the leveler expands and contracts with heat and cold. 2. And to prevent the self leveler from running into any cracks or through doorways. Plus, it created a nice channel to run some wires inside (more about that later in the week.)

Use painter’s tape to secure the insulation around the perimeter of the room.

Speaking of cracks, be sure to seal any large cracks with concrete filler and sealer. I neglected to fill this crack in the floor and literally poured 2.5 gallons of leveler into it before creating a little dam to stop all the leveler from pouring into the hole. Learn from my mistake, be sure to seal any large cracks in the concrete, or you’ll be doing the job twice.

Let the concrete filler dry before continuing.
Apply a primer to help the leveling material adhere to the concrete subfloor. Pour a small amount of primer into a paint tray.

Using a paint roller, roll the primer onto the floor and wait for the primer to dry per the instructions on the bottle.

The dried primer is tacky to the touch. If you wait more than 24 hours it will be necessary to reapply the primer.
Pouring and spreading the self leveling liquid:
Pouring and spreading the leveler is easiest to do if you have a partner (especially if you have an area that will require more than one bag of leveler.) One person can mix the next batch while the other is pouring and spreading. It is important to work into the wet edge or you will create ridges and bumps.
Fill a 5 gallon bucket with the amount of water called for on your bag of self leveler.
Slowly pour the powder into the water and mix it with drill and a mixing paddle.

The mix will be soupy like tomato soup when it is properly mixed. But, it will be much heavier!
When the bag is empty and the mix is completely mixed. Let it sit for 2-3 minutes. Then mix it again and begin your pour.

Immediately pour the liquid in 4′ sections and trowel it out, pushing more leveler toward any low spots.
Self leveler will do as it says, it will self level. But, only to a certain extent. Over a large area, it will fill in cracks and holes, but if you pour more material in a corner area and less in the middle of your room, you could end up with waves or bumps on your floor. Try to pour a consistent amount in each area.

Work into the wet pour with your next batch until you have finished leveling your area. Let the leveling liquid dry overnight before walking on it. The self leveling liquid will dry lighter and to a matte finish.
Clean out your bucket and trowel with LOTS of water. Hopefully you won’t have much leveler to dispose of. If you do, let it harden in a container you don’t mind throwing away.
Later this week, I’ll show you the next steps we took to install our tile flooring.

Pin for later!
Brittany,
Do you think a color can be added to the leveler mix. I was wondering about saving a step for the staining. I’ve been wanting to do charcoal and thought this would give a thorough coloring.
Kendra, I’m not sure. I’d recommend contacting the manufacturer.
Hello and good job on a quick fix! I’m looking to do a similar process to a 1200 sq. house. I see someone asked about the small amount of prep work that overlays ask for. Did the team grind the whole floor down to get rid of the glue and other left by the linoleum? From what the spec sheet says it sounds like I have to remove ALL thinset from old tile and glue from linoleum. Is that too much prep considering we have to use a primer? Thank you
Tim, I don’t think they did grind it down. I did vacuum it up the best I could. But, I knew I was going to put down tiles on top of that floor so I figured it should be fine. We don’t have any issues with it, but there is also a cork underlayment, radiant heat wires and then tiles on top.
Hi , Brittney:
Thanks for this tutorial. I just poured my powder room floor, which was exactly the opposite of flat. It looks pretty flat now, though. Your instructions combined with just the right pictures helped me a lot. Much appreciated.
So glad to hear this Debra! Glad I could help.
Good advice except when done mixing do not let mix sit. Pour immediately. Drywall mud and such needs to sit and mix a bit more. Not self leveling underlayment as used in above article.
Dan, thanks for your comment. I was following the directions on the self-leveler I used. I recommend always following manufacturers instructions.
This is a great article but it seems to be missing something. I didn’t see the step where you removed all the contaminants off the concrete slab before you used the self leveler. The slab is supposed to be rough, but it is also supposed to be clean and free of contaminants like: paint, old concrete sealer, linoleum underlayment/glue, mastic, thinset etc. Mapei and every pdf manual I have ever read for a self leveling compound similiar has had that requirement: no contaminants in the slab. Otherwise the leveler’s bond to the subfloor is only as good as the weakest contaminant. The rigid foam looks like the handy idea, I will check it out.
The linoleum, etc. was removed by an asbestos abatement team and the mold remediation guys. That’s why I don’t have a tutorial describing that process.
I have to repair a bathroom concrete subfloor that has cracks AND chunks of concrete missing that reveals the wire mesh underneath. Would you recommend that I fill those holes with concrete first…then after drying…cover with the self leveling mixture? Concerned that the 2-3 in. deep holes will take too long to dry and needs to be strong enough. Any suggestions?
Mary-Beth, that does sound like a good plan. 2-3 inches is VERY deep. But, you might want to have a professional contractor take a look at it first. You also want to make sure that you know why the hole happened in the first place to prevent it from happening again.
I am impressed with everything you have posted about this! I plan on installing glue down Bamboo flooring after following your lead. Can I leave the insulation in place to act as a spacer shim to do this? Please enlighten me!
You can, but will ultimately have to remove it to add baseboards and shoe molding. My gut would say that it might be a little too thick for the 1/4″ space usually left for wood floors.
Can you talk a little bit more about removing the insulation? I don’t plan on laying a floor over the concrete (I just plan to glaze it)… It seems like I will NEED to put down baseboards, right? Or else what does the edge look like??
Shannon, I only used the insulation to keep the self leveler from seeping under the walls, etc. If you are just skim coating, you probably don’t need it. UNLESS, your floor isn’t level and the liquid pools to one wall. Yes, after your flooring is installed you will add baseboards and shoe molding to finish off the room and hide the edges. Make sense?
OK yes, I think this makes sense. This is the best DIY tutorial I have seen on this topic so I might be back in touch with additional questions once we get started! Thanks so much!!
Ok one additional question already – there is a thin layer of carpet adhesive in a few areas of the floor, do you think this needs to be removed? Or can we just lay the self leveler overtop?
Shannon, DEFINITELY! I’m hear for any questions you have. I hope I can answer them ;-).
I’d remove it as best I could. Whether you have to scrape or use a paint thinner. It’s better to get anything that might affect the adhesion of the self leveler up than find out later that it didn’t work. And then you’d have it flaking up and pocking. Especially because it sounds like you aren’t using it very thick. And be sure to use the primer ahead of time.
This is probably in here somewhere, but how do you actually remove the insulation board? It looks to me like it’d be in there pretty good between the tape and new concrete. Does it just pull straight out, or do you have to cut it or scrape it, or…???
Steve, the foam insulation can be pried out. Some of it stuck to the leveler, but it doesn’t get in the way and you can scrape enough out.
Congrats to you for your success. I have a basement bathroom and I ended up hiring a tile man to do the job. Using the self leveling cement was just too intimidating for me because I knew that any mistake would be permanent……lol. You make it look so easy!!
Maude, nothing is permanent except the earth and sky, right?! But, I understand that it can be intimidating. It is also laborious work hauling those buckets around.
Awesome, awesome instructions! Super good to know! Big projects like this scare me – I like having a detailed “how-to” post. Muchas gracias!
I’m so glad you posted this, Brittany! We have a bathroom in our basement that my hubby used self-leveler on before he applied vinyl flooring. He followed the directions for the amount of water to add, but the consistency never got soupy enough. Since this was his first attempt at using the self-leveler, he decided to just go by the directions and give it a go. It turned out terrible. Now we have to rip up the flooring that is there and re-do the whole thing. Ugh. This time, we plan to lay tile though. 🙂
Suzy, wow, how odd that the exact mixture didn’t work out. We followed the directions to a “T” and that’s how we got the consistency. Did he have a big mixing paddle? I also learned you have to add the mix to the water, not vice versa.
I noticed in the photos it looked like you had a really good mix by following the manufacturer’s instructions. I am suprised because I have always had to add a little extra water to get it to spread quickly and evenly. May I ask what brand you were using? 🙂
Randy, I used Mapei brand. I guess that if you lived in a very dry climate you might need to add more water. We’re in NC where humidity is usually a little higher.
Great How-to article. I’m thinking of attempting to level a whole room by myself. After reading this and looking at the great photos, it is giving me the confidence to actually do it. Thanks Britany! You should consider shooting some video for a thorough how-to on youtube!
Thanks Ben. Actually I did have someone shoot video, but my cameraman was too shaky. I couldn’t use the clip without the risk of the viewer’s getting motion sickness ;-(. I did see that the pros wear cleats so they can walk in the wet areas. And, if you are doing a whole room, maybe rent a small cement mixer? It might save your back and allow you to work into the wets areas.
Kuddos to you!! I’m so impressed!! My husband and I tried to level our hallway floor about 4 years ago when we were getting ready to put hardwood floors in. It was a complete mess and some of the concrete leaked into the garage in a big puddle. We both swore that day that we would never attempt to do that again. Great job!!