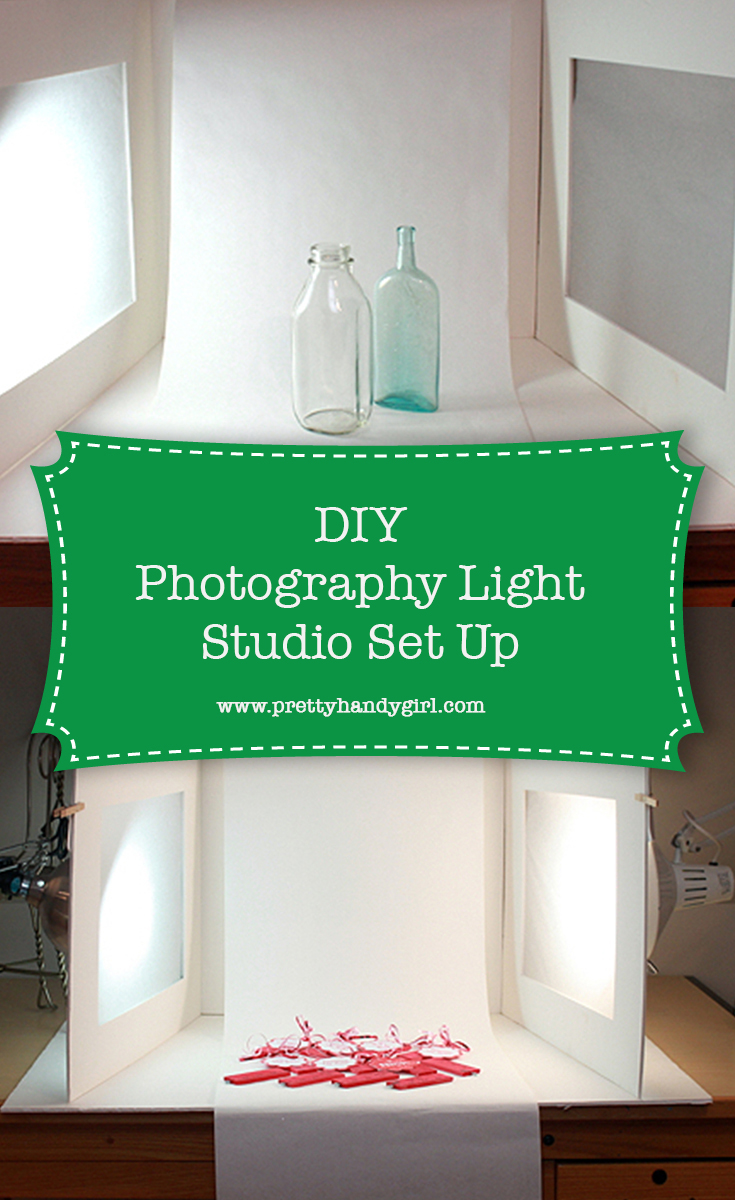
DIY Photography Light Studio Set Up

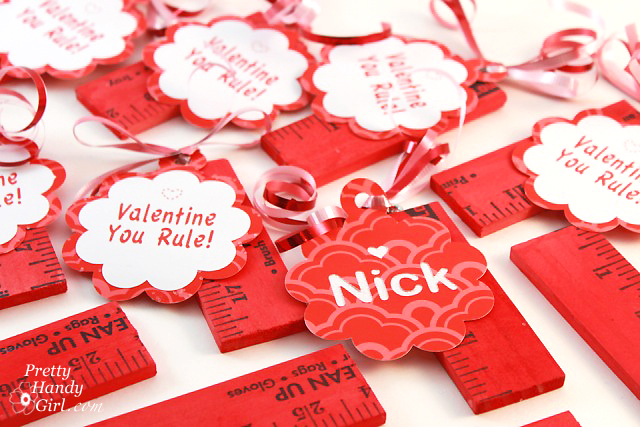
Can I just tell you that I have a bone to pick with Mother Nature lately. She seems to sense when I’m just finishing up a DIY project that really needs to be photographed. Case in point, last week I wanted to photograph my “You Rule Valentines“, but we had 4 days of gloomy weather! 1,2,3,4! I shook my fist at the heavens and told that Mother that I wasn’t going to wait any longer. Then I took matters into my own hands…so there!
I built a little table top light studio, and now come rain or sleet or shine, I have control of my photography lighting!
Want to make your own? It’s super easy. Here’s how…
Materials:

- 3 – 30″ x 40″ Foam Boards
- White Poster Board
- 2 Clothes Pins
- 2 sheets of Tracing Paper
- Xacto Knife
- Metal Ruler
- Scissors
- Packing Tape
- Roll of White Craft Paper
- 2 Lamps (clamp style or a bare bulb lamp)
- 1 CFL light bulb
- 1 Incandescent light bulb
Instructions:
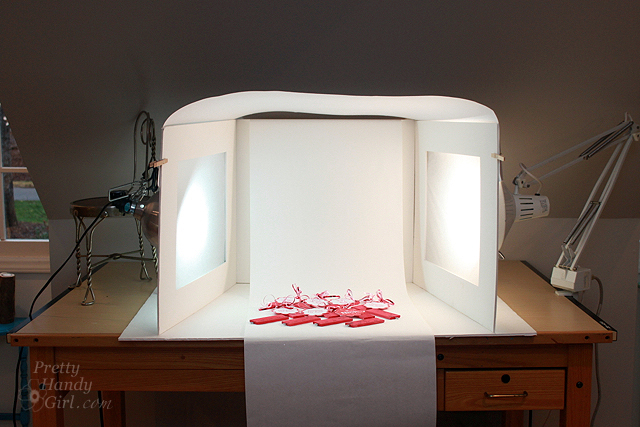
Cut two sheets of foam board in half along the 40″ side.
Cut a window (slightly smaller than the tracing paper) into two boards with the Xacto knife. Tape the tracing paper over each window.

Tape the two window boards onto one board in between the two. (Put your tape on the outside of the light studio so the glare off the shiny tape won’t be visible.) Set the tri-fold boards on top of the uncut 3rd foam board.

Arch the poster board over the top of the light studio and use clothespins to secure the sides. (This will give you more head room to take downward shots of your subject matter.) Leave a gap in the back to feed the roll of paper through. Let the roll hide behind the studio set up. (I like having a big roll of craft paper so I can tear off any that gets marked, creased or dirty.)

Line up the lamps on either side of the tracing paper windows. Keep an inch or so between the paper and the lights.

Here’s a trick I learned in art school. To get more natural color lighting, use one CFL bulb and one Incandescent. The warm and cool will balance each other out. (You may still have to play with your photo color temperature in a photo editing program, but this will get you closer to a good mid-range white.)


Set up your subject and snap away!
For more drama, try turning off one light.


It’s the perfect set up for photographing teeny rings and jewelry.

And when you’re done, simply fold one side forward and one side back.

…and your photo studio can be stored away easily.
Take that Mother Nature!!! Of course, wouldn’t you know that the day after I made my table top light studio, the sun was out and shining in full force. That Mother, she really knows how to annoy a DIY blogger. 😉
What about you? Do you have any photo tricks for dealing with imperfect lighting?
![]()
Two other posts to help you improve your photography skills!

Lighting Tips for Indoor Photography
Take Better Photos with Better Composition and Lighting

Pin for later!

THANK YOU!!! I know straight away that I have found the ONE STOP DIY Blog, No more buying & storing magazines etc. My husband will be thrilled to have the extra storage space!!
The movable light table instructions have come just in time to help me re-photograph my existing stock & new creations for my FB page & potential online market sites. I’m new to all this techno stuff, so any help I can get is really awesome!!
I have only JUST signed up to your group and can already see that I have made the right choice!! I’m looking forward to discovering loads more tips & tricks! THANK YOU AGAIN!
LOL, Jo, thanks for the compliment and nice to virtually meet you.
This is great! I have a small space so I need something that can be tucked away when not in use. Thanks, you just gave me a project for the weekend.
Thank you, I just started making jewelry and I need to do photo’s, but the lighting in here is terrible. I cannot wait to make this and try it out. Your directions were great. Thank you again 🙂
When you pinned a tutorial where someone read your mind…………
Funny, I was researching this topic on Pinterest to make something like this studio for my wife. And the first one I found was yours – she talks about your blog all the time! Thanks for a great tutorial, and for making my wife happy with your posts and comments.
You’re welcome and glad you found my tutorial.
I also find that switching the setting on the camera of a cell phone allows more or less light in. I have an android phone, not a fancy iphone and the pictures are coming out better (and better as I learn more). The ability to allow more light in, or less is also amazing and really whitens up the background in the box.
Editing Image Services : is an online graphic design studio and internet based outsourcing company which is an emerging giant in the field of images editing services and providing excellent quality along with all DTP services around the world. Images need to be processed is a time consuming and expensive procedure where we come up with a hand to make sure your editing requirement are met professional and efficient and very fast timely manner to opportune with low cost. We have a group of 200 full time highly skilled graphic designers with more than 10 years experienced in the arena of graphic related design. We provide reliable and quality solution of clipping path services for kinds of professional image. Even if large volumes we provide clipping path, multi path, , masking(fur, hair, transparent and alpha channel), photo retouching,, color correction, shadow(drop, soft, original), neck joint, as well as image manipulation for online and print media.
Editing Image Services is a company that works globally to the international standard which means whatever the order you provide we process them to deliver just once we get order. We are open 24/7/365 with three shift duty plan basis so no matter where you are from and what your timing is; we are always available and reachable to serve you instantly. So you can leave your headache on us to concentrate on your business. We can do this because we complete orders in a prompt process. We aim to provide customer satisfaction survey very often to judge the respected customers advice and valuable evaluation regarding images quality for further development production because customers satisfaction is our top priority above all. We also provide money back guarantee which means we only take payment when customers are 100% satisfied with the work. We have been building reputation by providing upmost professionalism and guaranteed reliability over the years because we strongly believe that reliability and commitment is the heart of everything.
Why choose Editing Image Services:
Providing highest quality with minimum cost
24 hours standby service with quick turnaround.
Money back guarantee with 100% customer satisfaction
200 Expert Designers with 20 quality controller.
Three times quality check with intensive care.
2500 images editing capacity in a day
Very easy and flexible files upload and download process with exclusive FTP along with user manual
100% confidentiality and security for every single images.
24/7/365 Customer support for any kind of urgent delivery
( Thank you )
Editing Image Services
What watt of light do you recommend? I need to set up a light room just like this, photographing cups with liquid
I think I had a 60 watt incandescent and the equivalent in Lumens for the CFL.
Thank you so much for sharing this. I am off tomorrow morning to get the materials as I have been struggling so much to get my photos right! x
what sizes are you lamps? I love this idea!!
It really doesn’t matter, they are just the standard work lamp size and just regular light bulbs.
I love the light box tutorial and all the tips. I’m confused on the light bulbs. what is the wattage on the bulbs.
Please advise.
thank you,
Laura
I am fairly new to blogging and my photography is a work in progress. I found your site while searching for photography tips and now I’m hooked! Thanks so much for this. I’m heading to Hobby Lobby today, because my indoor shots need lots of improvement. This just might be the fix I need.
Oh mannnn this is suuuuch a great DIY light studio!!!! I always was hesitant to make one simply because I have enough things “lying around” the house, but never thought of making one that can be folded and stored up. 😀
Awesome tips – thank you so very much for sharing these!
Love the photo box idea, I have been trying recently to set up something similar but getting the light into the box was always a struggle but the “windows” are a great idea.
I recently cleared some stuff out the garage and photographed it to sell on eBay (so lighting didn’t really matter). I have a packing table at work with a big roll of brown craft paper, so rather than using a big sheet of white paper as I normally would, I pulled a length of craft up and clipped it to the window behind the table. The pictures turned out pretty good with the craft rather than the white. I will defo be using craft again as it looks a bit different from plain white. Plus if it gets a bit dirty then it no big deal like it would be with white.
I just KNEW I had seen this months ago…. just took me a little time to find it. Hoping to put one of these together real soon. FYI -I’ve been following you for close to 2 years now. I love your blog.
Blondie, thanks and glad you found the tabletop studio ;-).
How could I NOT have thought of using tracing paper!? That’s genius. Every light box DIY I’ve found said to use thin white fabric. Genius. This is the best instruction I’ve found, and I’ve been looking since November. So thank you! And the ‘you rule’ Valentines are pretty adorable.
Hi! Thanks for this fantastic tutorial. I have some larger products that I need to shoot. Any suggestions for setting up something similar for those? I need about 48″ width and height. Thanks 🙂
Sandi, I’ve used a white sheet and foam core on either side to reflect light at it. I think you’ll probably have to experiment and add more lighting for a larger setting.
This was great. Though most of my photography is travel related, still photography and product photography is a lot of fun. Thanks for this great write up. Super!
Thanks for the great How-To. I love that this light box folds flat. Space is tight in my studio so this will work great! I’ve looked at many light box tutorials and finally have found one I think will be just right. I especially like that you included a hint about enough space for photos taken up higher and different lighting tips. I found the link to your site on the EverythingEtsy.com blog. Now I must get to work building my new light box!
Aloha!
This is great! I really need to make one of these. Thanks for the instructions and light bulb tips, too!
Absolutely brilliant!!! Thank you, thank you, thank you! I’ve needed to do this for some time and just didn’t know how! You ROCK!
I seriously love you for this!! I work during the day and with daylight savings it is always dark when I get home and I never have the time to take pictures of my projects during the day! I can’t wait to try this…lifesaver!!
xo Cindy
This idea is fantastic Brittany. You always take great pictures and I was wondering what tricks you’ve got up your sleeve. Thanks for being our mentor 🙂
Since Pittsburgh isn’t exactly sunny your tips will come in handy, LOL.
You know, you’re a life saver for me? I have been having this exact same problem with the lighting in my house and I have been upset at Mother Nature all winter. There has only been a hand full of sunny days this winter and my blog posting has suffered because of it. Thanks so much Brittany for your wonderful tutorial! I am going to go tomorrow to get my supplies and then make this set up.
Love it! I have previously set up a studio on top of my toilet using pvc boards because it was the only room in the house in which I could completely control the light. This looks like a much better idea!
Thanks so much, Brittany- I need all the help I can get!
Brilliant! Thanks for sharing this. Seattle is experiencing some gray days here. Can you come up with something similar that lights up an entire room? ;o)
You don’t know how badly I needed this dumbed down for me! I had seen one elsewhere and they used more expensive items, so this is fantastic. I think I already have lamps I can use for it, too!
I purchased an older digital Nikon on CL and I am afraid it isn’t as user friendly as the newer one’s (this is actually supposed to be a professional level one, so it is meant for people who know what they are doing!). Do you own a macro lens to take such great closeups?
Thanks for always being a great teacher!
Jenny
Thank you! I am going to make one of these today.
This is great! I have a small space so I need something that can be tucked away when not in use. Thanks, you just gave me a project for the weekend.
Wonderful idea!! Now I can get thoses great shots for on-line auctions and start to de-cluter my house! As always , your the “GO-TO GIRL”! Thanks Brittany.
THANK YOU! What a wonderful idea. I need all the help I can get in this department; I appreciate your writing out this tutorial. (Of course, I’d need more than good lighting to become a good photographer, but I’ll take what I can get!)
Hope you’re having a great January! Stay warm!
Hi, Brittany
You are so cool! I have all the material and I am going to make this. Thanks so much for sharing.
Hugs,
Vanessa
Thanks so much!! I so know what you mean about lighting dilemmas. We live on the West Coast, and gray winter days are a challenge for photography. I just love your photo booth set-up. I want to give it a try. Thanks for explaining it so well.
love that it folds away!
perfect! the weather has been less than cooperative here too! need to do this!
Brittany, what a great write up! Thanks for sharing a budget friendly way to take our photography to the next level!
The bulb things is a little weird. You can get most bulbs in any range of color temp. Main reason, I’m always in a panic over what bulb to get. LEDs, CFLs, and the like all come in Warm and Cool.
If you are unsure, remember that APSC 35mm camera’s are using direct metering. Stop and think about it, since you are using static lighting, get a small light meter that reads Incident light to meter properly (Sekonic). It doesn’t matter what the color temprature are, just use one loight as the primary and the second as fill use a 3 is to 1 or 2 is to 1 ratio and the primary light temp will be picked up.
Brilliant!!