Chalkboard Calendar for the Refrigerator

You may remember when we created our Summer calendar and bucket list. The boys really responded well to being able to see what was coming up on the calendar. And I enjoyed not having to pull up my Google Calendar on the computer whenever I was put on the spot for a play date. So, continuing to use a calendar in the kitchen was a no brainer. But, creating new calendars on poster board each month — although fun — seemed a bit tedious.
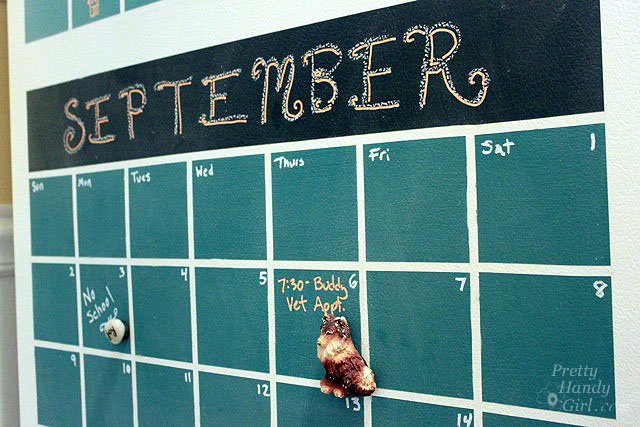
In a sheer stroke of genius suggested by Pretty Handsome Guy I decided to paint a chalkboard calendar on our fridge:

Project Materials:
(I’ve included affiliate links for your convenience. I earn a small percentage from a purchase using these links. There is no additional cost to you. You can read more about affiliate links here.)

- 3M 220 grit sandpaper*
- Sanding block
- Sponge or wet rag
- TSP cleaner
- BIN primer/sealer
- ScotchBlue multi-surface painter’s tape
- 1.5″ Paint brush
- Matte medium (optional to seal edges)
- Tape measure (and calculator if you need help figuring out your grids)
- X-acto knife
- Small square artist’s paint brush
- Chalkboard paint (Learn how to make your own colored chalkboard paint)
- Pencil
- Chalk
- Dry rag
- Chalk markers
- Double stick foam tape
- Corner edge molding cut to the width of your calendar
Required Safety Gear:

Prepping the surface:
Let me tell you, this project is an easy one, but you really need to make sure you do the proper prep work and wear good safety gear to produce a calendar that will stick around for years (and allow you to stick around as well.).
Side note: One thing I didn’t mention in my Girl Behind the Blog post, was that I used to work for a large cancer center in Philadelphia. While working there I saw slides and photos of all types of cancer tumors and witnessed the devastation that cancer can cause to a person and their families. For that reason, I’m really careful about wearing protective safety gear when working with chemicals and airborne particles. So — do me a favor — stick around a long time for me and wear safety gear when working on a project. And now back to the tutorial ;-).
Clean off the side of your fridge with the TSP cleaner. Follow the directions closely on the packaging and be sure to wear safety glasses, a mask, and gloves to protect your hands.

Lightly sand the sides of your fridge using the 220 grit sandpaper. You just want to rough it up a little to help the primer and paint stick. Keep your mask on while sanding.

Wipe off the fridge surface with a clean damp sponge or rag.
Pre-cut grid lines:
To create 1/4″ thin lines between the calendar days, pre-cut strips of painter’s tape with an x-acto knife and a ruler on a cutting surface.

Design the calendar grid on the fridge by measuring out your calendar and mark small tick marks with a pencil. (Each day on my calendar was a 3.5″ square.)

Watch this short video to see how I painted the chalkboard calendar.

Remove all the painter’s tape while the paint is still slightly wet.

After removing the tape, clean up any seepage by scraping with the x-acto knife and/or use a small flat brush dipped in the primer to clean up the edge.

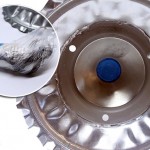
Install the chalk ledge:
Peel and stick the double-sided foam tape onto the back of the edge molding.

Level the molding and stick it onto the side of the fridge to hold the chalk.


Rub the side of a piece of chalk over the entire calendar and chalkboard surfaces to season the chalkboard. Wipe off the chalk with a dry rag.

Fill in the months and days on your calendar. And add your schedule to your new calendar!

I used chalk markers to write the days of the week and numbers. I used regular chalk for a fun textured shadow around the month letters.
It is really great for the kids and I to see what is coming up on the calendar.
I can use the top spot to make my grocery list. And I don’t have to transfer it to paper, I just take a picture of the list with my phone! Easy, right?!
And because the calendar is also magnetic, we can stick receipts or important papers to it as well.


I could also use the top spot for important reminders if I want. I love the flexibility.

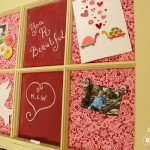
The colored chalkboard paint barely had enough time to dry before these two little artists were adding their masterpiece to the bottom section.

I love the sight of childrens’ artwork, don’t you?!

Just an explanation for you: my son’s stuffed caterpillar is named Pills. I have no idea, but it makes for some interesting conversation in our home:
“He loves his pills.”
“He can’t sleep without his pills.”
“He really needs his pills when he wakes up.”
See what I mean.


Disclosure: This post is a sponsored post paid for by 3M DIY. I was not told what to write or what project to create. The ideas and tutorials are my own.
This post is brought to you in partnership with 3M DIY. Learn how to work smart and be prepared at 3MDIY.com.
Follow 3MDIY on Facebook Follow 3MDIY on Twitter
*Content and/or other value provided by our partner, 3M Frameworks.
Sound great. Think I’m gonna do one myself. Will definitely help save trees cause I use unholy amounts of paper for these very things lol. Thanks for all the help and saving the rain forest lol.
Jeannie, it’s a great idea. FYI, when we bought a new fridge, we painted the chalkboard calendar on our wall. Here’s how I did it: https://prettyhandygirl.com/diy-chalkboard-calendar/
Hi Brittany! What a fun and useful project. You did a beautiful job executing and documenting 🙂
I would like to know how the chalk markers are working on the chalkboard. I’ve seen notes to not use markers on DIY chalkboards, but never any explanations. Thanks!
This is a great and such an original idea! I don’t think I’ve ever seen chalk board paint being applied to a fridge! Cool! I know that calendar of yours soon going to be filled! 😉
Kim, thanks for your comment. REALLY? So many people have painted their entire refrigerators with black chalkboard paint. I liked the idea, but I don’t like dark appliances.
I love the picture of you in that mask! Classic!!!!
LOL! My hubby thinks I should have that changed to be my driver’s license picture. ;-D
this has nothing to do with chalkboards. . but I love your hair in those tutorial pics. . .up like that.
Ha, thanks Su. I thought I looked a little Sarah Palinish though ;-).
Brittany,
What an awesome looking refrigerator you have now! I’d seen one covered in chalk paint before but not nearly as great looking as yours. We have a refrigerator under our pavilion that I’ve been wanting to paint, but being outdoors it now has little rust spots on it so not sure if painting is an option now.
TSP is great stuff~I used it a couple of weeks ago to clean one of the decks in our backyard, brought it back to looking new again. Glad to see that you mentioned the safety precautions while using that product.
Jana, thanks for your comment. That TSP stuff is amazing. And yes, that’s me, the Safety Girl ;-D
Oh wow, it looks amazing! And what a useful project. I bet the little guys love it. Fantastic!
Jessica, yes, they are always creating new art at the bottom and keeping up with their schedules. Now, if I could just teach them to pick up the chalk when they are done. Sigh.
Pure genius!