Make a House Shaped Mailbox – a Lowe’s Creative Idea


June is almost here (although it felt like summer this weekend) and more people are spending time outside sprucing up their yards and improving their curb appeal. As you drive down my street you are greeted by beautiful lawns, flowers, and {screech!}my peeling mailbox.

{Insert sad frown here.} My mom and I painted this mailbox shortly after we moved into the house. We had a lot of fun painting it together and I took all the necessary precautions of priming it and sealing it with polyurethane. But sadly we made the mistake of painting a few cute bumblebees on the top. Within a week of installing the mailbox I went to retrieve my mail only to find the bees had been pecked off the box. “What the…?”
I’m fairly certain a bird had just perched on top of my mailbox and was ready to partake in a buffet of bumblebees. After the paint had been chipped, it allowed water to seep underneath and slowly over the course of a few years we have the sad looking mess of a mailbox show here:

I wanted a unique mailbox that looked like a mini-me of our house. Plus, I wanted it to be tall enough to accomodate a priority mail box. So, I set about building my own custom mailbox and now you can too!
Now, before you jump up and ask if my custom mailbox is approved by the Postmaster General, the answer is yes. But, to be sure, I’d take your mailbox built (but not painted yet) to your mail distribution office and get your postmaster’s approval. Our postmaster told me that as long as it had a flag, an easily operated door, and it keeps the mail dry it should be approved.

There are actually more regulations on the mail box post than there is on the box, but I’ll go over that later this week.
Ready to get started?! Me too!
Materials:

(I’ve included affiliate links for your convenience. I earn a small percentage from a purchase using these links. There is no additional cost to you. You can read more about affiliate links here.)
- 2 – 1″ x 8″ x 8′ Pine Board
- 1 – 1″ x 12″ x 6″ Pine Board
- Gorilla Glue
- Clamp
- 1 5/8″ Deck Screws
- Cup Hook
- 2 Small Hinges
- Magnetic catch
- Timberwolf Composite Shims
- 2″ Machine Bolt with Nut and 2 Washers
- Task Force Scraper set
- Gatehouse Black Arched Cabinet Pull
- Paintable Window and Door Caulk
- Wood Putty
- Putty Knife
- Drill
- Drill Bits
- Miter Saw
- Table Saw
- Sandpaper Medium & Fine Grits
- Sander
Instructions :
Cut lumber to these dimensions (use a miter saw for the quickest and most accurate cuts):
2 – 1″ x 12″ x 19″
1 – 1″ x 8″ x 19″
2 – 1″ x 8″ x 21″

Rip the edge of the two 1″ x 12″ x 19″ boards at a 45˚ angle. (Best achieved on a table saw.)

Spread a thin line of Gorilla Glue onto the two side edges of the 1″ x 8″ x 19″ board (mailbox base).

Raise the base up (approximately 3/4″) by resting it on another board. Clamp the two sides to the base.

Pre-drill and drive a few deck screws through the sides of the 1″ x 12″ x 19″ sides and into the 1″ x 8″ base of the mailbox.

Dry fit the two 1″ x 8″ x 21″ boards together as show below:

This will create the roof. But, one side of the roof will be longer by approximately 3/4″ (the width of the board). Cut off the excess width from the lower board.

As you did with the sides, add a thin line of Gorilla glue. Pre-drill and fasten the roof pieces together using deck screws.

Before you attach the roof, lay the mailbox upright on its side and trace the front and back openings onto your leftover 1″ x 8″ boards.

Cut along the pencil marks (can be cut on the miter saw.)

Clamp both ends between the mailbox sides. Pre-drill and attach ONLY the back of the mailbox, using deck screws.

Attaching the Roof:
Center the roof onto the walls of the mailbox. Use a pencil lined up with the wall to make a mark onto the roof. Repeat on the opposite side and draw a line connecting the two marks. This will be your guide for inserting the screws.

Secure the roof to the walls by pre-drilling and driving three screws per side through the roof.
Handy hint: It is easier to start drilling at a 90˚ perpendicular angle from the roof and then tilt it straight down (plumb) with the walls.

Caulk all the seams of the mailbox. Fill any screw holes with wood putty.

After the putty dries sand down the entire mailbox.

Dry fit the front door.You will probably need to sand down the sides until it fits loosely. You may also need to countersink the hinges into the floor of the mailbox for a cleaner look.
Handy Hint: Add a cup hook to the outside of the door so you can pull the door back out.

Attach the door to the mailbox by installing the hinges.


Installing the Flag:
Cut an inch and a half off the fat end of the wood shim.
![]()
Drill a hole through the shim and the paint scraper large enough to feed the bolt through.
![]()
Drill a pilot hole through the right side of the mailbox. Then attach the flag by threading the pieces onto the bolt in this order:
- washer
- paint scraper
- washer
- composite shim
- mailbox wall
- nut
Tighten the nut until the flag is secure but can be raised or lowered without extreme force.

Adding hardware:
Position the magnetic catch 1 3/4″ back from the edge of the roof. Screw in the mounting screws.

Attach the metal plate to the door where the catch will strike when the door is closed.

Center the drawer pull onto the front of the mailbox door. Predrill holes for the mounting screws. Install the pull.

And now your mailbox is ready for painting! Check back this week for the tutorial on painting the mailbox.

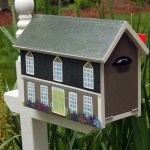
Isn’t it cute? A little miniature of our home.

And lookey here! A priority box fits perfectly inside!

I’m so thrilled with the new mailbox, it is a big improvement over “the flake”.


![]()
Disclosure: I have partnered with Lowe’s as a Lowe’s Creative Influencer. I was provided with a Lowe’s gift card to complete my project. The tutorial, photos and opinions expressed in this post are my own. I was not told what to write. #LowesCreator

The instructions indicate two 1X8X8″ pine boards. I couldn’t figure out where they went until I realized they must be the from and back sections. In that case shouldn’t they be more like 18″?
Such a cute house! I’m about to make a similar one for my house, complete with shingles on top. When you say the wood has started to rot where it was too close to the post, do you mean at the back or on the bottom piece that sits on the post? Thanks!
It was actually the vertical piece at the back of the mailbox, and there’s only a small 1/2″ space between the mailbox post (again the vertical section of post.)
I know this is an old post, but how has the mailbox held up to the outdoor elements being that it was made of pine? You didn’t mention much of the “finishing” process and I’m curious if I should make a mailbox out of pine or something else? Thanks!
Hey Mike, the wood has started to rot where it was too close to the post. Two things I’d do different are to use pressure-treated wood and add shingles to the top. Then it would weather better. Thanks for asking.