Fabric Backed Open Kitchen Cabinets – DIY on a Dime the Tutorial

I’m back to show you the updates I made to my kitchen. Remember the plans I shared with you? These fabric backed cabinets made the kitchen new.

Well, they have been implemented and I LOVE the results! Best of all, the materials I bought cost me under $25 and that included the white dish set. But, the cherry on top is that I can easily reverse the changes if we move (or get sick of the look.)
And now, I present to you:
Fabric Backed Open Cabinets for the Kitchen
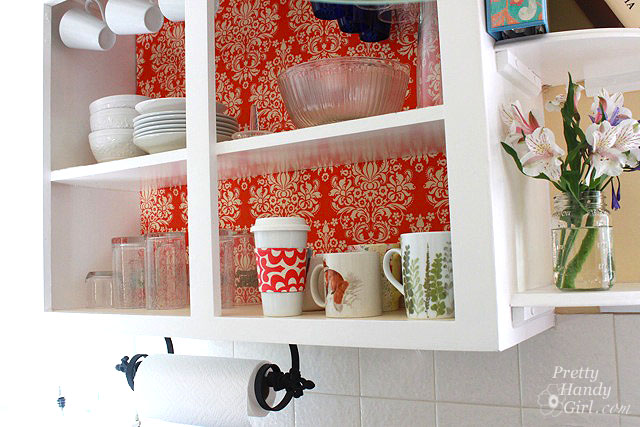
When we first met these sad cabinets, they were dark, dreary and had an eclectic collection of mugs:

Within only a few hours (minus drying times), I had a stylish new look that is bright and cheery!

Follow along for the tutorial and the 50 cent tour (please deposit your pocket change on the way out.) Just kidding. I’ll let you in for free.
Materials:
(I’ve included affiliate links for your convenience. I earn a small percentage from a purchase using these links. There is no additional cost to you. You can read more about affiliate links here.)
- Drill or screwdriver
- Small plastic baggie
- Foam board
- Fabric
- Packing tape or Duct Tape
- Scissors
- X-acto knife
- Metal edged ruler
- Tape measure
- Pencil
- Iron
- All purpose cleaner
- Rag
- Sand paper
- Wood putty
- Putty knife
Optional:
- Primer
- Paint brush
- Small paint roller
- Paint
- Shelf Paper
Difficulty: Easy
Step 1: Empty your cabinets.
![]()
Clean the insides with an all purpose kitchen cleaner.

Step 2. Starting from the bottom, remove the screws from the cabinet door hinges. The last screw should be the very top hinge (to keep the weight of the door from wrenching the screw out of the wood.)

Put screws into a ziplock bag and label your cabinet doors in order so that you can return them to the appropriate cabinet opening at a later date.

Now you should have a clean slate like this:

Step 3. If your cabinets are dark inside, you may or may not decide to paint the insides. (Be sure to check with your landlord if you are renting.) I chose to paint mine because the interiors were so dark. If you want to skip this step, fast forward to the next step.
Prime the insides by rolling on primer over the flat surfaces. Use a brush to get into the corners and crevices.

Once the primer has dried, get out the wood putty and putty knife.

Step 4. Using the putty knife, spread a small amount of putty over the holes where the hinges were. Push the putty into the holes, then scrape the excess off. Allow the putty to dry completely.

Step 5. Sand the puttied holes until smooth.

Step 6. Touch up the putty holes with paint or stain. Add caulk to any cracks or seams at the back of your cabinet. Allow the caulk to dry thoroughly.

If you are painting the inside of the cabinets, roll on paint with the small roller and use the brush to smooth out the paint and get into the grooves.

Step 7. Measure the dimensions of the back of your cabinets. Make sure your measurements are precise (measure twice, cut once is a good adage.)

Cut a piece of foam board using the measurements you just took.

Test fit the foam board into the back of the cabinet. If your cabinet’s face frame is smaller than the cabinet back, you will probably have to bend the foam board to get it in.

Step 8. Iron your fabric. Make sure to iron all the wrinkles out.

Cut the fabric 3 inches wider than the foam board. Lay the foam board on top of the fabric (wrong side facing up.)

Step 9. Tape the edges of the fabric onto the back of the foam board. Be sure to pull the fabric taut.

Fold the edges of the fabric as you would on a gift. Tape the ends to the back of the foam board.

Step 10. Insert the foam board into the cabinet.

Push the foam board firmly against the back of the cabinet. The tension of the fabric and the board against the edges of the cabinet should hold it in place, no need to tape or glue anything!

It is a good idea to try to line up your pattern if you have multiple shelves. (Do as I say, not as I do.)

Start putting your coordinated dishes back into the cabinet. Think about displaying them as you might see in a store to complement these fabric backed cabinets.

For visual interest and extra storage, I hung some mugs from the top of the cabinet.

It was as simple as pre-drilling some holes and screwing in white cup hooks. (I did measure the same distance back from the face frame and spaced the hooks evenly. But, I’m a perfectionist like that.)

I am in love with my new kitchen! And all it took was less than $25 in supplies and a few hours.
What do you think?
The best part about this project is that I can easily remove the foam boards…

…or tape new fabric onto the back when I want to update the look!

Can you imagine a cheaper, easier or more glamorous update to your kitchen?
Are you an apartment dweller that is restricted from making permanent changes to your home? Or does your budget limit the renovations you’d really like to make? Why not make a few frugal changes that reflect your own style. These fabric backed cabinets are a win for any kitchen!
Apartment Guide has changes you can make that won’t break the bank:
- Make your own budget-friendly design changes in your home.
- Easy furniture facelifts for your furniture. Just cover it or upholster it in no time.
- Forget buying new accessories, try decorating with thrift store finds and vintage goodies.
Want to find even more design tips for your home? Apartment Guide has budget friendly ideas and DIY how-tos for people in any sized home on https://www.movingtoday.com and https://www.apartmentguide.com/blog/

Disclosure Statement:
Apartment Guide and owner Consumer Source, Inc. partnered with bloggers such as me to participate in their monthly blogger program. As part of that program, I received compensation. They did not tell me what project to create or what to purchase. Nor did they influence my opinions! We believe that consumers and bloggers are free to form their own opinions and share them in their own words. Consumer Source’s policies align with WOMMA Ethics Code, FTC guidelines and social media engagement recommendations.
I know it’s been a while since u did this post, but can u remember the name of fabric or where you got it from. I love it
Waverly Pom Pom Spa Play
What Shaquan said….you’re amazing!
I do not know what I am going to do with you! This is one of the most clever things I have picked up from Pinterest! Thank-you Thank-you Thank-you for sharing! I am looking to glam up a built in china closet for our new house and was toying with using wall paper as a backing but has trouble finding a pattern that I liked (and that fit into my budget). This is absolutely perfect and because of the low cost of the foam board and fabric, I can change out the style when ever I want! You Rock!
You are welcome! Enjoy sprucing up your cabinets!
I have used foam board to line the inside of a woven grass storage cube. I covered the foam board with self-adhesive shelf liner to give it some pizazz.
Now, to the real reason for my comments. Our kitchen cabinets are cold in the winter. I’m fairly certain it is because they hang on the outside wall of the house. I was thinking about using foam board to line the inside of the cabinets. Maybe it would insulate the cabinets enough to eliminate the need to pre-warm our plates before serving dinner. Did you experience any difference in the cabinet warmth after your project?
Our walls were fairly well insulated and we live in the South (not too cold outside.) So, I didn’t notice. But, if you want to try this, use rigid foam insulation from the home improvement store as the thin foam board doesn’t have much of an R value.
I love this idea. It looks easy and makes the kitchen bright and cheery. Love that one can change out the backers to create a new look!
Love the idea, but think 1/4 inch plywood would be better than foam board. I would roll clear drying glue on the board and tightly afix the fabric. Also would spray with a clear coat of polyurethane for easy cleaning. I live in the country with wood burning stove. Everything needs cleaning in the spring!
T, that’s your own call. The foam board worked perfect for us and allowed me to change out the fabric whenever I wanted. It also allowed me to be slightly off with my cutting because the foam can compress and hold in the space.
LOVE IT!! My kitchen is honey oak overload. This would help reduce some of it and for people who like to change things often this is GREAT!!
Thanks Max. Yes, it would definitely help break things up.
THANK YOU SO VERY MUCH for this demo. I am renovating a 1940’s home, and will definitely be using this idea on the kitchen cabinets. What a Bang for your money and effort. I appreciate so much people like you who freely share your wonderful ideas.
Johnnie, so glad I could share the idea! We miss our fabric backed cabinet. Sadly they got the boot when we did an entire kitchen renovation. I have two open shelves now.
Some great ideas here!
Great job. I’m going to do this in my kitchen & because I love red, will use that in my fabric. You can also use this idea on bookcases!!!
Great job! I love the red (going to do this in my kitchen also using red). You can also use the same idea for the backs of bookcases!!
did you paint the outside of the cabinets too?
Vanessa, no I didn’t.
This is exactly what I was looking for! Great tutorial. When you refresh the interior gained new life
Love this project! The design and color of the fabric are really nice. I have 2 sets of cupboards (4 total) with glass doors – thinking of trying this. I have a question – With our particular cupboards I don’t think foam board and fabric will fit…the shelving goes right up to the cabinet door. Does that make sense? I’m thinking about trying it with scrapbook paper but I don’t think it will look quite as nice. Any tips???? thanks!!
Bita, I think I saw somewhere that you can use fabric starch to wet the fabric and attach it to the back of the cabinets like wallpaper. Then it peels off and can be wiped clean when you tire of the fabric with no damage to the cabinet. See this post: http://www.apartmenttherapy.com/how-to-make-removable-fabric-w-74483
Olá achei o seu blog maravilhoso!
Quando puder venha conhecer o Pense Crie!
Kissis!
http://pensecrie.wordpress.com/
amazing ideas and work! thumbs up !
Love! Can’t wait to try the cabinet fabric!
I think I might try this, but use my favorite contact paper to cover the foam boards.
We are working on painting our kitchen cabinets right now!
Juju, contact paper is an awesome idea! So is wrapping paper. Have you seen Thistlewood Farm’s bookcases: http://www.thistlewoodfarms.com/faux-wood-wallpaper-bookcase
Hi… Love your blog… saw the idea for changing your kitchen on Pinterest and just had to have a look. Your ‘new’ shelves are so beautiful. The wonderful fabric you chose is to die for and really lightens and brightens up the kitchen.
Thanks for posting so many helpful hints…
TEMA
You’re welcome. Glad you liked it.
Nice job and great idea. Thanks for sharing.
where can I find the foam board? a craft store or a home improvement store? Thanks! I was just thinking about painting the interior of our shelves the other day, but since we are renting I’d rather not. This is a fantastic idea!
Jenn
Jenn, yes, but also sold in office supply stores, Walmart. I don’t think I’ve seen it for sale in Home Improvement stores. It’s sold with the poster board.
excellent! As much as I love Home Depot this will save me a trip – thanks 🙂
I have in my possession two 30 X 20 inch sheets of foam board I bought at the Dollar Tree.
LOVE this!!
Thanks for sharing!!
Great look! Even easier is to use scrapbook paper (or any paper that strikes your fancy) and use double-sided tape to attach to the cabinet wall. Using this method you can bring the paper around to the sides of the cabinet easily if you wish. I think using foam board is really nice though cuz it gives it more depth.
As said before I loved this and pinned it. Are you o.k. with it being pinned? I have a couple of other things I’d like to pin (like that DIY ladder). Do I need to ask you each time? Thanks!
Great tutorial thanks heaps. I was wondering how to cover the back of my cupboards and this tut was a real eye opener. I also covered my cupboards you can see my tutorial on http://www.nzecochick.com/2012/09/cloth-cupboard-backboards.html M xx
I absolutely love your blog and find many of your post’s to be just what I’m looking for.
Do you offer guest writers to write content available for
you? I wouldn’t mind producing a post or elaborating on some of the subjects you write with regards to here. Again, awesome website!
Thank you so much for this wonderful tutorial…you have inspired me to do my kitchen cabinets…I will post pictures when I’m done!
Thank you
Wanda, thanks for your comment. Glad I inspired you and I’d love to see a photo when you are done.
I am so glad I found this on Pinterest! I have been seeing pins about painting or using scrapbook paper or fabric to cover the inside (back) of bookshelves and I would love the look in my classroom, but the bookshelves belong to school and I can’t do anything permanent. This is the perfect solution and will work just as well on a bookshelf as your cabinets! I never would have thought of it! Thanks for the inspiration! 🙂
What a fantastic idea!!!! And I didn’t even know I was looking for this but it’s a perfect way to brighten up the back of my recently-inherited mahogany china cabinet, without painting…bc I will get in trouble with the in laws if I dare to paint it!! Thank you!!
I saw your cabinate background design on pinterest and just had to try it. Check out my design: http://pinterest.com/pin/26669822763691955/?timeline=1. I linked you on my pin to give you the recognition. I love your project ideas, keep them coming! 🙂
This is exactly what I was looking for! We don’t rent, but I wanted something cheap and a little less of a hassle than the crappy contact paper. This is perfect! Plus! I can change it for the seasons, my mood, or whatever without breaking my neck! Thank you so much!
Where did u get the fabric from? I love this!
Hey Chelsea, thanks for your comment. I bought it at Michael’s but I saw the same line in Hancock Fabrics. It is in the Bella Citrus Line by Top Drawer: http://www.hancockfabrics.com/Bella-Citrus-Collection_stcVVcatId553999VVviewcat.htm
I loved this idea so much I pinned it last night. As of this morning 58 others have repinned it, so I’m thinking that everybody is just loving it! I especially like the idea that you can change out the fabric, or get another foam board and just change out the foam boards whenever you want.
I love this idea! Any ideas for doing this to a cabinet that is wider than foam board? Would you do two separate pieces and then tape them to the back of the cabinet or would you tape two pieces of foam board together and then cover in fabric? Thanks! 🙂
Bethany,
If I were to do that, I think I’d tape the two foam boards together first using strong packing tape. And then wrap them with fabric. Is your cabinet over 40″ wide? They sell foam board up to 4′ wide. Check with an art supply store or sign company.
I love your fabric choice! So bright and cheerful! I have started this project on the bookcases in my living room. I like the idea that it’s not permanent and can be changed out easily. Your photos and tutorial are great! Cheers and have a super day!
Donna, Exciting! I’d love to see pictures of your bookcases when you are done.
love this idea. we have redecorated our kitchen with a new counter and some new appliances but did not want to spend the money on new cabinets so my husband restained them and it looks good but I have cabinets with glass doors and they look so blah… so I’m going to give this a whirl. In fact, I took a few days off from work and you inspired me to do this as my next DIY project! thank you so much.
melissa
Where did you get your paper towel holder from? Love this look! Thanks for sharing!!
Holly,I ordered it from Ballard Design: http://www.ballarddesigns.com/ballard-under-cabinet-mount-paper-towel-holder/13355?listIndex=2
brilliant! Thank you for sharing this tutorial!
I did this today and love it!!! But I’m not having any luck finding the wine glass mounts. Where did you purchase yours?
Thanks!
Leia_Barrett at yahoo dot com
Leia,
Ours were already installed by the previous owner. But, they look a lot like this one (only white): http://www.organizeit.com/under-cabinet-wine-glass-rack-antique-copper.asp
Wow I love that idea! So cheap too. I would have never thought to do that to the cupboards. My husband would absolutely love the idea of how reversible it is. Maybe i can talk him into re doing the cupboards now after two years of trying 🙂 Thanks for the great inspiration
Love this project! I love how easy and inexpensive it is, and how easily it can be changed.
Chrysta
I just stumbled onto your site. This is a great tutorial and a great idea. But I wonder about using fabric in the kitchen. It will pick up smells and oils and moisture and may get stinky or germy over time. Did you buy or save extra fabric so you can replace it regularly as needed? I think in a dining room or display area, this would be fine, but inside the actual kitchen I’d be wary. I am pondering replacing the doors on my dish cabinet with glass-front ones, and I think I’ll steal your foam-core idea if I do, but I’d probably use contact paper or wrapping paper instead of fabric, since the cabinet is right next to the sink and pretty near the stove. But in the meantime, I’ll be adding your blog to my reader!
I think they’ll be fine. They aren’t near the stove and we don’t cook super greasy. They flank the sink, but water would have to try really hard to reach the back of the cabinets. Anyway, if they get messed up, it is only an excuse to replace with new pretty fabric 😉
I love the color and pattern interest it brings to the kitchen. Love this idea!
I love the fabric,where did you buy it??
looks great!!
How fun, I bet the finished product will be amazing! Psst, see you at SNAP!
What a great idea using the board! I love love love this!
I absolutely love what you did with your cabinets. I was wondering if you could tell me what you used to hang the wine glasses inside the cabinet. Thanks!
This is a great idea! I would love if you would share it at my blog party this weekend. Hope you can join in!
This is gorgeous! I wouldn’t have thought of making it removable like that. Now I think I have to try it right away!
Honestly I don’t know what to say other than you are screamingly brilliant!
…and Thank You!
So cute! Love the idea of being able to change them out on a regular basis!
Beautiful! I wish my cabinets weren’t stuffed so full. Maybe I could do something like that.
I LOVE this project!
AND I noticed that you were using the awesome Tomboy Tools fractional tape measure!! Wooohooooo!!!
The cabinets are lovely and what a perfect project for the antique glass and flatware collector. Wonderful idea and thank you so much for sharing!
Wow this looks great! Love the orange/white fabric and how it pops with the white cabinets. This gives me ideas for my kitchen. 😀 Thanks PHG!
LOve the new look Brittany! Foam board=genius!
so easy to change.
gail
Beautiful! Love this idea! Thanks for sharing. I may have to give it a whirl this Spring!
This turned out fantastic! Love how easy it would be to change it out. I’ve got a spot where I might be implementing this idea–thanks!
Thanks Kristen, I can’t get over how easy it was too ;-).
I love it, Brittany- the fabric is the perfect pop of color. Love the white dishes against the fabric. This would be great to do in bookcases also. hmmm….
Your kitchen looks AMAZING…really fresh and beautiful!!! Great idea!
thanks so much for sharing! I just love your kitchen. I’m redoing my in white with red so of course I fell in love with the fabric…I might just have to try this one 🙂
Great idea and a GREAT look!!!
Pretty! I’d love to try this in our tiny apartment kitchen.
So pretty. It’s amazing how that brightened up your whole kitchen.
I love this!
I can’t wait to try it when we close on our mobile home! It needs some serious personalization 😉
I can’t believe the transformation! It has a much softer and inviting look. You are amazeballs!
This turned out so fabulous! It makes me want to paint my cabinets and transform my kitchen too!
Love this Brittany!! Truly love! Amazing job. And it could not have come at a better time. I am redoing a cabinet that has glass doors. Thinking of doing something like this in the back of the shelves where the glass doors are.
It looks awesome Brittany! This is even a brilliant idea for homeowners because it can be changed out so easily. Thanks for another great tutorial.
PERFECT TIMING! I’m in the middle of a Kitchen re-decorate – and I decided, above the fridge, to remove the cabinet doors and turn the cupboard into my cookbook shelves. I couldn’t figure out what to do with the ugly wall behind the shelves. THIS IS PERFECT! I wanted something different and this is it! THANKS!
I love this! What a great way to add color.
Thanks so much for this tutorial. I’ve had fabric stashed for about a year for the same project, but without the right steps to go ahead with it. I hadn’t thought of the foam core idea and I love it!
I love this!! It seems easy enough that I won’t even have to ask you to come and help me ~although you are welcome to if you want 🙂
What a great change, so bright and fun! It looks gorgeous! In my last house I used scrapbook paper for the backs of my cabinets but fabric seems to be a better fit. Thanks for inspiring!!!
Fantastic. I have a kitchen cabinet in white, exactly like that and I am gonna do it. Love it Brittany! Thank you for sharing
Your kitchen looks wonderful! I love the look and you’re right, it wasn’t too hard!
Susan
Looks great!! Love that fabric!