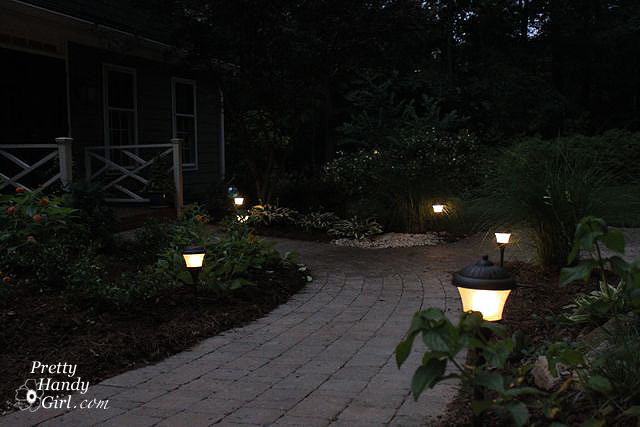
Installing low-voltage landscape lights has been on my “Want To Do” list for years now. I even bought some lights on clearance three years ago! Now that they are installed I’m kicking myself for waiting so long. They look so inviting.

Materials:
(contains affiliate links)

  • Hammer
  • Drill
  • Screwdriver
  • Pliers
  • Wire strippers and cutter
  • 3M Heavy Duty all-weather duct tape
  • Landscape lights (it might be wise to purchase one extra, you’ll see why later)
  • Transformer for Outdoor Lighting
  • Low voltage landscape wiring (I used 100 feet of 14 gauge, but check the directions for your lights)

In order to figure out what size transformer you need, you should add up all the wattage on the bulbs your lights use. This is a simple equation, for example, if your lights use 9 watt bulbs, then multiply 9 time the number of light fixtures you have. I ended up buying a Portfolio Outdoor 200W Magnetic Transformer for Outdoor Lighting. The transformer senses darkness and turns on the lights at dusk. I prefer this instead of a timer, especially because it will not need to be reprogrammed as the days vary in length throughout the year. The only downside is that they will come on during hurricanes, tornados and big bad dark thunderstorms. Then again, that isn’t necessarily a bad thing.

Matchy-Matchy. How to unify two colored lights:

Well, of course once I got ready to install our lights, I realized I needed more. Because the lights I bought were on clearance, they were no longer available in the stores. So, what’s a girl to do? I got eBaying and creative!

I was able to buy similar lights from an eBay seller. The fact that they were a different color was not going to dissuade me! Not when I have a can of spray paint in my arsenal. That and a can of automotive primer was all it took to turn those brown lights black (well, Oil Rubbed Bronze to be exact.)

After the paint dried, I began laying out my lights along the front path.

I decided to stagger them for maximum illumination along the path and to avoid creating an airport runway look (aka symmetrical.) I don’t know if you believe in UFOs, but I’m not taking any chances.

Installing the transformer:

*Be sure to read all the directions that come with your transformer. The following tutorial is based on the Portfolio transformer I purchased. Your directions may vary.

You will need to locate your transformer near an outdoor GFCI outlet. Luckily I had my electrician install an outlet last year. (Yes, there are some things that I will leave to a professional. Adding new wiring is one of them.)

Measure up 18″ from the ground (or the height recommended in your directions) and use the template that came with your transformer to drill two pilot holes for the mounting screws. Insert the anchors and tap them gently into the pilot holes.

Screw the mounting screws in, leave them extended partially to accept the holes on the back of the transformer.

Split the end of your low voltage wire. Then strip a small amount off the ends using your wire cutters. Slip the wires through the holes on the transformer and tighten the screws over the wire.

Play with the amount the screws extend until the transformer fits flush against the wall. Leave the transformer unplugged.

Installing the lights:

*Be sure to read all the directions that come with your low voltage lighting. The following tutorial is based on the Malibu lights I purchased. Your directions may vary.

Dig a narrow trench along the path to the location of each light. Aim for 8 – 12″ deep, the deeper the better so you don’t accidentally chop your wire while digging or planting.

Because the wires are low voltage you won’t be harmed. However, if you accidentally cut your wire, you will have to re-install your lights all over again! NOT COOL!

Run the wire into the trench until you reach  your first light. The directions that came with the transformer explain that you want your first light to be at or further than 10′ from the transformer. You can cheat this by making your wire loop or arc to take up more length on the wire before your first light. But, make sure your light isn’t so close to the transformer that it would be read by the photo sensor (the same holds true for having your transformer too close to your house lights.) Make a loop around your light. This protects the wire from being too taut and will hopefully prevent all your lights from being uprooted should someone accidentally (or intentionally) play soccer with one them. I can’t imagine that happening in our yard!

Open the connector on your light.

Insert the wire into the connector. Then press the connector back together firmly.

Unless you have super human hand strength, you may wish to use pliers (I used my Irwin Groove Lock Pliers) to press them together. You need to insure that the metal prongs pierce through the wire insulation and make contact with the wire inside. Later, if one of your lights doesn’t work, you’ll know that it could be that the connection isn’t tight enough.

Insert the stake of your light into the ground. Don’t fully bury it yet. Trust me on this one. It’ll save you from re-enacting The Diggingest Dog should your lights fail to work properly!

Repeat for the remaining lights.  When you reach the end, you may wish to “cap” off the end of the wire with duct tape. This is not required, but I decided it was best to protect the wire from any source that might short it out.

Plug in your transformer and adjust the settings to turn your lights on. Do they work? Then clap yourself on the back! If not, you need to go back and check all those connections. Good think you listened to me and didn’t bury them, right?!

Let me tell you a little antidote about a girl, let’s call her “Whitney”, who buried all the connections, turned on the transformer and got all excited because the lights worked. Only to come back 30 minutes later to an error message on the transformer and no working lights. Needless to say, she had to dig up every single light and press all the connections tight again. Then she tested the lights only to be disappointed yet again. She was so frustrated, that she went inside and went directly to bed. The next day she spent too much time on hold with the customer service numbers for the transformer and the light manufacturer. They weren’t much help. “Yes, I read the directions. Yes, I checked the connections. Yes, yes. YES!… Okay thanks (or no thanks!)” But, she knew she was smarter than the average bear, so she systematically removed one light at a time and then turned on the transformer. Finally upon removing the last light and plugging in the transformer she found that they suddenly worked. I’m not sure why (errr, I mean she wasn’t sure why that last light caused the problem), so she decided to discard the last light.

For good measure once all the lights are working, wrap the connectors in Scotch Heavy Duty All-Weather duct tape to keep them sealed and connected. Call it overkill, but I didn’t want to end up like Whitney.

It doesn’t have to be pretty to be function. Just ask Pretty Handsome Guy, since this does remind me a LOT of that post he wrote for me.

NOW, you can bury the light stakes, check that they are level and then fill the holes with dirt and pack it down.

And that is it! This is a relatively easy install. It may require a little bit of patience if the lights don’t work at first (or second.) But, if all goes perfectly, this is a half a day project.

Landscape lighting can improve your curb appeal, and also the value of your home. They are also great for deterring thieves. But, I like them because they light up my beautiful plants. And, because, it is very relaxing sitting outside after dark in the glow of the lights with a drink in hand. What more reason could you need for installing landscape lights?

What do you think? Do you like? Is this a project you think you could attempt yourself? I bet you could.


Disclaimer: I was not paid by Portfolio or Malibu to write this post. Those are the brands I purchased with my own money. The 3M All Weather Duct Tape was sent to me by 3M to use. As were the Irwin Groove Lock Pliers. I was not compensated in any way by them. Nor was I swayed to write positive things about their products. There, I think that covers everything.


The other day I showed you how to prep and sand a branch to make a towel bar. If you haven’t viewed that tutorial, you may wish to do so now.

Okay, so let’s get started. This shouldn’t take too long, but you’ll want to grab a few supplies before you begin.

Materials:


  • Prepped tree branch
  • Tape measure
  • Pencil
  • Level
  • 2 Handrail brackets
  • Drill with drill bits
  • Philips head screwdriver
  • Safety Glasses
  • Miter saw or hand saw
  • Water-based Polyurethane
  • Brush
  • 180 grit or finer sandpaper
  • Damp Rag


Tutorial:

Start by marking the desired height of your towel bar. I hung mine at 38″ high.

Use the drill and the philips head bit to insert one screw into the bottom of your handrail bracket. Drive the other two screws into the bracket.

Repeat the steps above to install your second bracket.

Rest your branch on top of the brackets. Mark the desired length of your towel bar onto the branch.

Cut the branch with a miter saw or hand saw.

Sand down any rough edges at your cuts. Lay the branch on top of the brackets.

Center the branch and check to make sure it is relatively level. If it isn’t, you might need to move one of your brackets.

Hold the “U” shaped hook under the handrail bracket and make a mark where the holes are on the branch.

Choose a drill bit slightly smaller than your screw.

Drill pilot holes into your branch for the first bracket only.

Rest the branch onto the bracket and drive the screws loosely through the “U” shaped hook and into the bottom of the branch.

Line up the other end of the branch onto the handrail bracket and trace the holes through the “U” shaped hook.

Remove the screws holding the first hook and drill pilot holes where you marked for the 2nd “U” shaped hook.

Lay the branch back on top of the handrail brackets. Attach the screws through both “U”shaped hooks and into the branch’s pilot holes.

Wipe off the branch with a damp rag. Brush a water-based polyurethane over the entire branch and allow it to dry (about 30 minutes.)

Gently sand any burrs or imperfections off the branch and wipe the branch with the damp rag.

Add another coat of polyurethane.

Repeat sanding and adding a coat of polyurethane until your branch has 5 coats of poly. Do not sand the last coat.

Let the branch dry completely for a day and then add towels to your unique branch towel bar!

I purposely left some extra overhanging branch on the ends for extra towels.


I don’t know about you, but I love it! I think the branch is unique and adds some warmth to the bathroom. How about you? Do you like it? Or is a branch in your bathroom just wack-a-doodle!

Linking to: Funky Junk Interiors Branch Party.


We’ve moved several times and each time I’ve packed one special tree branch with us. I have had this branch so long that I can’t remember where I found it. I do know that I picked it up on one of our camping trips. Whether it was Yellowstone, Acadia, Nova Scotia or somewhere else I’ll never know. What I do know is that I kept it because I thought I could do something really special with it someday. Well, that day has arrived. I decided to turn the branch into a towel bar for my sons’ bathroom.

(This post contains affiliate links. To learn more about affiliate links, you can read my disclosure page.)

Materials:


  • Tree branch stripped of bark and branches
  • Coping saw or other hand saw
  • Sandpaper (80, 120, & 180 grits)
  • Pencil
  • Scissors
  • Power sander
  • Gloves
  • Dust mask
  • Safety glasses


Tutorial:

Start by sawing off any nubs, knots and sticks using a coping saw.

Pull out the sandpaper and power sander. 3M just sent me these color coded sandpaper sheets. I think the idea of color coding them is brilliant! It really helps you grab the right grit quickly. I give them two gloved thumbs up.

Stack your sandpaper sheets. Lay the sander along one edge of the papers and trace a line along the edge of the sander with a pencil. Be sure to leave excess on both ends to attach under the clips of your sander.

Cut the papers along the pencil line.

Load all three pieces of sandpaper into the sander (if possible). The coarsest grit (80 grit) should be on the outside, followed by the 120 grit and finally the 180 grit sandpaper.

Now you are ready to start sanding!

Here is a video tutorial on sanding the branch down. I’ve upped my level of professionalism, so I hope you enjoy my efforts.

Coming up next. Installing and finishing the branch towel bar.


Slipcover a Couch Beautifully

We definitely have paranormal activity in our home. Things move without explanation. Pillows that were strategically placed by me to look magazine pretty inevitably end up on the floor after I leave the room. Kid sized chairs levitate on their own and land on top of the couch.

Slipcover a Couch Beautifully

And don’t even mention this pillow that has systematically lost all its buttons one-at-a-time!

Slipcover a Couch Beautifully

When questioned, both boys emphatically shout “It wasn’t me!” Hmmph.

Well, if this continues I might have to call in an exorcist, because it is getting VERY annoying.

But, I know you don’t want to hear about my boring ghost stories. Instead I thought I’d share with you a great source for brand name (to remain un-named) slipcovers at a fraction of the cost! May I introduce to you UglySofa.com.

Slipcover a Couch Beautifully

And let me tell you, the name is a misnomer, because this family-owned company is actually on a mission to give you a beautiful sofa! When UglySofa.com emailed me and said they wanted to send me a “brand name” slipcover to try out, I was skeptical. I mean – come on – how can you sell slipcovers from the famous PB&J (minus the J) at a fraction of the cost? I really doubted their authenticity. But, low and behold, a few days later my boxpleat slipcover arrived and when I opened it up, it truly was the brand they said it was and the quality was just as good as the slipcover I bought years ago from the store “that shall not be named.”

Slipcover a Couch Beautifully

I immediately ran over to pull back the worn red slipcover I’ve been using for as long as my oldest has been alive. WARNING: What you are about to see is a flashback to the 90’s. I admit, I did recover this sofa way back in my college years when hunter green was popular color. (I’m sad just wondering when blue-gray will be the “dated color”.) But, if you saw the granny fabric that lay beneath you’d be even more horrified.

Slipcover a Couch Beautifully

Now don’t even ask me why we still have a sofa that is well over 20 years old. Someday we’ll get around to replacing it…until then I have my new slipcovered sofa! Isn’t she pretty?!

Slipcover a Couch Beautifully

Have you ever purchased a slipcover because it looked beautiful in the catalog only to get it in the mail and you can’t for the life of you figure out how they got the slipcover to look so good?

Slipcover a Couch Beautifully

That used to happen to me too, until I worked as a photo stylist for Plow & Hearth (one of my responsibilities as a graphic designer for their catalog). I learned how to install slipcovers so they look beautiful.

Here are a few easy tricks for installing a slipcover so it look less like a rumpled college frat house slipcover. Please excuse my “butt shots”. I’m still new to this little thing called vlogging!

Start out by getting the ginormous cover on.

Find the “Back” tag on your slipcover. (And don’t look at the famous PB & J (minus the J) tag. Ha, I made you look ;-).

Slipcover a Couch Beautifully

Throw the “back” of the slipcover over the back of your sofa.

Locate the center of your slipcover and center it between the two arm rests.

Then line up the front skirt of your slipcover. I like to let the skirt puddle on the floor a little instead of kissing it.

Slipcover a Couch Beautifully

Smooth out the fabric with your hands, and neatly tuck and fold under any excess fabric.

Slipcover a Couch Beautifully

This is especially crucial on the arm rest, you want to disguise any excess fabric so the slipcover looks like it was custom made for your sofa.

Slipcover a Couch Beautifully

Wrap the side panels around the side.

Slipcover a Couch Beautifully

Locate the D- rings on the back of the slipcover.

Slipcover a Couch Beautifully

Feed the straps from the side panels through the D-rings in the back of the slipcover, and loop back between the two rings.

Slipcover a Couch Beautifully

Pull the straps until the slipcover is tight. Be sure to leave enough slack to be able to tighten the other side.

Slipcover a Couch Beautifully

Tuck any excess fabric into the folds behind the side panels and the d-rings.

Once you have the slipcover positioned, folded and tucked the way you like, then insert several cardboard light-sabers shipping tubes into the crevices between your cushions.

Slipcover a Couch Beautifully

These will secure and hold your slipcover in place.

And now, another little video on eliminating the wrinkles in your slipcover. I just used my hands and a squirt bottle filled with water. Be prepared as I almost cross the line. I admit it, sometimes I have the mind of a 7th grade boy.

I hope those videos were helpful for you! Do you like my new UglySofa.com slipcover?

Slipcover a Couch Beautifully

The boxpleat slipcover has a nice relaxed weave, very similar to a grain cloth.

Slipcover a Couch Beautifully

And the sides drape nicely over my sofa’s arm. The color I chose was ivory linen.

Slipcover a Couch Beautifully


Slipcover a Couch Beautifully


Thank you for all the kind comments about my boys’ bathroom. One of my favorite changes in the room was the addition of the built-in decorative shelf. It was fairly easy to build and install. I used a router to give the shelf a decorative edge, but it isn’t necessary if you don’t have a router (or are afraid to use one.)

Materials:

  • 1x 8″ Pine board (cut to length for your shelf)
  • 2 Wooden shelf brackets (with included mounting screw)
  • Sandpaper
  • Construction adhesive
  • Finish nails or nailgun
  • Hammer
  • Primer
  • Paint
  • Brush
  • Router and bit (optional)

Instructions:

Cut your shelf board down to size. If you want to add some pizzazz, use a router to give your shelf a decorative edge.

Sand any rough edges down with sandpaper.

Set the shelf aside and get the shelf brackets. Line up the top of the shelf bracket with the top of the board and batten moulding.

Insert the mounting screw into your shelf bracket and press it into the board and batten where you wish to install the shelf.

Remove the screw and drive it into the board and batten where you left the mark. Slip the bracket over the screw. Adjust the depth of the screw until the bracket fits snug against the board and batten.

Squeeze some construction glue onto the back of the bracket and then slip it back onto the screw. Insert two finish nails through the bracket and into the board to further secure the bracket.

Repeat the installation steps for the other bracket. Lay the shelf on top to check the fit. Little gaps are okay because you can always caulk them later.

Remove the shelf. Squeeze a bead of construction glue on top of the board and then reposition the shelf on top of the board and shelf brackets.

Nail finish nails through the top of the shelf and into the board and the top of the shelf brackets.

Your shelf is now attached.

If you want, you can add decorative moulding underneath your shelf at the top of the board. I cut the edge of the decorative moulding at a 30 degree angle.

The moulding was cut at a straight 90 degree angle between the two brackets.

Caulk, prime and paint your shelf. Then wait about 3 days before resting anything on the shelf to avoid it sticking to the newly painted shelf.

But, then you need to put some pretties on that shelf and admire your handywork!

And now the moment that you have all been waiting for! We have a winner of the MirrorMate giveaway! I really wish I had more than one. But, don’t forget you can still get a 10% discount. Simply use: PHGBlog at checkout. Hurry because it expires on Sept. 27th 2011.

Let’s give a big “Congratulations!” to Diana C. who was chosen at random to win the MirrorMate frame credit!


Diana said: “What a great and easy way to update a bathroom mirror! I liked MirrorMate on FB … and my favorite frame is the simple, yet elegant look of the Chelsea Espresso frame!” Nice choice Diana, I hope you send me before and after pictures of your mirror.

Ta ta for now, I’ll be back soon with another fabulous giveaway!


Â