Video Tutorial for using Simply Screen – Free Printable

The holidays are at full throttle speed and my boys couldn’t be more excited. Myself? I still haven’t decorated the house — in fact — truth be told I let Pretty Handsome Guy and the boys bring in the tree and decorate it. But, I did want to get into the holiday spirit so I poured a little eggnog into my coffee (Dee-lish-ious!!!) and sat down to make a humorous holiday shirt for my eager little ones.
If you’ve ever used silk screens before you know how wonderful they are for making duplicates. Team t-shirts, family reunion shirts, signs, banners, gift bags, pillows and linens are only a few things that you could silk screen. But, getting fine details and creating a screen that has text on it was usually reserved for the professionals who had the proper equipment. Well, those days are gone! Plaid has developed a DIY silk screen kit that allows you to create a screen using any black and white design printed on your home computer using regular printer paper. No transparencies and no need to reverse your image! Plus, for those of us eco-conscious crafters, the simply screen inks are acrylic and non-toxic! The Simply Screen kit retails for $39.99 and you can purchase the refill screen pack for $19.99. The kit can be found at Hobby Lobby or online at shop.plaidonline.com.

Plaid was kind enough to send me a kit to try. And thankfully, several bloggers (especially Crafts by Amanda and Mrs.Greene), worked out the kinks and shared their knowledge. Gotta love that creative blogger network ;-).
This video will give you all the tips and tricks you need to know to get a perfect screen exposure when creating a Simply Screen silk screen:
If you have trouble viewing the video, here are the steps to create the screen:

1. Print out your black and white design on regular printer/copier paper. Touch up any white spots with a sharpie marker.
2. Remove one screen from the black plastic envelope. Cut the screen down to size (leave at least 2″ on all sides of the design.) Put the unused screen back into the black plastic bag.
3. Peel the backing off the screen.
4. Flip it over and lay the sticky side onto your image.
5. Use the squeegee to firmly press down on the screen and to affix it to the design.
6. Turn the image and screen over so the screen is on the bottom. Lay it onto the bottom of the Simply Screen box.
7. Lay a piece of plexiglass or glass on top of the screen and printout.
8. Close the lid, turn on the light, and set your timer for approximately 25 minutes.
9. Turn off the light, remove the screen and immerse it in tepid water for 30 seconds. Gently rub the design with a sponge.
10. Continue rubbing both sides of the design until there is no blue emulsion in the graphic areas. The graphic should be a clean see-through image.
11. Dry your screen and follow the directions below to make your screen prints.
Printing Using your Silk Screen:
Now that you have learned how to create the screen, printing with it couldn’t be easier! This is truly the fun part.
Start by taping your fabric to a piece of cardboard or foam board. If you are printing shirts, pillow cases, or anything that is double thickness, put the cardboard directly behind the layer you are printing on to protect from any ink bleeding through.

Position the screen where you would like the image to appear.
Tape the screen down with masking or painter’s tape.

Run a thick line of Simply Screen silk screen ink at the top of your image.

Hold the squeegee at a 45° angle against the screen.

Press down firmly and pull the squeegee towards you. Focus on pressing the ink through the screen and scraping it off the screen at the same time.
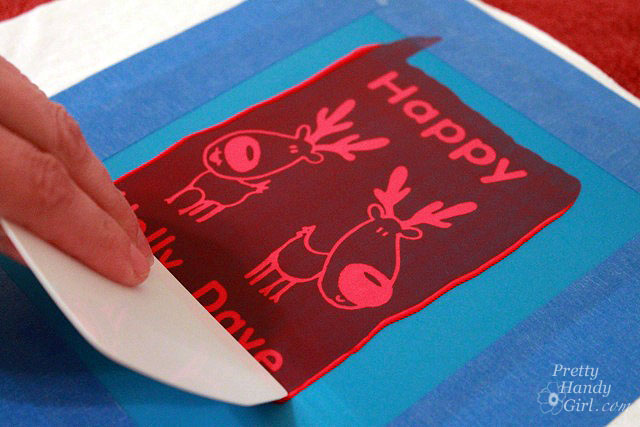
Immediately remove your screen being careful not to get any ink on anything when you lift. Lay it down on the next item you want to silk screen. (It is a good idea to clean the screen after every third impression, as the ink starts to stick around the edges and the image quality will decline.)

Let the ink dry.
Heat set the image with a hot iron. Wash on cold and air dry to protect your image.
I think this is the perfect kit for making holiday gifts! I’m on a big sew your own gift bag kick and I think I’ll make some more bags and screen print a graphic on it for gifts.

If you like my “Happy Holly Dave” design, feel free to download the printable pdf file and use it for your own personal use.

Or you could also download an earlier incarnation of the design with three reindeer!
Hope you all have a Happy Holly Dave! LOL!

Disclosure: This post has been sponsored by Plaid Simply Screen. I was sent a Simply Screen Kit and paid a small fee in return for writing a post about my experience using their product. The ideas and opinions are strictly my own. I will never let any compensation (monetary or free product) keep me from giving you (the reader) a straight up and honest review.
Cannot find the film to make more stencils
Ana, I know, it’s so sad. I wish I could help you.
Did you have to print out a mirror image of your design to burn to the screen?
Danelle, no, you don’t need to, because when you burn the image you are making holes in the screen. You can flip the screen depending on which way you want it to read. Make sense?
Yes I understand thanks. I did notice that you flipped the picture and screen so the the screen is on top when you burn the picture in the light box. Does that help it capture the picture better. I noticed another blogger did not flip the picture that is why I am asking. Also is plexi glass better than just glass. Thanks in advance!!
Danelle, you do have to follow the directions with your kit. I think it recommends to place the emulsion side up (I think.) It doesn’t make a difference which way the paper lays on it though. Plexi is what I had on hand. Glass would work too.
Thanks for the nice clear step-by-step.
I am impressed! You made it look too easy to not try it. Thanks for a great video tute and the extra tips.
Great video tutorial Brittany! The process seems much easier and less intimidating after watching you walk us through it.
Brittany, great review and excellent “how-to” video. Thanks for sharing the extra tips.