Tree Branch Ornaments by Laura Makes
Today I have a special guest with a special holiday project. Laura is going to show you how to make those adorable tree branch ornaments! But, first, let me tell you a little about Laura.
This is Laura with one of her four fur babies!

Laura writes about making on her blog Laura Makes. She writes about a variety of projects including crafts from knitting to making mosaics (and everything in between), food & drinks (mainly vegetarian), baking, and home improvement projects with a focus on healthy living and environmentally friendly projects. She even faux tiled the concrete floors in her home using soy based concrete stain. The results are nothing short of amazing!

Laura’s Stained Concrete Floors
Will you all please give Laura from Laura Makes a warm welcome!
![]()
Every year, I make some percentage of my gifts rather than buy them. At first I started out with grand ambitions and would pick one or two recipients to get a labor-intensive gift like a crocheted afghan. In the last few years, I’ve scaled my efforts back and now make small gifts for multiple recipients. I typically will make a handful of one style of gift to boost my holiday time efficiency.
This year I started thinking about what type of ornament I could make from materials I had lying around. I settled on ornaments made from branches we cut off our trees a few years back. Basically, I cut thin slices of the branches, added a painted Christmas design and a ribbon for hanging and they are ready to go!
So you’re probably wondering how you can do this too… Well, you’re in luck because I’m ready to share!
Step 1: Cut your wood slices
Find a branch with a diameter of 2 – 3 inches (or large enough to fit your design) and cut thin slices. I used a reciprocating saw with a 9” wood blade on it to cut slices about an inch thick. I just have a photo of the saw, but remember to securely clamp your branch before starting to saw it and to wear safety glasses while operating the saw.

Step 2: Sand your wood slices
The reciprocating saw left a rough finish so I used sanding blocks to create a smooth surface. I first used a very coarse grain sandpaper to get the surface level and then a fine grain sandpaper to create a nice finish. The sanding blocks were very handy – I held the block still while moving the wood slice to sand the surface.

Step 3: Drill holes for small eyelets
This is as easy as it sounds. Use a small drill bit to drill a hole in the top of your wood sliced and then screw in a small eyelet. This will allow your gift recipients to hang your ornaments. You can pick up small eyelets at any home improvement store.

Step 4: Create your designs
I like to create my own linocuts (a print-making method) so I decided to create reproducible designs by basically making holiday stamps for my wood slices. You could also simply buy stamps or paint a design if cutting your own stamps isn’t your thing.
I started by drawing my designs on paper – a snowflake, a Christmas light bulb, and a Christmas tree. I traced the outline of my wood slices so that I would be sure to create designs that fit on the slices.

After that, I transferred the design onto my carving blocks.
![]()
And then I used my speedball cutter to carve out my designs.
Step 5: Get that design onto your wood slice!
Whether you make your own stamp, buy a stamp, or paint your design free hand, it’s now time to get the design on to your wood slice. Because two of my designs were meant to have two colors, I used a paintbrush to apply my paint to the stamp before stamping the wood slice. Of course, before doing any stamping I first tested my carved stamps to make sure they looked how I expected and also tested the amount of paint that need to be applied.

The snowflake design only used a single color so I used a small brayer instead of a paintbrush to apply the paint.

I found that it worked best to lay the stamp on the table, place the wood slice on top of it, and press down with firm (but not hard) pressure. This helped transfer the paint to the wood even if some small ridges remained after the sanding step.

The trick is getting the right amount of paint on the stamp so I recommend practicing on paper for a while before moving on to the wood slices. If I painted the paint on too thick, I would first lightly place the stamp on paper to absorb some of the extra paint. Of course if you are just painting directly on the slices you can just jump to that step! I made one freehanded design of a snowman for a particular snowman lover in my life.

Step 6: Embellish your designs
Because I felt that my Christmas bulbs and trees turned out a bit plain, I broke out some leftover red glitter glue to embellish them. For the red bulbs, I painted on the red glitter glue. For the trees, I added little dots to signify tree decorations.

Step 7: Seal your ornaments
I wanted to add some sort of sealant coat to my ornaments for protection. I settled on Mod Podge because I had some at home. Experimentation taught me that I couldn’t use a sponge applicator to brush on the Mod Podge or it would smear the paint even though it was dry. Instead, it seemed that using a paint bush to dab the Mod Podge on top of the paint worked the best. When first applied, it looks somewhat white but it does dry clear.
Before drying:

After drying:

Step 8: Add a way to hang those ornaments
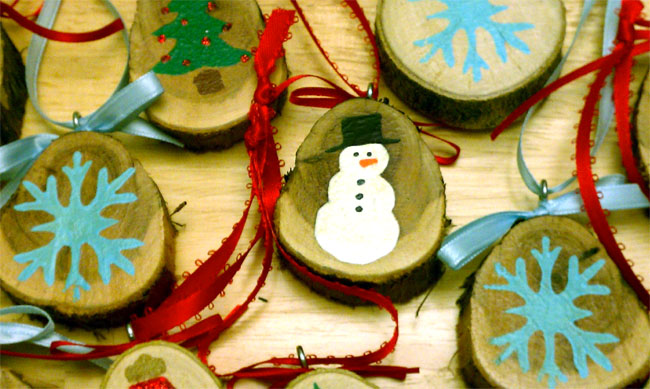
I used ribbon to create a small bow at the top of the ornaments and also to create a loop so that the ornaments can be hung. Hooray! They are complete and ready to be gifted!

![]()
Don’t you just love her ornament idea?! I was watching Celebrity Holiday Homes on HGTV last night. And one of the designers who was decorating Jo Dee Messina’s home, glued her family photos to the center of a wood cut out and turned them into ornaments. I bet Laura inspired him!
Thanks for sharing your tutorial with my readers Laura!
Do you want to be a guest on Pretty Handy Girl? Go ahead and submit your idea! I love having people over.


I saw this idea in a magazine where you save the cut from your real tree each year and make an ornament out of it. . and on the tree cut you would put the year and Our first Christmas. . or the year and your last name. . thought that was a sweet idea. I have a fake tree though.