Coffee Lover’s Snowflake Gift Set using Martha Stewart Craft Stencils and Paints

Looking for a gift for those hard to buy people on your list? Or simply an inexpensive gift for your child’s teachers? I found the perfect gift while grocery shopping. Our local Kroger had Illy ground coffee and tumbler sets on clearance. Naturally I shoved everyone aside and grabbed as many as I could (not really, but I would have!) For under $8 each, it was a real sweet deal.

I thought the gift sets needed a little somethin’ special to give them holiday flair (or maybe I was feeling guilty that the gifts were just too easy and inexpensive.) With a little Martha Stewart multi-surface craft paint and Martha Stewart decorative snowflake stencils, I turned them into extra special holiday gifts.

Materials:
(I’ve included affiliate links for your convenience. I earn a small percentage from a purchase using these links. There is no additional cost to you. You can read more about affiliate links here.)
- Tumbler and ground coffee
- Martha Stewart craft supplies:
- Multi-Surface Craft Paints:
- Mother of Pearl
- Wedding Cake
- Summer Haze
- Metallic Sterling
- Holiday stencils
- Holiday adhesive stencils
- Roller tops
- Specialty sponges
- Multi-Surface Craft Paints:
- 3M ScotchBlue painter’s tape
- Paint brush
- Fabric
- Baby wipes or wet rag
Decorating the Tumbler:
Clean the tumblers with soap and water. Let them dry.
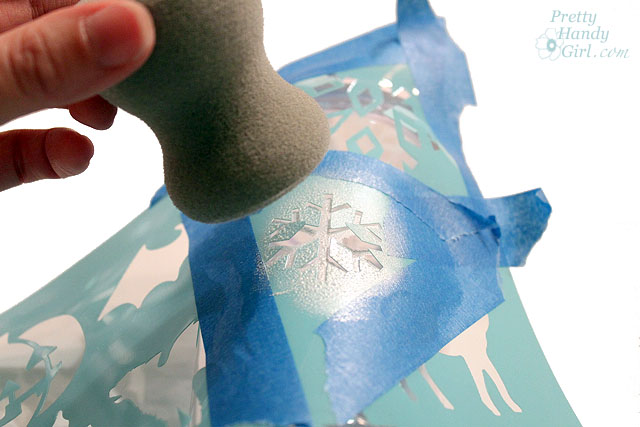
Tape off the areas of the stencil that you aren’t using. Add more tape to the outside edge of the stencil to hold it in place on the tumbler.

Wrap the stencil around the tumbler.

Dip a specialty sponge into the Martha Stewart multi-surface craft paint. Dab off any excess paint.

Pounce lightly and straight onto the stencil. (If you come at it from an angle some of the paint may seep under the stencil or move the stencil.)
Gently remove the stencil and reposition it in another location on the tumbler. (Be careful not to overlap the first snowflake.)
Fill in areas between the larger snowflakes with small self-adhesive stencils.

The specialty sponge is too big for these smaller stencils, but you can use a paint brush to paint inside the stencil.

Repeat until you are happy with your decorated tumbler.

Snowflake Gift Bags:
Squeeze some craft paint into a Martha Stewart roller top (best invention EVER!)

Tape the stencil onto your fabric.

Gently roll the roller top back and forth over the stencil until the desired amount of paint comes out.

Remove the stencil and let the paint dry.

Repeat the snowflake design randomly throughout the fabric.

Sew a little box bottom drawstring gift bag, using the snowflake fabric. I think the snowflake themed coffee gift set will be a big hit! (Holiday decoration, thrifty, re-useable, and come on…who doesn’t LOVE coffee?!)

This was a very easy craft to create. You could decorate with any stencils you like. Think how cute a stenciled monogram would look on the tumbler.
I will probably include a note mentioning that the tumbler design will last longer if washed on the top rack of the dishwasher.

Disclosure: I was provided the craft materials and a small payment in exchange for writing this tutorial. The ideas, tutorials, and opinions are my own.
Sharing with:

Is there a way to seal the paint on the plastic? I recently painted some sippy cups with food safe paint but it washed off over time. I’m repainting them now and looking for a way to seal it.
Have you by chance found a way to seal them?
I am sooo curious before I start my adventures In tumbler painting lmao 😀
I haven’t but if you hand wash the tumblers the paint will last longer.
This is exactly what I was looking to do with some acrylic tumblers as a party favor for my sister’s 40th b-day. Thanks for all the tips – I totally had no idea what type of paint to use.
Did you happen to hear any results of how long the design will last if washed on the top rack? I’d like to have some idea before giving them out.
Love the snowflake stenciling. What a sweet gift idea! I’ve not seen these paints. I like it is washable. Have a great day! {{hugs}}
Oh my gosh – I want someone to give me one of this – wink – wink!! You should come and enter my Vanilla Bean Paste giveaway http://eatcakefordinner.blogspot.com/2011/11/vanilla-bean-paste-giveaway.html
Darling! Are the tumblers plastic? I haven’t tried MS paints on plastic yet. I read somewhere they work on it though.
Have a wonderful thanksgiving! I’m so thankful for meeting and getting to know you this year 😀
Colleen,
Yes. They are plastic. It seemed to work really well. But, I will recommend top shelf cleaning as I’m sure if it gets scratched it will come off.
Happy Thanksgiving! Love how your glass turned out. Thanks for sharing another great idea with us.
Thanks and Happy Thanksgiving to you and your loved ones!
Love this idea!!! Looks great!
These are really cute, thanks for sharing.
Happy Thanksgiving.
Vicki
Thanks and Happy Thanksgiving to you.
Brittany
I love it and this is a perfect gift for that coffee lover.
I know I’d love to receive it! And I LOVE my coffee 😉
Happy Thanksgiving friend.
Brittany
I love this idea. So cute & filled with personality!
I’m a new follower 🙂
Welcome Anne, and thank you for your comment ;-).
Awesome idea! I would’ve never thought of this.
Thanks for sharing! Happy Thanksgiving!!!
Happy Thanksgiving to you too Sandi!
What an excellent idea! Thanks for sharing.