How to Use a Miter Saw
Today I’ll teach you how to use a miter saw safely. We’ll learn the difference between a miter and a bevel cut. Plus, I’ll also show you the different features and functions of miter saws.
How to Use a Miter Saw
Hello and welcome to the very first Tool Tutorial Friday (a series of tool tutorials)! Come right in and have a seat. If you give me less than 10 minutes of your time, I will empower you with a new power tool skill! Today, I’m going to show you how to use one of my favorite power tools. Before I owned a miter saw, I used a hand saw and a cheap plastic miter box. But, they were really putting a cramp in my DIY style (if you know what I mean.)
About two decades ago, my husband gifted me my Makita 10″ Sliding Compound Miter Saw. That’s right, I don’t ask for jewelry for big occasions, Pretty Handsome Guy knows to ask one thing before an upcoming holiday, “So Honey, what power tool do you want now?” It’s true, I’m a power tool junky.
Ready to learn how to use a miter saw? Okay, let’s get started…
Working with power tools can be dangerous, but your risks drastically eliminated if you give the tool some respect. Today I’ll show you how to use a miter saw safely.
About Miter Saws:
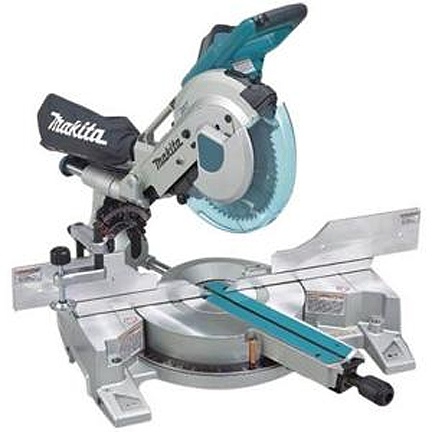
Miter saws come in many shapes, sizes, and colors. The size (usually from 7.25″ up to 12″) refers to the diameter of the blade on the saw. The larger the blade, the wider the material it can cut. However, if you purchase a “sliding” miter saw, you can cut several inches wider than your blade diameter (the specifications on the saw should tell you this cutting distance). Miter saws run anywhere from $80 up to $800 depending on the features and brand you choose. 
Sliding Miter Saw:
I highly recommend a sliding miter saw if you can afford it. Being able to cut lumber a few inches wider means the difference between using your miter saw or having to break out the circular saw or table saw.
On a non-sliding miter saw, the saw head will not slide forward and back. Most of the entry-level models will cut a miter and a bevel. You may have heard miter saws without the ability to slide referred to as chop saws. They will work great for “chopping lumber” but without sliding, dual miters, and dual bevels, you will spend some time flipping the lumber to make your compound cuts.
Speaking of miters and bevels, let’s talk a little more about what is a miter and a bevel cut.
Type of Cuts:
Miter saws are perfect for cross cuts, miter, and bevel cuts. Miter saws cannot make rip cuts. Rip cuts are easier cut on a table saw or track saw (or using a variety of other handheld saws.)
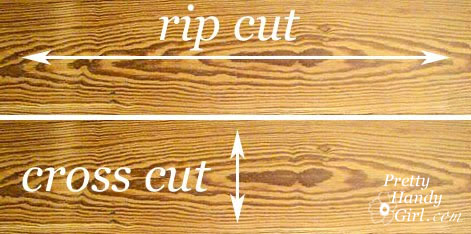
- Rip – ripping a board is cutting with the grain along the length of a board. This is usually done with a table saw but can be done with a variety of handheld power saws and a straight edge.
- Crosscut – a type of cut that is perpendicular to the grain or along the width of your board. Crosscuts are usually made with a miter saw or circular saw, but can also be made with a track saw, jigsaw, band saw, or hand saw. You can make crosscuts with a table saw, but you will need a crosscut sled to perform a crosscut cut safely.
Miter Cut:
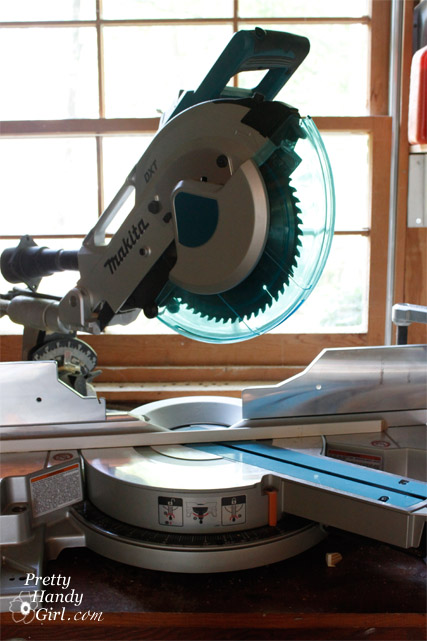
A miter cut is made when you change the direction of your blade from straight ahead (90˚) by moving it from side to side. Think of pizza wedges. For example, in the image below, the saw is set up to cut a 45˚ miter, and no bevel because the blade is still straight up and down.
Bevel Cut:
A bevel cut is made when you angle your blade tipping it to the left or right. As an example, in the picture below, I’m making a 45˚ bevel cut into the wood.
Compound Cut:
A compound cut happens when you make a miter and a bevel cut at the same time. Essentially you are cutting two angles simultaneously. This is particularly useful when you are cutting crown molding for a room.
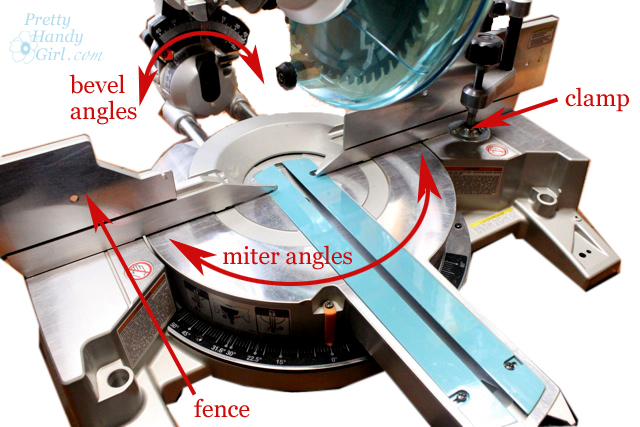
You can see in the diagram below how to set up your saw for bevel angles, miter angles, or both.
Safety Features and Operating a Miter Saw:
All modern miter saws have a trigger built into the handle. Most miter saws also have a safety button that you must push with your finger or thumb before you can squeeze the trigger. To start a straight downward cut, press the safety button, squeeze the trigger and wait for the saw to reach maximum rotation. Then slowly lower your saw into the board you are cutting. Never force the saw through the wood. Let the saw cut and then guide it downward. Once you have completed the cut release the trigger while the blade is in the wood. Let the saw come to a stop before lifting it out of the wood.

Most miter saws have a fence. The fence lets you rest the position your lumber against a straight edge. It keeps the wood steady and helps your miter saw cut true to the degree setting you have chosen.
Some miter saws have a detachable clamp. This is a nice option and helps keep your hands away from the blade during cuts. Let the clamp be your right-hand man (or left-hand man). If you don’t have a clamp on your saw, be sure to always position your hand as far away from the blade as possible. Do not attempt to make cuts where your hand is close to the blade. AND NEVER reach under the saw while it is rotating! Even when you have finished your cut, your hand is not safe until the blade has completely stopped.
Three Safety Tips for Using a Miter Saw:
- Blade down until it stops! You should always end your cut and release the trigger while the blade is down and in the lumber. Let the blade come to a stop before raising the blade.
- Always make sure the lumber is supported on both sides. And never clamp both sides of your lumber. One side should be free so as not to pinch the blade during the cut.
- Never cut small pieces of wood where your fingers are too close to the blade. If you absolutely must cut a tiny piece, clamp or attach it to a larger piece of lumber.
Making a Safe Sliding Cut:
When using a sliding miter saw, there is a proper way to make a sliding cut (used to cut wider boards):
- Make sure your saw is positioned fully on your workbench. Test the blade in its full reach toward you to make sure it won’t tip as you lower the blade.
- Put your lumber up against the fence and clamp it on one side (if you can).
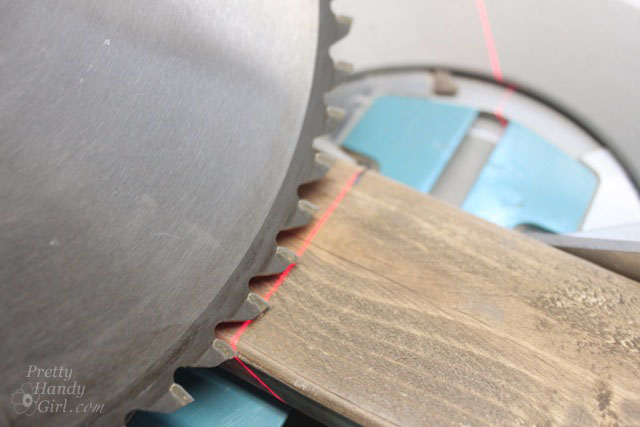
- Before you start the blade, pull the saw toward you until the blade is directly over the board’s edge closest to you.
- Squeeze the trigger to start the saw and wait for it to reach peak rotation speed. Then lower the blade down into the wood.
- While the blade is still rotating, slide the saw back and away from you as your blade cuts through the rest of the wood (see photo below.)
- Once the blade has finished cutting through the wood, release the trigger and let the blade stop before raising the blade.

I created a video, so you can see how to safely use a miter saw. Before you watch the video — a few necessary words of caution:
DISCLAIMER
The viewer assumes all responsibility and liability associated with the hazards of woodworking. Pretty Handy Girl is not responsible for any errors or omissions that may be present in this tutorial. She also assumes no liability for any action or inaction of a viewer.
Please use extreme caution when using power tools. Read your tool manual thoroughly and wear protective safety gear. Take your time familiarizing yourself with a tool before using it. (If you are missing the manual, you can easily find it online by going to the manufacturer’s website or google your saw’s make and model + manual.)
Update: Please recognize that I have tried to put together a basic miter saw usage tutorial to get you started. I have tried my best to show the safest way to use a miter saw. Two safety revisions I want you to be aware of:
- You should wear appropriate Personal Protective Equipment when using a miter saw. (Ear protection, eye protection, and a dust mask.) I should have been wearing a mask.
- When I first learned to use a miter saw, no one told me to keep the blade down until it came to a stop. This is now standard practice when I work.
And now, let’s get you more familiar with using a miter saw!
I hope you have been empowered to use a miter saw! Go on and give your miter saw a try if you own one. If you decide to buy a new miter saw, I recommend buying a reputable brand with a decent amount of features. I have a lot more information about how to buy quality tools and save money on tools in this article.
These workshops were meant to be interactive, so don’t be shy! Ask questions, leave comments, and let me know you are learning something new.


Do you have a tutorial on how to change the blades of a miter saw.
I don’t but you should check your saw manual or look online for your saw’s manual.
Very nice tutorial, Brittany.
My wife has been asking me to show her the ropes, and I just haven’t had the time. I will share this article with her to get her going.
Thank you for this tutorial, now i can safely use the miter saw !
“How to Use a Miter Saw – Tool Tutorial Friday” is GREAT post to use miter saw.
Thank you for sharing!
Keep your work!
Thanks for sharing the detailed guide, Brittany
We often get asked what our most-used tool is. I always answer the same… It’s my miter saw! I love it. I have had it on a stand for the last year.
Happy thanksgiving day!
A year ago I purchased the Ryobi Sliding Compound Miter Saw…with the laser. I just started using it and the laser really did ensure precise cuts. lol…Unfortunately, newbie that I am, I wasn’t holding something tight enough and a piece of wood kicked the laser loose. Aaaack! Now trying to see where it was actually set so I can put back! Any experience with this?
I agree with you that it is a necessary product for home
Thanks for your guide. I love wood working and I often use wood router and miter saw. They are the most essential tools for wood worker.
Hi Brittany!
My husband was looking for a miter saw. I was sent him your Tutorial link.I love to see a tutorial on Miter saw Stand.So, I subscribe your Blog for more tool tutorial.
Thanks for this great Tutorail
Thanks for this tutorial! We have the same saw and my husband and I love it too! I am glad you stressed the importance of the clamp..I have seen ours but have never used it…but I will now!
I bought a miter saw last year that I am afraid to use. Maybe this post of yours will convince me to give it a try. I use a jig saw all the time and even the reciprocating saw but I’m scared of the miter saw. Sad huh?
hi, Brittany Bailey
Tutorial about how to Use a Miter Saw is really helpful.Thank you so much for this compilation of great ideas. I’ll be making up my own design but this really helps as a starting off place for my miter saw station. I”ll post my design as soon as I’ve figured it out!
I love the tutorials and i like this miter too 🙂
I think this is what I’ll get for my husband a new miter saw ! I loved the explanations here and thanks so much for your articles. Now I need to choose one of them. the hardest job still. I’ll see what he likes
thanks so much for your tutorial! i also spent ages trying to find some info and sifted through loads of rubbish today before finally finding your great site.
Lots of pertinent info and actual video of you using the saw..brilliant!
good to read about the dust bags not being much use…mice have eaten mine! and luckily only nibbled the edges of the manual so i can still read it! (i do intend sewing a new bag at some point!)
My sister always did my DIY , i just bought the power tools!…now i`m finally trying to do some for myself and am in the middle of 4 projects ..now i`ve watched your tutorial i feel much more able to get on with them ! up until now i`ve been managing with manual saws and rather ridiculously i`ve found the coping saw and hack saw give me the best cut ! …not anymore!.. onto bigger and better things!!
Hi!
I have been looking for a clear and simple instruction of miter saw all morning and I’m glad I found your site. I did a big home improvement project couple of years ago using a hand saw and has’t been able to force myselt to do anything else since then. I think I got a hand saw “poisoning”. Now I plan to build a chicken coop and decided to use power tools as I can’t even look at hand saw any more. I love the consept of the miter saw, but after watching your videos I realize I need a circular saw instead. I know nothing of the power tools but I’m glad to read that ladies are using them effectively and love it.
Thank yo for posting info on power tools!
Katrin,
I’m so glad you found my tutorial helpful. A circular saw is definitely more versatile for cutting all sizes and shapes of wood. Did you see my other tutorials on the circular saw and other power tools? https://prettyhandygirl.com/tool-tutorials
Best of luck with the chicken coop. I’d love to see a picture of it when you are done!
I got some money for Christmasand I have been wanting a mitre saw for years. I was so happy to find your blog as it answered many of my questions. This will be the first time I will be using something other than a plastic box with that awful toothy saw! Seeing all the other awesome ladies on there makes me feel very empowered. Thank you so much, looking forward to reading more of your blogs.
Great tutorial, Brittany! This is on my Christmas list. And if Santa doesn’t get the memo, I’m buying myself one in January! lol
Aloha,
Charlie
This tutorial has perfect timing! I received a 12 inch miter saw last week for my birthday (and a $200 gift card to Harbor Freight!)! I can’t wait to go tool shopping. What are your must-have power tools? I’m thinking a jigsaw and a brad nailer are on my list to buy with the gift card. I too would rather have power tools than jewelry! My husband still gets frustrated with me that I always want something for our house for my birthday and Christmas. Thanks for the tutorial!
Beth
Beth, I do think a jig saw and a brad nailer are two great purchases. But, if you don’t have one, I’d choose a power sander over the nailer. I use my sander more.
And, last Friday’s Tool Tutorial is on the jig saw. Be sure to check it out.
I’m so glad you’re doing this series! I am a power tool newbie but am starting my collection. I wasn’t looking forward to talking to the guys at the home improvement stores because you never know if you’re going to get a super helpful guy or some guy that takes one look at you, sees you’re a woman and a young mom and just assumes you’re an idiot about projects and power tools (which I kind of am at this point but how am I to learn?) Anyway it’s so great to learn about these tools from a woman’s perspective and figure out which one to buy! Thanks! (PS I stumbled this.)
Great tutorial Brittany! I love my miter saw, it’s a Dewalt, but it’s not a slider. It was one of the best gifts I’ve ever received!
thanks for the wonderful tutorial….I am so ready to get going with some power tools and your tutorial gives me some courage! Asked for a nail gun for last mother’s day and maybe can work my way up to a miter saw for Xmas!!
thanks again!
Julie
I’m so excited about this tutorial! I am “afraid” of the hubby’s miter saw but now I’m ready to tackle it, on my own! Thank you.
Thank you so much for the encouragement and how-to’s for using power tools! I’ve been asking my hubby for a miter saw for a while now, but he’s reluctant b/c he’s afraid to come home to a one-handed wife! 🙂 Maybe with your help, I’ll sound more knowledgable! I’ve been following for awhile now, but just started my own blog (overwhelming!), so my info on here is new. Hope you can stop by and give me some advice! 🙂
Thanks for the tutorial! I just got a miter saw and I LOVE it! want.that.hammer.
I LOVE using my hubby’s miter saw. Such a handy tool! You know what else would be handy??? Yep… a magnetic hammer!!!!! : )
Fantastic tutorial Brittany!
Thanks Sandra. Hey, let me know if you can reply to this ;-).
Just wanting to start collecting tools 🙂 thanks for information.
I’m new to your site but absolutely love it!! I really thought I was the only wife/mom that asked for power tools as gifts!!! Love this!! Thank you!
Power Tools are a Girl’s Best Friend ;-D
Great tutorial. I use to be afraid of the miter saw, but when we replaced our floor, my husband convinced me to give it a try. BIG MISTAKE! I loved it so much that I made most of the cuts for our floor (I totally hogged it, hehehehe). Unfortunately, we were only borrowing the saw, and I had to give it back. 🙁 Now I want to get my own, but they are expensive and I want to get a good one! Someday!
BTW, I have never used a sliding one, so it was nice to see the proper way to slide it! Thanks!
Stephanie, definitely save up for a good one. Then it will be with you for life.
Brittany
I LOVE my chop saw!!! When it comes to DIY, he’s one of my “main men”! He and I first got acquainted 5 years ago when we built our new “old” house and I put down 6 rooms of laminate flooring all by myself. Now, when hubby says “let’s DIY”, my first question is always “Do I get to use ‘chopper’???” :>)
😉 Gotta love a good miter saw!
We have a chop saw. Yours is nicer. I have wanted to learn how to use ours. I think I need to try it out on some scrap pieces of wood.
Ruth
Ruth, that is an excellent idea. Start on some scraps, just make sure they are long enough to keep your hands away from the blade.
I have always been afraid of power saws, but after watching this it really makes me want one! I dread using my cheap hand saw now.
That’s the spirit Melinda!
Great tutorial Brittany! I learned how to use our miter saw last summer and I’m totally addicted! Ours isn’t as nice as yours, but it does the trick. Thanks for taking the time to put these videos together. I know it’s a lot of work.
I would love me a pink hammer! Mine is a wimpy little one that’s only good for hanging pictures. I’m always borrowing hubby’s. I’m sure he would love for me to have my own too LOL!
Best of luck Deborah! Remember if you don’t win this week, there will be a hammer given away for each Tool Tutorial Friday.
Brittany
I love this series. I can’t wait to see the rest. I really want to use my husband’s power tools but I’m too scared. Maybe this series will empower me. Thanks so much.
You can do it! And remember it is good to be afraid, it should make you more cautious.
Brittany
A great start to the tool tute series! I used to use an old miter box and saw my Dad had in the basement, then decided to make one of my own in a woodworking class (it was so pretty — I even refinished it — that I’ve never cut anything with it though I have thought about using it to cut bread), Dad bought me my own miter box like I used to play with, then I bought an older Delta chop saw from a neighbor, then just HAD TO HAVE a Makita sliding compound miter saw. Sometimes I’m just content to go to the garage and chop some wood, just so I can put on my goggles, ear protection, open the garage door a bit, and impress the neighbors — ha. Looking forward to a possible tute on a table saw. Now, those scare me….
Lucy, question for you: I love my Makita, but the only thing I really don’t like is the dust collection bag really doesn’t do diddly. Sometimes I attach the shop vac to it, but it still has a lot of sawdust.
Brittany
I get a lot of dust, too, but just use emptying the bag as an excuse to stretch a bit and drink some water. I did try to put a bigger bag on and clamp it on tighter, but it didn’t make much difference. The old Delta chop saw doesn’t even have a dust bag, so I live with. I guess I figured they’d all be similar. I’d like to have that laser guide like you have! Heaven forbid you should hear from someone with the PERFECT saw properties and bag capabilities. I don’t think I have room for another one!!! 😉
Great post…love that I have a place to start learning about power tools! I have a long list of projects that I plan on doing around the house and can’t wait to get started.
JT, thanks for your comment. And glad I’m helping you to knock off those projects off your list.
Brittany
Hello and thank you for stopping by my blog…And for the Silhouette tip… I just signed up to follow and enjoyed your Miter Saw tutorial…. My husband showed me years ago how to work it and It was fun at first but I happily let him do it as My Favorite thing to do is PAINT which he very Much dislikes… Very cute hammer…. My Husband actually bought me the Full Pink Took Bag…. I LOVE it… Happy to meet you
Ruby, now that is a good husband buying you tools!
Wow–awesome! So, what do you use your circular saw for vs. the miter saw? Thanks so much!
Elizabeth, miter saws only make short cuts. Think cutting a 2×4″ (or other long thin boards) in half. If you had to cut a large piece of plywood in half, you’d need to use a circular saw or table saw.
Brittany
Brittany, I am a single mom of 4 who, after renting for 11 years after my divorce, just bought my first house. The house was built in 1972 and was updated in the late 70’s….so yes, it’s VERY 70’s-licious! I recently bought a miter saw (wish I had seen this first) and am in the processing of completing my first project which is board and batten on a wall in the living room and new trim in that whole area of the house (living room and hall). You boys bathroom board and batten post was a life saver for me! Mine still is not done but its getting there. Since I know NOTHING about power tools, this series is going to do wonders for someone like me who has nobody to show her how to use them. Thank you, Thank you, Thank you!! I spent most of my money on the things you don’t see (new thermal windows, new insulated garage doors, new heating and cooling systems and new hot water tank)and plan on doing things as I can, but my question is this: what basic power tools should I buy since I plan on doing a lot to bring my house into 2011? I have a Dewalt 10″ compound miter saw and a cordless drill, that’s it. What power tools will I be needing? I have 600 sq ft of pine flooring to lay (to match the rest of the house)a new kitchen to install (cabinets and all) and a lot of general maintenance and fixing up. What power tools have you found to be of the most use to you? Thanks again for doing this series!!
Missy, thank you for the time you took to leave this comment! Your comment gives me great joy and lets me know that I’m actually achieving my goal of truly empowering others. 😉
It sounds like you might need to purchase a good jigsaw now. I wrote a post about what every homeowner needs:
http://parentables.howstuffworks.com/nesting/whats-your-toolbox.html
Good luck on all your DIY projects!
Brittany
Wow! Thank you for the tutorial. When you unveiled the post of Power Tool Tutorials on Fridays I went wild!! I was so afraid I was going to miss it somehow. I am not familiar with the Miter Saw, what projects have you done with yours? Do you have a picture of what the wood looks like after it is cut since you were mentioning that is miters and bevels? Thank you for the inspiration!! Andmre
Andmre, How much time do you have? I use my miter saw for almost every project that involves cutting wood! (My ladder turned into display shelves, picket fence nightstand, shelving, living room floors, son’s reading nook closet, and many more.
Brittany
Thanks for the chance to win…. nice looking hammer… maybe the PINK color will keep my husband from taking my it!!
That is what I was thinking … I “had” a set of vise grips, a hammer, screwdriver with multiple heads and a tape measure. Note the “had”. They keep going missing because the men in my family never put anything in the same place twice and know mine have a home 🙂
LOL! Well, you need to check out Tomboy tools (click on the link in my sidebar.) Then they won’t touch your pink tools! ;-D
Cheryl, you are welcome and yes, pink tends to deter it from being swiped by the men ;-).
yeah… I wouldn’t bet on it since he did allow me to paint the master bedroom & bathroom a very pale pink with burgundy accents…. I don’t think pink affects his manhood like it does with most other men. See with him it usually depends on the quality of the equipment …so if this is a great guality tool then I just might as well hand it to him and annnounce that I won it for US!
Thanks for the information. My husband has no patience when it comes to explaining things.
My question isn’t about use, but about storage. Do you have somewhere your miter saw is set up and stays there? Our lives in our attic, and I don’t use it as much as I should or would like to just because of the hassel of getting it out and setting it up. Do you have tips of things I could do to ease that process? There is just nowhere we could put it to leave it out. We live in a townhome.
Thanks, for this tutorial and all the great ideas I’ve stolen from you! When i finish the reading bench I’m making my daughter using a knock-off of your mudroom bench tut, I’ll try to remember to post a pic.
Ah, good question Stephanie. I’m lucky that I have a garage with a workbench. My miter saw sits proudly in the center of the bench all the time. I use it for cutting more than any of my other saws.
Do you have a walk up or a tall enough attic that you could put up some saw horses and a plywood top and use that as your work bench? I feel for you because my saw is one hefty tool and weighs a lot.
I agree the compound miter saw is a very very versatile tool and a wise investment. Also a big fan of Makita, Brittany
@Stephanie
Have you thought about renting a workshop, maybe with a few friends? Or maybe repurpose an unused garage?
Thanks for this tutorial! We have the same saw and my husband and I love it too! I am glad you stressed the importance of the clamp..I have seen ours but have never used it…but I will now!
LOVE the clamp! It is a great saw isn’t it!
I love the tutorials. I can’t wait until I have my own power tools. I grew up in my dad’s wood shop!
Nice to meet another female who’s father believed in her ;-).
Great tutorial. Wish I had seen this before I bought my miter saw many years ago before I really knew what I was doing. (Sometimes I still don’t!) I sure could use that sliding feature! Thanks.
Felicia, the sliding feature is nice, but I guess that just gives you an excuse to use a table saw ;-).
So much easier than the hand saw! Will look into renting one for our next project!
Excellent idea. Ask the tool rental people to show you how to use it before you leave. Even I ask because not all power tools are the same.
Thanks so much for the tute! I just sent the link to my husband so he’s aware that yes, I will be getting into his miter saw at some point:)
You go girl! Grab the proverbial miter saw by the horns!
Dang, lured out of lurkdom by an alluring pink hammer.
Thank you, as always, for such complete, yet simple, how-to and learn-about posts. With lots of photos.
LOL! Well, hello Jude! Nice to meet you ;-D
Thanks so much for the tutorials. I’m still a beginner but I did pass the woodworking bug on to DH. I’d love to see a tutorial on jig saws. I want to use it as a birthday gift hint 🙂
Sandy, your wish is my command! Stay tuned for next week’s Tool Tutorial Friday!